Jul 31, 2007 | Announcements
Hello from Denver! I’ve arrived safe & sound and we’ve already been to the "pyjama stamparama", where we made 5 great projects with 2 of our 3 new sets we received. Tomorrow is the first "official" day of the convention, the theme of which is "Dream Big" (hence the pyjama reference).
Big news for my site – you can now reach my blog by an easy to remember handle! Welcome to www.yamstamps.com Rather than having to type in the long title, you can now reach this site a little more easily (I hope!).
I hope to be able to have the chance to upload some photos in the next few days (free internet at the hotel!! yay!!). Tomorrow is my chance to walk on stage to commemorate my 5 years as a demonstrator. Thanks for your support of my business!!
Jul 20, 2007 | rubber stamping
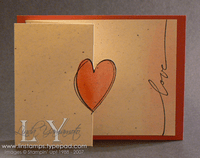
 Here’s another swap card that I did for our demo only swap. I’m taking this one with me for convention in a couple of weeks, as I’m in 3 different organized swaps while there! I may "tweak" it further to meet the requirements for the swap (i.e. more "stuff" on it). (so if you’re a demo going to second session, involved in a shoe box or wow swap, don’t "CASE" this one!! LOL).
This card uses Year After Year again. It also uses the wonderful words set, and In My Thoughts set. I used the aquapainter with rose red reinker to colour the image and put a wash of colour over the word "love"
 I stamped the heart that’s on the fold first, then masked it and restamped the heart so it appeared behind the first one. Using my hobby blade (and those who have been in classes with me know how much I like to use that blade NOT) I cut the edge of the first heart so the card folded flat. I used confetti cardstock which tends to handle the wetness of the aquapainter fairly well, not too much warping. (of course, after they dried, I did set them under a book for a while to ensure that!! LOL).
Jul 17, 2007 | rubber stamping
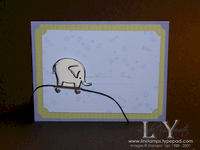
 This is one of the cards I did for a recent demonstrator swap. We each make numerous copies of the same card & send them to the swap host (in this case, my friend Sue), she "swaps them out" & mails a set of each swap card back to us. Well, at least that’s how it’s supposed to happen… I was a little late 🙁 so mailed each person their cards individually. Anyway. This card uses the Year after Year stamp set. I stamped the elephant pull toy onto glossy white cardstock, coloured around the lines with my bordering blue stampin’ write marker, then used my blender pen to pull the colour around the image. I used silver brads on the wheels, and then attached black hemp with my crystal effects (dimensional glaze / super glue!). The background is stamped with the word "baby" from Everyday Flexible Phrases, plus one of the stamps from Background Basics. I used (I think!) bashful blue cardstock, brocade blue cardstock, and one of the certainly celery designer papers from my palette o’prints. This is a slider card, so the elephant pull toy can be (um) pulled across the card. I used the ticket corner punch on the corners of the layers to make it a bit more interesting. If I did this swap card again, I might do something different with the dimensions, or perhaps add a larger greeting or sentiment on the front of the card, because as I look at it, it looks kind of bare. Ah well. It’s a sample for ideas, right? LOL.
Until later….
Jul 8, 2007 | Uncategorized
Thank you to all who were able to make it to the new catalogue open house & rubber garage sale. I imagine you’ll all be busy over the next few days poring over the fall-winter collection & creating your wish lists (and don’t forget I’ll be checking up on you to see how they’re coming along!)
As promised, I’m posting the recipe for the cherry loaf pound cake. This recipe came to us via a friend of my mother’s, Fran, and has become a favourite. I am the proud owner of a kitchen aid stand mixer (LOVE IT) so find this (and many other recipes) is a cinch to whip up. The longest thing is the baking!
CHERRY LOAF POUND CAKE
2 cups all purpose flour
1/2 teaspoon salt
1 cup candied cherries, halved
1 cup butter
1 cup granulated sugar
4 eggs
2 tsp almond extract. I usually use vanilla extract instead as we have nut allergies in the house.
Combine flour & salt, stir well to blend. Mix 1/2 cup flour mixture with cherries & set aside. Cream butter & sugar together until light and fluffy. Add eggs, one at a time, beating well after each addition. Add extract. Add remaining 1-1/2 cups flour gradually. Stir in floured cherries, mixing until well blended. Spread mixture in a greased loaf pan. Bake at 300F for 90-100 minutes or until toothpick inserted in centre comes out clean. Cake will crack on top.
A REMINDER that the stampers club will be starting soon. ONLY TWO SPOTS LEFT. Don’t miss out! RSVP ASAP. This club will be meeting in Burlington.
Now that the madness of the rubber garage sale is over…I’m hoping to get some card samples posted in the near future!!
Jul 6, 2007 | Announcements
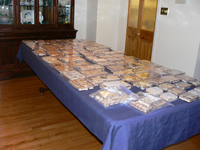
 This is the "stamp table" portion of the rubber garage sale…another table has punches, assorted non-SU crafty things etc. Good thing I have such a big dining table!
10 am – 2 pm Saturday July 7th – New catalogue open house & rubber garage sale! Details were in the newsletter….email or call if you need directions.


