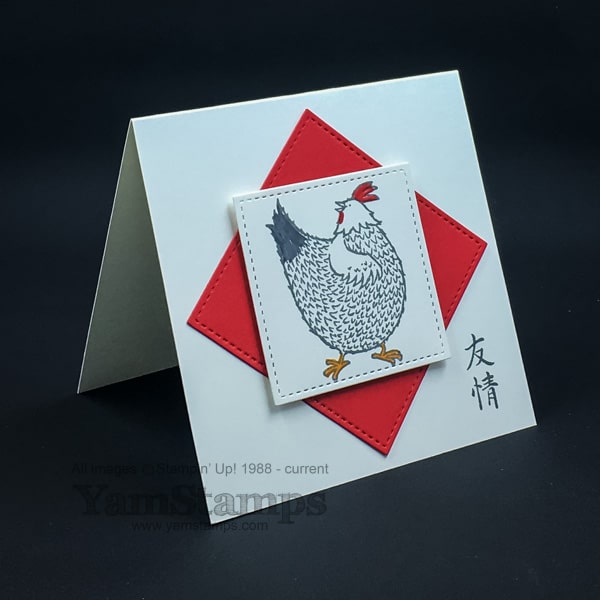
Happy Lunar New Year! Here’s a quick card to celebrate the Year of the Rooster – I used the Stampin’ Up! Sale-a-Bration set, Hey Chick, which you can get free with a $60 product order, and I added on the calligraphy from the Artistically Asian set (wood or clear mount) that apparently means “friend”. I also used the Stitched Shapes Framelits which are back in stock and available to order! Some basic colouring with the Stampin’ Write markers and it’s ready to mail!
I had great plans that have gone seriously awry the last couple of days 🙁 – I was set to do a big final push on the Online Class but instead have been trying to nurse myself back to some semblance of health. You know you’ve been pushing it a bit too much when your body pushes back. Nothing like a little enforced rest. Anyway. Starting to feel human again, so hopefully back at it shortly, with the launch not too delayed as a result. Fingers crossed!
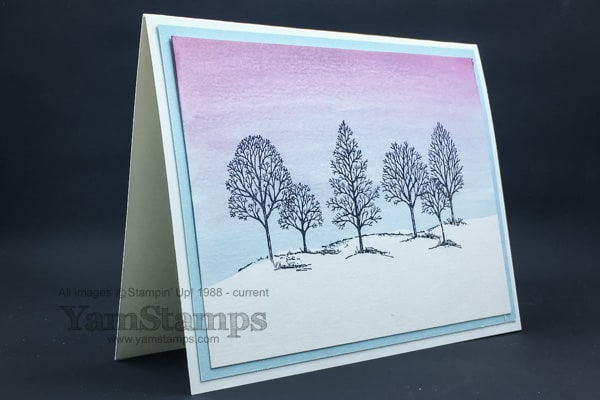
Lovely as a Tree (clear mount or wood mount) is the oldest stamp set in the Stampin’ Up! Annual Catalogue…I think it’s been in there almost as long as I’ve been a demonstrator?! This was my contribution (oh – add some “bling” in the corners because it’s ANOTHER design that I had to add to in order to meet the Canadian Business Conference swap rules LOL – the swap version is on the YamStamps Instagram Account). We did a version of this in Stamp Club, and when I redid it for the swap, I left the ground white, so it looks kind of like snow. Hard to see, but the image is on Shimmery White cardstock so it gives a subtle sheen to everything, and stands up quite well to the watercolouring that I did for the sky.
In the meantime, if you registered for the Watercolour Pencil class, you will be glad to know that the order for supplies was put in well ahead of time – so the fact that the pencils are currently unorderable is not a factor. (phew). If you didn’t (why not?!), the pencils will be available to order again in a couple of weeks – contact me and I can place an order for you as soon as they’re available again. Good news, though, that the Stitched Shape Framelits are in stock and available for order once again. Contact me if you have any questions or concerns, or need to still register for the Monthly Card Class on Wednesday. Other than that, I’m working on the videos for my new Online Class, Clever Cards. If I wasn’t so much of a procrastinator, I’d have finished up the videos in advance of getting a touch of laryngitis….*sigh* Wish me luck.
Warning: Undefined array key "alt" in /home4/yamstamp/public_html/yamstamps/wp-content/plugins/wp-evs/wp-evs.php on line 54
Warning: Undefined array key "alt" in /home4/yamstamp/public_html/yamstamps/wp-content/plugins/wp-evs/wp-evs.php on line 54
This past weekend I was able to take part in an event for Canadian Stampin’ Up! Demonstrators. The Canadian Business Conference was organized by Stampin’ Up! Canada staff and a group of high level demonstrators. It was a fantastic opportunity to learn from the speakers (mostly other demonstrators), be inspired both creatively and business-wise, and meet up with new and old friends from across the country, in an intimate and supportive setting. It was fantastic and a good “shot in the arm” for me, both personally and professionally.
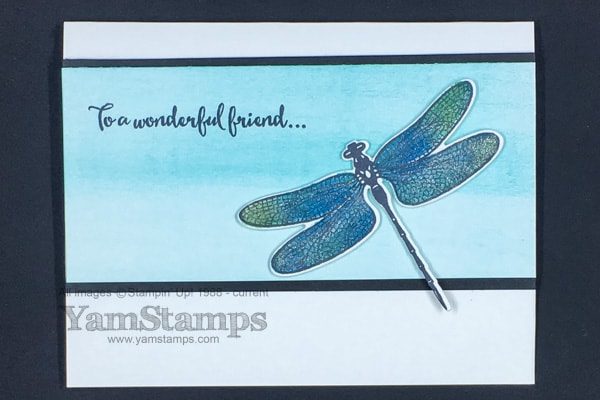
I participated in two organized swaps, featuring a designated stamp set. One was for the Occasions Catalogue set, Dragonfly Dreams. This was my contribution above. Slightly hard to see, but there’s shimmer on the wings thanks to the Clear Wink of Stella Glitter Brush – one of my favourite tools these days! I brayered on colour from the Bermuda Bay Ombre Ink Pad in the background. For the dragonfly, I stamped the image in Memento Tuxedo Black Ink, then inked the solid wing image with my own “ink pad” made from a baby wipe with drops of reinkers before stamping in place. The coordinating framelit means no fussy cutting – yay! After I completed eleven of these cards, I realized that I missed something…..I was supposed to have some sort of embellishment on the card….so I added some rhinestones to the upper left and lower right corners of the Bermuda Bay strip. Note to self: check the swap card requirements BEFORE designing your card in future. (you can see the adjusted final swap card in the collage below). Collage features scenes from the weekend: tablemates, friends, swap cards and a fog enshrouded CN Tower!
I actually didn’t take as many photos as I thought I would – I was too busy being inspired by all the great information and great people in the room! We had assigned seating at round tables, which was a great way to mix and mingle, and on the final night, we were able to go up the CN Tower for dinner if we wanted. Even though it was foggy (boo) it was okay because I think we spent more time laughing and talking than looking out the windows! I am looking forward to the next time I will see many of these great ladies – at Stampin’ Up!’s On Stage event in April. I am grateful to all the organizers of the event, and (I know it sounds twee but it’s true) grateful that I have my Stampin’ Up! business because it’s brought so much to my life. [OK. Enough of that! Back to being my usual sarcastic self haha].
A reminder that the end of the month is drawing near (how does that happen so quickly??!!) as is the next Monthly Card Class. February’s class will be Wednesday, February 1 – either at 1pm or 7pm. Registration deadline is January 30, $20 class fee includes all supplies and envelopes to make 4 different cards, one of which will be suitable to use for Valentine’s Day or some other “love”ly occasion that you might have coming up. Please contact me to register. Remember that if you can’t make it to class at that time, get a group of friends together and we can have a private class! Hope to see you soon.
Warning: Undefined array key "alt" in /home4/yamstamp/public_html/yamstamps/wp-content/plugins/wp-evs/wp-evs.php on line 54
Warning: Undefined array key "alt" in /home4/yamstamp/public_html/yamstamps/wp-content/plugins/wp-evs/wp-evs.php on line 54
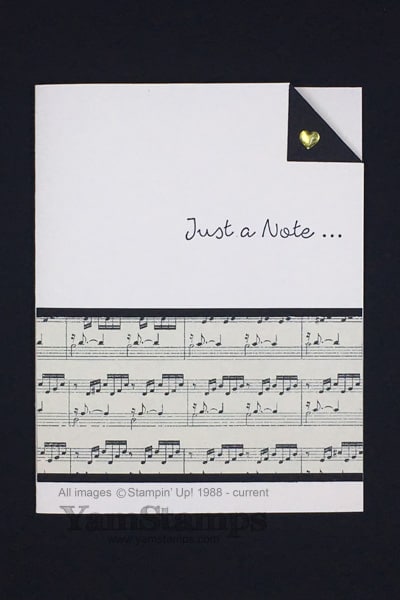
It’s always nice to receive “real” mail these days, and this is a quick note card that you can create to send to someone special! This is a previous month’s “Thank You” card for customers. I send out thank you cards if you’ve placed an order with me in the previous month (or two…because sometimes despite my best intentions I get a little behind…like now…LOL). I always make them “reusable” so they can be forwarded on or “re-carded”?! Simple designs are sometimes just the ticket to get the job done and out the door. In this case, the This Christmas Designer Series Paper has some designs that can be used year round. I especially like that this paper, while accurate, is not actual sheet music, because it would pain me to cut that up for decorative use. To jazz up this straightforward design a bit, I added a black triangle at the top corner of the card, and trimmed the exposed cardfront back. A metallic enamel shape adds an extra touch.
It’s great to have a bit of a “card stash” – cards to have on hand, ready to send when you need them! If you need to build up your supply, register for one of my Monthly Card Classes! They are always the first Wednesday of the month, at 1pm or 7pm in Burlington ON, and your $20 class fee includes all supplies and envelopes to create 4 cards. Don’t forget, if you place an order at that class, at some point in time you’ll get an additional card from me in the mail that you can add to that stash! See the YamStamps Events page for upcoming classes, or contact me if you have any questions or would like to book a private class with friends.
I’m getting set to attend the Canadian Business Conference for Stampin’ Up! Canadian Demonstrators over the next few days – I’m really excited to see friends and get inspired – both business-wise and creatively. I’ll share my swap cards over the next few posts – I’m participating in an organized swap – so there’s a set number of cards with guidelines and we each create one design – then we share them and end up with a whole bunch of different ideas with the same stamp set!
Over the past few weeks, we’ve had a number of new demonstrators join Stampin’ Up! (because it’s such a great deal during Sale-a-Bration!) and in our “Eh” Team (my group of demonstrators) one of the questions that went through our group meeting at one point was about card cutting and matting. I thought I’d share this video from a number of years ago (hard to believe) that is still relevant today – because it might have been “buried” on the YamStamps YouTube channel or here on the blog. It’s a video covering the basics of the “typical” A4 sized card, from an 8.5″ x 11″ sheet of cardstock. Perfect to share on a Throwback Thursday?!
If you can’t see the video embedded in the post, here’s a direct link to it on the YamStamps YouTube channel. I’m still working on the Clever Cards Online Class, which will be “not your basic” cards – so stay tuned for the launch!