
Thrifty Die Cut Birthday Card
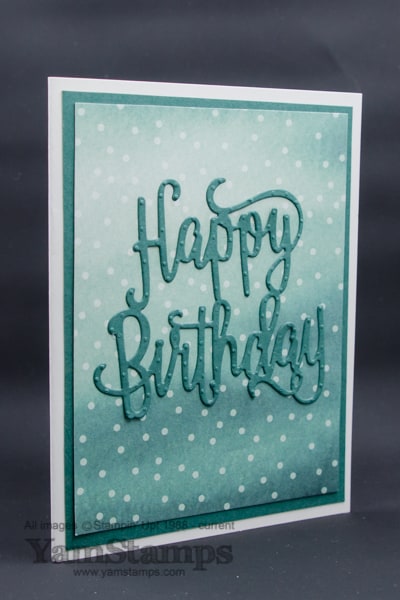
If you’ve attended a card making class with me, you’ll know that one of of my favourite thrifty techniques is to die cut or punch from the mat layer of a card. This thrifty die cut birthday card is an example of that technique! The words are cut with the Happy Birthday Thinlits die – and they come out as a single piece which makes it easy to adhere in place. I used the Multipurpose Adhesive Sheet to make it even easier! I cut my Tranquil Tide cardstock to 4.25″ x 11″, and placed it onto the adhesive sheet. I replaced the top liner sheet and then trimmed the adhesive sheet/liner so it lined up with the edges of my cardstock. I then cut the cardstock (with the adhesive and back liner in place) to 5.25″ x 4″ (reserving the left over for other projects or smaller die cut pieces). The words were die cut from the centre of this piece of cardstock. Since the Designer Series Paper goes on top of the cardstock, noone knows about the gaping hole!
The Designer Series Paper showcased on this card is Delightful Daisy. I love the watercolour / wash type effect on this paper – it gives more interest when you’re using it as a backdrop for projects. It’s adhered onto the (front side of the) Tranquil Tide cardstock with SNAIL, but then I just peeled off the backing from the adhesive on the backside of the cardstock and adhered it onto my Whisper White card. I peeled the backing from the back of the die cut words and adhered them in place on the cardfront. No fuss, no muss, and no waiting for liquid adhesives to dry (I’m usually an impatient crafter).
I was really happy to see the return of adhesive sheets in the latest Stampin’ Up! Annual Catalogue. They make this thrifty die cut birthday card easy peasy! Another way to use the adhesive sheets is to take a die cut piece and place it onto the adhesive to transfer the adhesive to the back of the die cut shape. (I’m getting ready to re-shoot my Subscriber bonus video and use that technique in the project I share).
Stampers Club members got to make this card as part of the club class this month. I like this card so much, it may appear in a future Monthly Card Class as well! If you are local to Burlington, please consider joining me for a class! No experience is needed, and your class fee covers all supplies required for the projects. This Saturday, June 25th (which by no coincidence is 6 months until Christmas), I’ll be having a Christmas Card Class! We’ll make 4 different holiday cards. I’ll be having holiday card classes each month leading up to December, so the more classes you attend, the more cards you’ll have ready to mail out before the postage deadline! Please contact me to register and make arrangements to pay the $20 class fee for the Christmas Card Class by this Thursday. Check out the YamStamps Events page for upcoming dates. See you soon!


