Aug 31, 2017 | cards, Seasonal Catalogue, Stampin' Up!
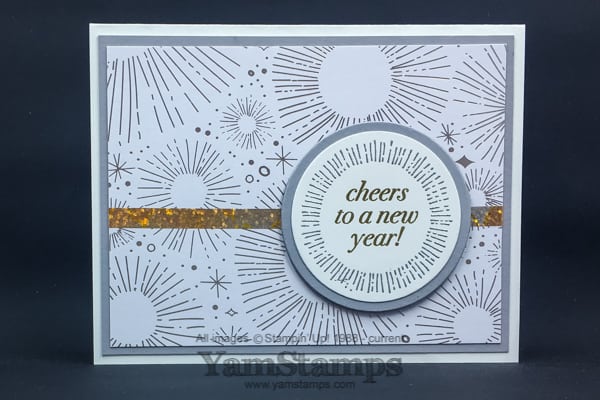
Happy New Year! This is another swap card that I made using products from the new Stampin’ Up! Holiday Catalogue (English / French) – available for ordering September 1st. The background is the gorgeous Year of Cheer Specialty Designer Series Paper, and the main image is from the set called Cheers to the Year (wood / clear). This was a great set that I also used for some ideas to share with the Weddingbells Magazine staff, because it includes a Mr & Mrs stamp. The strip is a portion of the Year of Cheer Specialty Washi Tape – five rolls of metallic washi tape that are just gorgeous.
I used the Layering Circle framelits to cut out the main sentiment image and the layer, which was cut from the Smoky Slate mat layer behind the Designer Series Paper. I find that circles are a more forgiving shape to use if you are mass producing projects – you don’t have to worry about cutting it perfectly straight (other than making sure your image is more or less centred), and can make adjustments as needed when you place the image on the cardfront. I thought the circles also went well with the images in the paper, which reminded me of sparklers or fireworks – and appropriate for a Happy New Year card.
Attendees at the September Christmas Card Class will have the opportunity to make this card in class, and build up their stash of holiday cards ready for sending in a few months! I always need at least one card that I will be able to send a little later….because I don’t always get all my cards out on time – hence a Happy New Year card this time around. (I know, so bad…but it’s reality!) You can still register to attend the class – the Basic Registration is still open until September 11th – for $20 you’ll be able to attend class to create 4 different holiday cards that will all feature the Year of Cheer Specialty Washi Tape. You can contact me to register. Don’t forget there are more Christmas Card Classes in October and November as well! You can always see upcoming events on the YamStamps Events Page.
updated September 1 to include live links to Holiday Catalogue and Holiday Catalogue items!
Aug 30, 2017 | 3D samples, cards, Christmas, event, Stampin' Up!
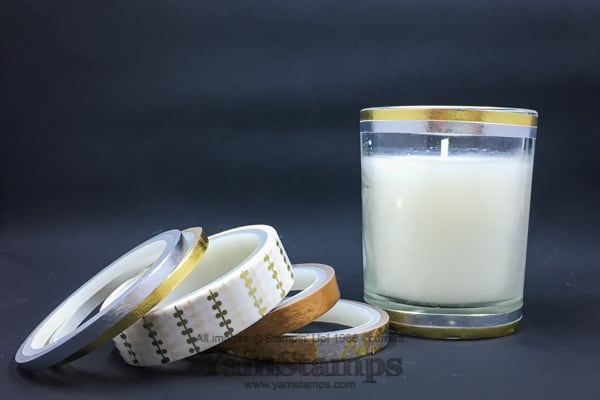
Today is the registration deadline for the Basic+ Option for the September Christmas Card Class! Class times are 1pm or 7pm, Wednesday September 13th here in Burlington ON. Your Basic+ Class fee of $30 is due at time of registration, and will include all supplies required to make the 4 different Christmas cards during class, PLUS you will receive 5 rolls of metallic washi tape from the upcoming Stampin’ Up! Holiday Catalogue! Pictured above, the five rolls of tape are GORGEOUS and make your crafting easy and elegant.
The votive candle in the picture is simply decorated with strips of the gold and silver washi tape around the top & bottom of the candle – adds an easy custom touch. You could group them on your mantle, or place them on a mirror as a table centrepiece. I shared this idea (among others) with the people at Weddingbells Magazine a while back – because who couldn’t use a little bit of elegance AND thriftiness at a wedding?!
Contact me to register for the class! Basic+ Fee is $30 and includes all supplies and 5 rolls of washi tape. Basic Fee includes all supplies for the class, no additional product. Payment due at time of registration please & thanks. Please contact me if you have any questions.
Aug 27, 2017 | cards, Stampin' Up!
I’m here! I’m here! Here’s a clean and simple Tranquil Tulips Greeting Card to apologize for my absence… I have been packing in a bunch of things before the end of summer! I made a whirlwind trip to the Ottawa Valley last weekend to visit with some long time friends – we all celebrated a significant birthday this year, so gathered to mark the occasion (or commiserate, take your pick haha). This past weekend, plans for a second road trip fell through, so I took advantage of a couple of days off in a row to….clean. My poor stamp room has been a disaster zone for a very long time, so I spent a fair bit of time sorting, recycling and organizing things in there. It’s nice to be able to see some floor space again. My downfall is partially sorting things into old Stampin’ Up! cardboard boxes…and then ending up with a bunch of boxes with half sorted items all over the place. I vow to be a bit more on top of things now!
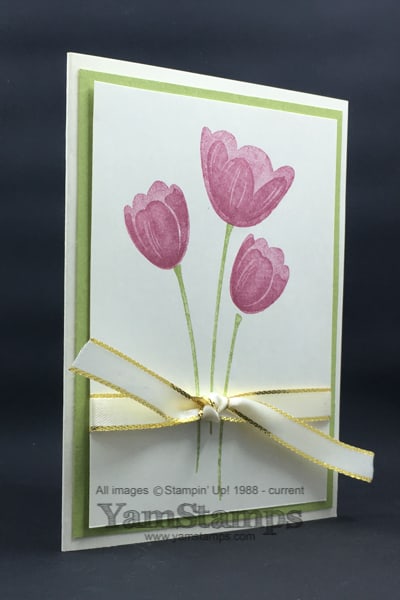
Between the Wedding Magazines presentation and August Christmas Card Class, I realized I had nothing but winter type cards to share! Luckily, this clean and simple tulips greeting card comes to the rescue. One of the things that drew me to Stampin’ Up!’s products over 15 years ago was two step stamping, and watercolour type images. Combine the two of those and I’m in heaven! This Tranquil Tulips set is available for purchase with Stampin’ Rewards – which you earn by hosting a class/workshop/online party or by placing a single order of $200 or more. Two step stamping simple means that it takes more than one stamping to create a full image. In this case, the stems (stamped in Pear Pizzazz) are a separate stamp from the flower heads, and the flower heads themselves are two stamps. The flowers are stamped in Sweet Sugarplum, and no special technique is needed. You simply stamp the larger portion of the flower first, then stamp the smaller “front” portion of the flower in the same colour on top of the original image. This won’t work as well with really deep colours, since you’ll lose some of the detail, but with medium or lighter shades – it’s fantastic!
The ribbon accent is done in two steps as well. The Gold Metallic Edged Ribbon is one of my latest favourites! The horizontal ribbon is simply attached in behind the cardstock with tape, and the knot portion is a second piece of ribbon that is tied onto the first. I find this an easier way to do my ribbon knots or bows – in part because I can move the knot/bow around as needed (by sliding it along the horizontal ribbon), and in part because I’m really bad at judging how much ribbon I will need if I do it all in one (plus it’s never as taut as I want it to be if I do it that way). If you are mailing this tulips greeting card, you can simply omit the knot portion of the ribbon to make the envelope less bulky.
Around here we are enjoying the last bit of summer, and getting ready for back to school after Labour Day. I hope that you are able to celebrate the last few days of summer before getting back to the busy school time schedules! Don’t forget that YOU can get back to classes as well – registration closes shortly for the September Christmas Card Class. Basic+ registrations will include a package of the gorgeous metallic washi tape from the Holiday Catalogue! Check the YamStamps events Page for more information, or contact me if you have any questions or are ready to register. Hope to see you in class soon!
Aug 18, 2017 | cards, Christmas, Stampin' Up!
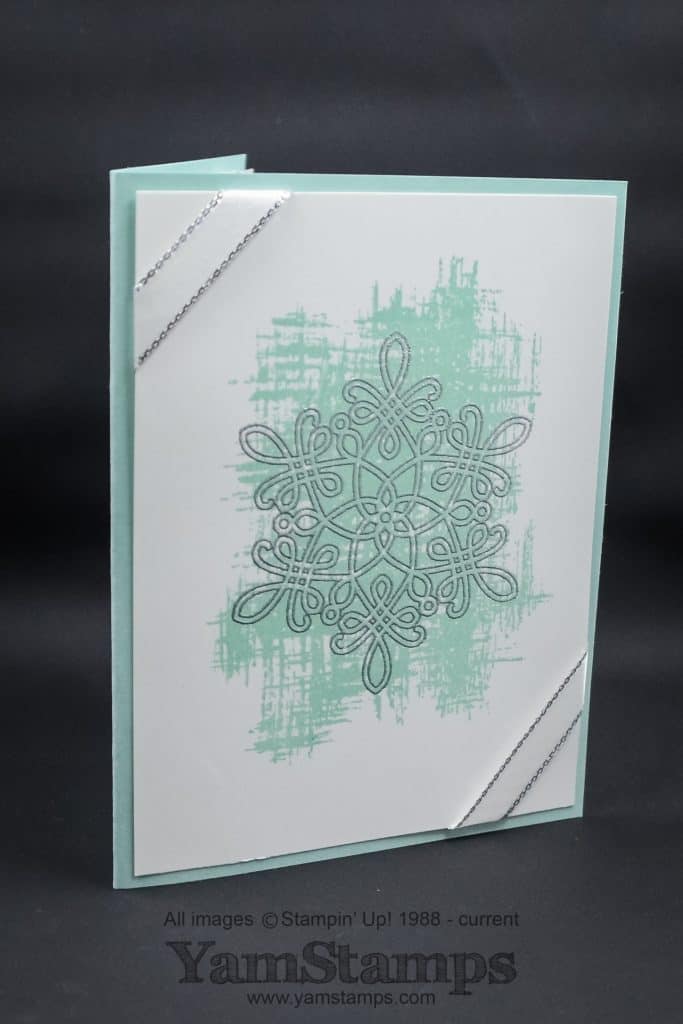
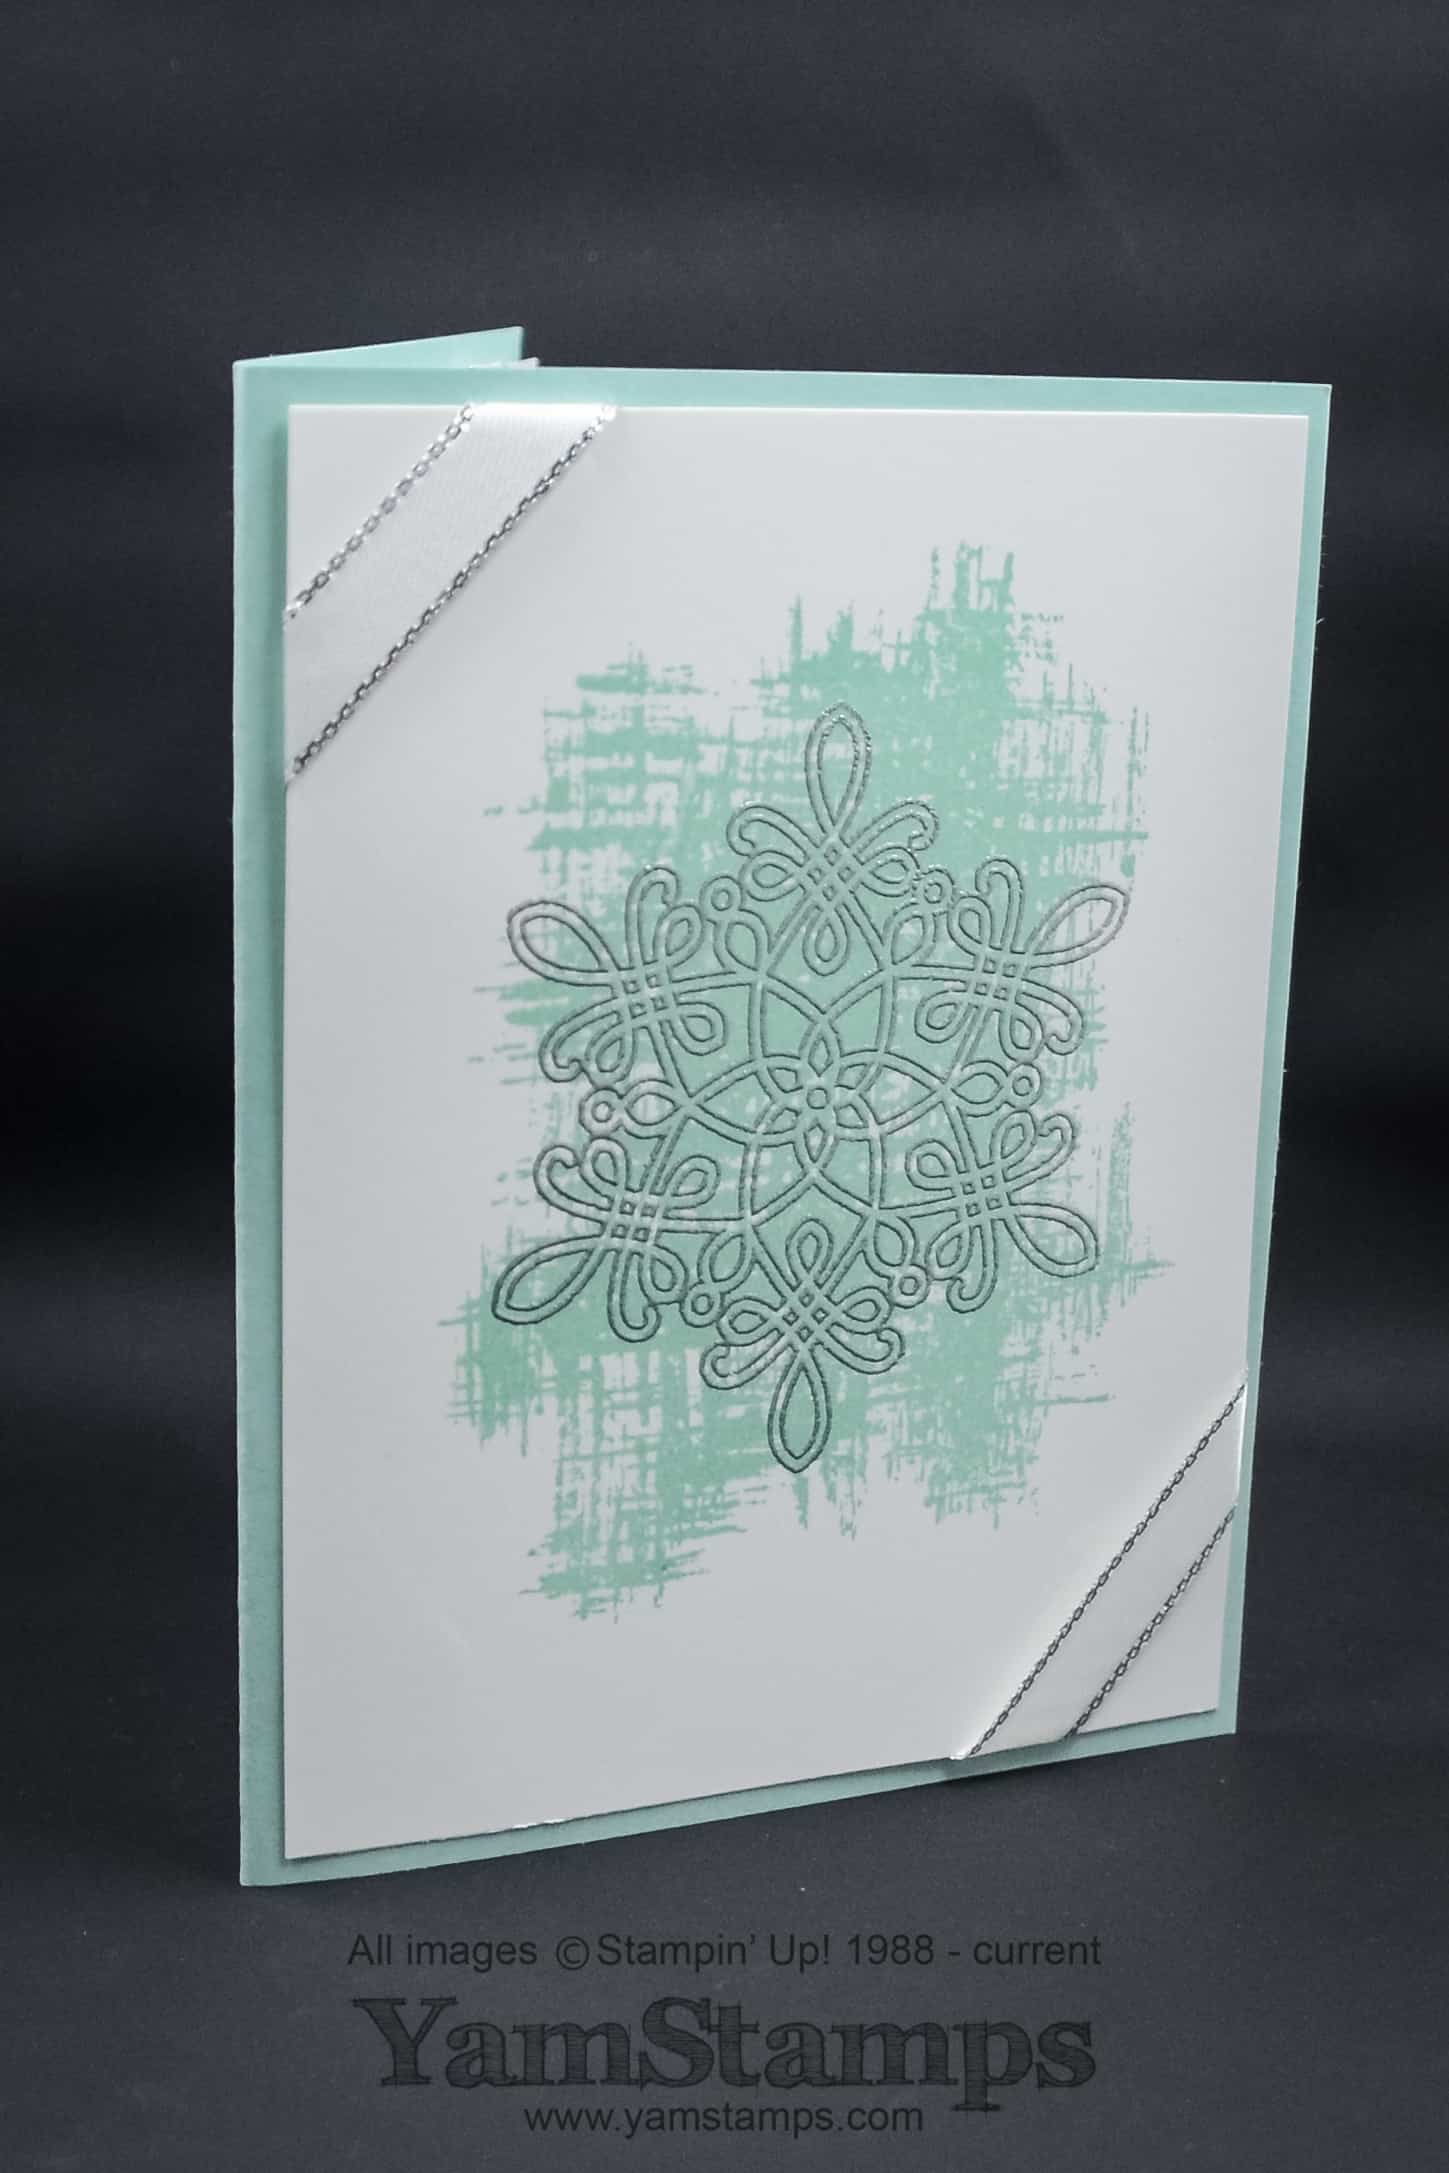
Yes…I know…snowflakes and August don’t necessarily come to mind together…but I have a reason for this card! It’s been a little quiet in the YamStamps online world, you may have noticed. I was busy behind the scenes creating winter wedding ideas and getting ready for yesterday’s Christmas Card Class! So while it’s been humid and warm outside, (and occasionally inside since our air conditioner was needing repair, but that’s another story)….I was trying to find winter inspiration.
I was asked to prepare some winter wedding ideas for a Stampin’ Up! presentation to Wedding Bells magazine. Most of the ideas I shared were using products from the upcoming Holiday catalogue (which is arriving in various mailboxes across the country as I write this….), but this is one that uses Annual Catalogue supplies – so you can make it right away! Snowflakes and winter are synonymous – at least where I live…so I used that as a basic jumping off point for most of my ideas. This card is Pool Party, as is the background hatching image – which is from You’ve Got This (avaialble in clear mount or wood mount). The large snowflake is from Flurry of Wishes, and is heat embossed in Silver. The silver metallic-edged ribbon adds an elegant touch, and is flat enough not to bulk up the card too much when mailing. For the wedding idea, the insert was the wedding invitation, with additional ribbon on the corners (I put the insert ribbon on the opposite corners to even out the bulk). For a holiday card, you can just stamp an appropriate greeting!
If you’d like to see more of what was shared, I will share other pictures on the blog here, but check out Instagram in the meantime. The YamStamps instagram feed has a couple of shots (including a behind the scenes shot of how I create chaos in my wake LOL), and the Wedding Bells Instagram feed has a picture – but check out their Instagram story while you can (you have a few hours left before it disappears) to see embossing & die cutting featuring Holiday catalogue items!
This weekend, I’m planning on enjoying the warm weather and will NOT think about snowflakes! At some point I’ll have to be finishing planning for the September Christmas card class – which will feature cards using the new metallic washi tape from the Holiday catalogue (you can get a glimpse of it on Instagram). If you’re interested in attending, please register ASAP! Basic+ Fee is $30 and includes the washi tape set. Basic Fee of $20 does not include additional product – just the necessary class supplies. Check the YamStamps Events Page for other upcoming class dates! Hope to see you soon!
Aug 11, 2017 | Paper Pumpkin, specials
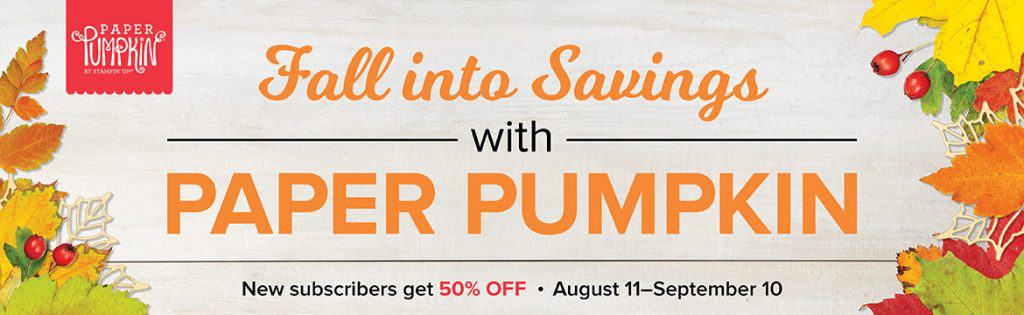
Stampin’ Up! is running a limited time crafting subscription kit sale! Paper Pumpkin is 50% off for new subscribers until September 10th with the code HALFOFF0917 . Paper Pumpkin is delivered directly to your door, and is a complete mini crafting kit to create that month’s project. In the past, kits have featured cards, 3D items such as a frame or mini wreath, tags and cute packaging ideas. Each kit contains stamps, paper products, accessories, ink spots or colouring tools and usually glue dots or some adhesive. All you need to supply is a few moments of your time! (oh, and since your first kit is coming in September, with the children going back to school you may have a chance at a couple of minutes to yourself?!)
I love these kits for traveling, and know that some subscribers have used them with younger family members. It’s a fun way to craft together, and not worry about protecting your crafting supplies, since it’s an all in one. I created an info page here.
So if you’ve haven’t tried Paper Pumpkin yet, now is a great time – this crafting subscription kit is on sale! Click here to start.
If you have any questions, please feel free to contact me.