
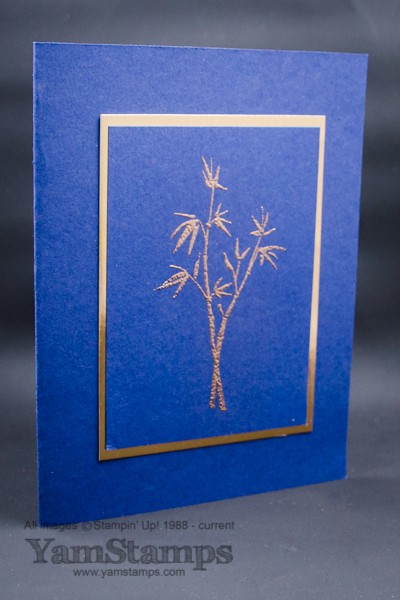
I’ve shared this navy & copper card in a couple of classes lately – I love this combination. I laughed when I uploaded this just now….do you remember this navy & gold card? Obviously I like this look…and honestly didn’t remember that I had created one quite similar in the recent past…ah well. Still like it. This card pairs Night of Navy with Copper Foil sheets and copper embossing powder.
The image is from the Stampin’ Up! Canada set, Artistically Asian, which is available in clear mount or wood mount. Both options feature the red rubber with foam padding, but different adhesive backings. The clear mount stamps are used with the clear blocks, and stored separately. It’s a good option if you have limited space, since the cases are thinner (like a DVD case). There’s a little more flexibility because you can cut a stamp apart (for example, cut the sentiment off the image), and then have the option to use the pieces separately or together, depending on how you place them on your clear block. You need to purchase the clear blocks separately. Don’t confuse these stamps with photopolymer stamps, which are the clear stamps without any padding. Stampin’ Up! also offers a certain number of stamp sets in photopolymer, which is often a favourite due to the thin storage case and the ability to actually see through the stamps to your crafting surface (well, depending on how much ink you have on your stamp….haha). Wood mount stamps are red rubber with foam padding, and the price includes wood blocks to which you adhere your stamps. These are the “traditional” stamps that many know. The case is more the thickness of a VHS case (if you remember those….am I dating myself?!). These are good options if you just want to grab and get crafting (no searching for the right block to stick it onto), or craft without much of a set plan or with friends. Since I run classes, I often find myself having to ensure I have enough of the right sized blocks – my classes are set up in card stations, with each card having all the supplies out & ready, and people rotating to them when there’s an opening. I have this stamp set in wood mount, so when we made this navy & copper card in class, I didn’t have to worry about how many clear blocks I needed to have handy.
While I love using the metal foil sheets as a mat layer for images, it does make me sad to cover up so much of the beautiful cardstock! In this navy & copper card, you only see a bit of the copper sheet. You know me, though, I love my thrifty trick of die cutting from the mat layer, so I figured out how to work that into this card. In class, we die cut a dragonfly from the foil to use on a different card, and then used the remainder as the mat layer for this card. Frugal crafting for the win!
One tip for heat embossing with the Copper Embossing Powder. I found that the copper powder, especially when brand new, tends to leave a reddish sheen on the cardstock after coating the image and sliding off the excess powder. It is helpful to use the Embossing Buddy before stamping – that light powdery dusting tends to reduce the remnants of embossing powder. I also found using a soft microfiber type cloth after heat setting the powder can help to redust the embossing “dust” that may coat the cardstock.
I am looking forward to trying out some of the Holiday Catalogue stamp sets with the Copper Embossing Powder….just waiting for my shipment to arrive! Demonstrators are able to order from the Holiday Catalogue NOW so it’s been fun seeing what everyone’s picking. If you are keen to get your hands on holiday product, if you order the starter kit during August, you can actually select Holiday Catalogue product in your starter kit! Contact me for more details, or get more information about joining my group of demonstrators here. In the meantime, I will sit on my porch and wait for the UPS truck to bring my holiday goodies…..


