
I’m here! I’m here! Here’s a clean and simple Tranquil Tulips Greeting Card to apologize for my absence… I have been packing in a bunch of things before the end of summer! I made a whirlwind trip to the Ottawa Valley last weekend to visit with some long time friends – we all celebrated a significant birthday this year, so gathered to mark the occasion (or commiserate, take your pick haha). This past weekend, plans for a second road trip fell through, so I took advantage of a couple of days off in a row to….clean. My poor stamp room has been a disaster zone for a very long time, so I spent a fair bit of time sorting, recycling and organizing things in there. It’s nice to be able to see some floor space again. My downfall is partially sorting things into old Stampin’ Up! cardboard boxes…and then ending up with a bunch of boxes with half sorted items all over the place. I vow to be a bit more on top of things now!
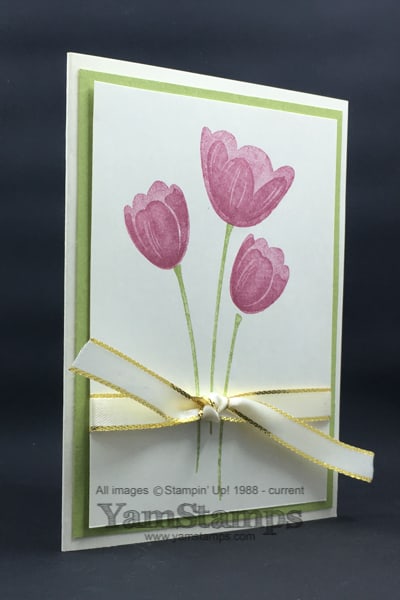
Between the Wedding Magazines presentation and August Christmas Card Class, I realized I had nothing but winter type cards to share! Luckily, this clean and simple tulips greeting card comes to the rescue. One of the things that drew me to Stampin’ Up!’s products over 15 years ago was two step stamping, and watercolour type images. Combine the two of those and I’m in heaven! This Tranquil Tulips set is available for purchase with Stampin’ Rewards – which you earn by hosting a class/workshop/online party or by placing a single order of $200 or more. Two step stamping simple means that it takes more than one stamping to create a full image. In this case, the stems (stamped in Pear Pizzazz) are a separate stamp from the flower heads, and the flower heads themselves are two stamps. The flowers are stamped in Sweet Sugarplum, and no special technique is needed. You simply stamp the larger portion of the flower first, then stamp the smaller “front” portion of the flower in the same colour on top of the original image. This won’t work as well with really deep colours, since you’ll lose some of the detail, but with medium or lighter shades – it’s fantastic!
The ribbon accent is done in two steps as well. The Gold Metallic Edged Ribbon is one of my latest favourites! The horizontal ribbon is simply attached in behind the cardstock with tape, and the knot portion is a second piece of ribbon that is tied onto the first. I find this an easier way to do my ribbon knots or bows – in part because I can move the knot/bow around as needed (by sliding it along the horizontal ribbon), and in part because I’m really bad at judging how much ribbon I will need if I do it all in one (plus it’s never as taut as I want it to be if I do it that way). If you are mailing this tulips greeting card, you can simply omit the knot portion of the ribbon to make the envelope less bulky.
Around here we are enjoying the last bit of summer, and getting ready for back to school after Labour Day. I hope that you are able to celebrate the last few days of summer before getting back to the busy school time schedules! Don’t forget that YOU can get back to classes as well – registration closes shortly for the September Christmas Card Class. Basic+ registrations will include a package of the gorgeous metallic washi tape from the Holiday Catalogue! Check the YamStamps events Page for more information, or contact me if you have any questions or are ready to register. Hope to see you in class soon!


