Oct 31, 2017 | cards, Christmas, Occasions, specials, Stampin' Up!
Boo! Scary thing is – it’s the last day that you could get the Merry Patterns stamp set for free! This is the stamp set that Stampin’ Up! is offering free with a $375 product order (and NO, it doesn’t have to be just one person ordering – most people have earned it by having a group of friends place orders together, or having a card making party). This card is from October’s Christmas Card Class – each participant received a package of Stitched Felt Embellishments that we then used on the cards. The sentiment is from the Merry Patterns set – as are the tree trunks (those are the patterned candle portions). The “stitched” cardstock trees are created using the Quilt Builder Framelit Dies – which you can also get in a discounted bundle along with the Christmas Quilt Stamp Set. I thought this combination was fun and coordinated well!
More scary news – it’s also the last day for the Buy 3 Get 1 Free Designer Series Paper Sale! Selected papers have been part of this special, and if you still need to stock up, you have until end of day to take advantage of this deal! I put together a huge binder featuring all the different designer series papers that were part of the special and had it on hand at the Scrapfest / CreativFest booth this past weekend. I’ll still be able to share this way of seeing the papers, but the deal will be gone….*sigh*
So here’s some good scariness…..how about a Halloween card?!

I received this fun card as part of a demonstrator swap a little while back! We each created a number of copies of our card design, and received a card from everyone participating in the swap! I love this card from Lesley Poper. The eyeballs peeking out of the cup make me laugh….and of course the cup reminds me of my oh so favourite “Grande, Coconut Milk Chai Latte…with cinnamon powder please”. Not sure how happy I’d be to see those eyeballs looking at me though… I am sharing a number of the Halloween themed cards on my various media platforms today at various times – so besides here at the YamStamps blog, you can also check out YamStamps on Facebook, Twitter and Instagram to see different fun holiday projects!
I hope that you and your goblins have a fun and safe Happy Halloween!!
Oct 30, 2017 | Events, rubber stamping, Stampin' Up!
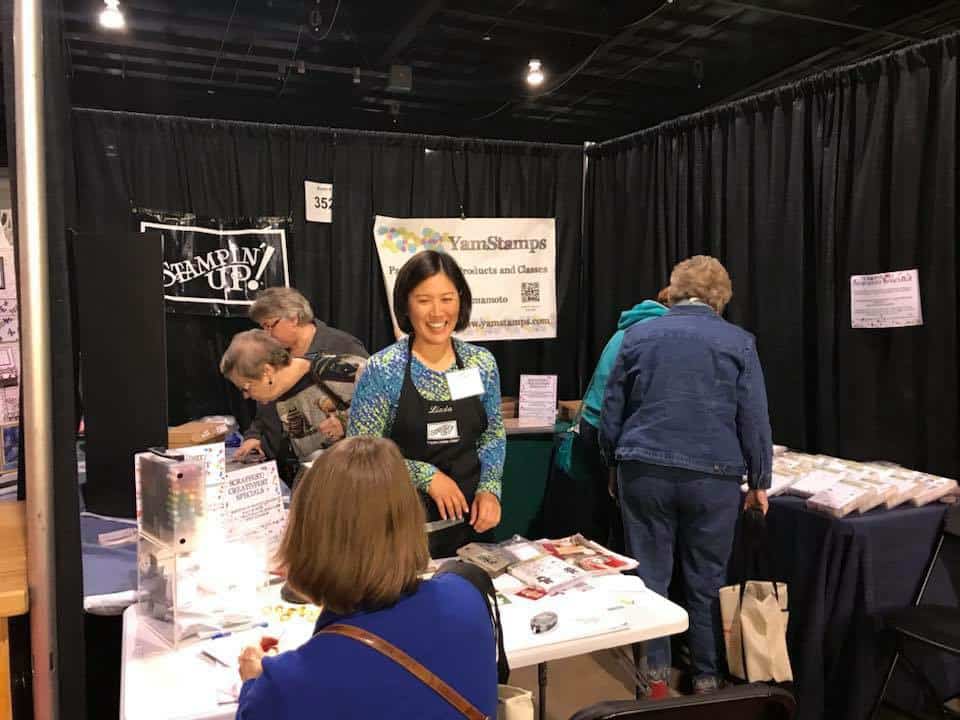
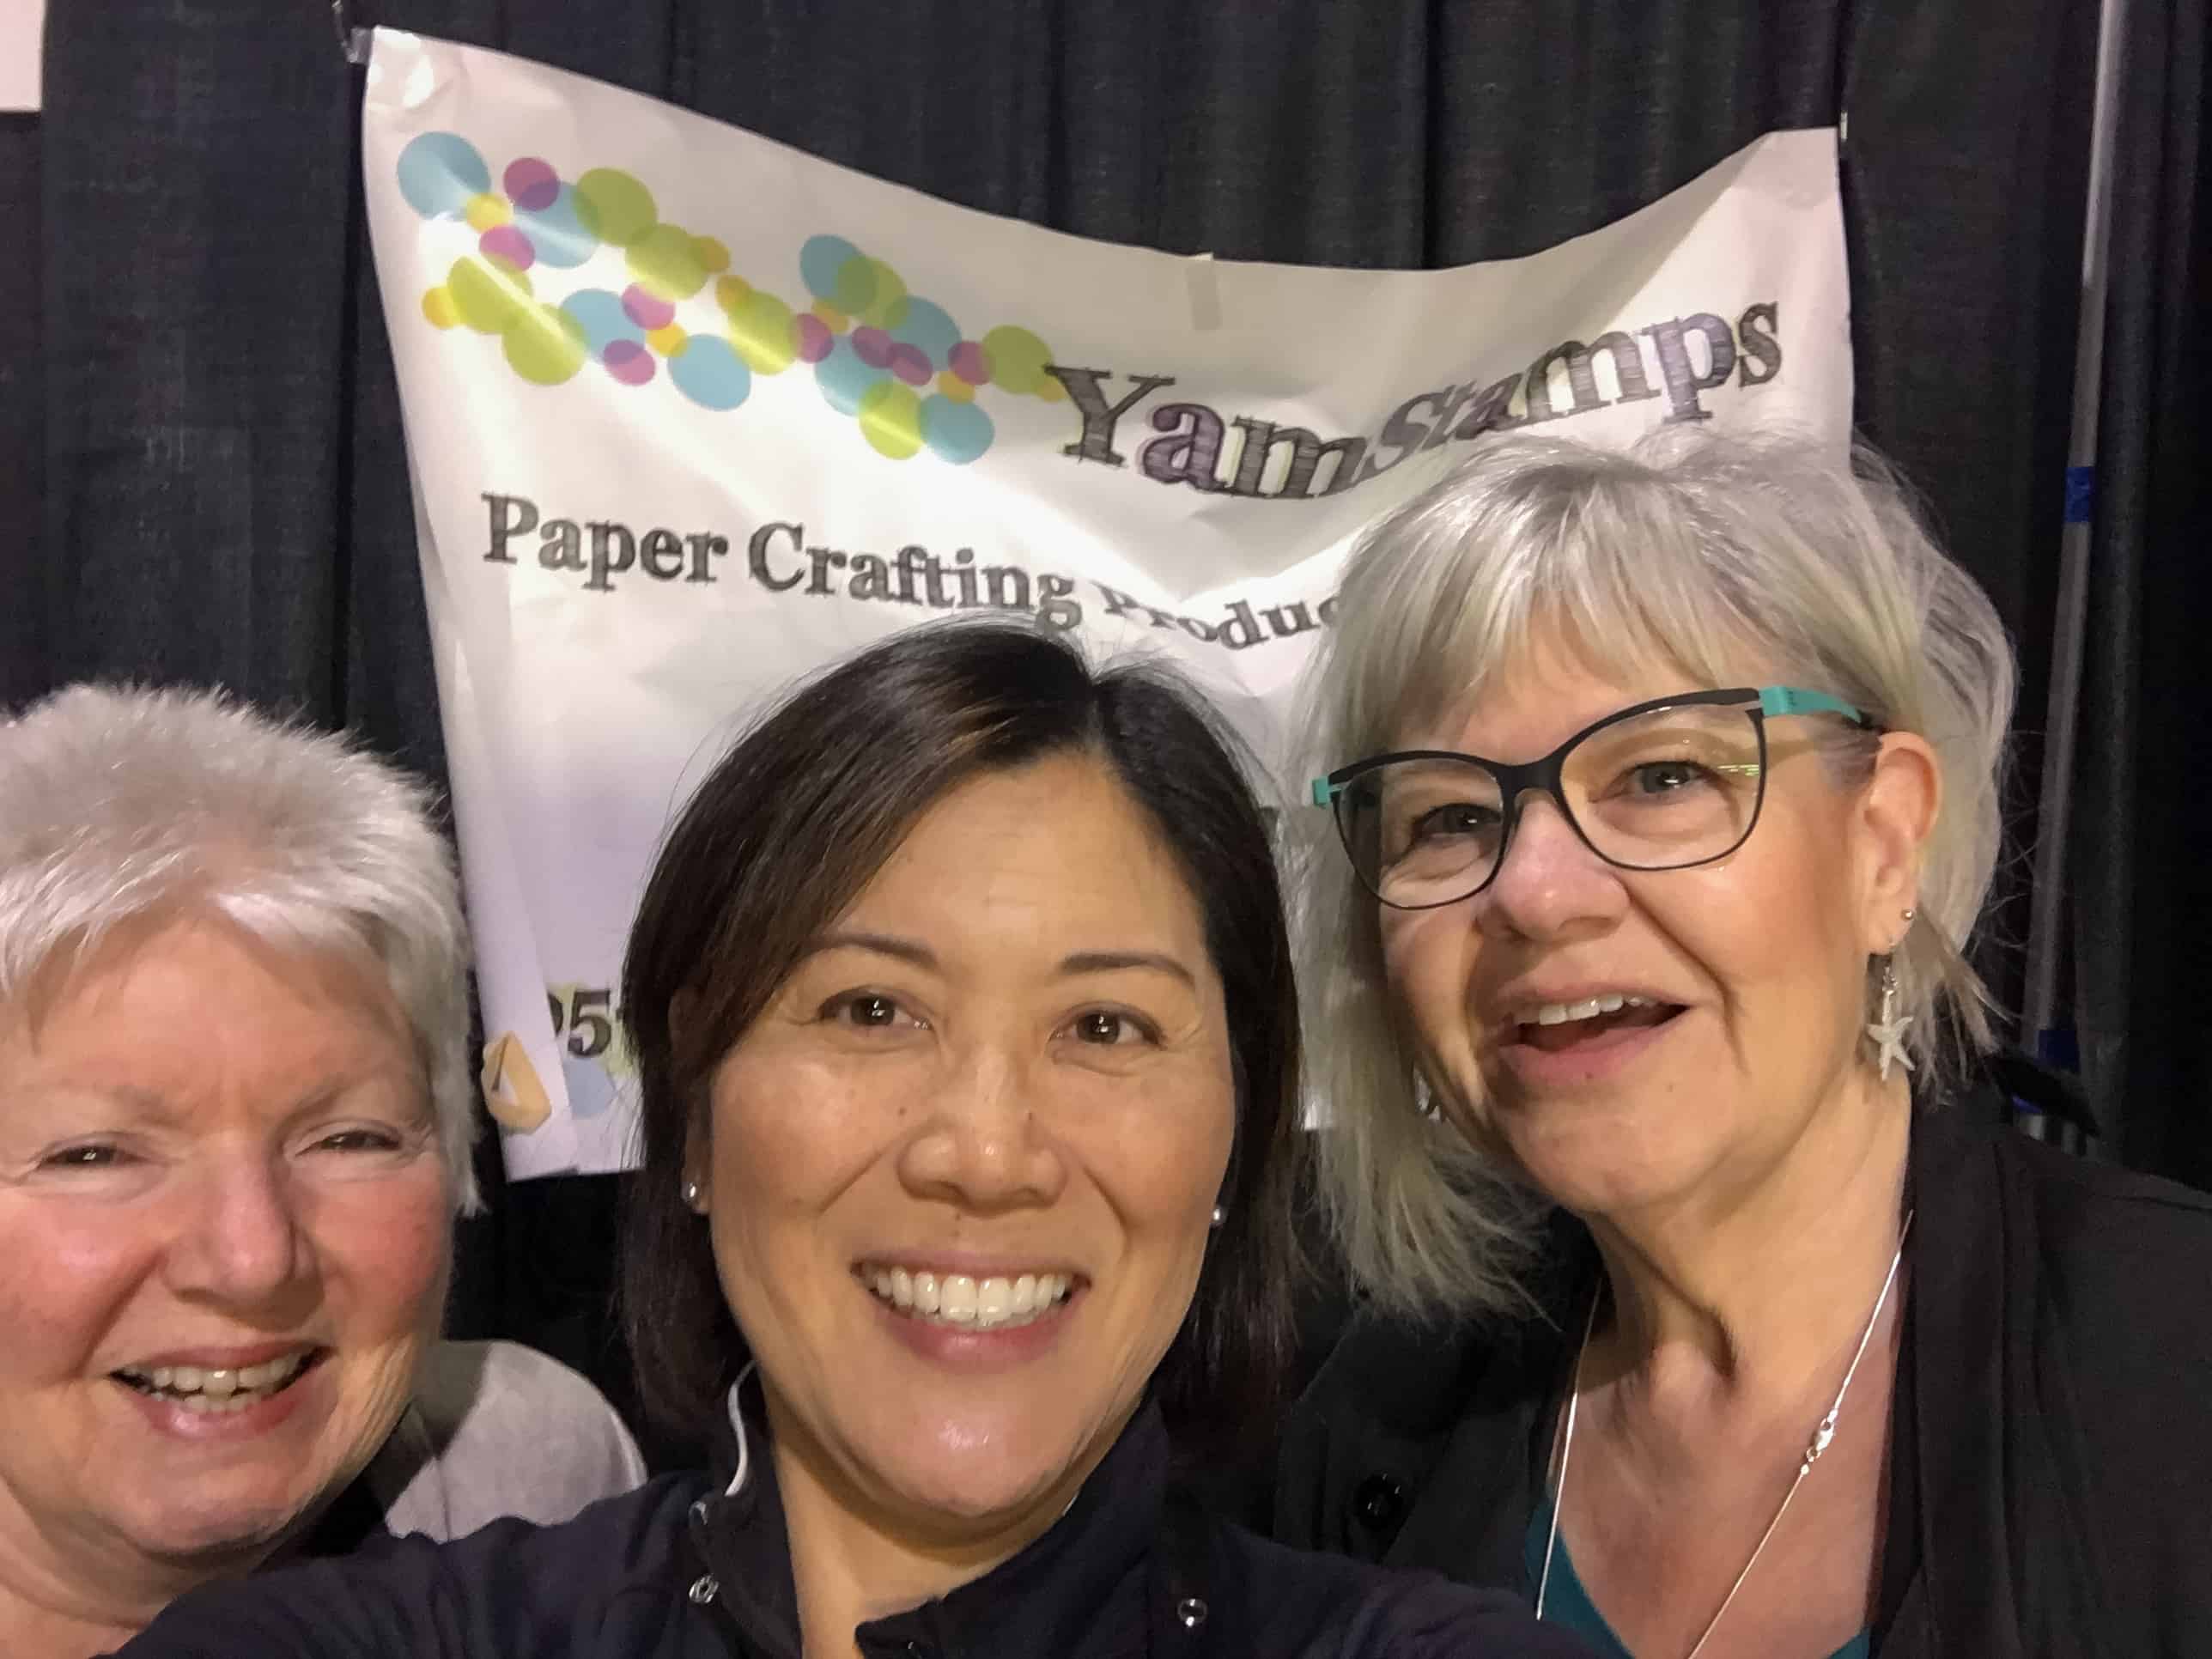
I survived! Scrapfest / CreativFest 2017 in Mississauga was a lot of fun, but it was tiring for sure. Here I am, and it must have been early enough so I wasn’t yet drooping, but late enough so that I was awake (and smiling)…LOL. I had super helpers – Arlene was there for all three days, Anne made it for two (something about trick or treating with the grandchildren on the Saturday, I mean, really…..LOL), and my mother filled in on the final day too. Thank you to everyone who stopped by, filled out a ballot, chatted, shopped and visited. Thanks to my helpers, and thanks to Lisa of Scrapfest.
Congrats to Jackie H who won the free draw and had her choice of either a Big Shot Die Cutting Machine or a full set of Stampin’ Write Markers, and to Sandre, who won the same choice in the draw that was exclusively for those who purchased a starter kit by Sunday.
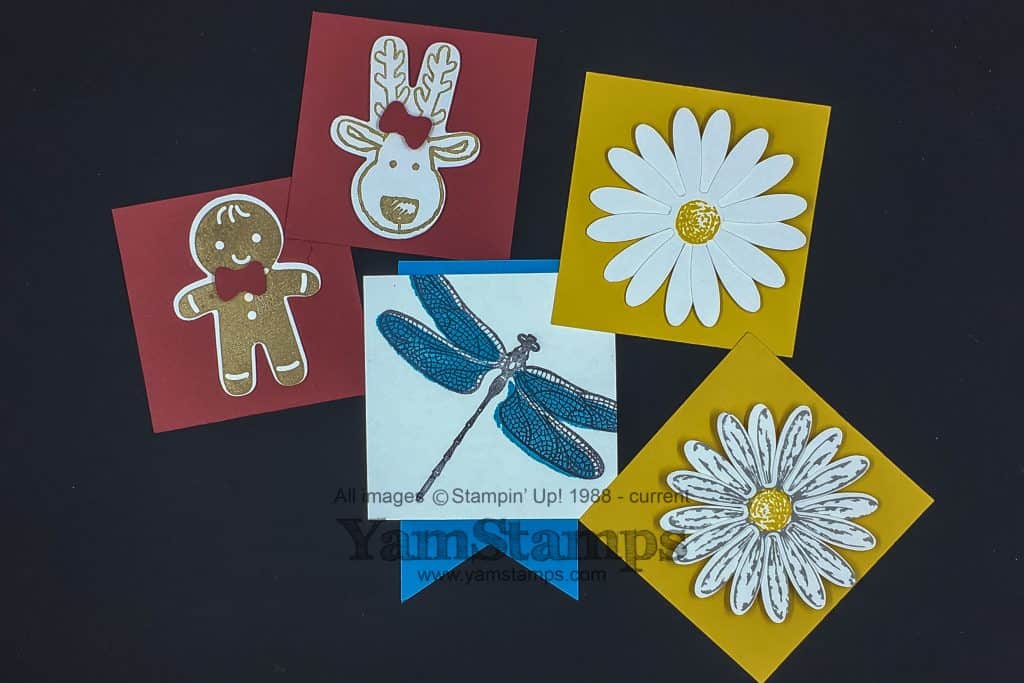
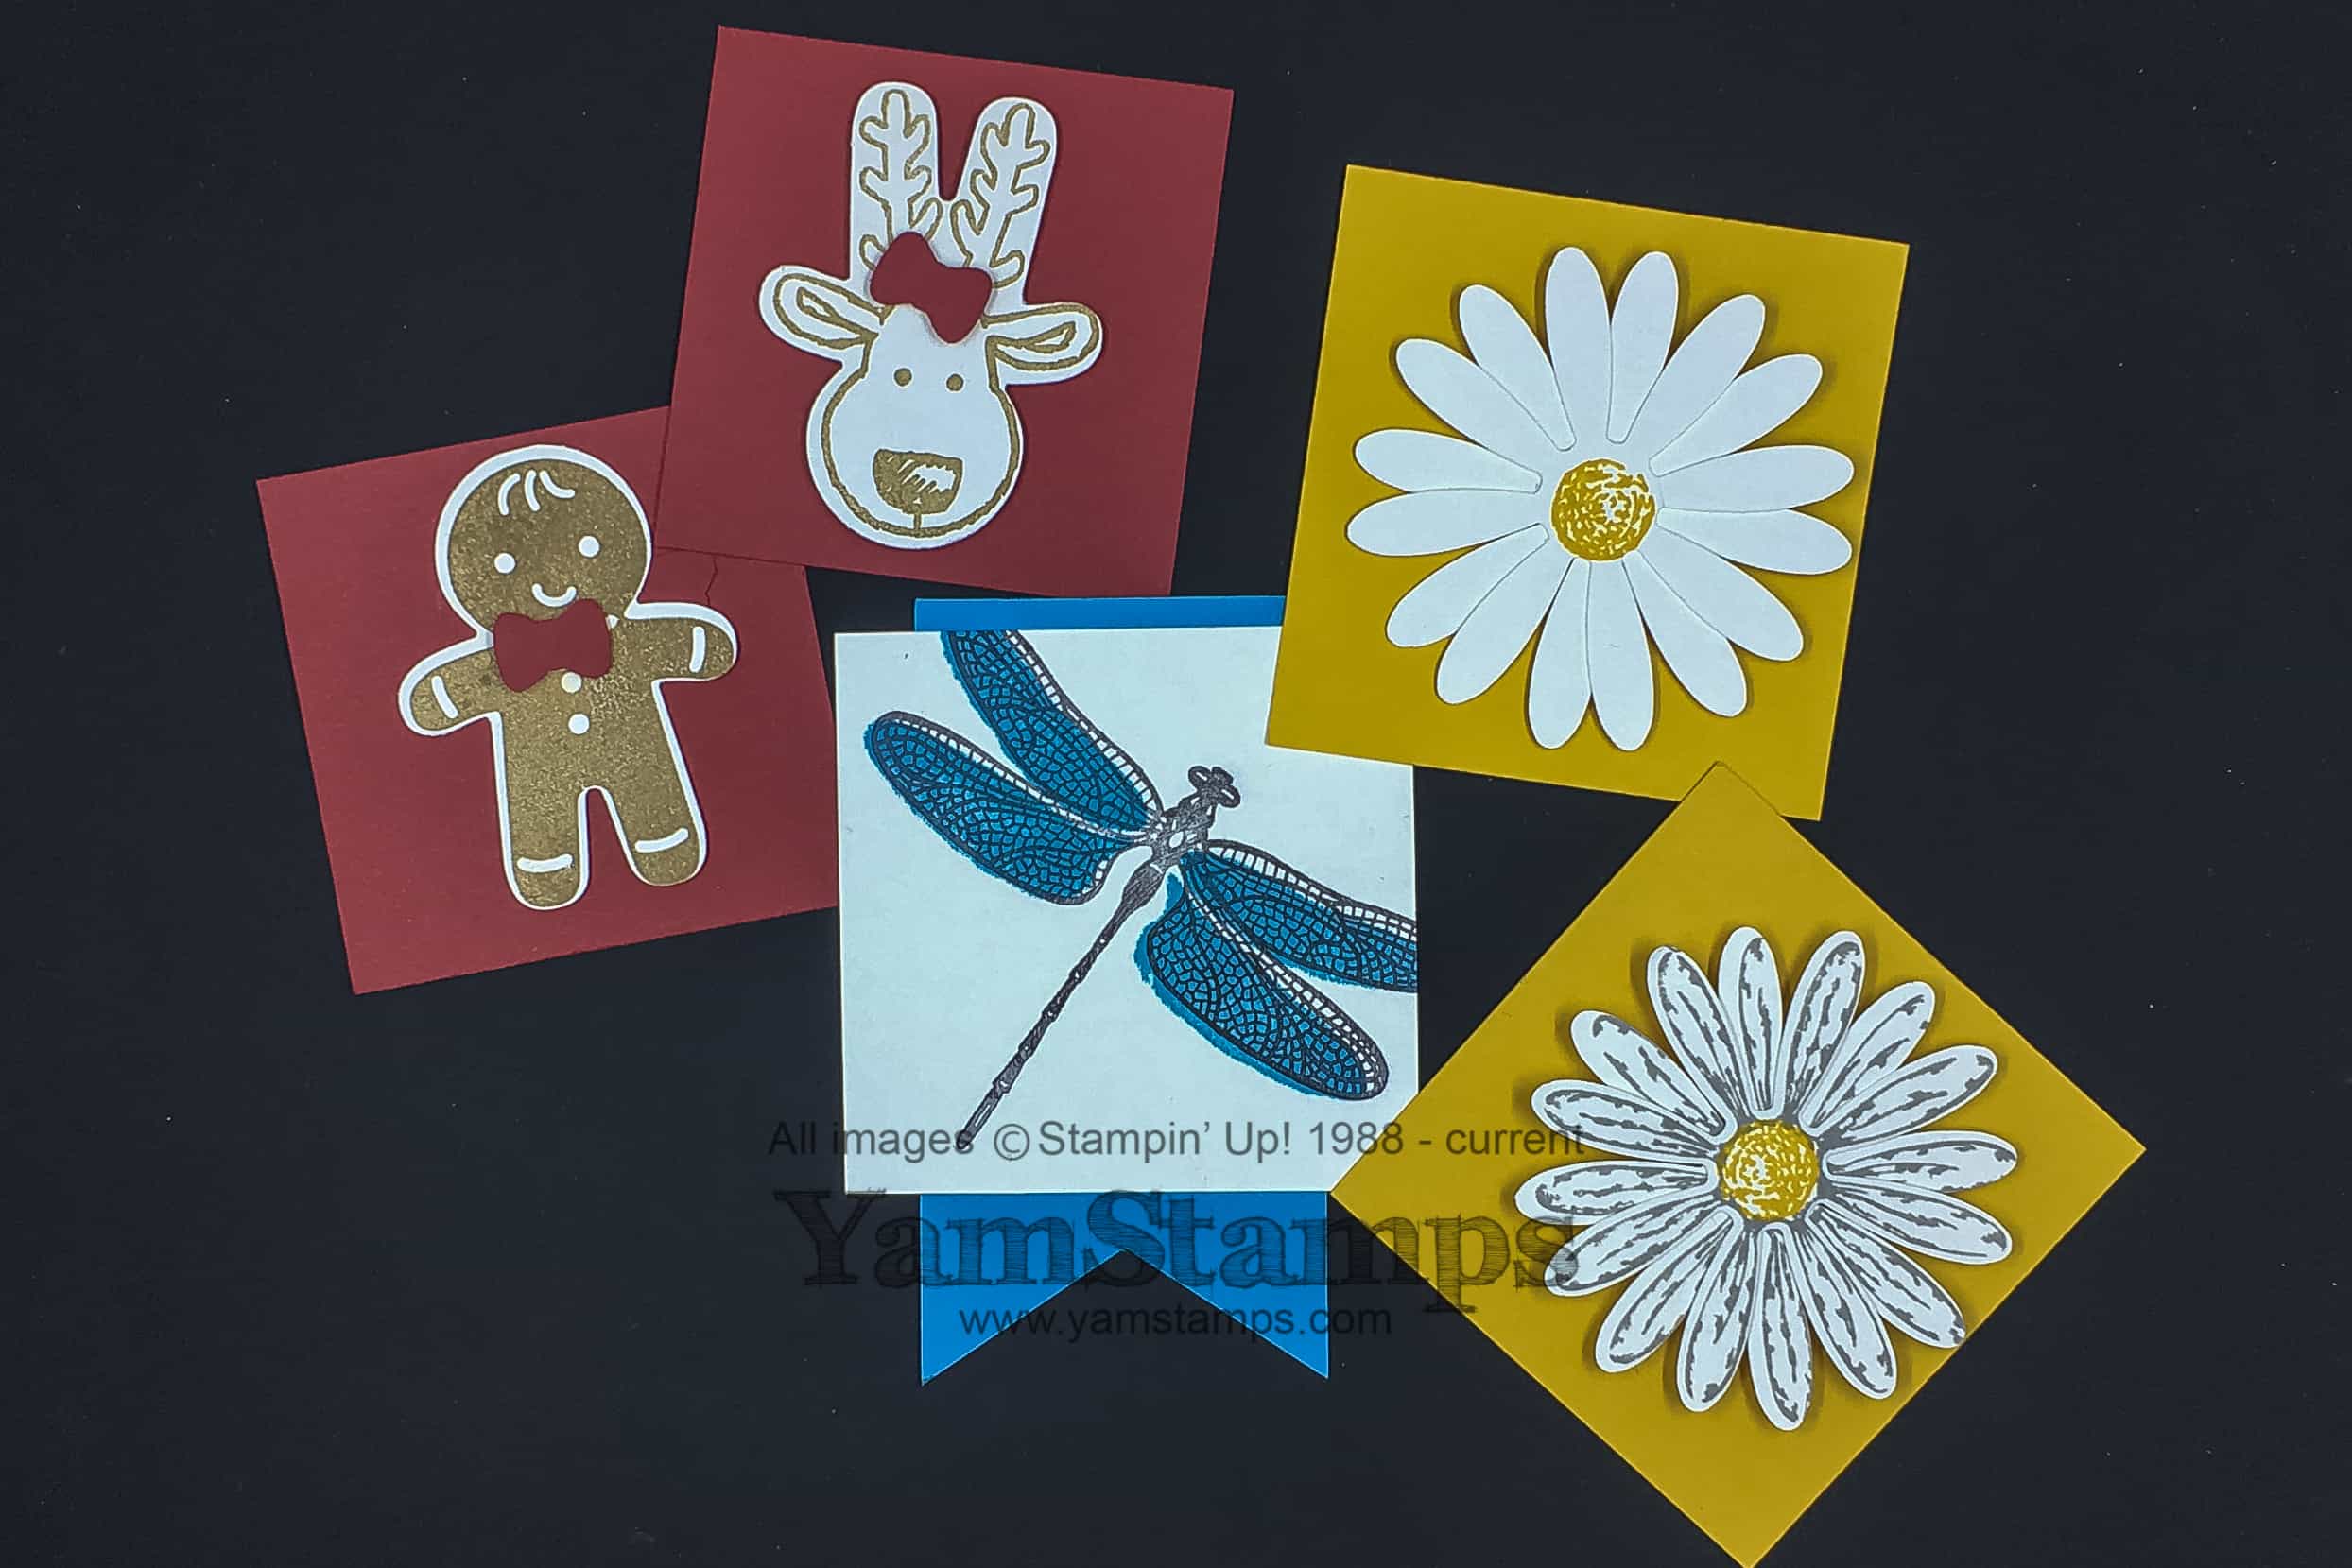
These are the various free make and takes we did over the three days. We did the dragonfly the first day (Dragonfly Dreams and Triple Banner Punch were the featured products), the gingerbread man/reindeer the second day (Cookie Cutter Christmas set and builder punch), and the Daisy the last day (Daisy Delight set and punch / discounted bundle). I wanted to have make and takes that were cute, but quick and easy – Scrapfest attendees tend to be set on cruising all the booths, sometimes in a limited amount of time, or en route to a special class, so it’s good to have something that’s not too much brainwork. (OK maybe that last part was just for me….). I figure that people can take their make and takes and use them as tags for gifts, or stick them onto a cardfront or scrapbook page. Or hang them on the fridge. Whatever works.

Here’s a selfie attempt – that’s Arlene on the left of the picture and Anne on the right. Arlene is the only one who seems to know where to look when taking a selfie….and yes, we did fix the sign so it hung better than that…. I hope to be able to be at the next Scrapfest event – it’s always fun to meet new people and catch up with customers and friends who are getting a little crafty shopping time too! To those who requested to be added to my mailing list – I’ve finished that job earlier today and you should have received something from me already – please let me know if you didn’t get an email and wanted to be on the list! To those who requested catalogues – I’m working on confirming mailing addresses and getting things organized for mail out.
In the meantime – tomorrow brings Week 5 of the Twelve Weeks of Christmas to subscribers’ inboxes, and Wednesday is the weekly email….so I’d better get busy!
Oct 23, 2017 | cards, Manic Monday, Stampin' Up!
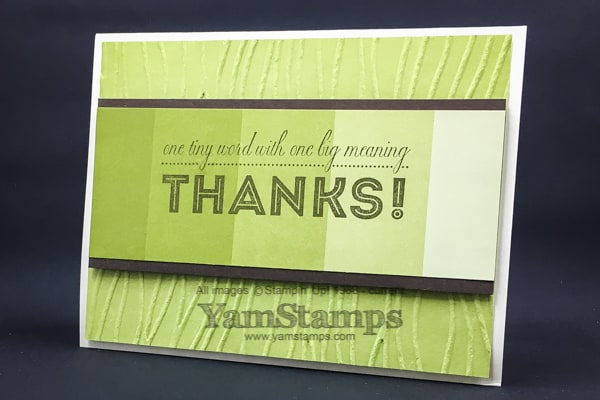
A quick and easy thank you card to share on a Manic Monday. One of the things I have been known to struggle with is sending cards. Not necessarily creating them, or writing them, or even mailing them, but actually keeping the flow going from step one to three! So I have to try to keep it as easy as possible for myself – hence this quick and easy thank you card! The less I have to do to get the card created, the less chance there is for me to get sidetracked along the way…..that’s the theory at least!!
The Colo(u)r Theory Designer Series Paper Stack makes this card stand out – without too much work. There’s a great choice of ombré patterned papers in different colours. You get four sheets of each of the double printed designs – and all the sheets are 6″ x 6″ so good for cardfronts! There are 48 sheets in all, so imagine how many of these quick and easy thank you cards you could make! This background cardstock is Old Olive, same colour as this particular sheet of Designer Series Paper, (no brain work involved in colour picking!), and embossed with the Seaside Embossing Folder. I aligned the ridges vertically so that they echoed the vertical lines of the ombré progression. The sentiment is from the One Big Meaning stamp set, available in wood mount or clear mount. It’s stamped in Early Espresso, which is also the cardstock behind the strip of Designer Series Paper.
A reminder that the Colo(u)r Theory Designer Series Paper is one of the papers included in the current Buy 3 Get 1 Free promotion! Until the end of the month on selected styles of Stampin’ Up! Designer Series Papers, you can buy three packages and get the fourth one for free! If you are entering the order yourself at the YamStamps Online Stampin’ Up! Canada store, you’ll want to enter the 3 most inexpensive papers FIRST (hint: Stacks), and have the most expensive paper (hint: Specialty Designer Series Paper) as the fourth one you enter, because that’s the one that will be free. And YES – you get to pick which one you get for free! So if you’ve had your eye on the Just Add Colo(u)r 12 x 12 Specialty Designer Series Paper, now is the time to grab it…because you could get it for free. Stampin’ Up! has new alcohol based markers coming soon (I’ll write more about them before you are able to purchase them on November 1st, don’t worry), so you can stock up on this colouring paper and be set to play with the new Stampin’ Blends!
If you’re attending the CreativFest / Scrapfest October 26 – 28, be sure to stop by my booth – I’ll have samples of all the selected Designer Series Papers that are part of the sale, so you can see them in person! (oh, and there may be a show special on orders….just saying…). See you soon!
Oct 18, 2017 | cards, Christmas, Stampin' Up!

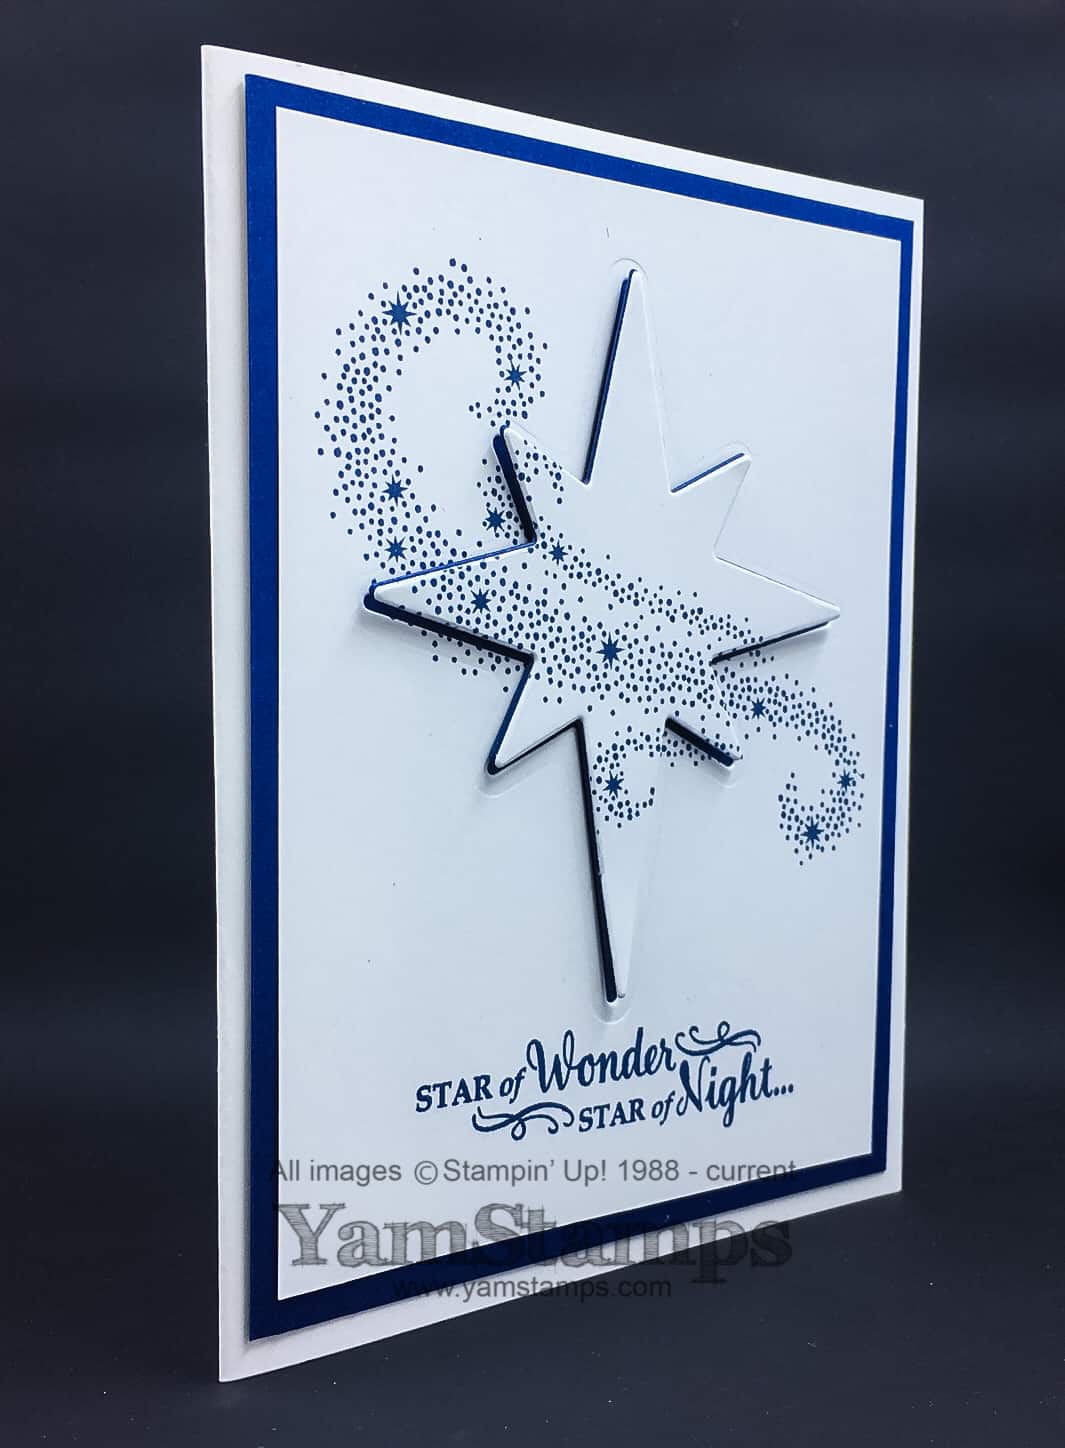
This is the card I teased a preview of on YamStamps social media accounts (well, at least the Facebook Page and Instagram…) earlier in the week. This Christmas Eclipse Card is super easy to make and super impressive! This card features the Star of Light stamp set and Starlight Framelit Dies. You may also notice one of my favourite colours on this card – Night of Navy. Blue and white – such a classic combination.
Essentially, with the Eclipse technique, you stamp the cardstock, and then die cut shapes from the stamped cardstock. The die cut cardstock is then backed with the same shape in a different coloured cardstock – in this case, Night of Navy, and when the project is assembled, the die cut piece is popped up. For this card, the backing layer is peeking out to act as a mat around the edges of the stamped cardstock. You can also do a version when the only evidence of the backing layer is underneath the die cut area (and behind the die cut). If you want to see more of the Eclipse Technique in action, I shared a scrapbook page that also used this technique in the October YamStamps Projects newsletter. New subscribers get a copy of the current month’s project newsletter, plus the weekly updates featuring a different, exclusive project, or highlighting a current special, news or FAQ. Click on the link to subscribe. You’ll also receive the next installment of the 12 Weeks of Christmas Projects while you’re at it!
I like this Christmas Eclipse Card so much….I think that I will have to use it in the November Monthly Card Class as well! First Wednesday of every month is the Monthly Card Class – 1pm or 7pm – so if you’re looking for a creative break, please consider joining me! Right now, the monthly classes continue to have a variety of cards of different occasion, but they will include a holiday card as well. Contact me to register or if you have any questions.
Also a reminder if you’re in the Toronto area – look for the YamStamps booth at Scrapfest @ CreativFest next week! I’ll have a few show specials, plus the chance to do a make and take AND a free draw for a Big Shot!!
You may notice that the YamStamps site has a new look – what do you think?
Oct 14, 2017 | cards
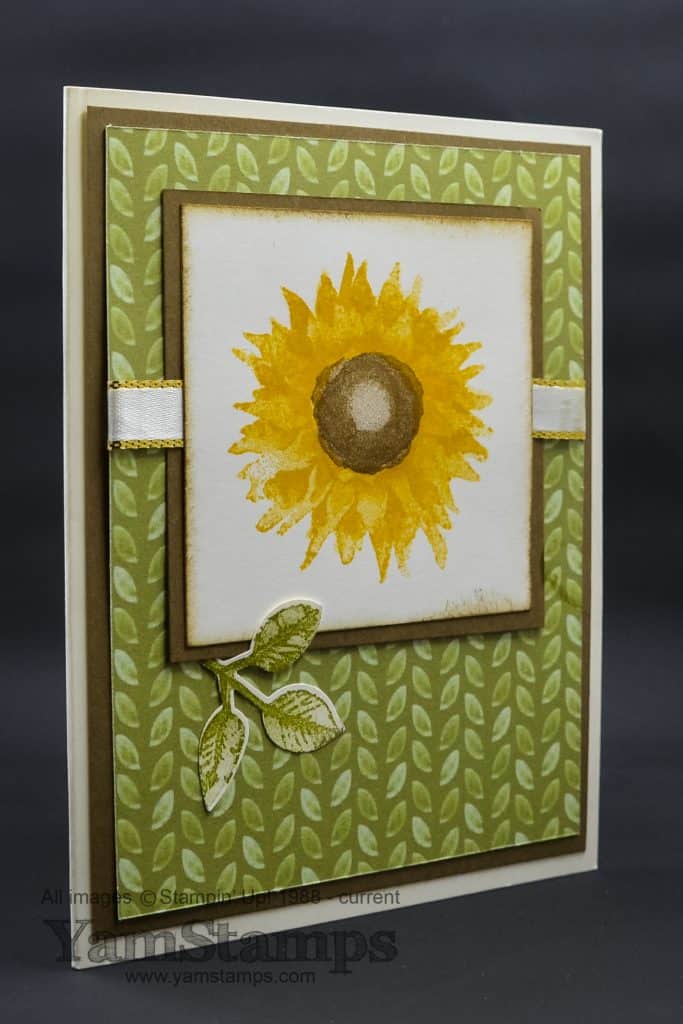
I love the Delightful Daisy Designer Series Paper – I think it’s one of my favourites in the current Stampin’ Up! Annual Catalogue. It’s not just for daisy projects! Check out this versatile designer series paper Sunflower Card! Since one of the patterns in this paper package has a leaf motif, it could be used with any botanical (or not) themed image.
The main image on this card is from the Painted Harvest stamp set and I added an accent with the Leaf Punch that coordinates with the leaf images in the set. You can get these two items together in a discounted bundle as well! These images have a softer, more watercoloured look, which I love. Two step stamping, combining more than one stamped image to make a single, more complex image, is what initially drew me to Stampin’ Up! products, and it’s still one of my favourite things! Here, the petals are two layers, as is the leaf. I love that I can get such an artistic, detailed look so easily.
The edges of the cardstock are sponged with some Early Espresso ink, and Gold Metallic Edged Ribbon finishes everything off. When we did this card in class, I did cut out the backing square for the flowers from the larger Early Espresso cardstock – because I don’t like to waste cardstock!
Stampers Club members have found that I’ve used this Designer Series Paper a number of times in different months for various projects. If you have a sharp eye, you might have caught a few other instances of it in projects I’ve shared here on the YamStamps blog….and trust me, there are more to come!! What’s your favourite Designer Series Paper so far this year? Don’t forget to stock up right now – selected Designer Series Paper is on sale – Buy 3, get 1 free during October! I did try to stretch my wings and pick up some DIFFERENT Designer Series Papers to use…..but I think because I like the colours in the Delightful Daisy package, I keep going back to it. I will try to work on that though….LOL. In the meantime, please continue to enjoy this versatile Designer Series Paper Sunflower Card….until I can work up the creative mojo to use a different package of paper!
If you’d like to work on building up your stash of paper/supplies and cards, and are close to Burlington ON, please consider joining the Stampers Club! Stampers Club members can start at any time for a period of 6 months. Members commit to a minimum purchase each month at their exclusive club card class, and will receive Stampin’ Rewards (minimum $20 free product of their choice) during their 6 month membership period. We currently meet the 3rd Monday of each month, either at 1pm or 7pm. Contact me for more details!