Sending out belated valentines….
I'm sending out a valentine to everyone on my email newsletter list around 1pm today, so be sure to check your inbox. (click on the blue words to register if you haven't already!)
I'm sending out a valentine to everyone on my email newsletter list around 1pm today, so be sure to check your inbox. (click on the blue words to register if you haven't already!)
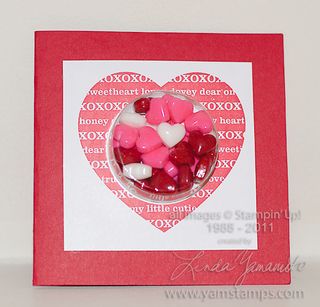
 Happy Valentine's Day! Today's Sweet Treat uses a Sweet Treat cup! I found these great candy hearts, so featured them in the see through Treat Cup. I used the heart image from the Sweet Centers set, and punched out the centre of the heart with the 1-3/4" circle punch so I could insert the filled Sweet Treat Cup.
I hope these Sweet Treats have helped you ramp up your presentation! These easy to come by treats are made so much more impressive when you put just a bit of time & effort into the packaging – and the recipient will definitely notice!!!
Last call for registrations for the Birthday Class this Wednesday – remember, as always, if you are unable to attend a scheduled class, consider getting a group of friends together, and I'll come to you!!
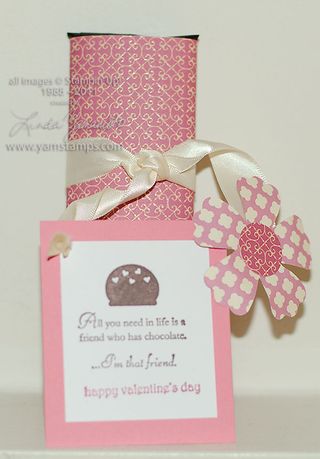
 Today's take on a sweet treat for Valentine's Day is a chocolate bar wrapper and tag. I used the Sweet & Sour Specialty Designer Series Paper to wrap around the chocolate bar and in the Big Shot with the Fun Flowers Bigz die for the flower & centre.
The tag uses an image and sentiment from the set Eat Chocolate and I added the "Happy Valentine's Day" sentiment from the Teeny Tiny Wishes set.
Please give me your feedback – I've linked the items to my online store so that you can see the images of the sets/dies – is this something you'd like to see in future posts??? Please either leave a comment below (please note that I've had to moderate comments so it won't appear right away), or send me a quick email. Thanks in advance for your input!!
 Over the next few days, I'll be sharing some quick and easy sweet treats to share with your Valentine!
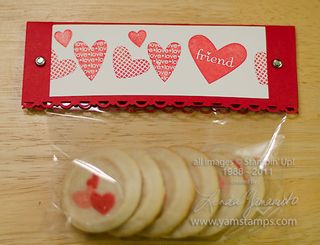
It's all about presentation – these "homemade" cookies (the kind you pick up and put onto a sheet & bake – you don't even have to slice them anymore!!!) are dressed up even more with this bag topper. I took one of the medium sized cello bags, and topped with Real Red cardstock. I added images from I {Heart} Hearts set onto Whisper White cardstock, used the Scallop Trim Border punch along the edge and added some Clear Rhinestone Brads for effect and used sticky strip to seal the bag shut and secure the topper. That's it! Easy peasy and a wonderful way to present your efforts.
On a side note, a sweet class is coming soon – the birthday themed class is THIS Wednesday, so if you're interested, please visit my classes and events page and click to register. Contact me if you have any questions, or wish to pay by cash/cheque.
Stampin' Up! has heard my anguish LOL…. Click HERE to access the My Digital Studio pdf catalogue (you'll need Adobe Reader) – a visual directory of all the available My Digital Studio images and downloads! An easy way to see all that's available for your digital crafting in one spot *phew*
I used My Digital Studio software to create the image for my travel cup liner that I showed on CH Morning Live the other morning – pictured below – also see the video from a couple of days ago if you missed it! (My grandmother marvels that I somehow manage to get a picture of my son on the air despite having only a few minutes each time! LOL).
The mug features the Spring Shades Designer Series Paper download, and Basic Pearls & Rhinestones. I used the full heart digital punch to create the pale heart accents. The gratitude sentiment is from the Design Your Life digitial brush set. This took me very little time to design (including the download of the rhinestones!). So easy, you could change it out for each week if you really wanted!!
Please feel free to contact me if you have any questions about digital crafting with My Digital Studio.