Here’s a cute project to celebrate someone who’s going places! Plus more of my Japan trip photos!
Know someone who is going places? Could be a trip somewhere, or could be a new life adventure….here’s a cute project to celebrate! It uses the On the Go Suite products – which I LOVE!
Speaking of going places, I did promise more pictures of my trip, which now feels like a lifetime ago….but here’s some photos from our time in Tokyo!
I called this the Ghibli clock, but more accurately, it’s the NTV clock designed by Hayao Miyazaki. At different times during the day, there’s a show where the clock comes to life! This was on my list of “things I want to try to see in Japan” and it was actually quite close to our hotel, so my mother and I wandered over one day to see it! (I think Dylan & Denisse were shopping at Uniqlo at the time LOL).
We visited Sensoji Temple – definitely one of the more crowded areas! Once we made it to the main hall, it was a little less congested.
A few sights from around the grounds of the temple – koi fish and yes, flowers on the trees, in JANUARY. Just at the very top, but still – January!!
So exciting to attend one day of the Tokyo Sumo Tournament!!! Nothing says “I am in Japan” like watching sumo wrestlers! We grabbed a bento box and sat and ate (in the cheap seats way up high), and watched the tournament. We were very excited that there was a wrestler called “Ichiyamamoto” so of course we had to cheer for him (he’s not in this picture though).
Last but not least, one of my stationery purchases from Tokyo – so cute! If you have watched the Ghibli films My Neighbour Totoro or Spirited Away, you’ll recognize these soot sprites or kurosuke. These are little erasers!!
If you are going places, like travelling to Japan, I got these erasers at the NTV store on the ground floor of where the clock is located.
I plan on using some of the On the Go Suite for scrapbooking some photos from our trip! Stay tuned for those pages (but don’t hold your breath, because you can see how long it’s taking me to go through and pick out/edit photos!!).
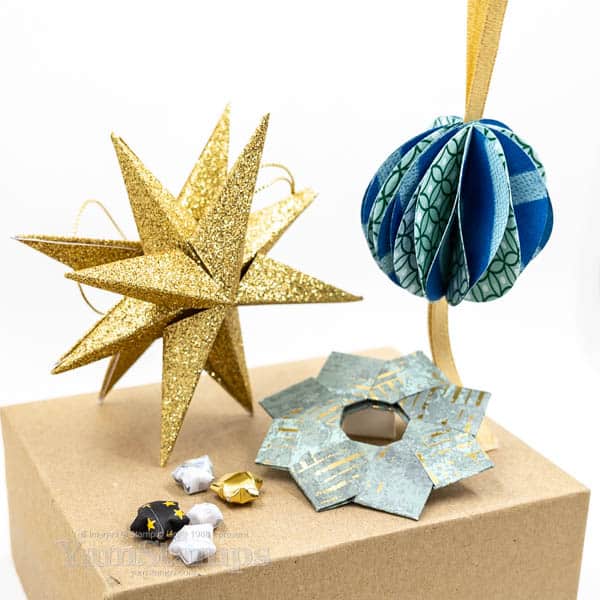
Festive Paper Folds teaches you how to create AMAZING decorations!
My next online class, Festive Paper Folds, launches on Thursday, 8 December – but if you register during the pre-launch (aka NOW) you’ll save $10 on the regular class price of $30! Pay just $20 for lifetime access to the videos and instructions.
Festive Paper Folds Online Class
I’ll show you how to make little puffy stars, a 3D multipointed star, an easy circular ornament and a folded wreath. These fun projects require your base material (cardstock, Designer Series Paper, vellum etc), a Paper Trimmer/Scorer, Bone Folder and only two of these projects require any adhesive at all!!
This class comes just in time to get a little holiday crafting done! Or you could watch the videos and make the projects over your Christmas holidays. Since you have lifetime access, you can refer to them next year if you like, or the year after that – but the Early Bird/Pre-Launch pricing only comes once – and that’s right now. CLICK HERE to get more information and register for $20CAD now! Once class launches on Thursday 8 December 2022, the regular price of $30CAD will be in effect. (Still a good deal, but who doesn’t like to save a little more money?!). If you have any questions, feel free to contact me.
Happy New Year! I’ve been enjoying some time off work and enjoying spending some time with my son who is home from university (at least for a little while longer). I thought this stand up triangle card would be a fun one to share on the blog to help celebrate a new year.
Stand Up Triangle Card
This is a card we did in December’s Stampers Club – as I’ve mentioned, we are currently meeting online rather than in person, so our projects are usually more focused on die cuts and punch outs rather than stamping itself because of the fact club members don’t all have the same stamps or inks at home (and my brain can only manage so much LOL). I precut supplies for the projects, and then we work on finishing them together online (or some of us finish them and others watch and then complete them in their own time later, using the video that is stored on the membership site). The videos also tend to be a good guide for members who want to recreate the projects later with different supplies.
The stand up triangle card is actually easier to create than it looks! It’s three squares combined so that they can be assembled to stand up but also ships flat in a regular medium Stampin’ Up! envelope. The only trick is getting the card to stay together. My sample used magnets to hold the flaps together – which worked for the sample but I think it also depends on how strong the magnets are – I think if you have weaker magnets you either need a bigger piece of them (I still have to check that theory though). We used cut up pieces of promotional magnets but I believe not all promotional magnets are created equal…
I was also proud of this card because it features Mango Melody, which is not a frequently used colour in my repertoire for paper crafts. I picked it from the Artistry Blooms Designer Series Paper sheet that I used as the accent piece. I die cut some stars and the swirly star piece from the Stitched Stars dies which I think make this a great card for a celebration.
I was so happy to connect with some friends and family over the last month, though it was definitely different than in previous years. I hope that you were able to do the same! Thank you for stopping by and connecting with me here. I look forward to bringing you more creative ideas and inspiration over the year (and years to come!).
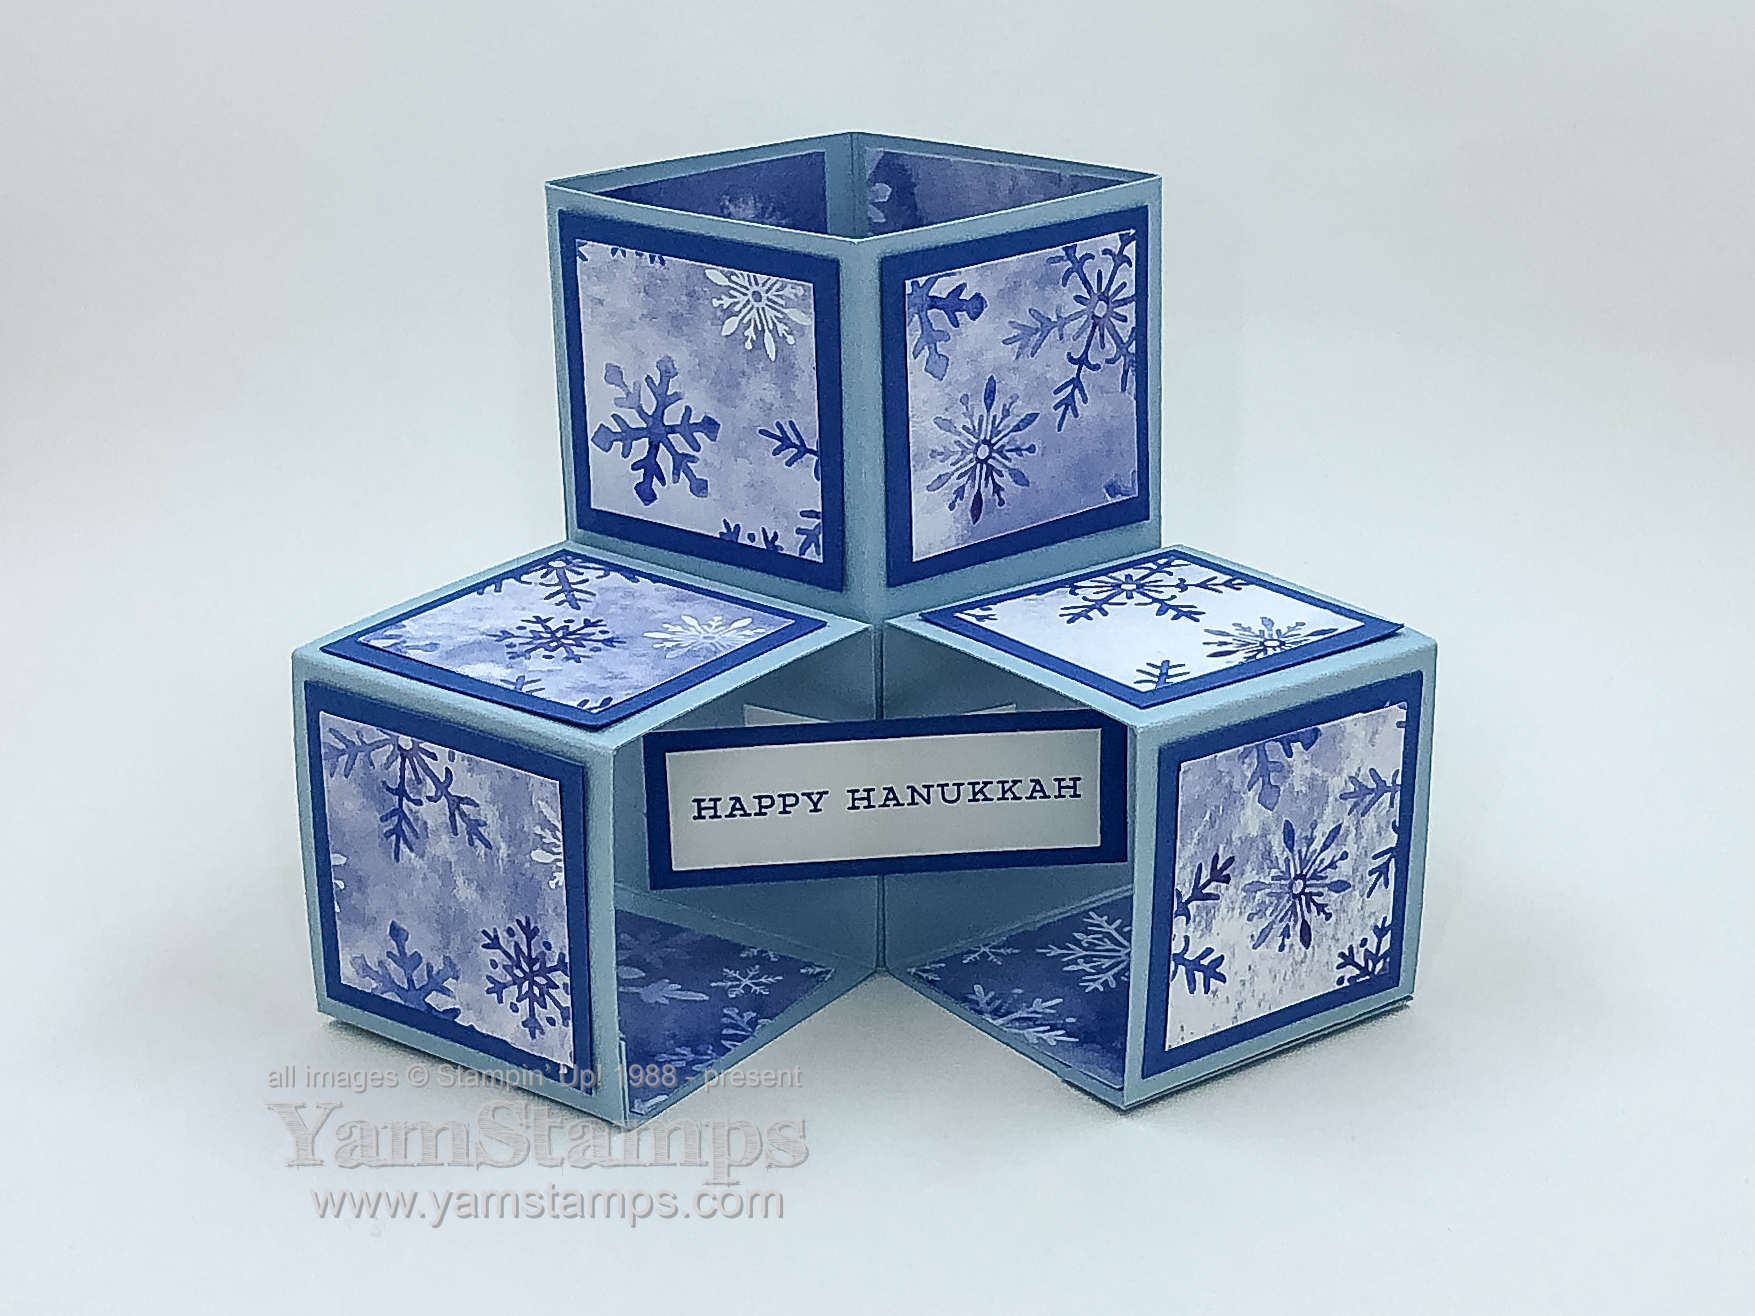
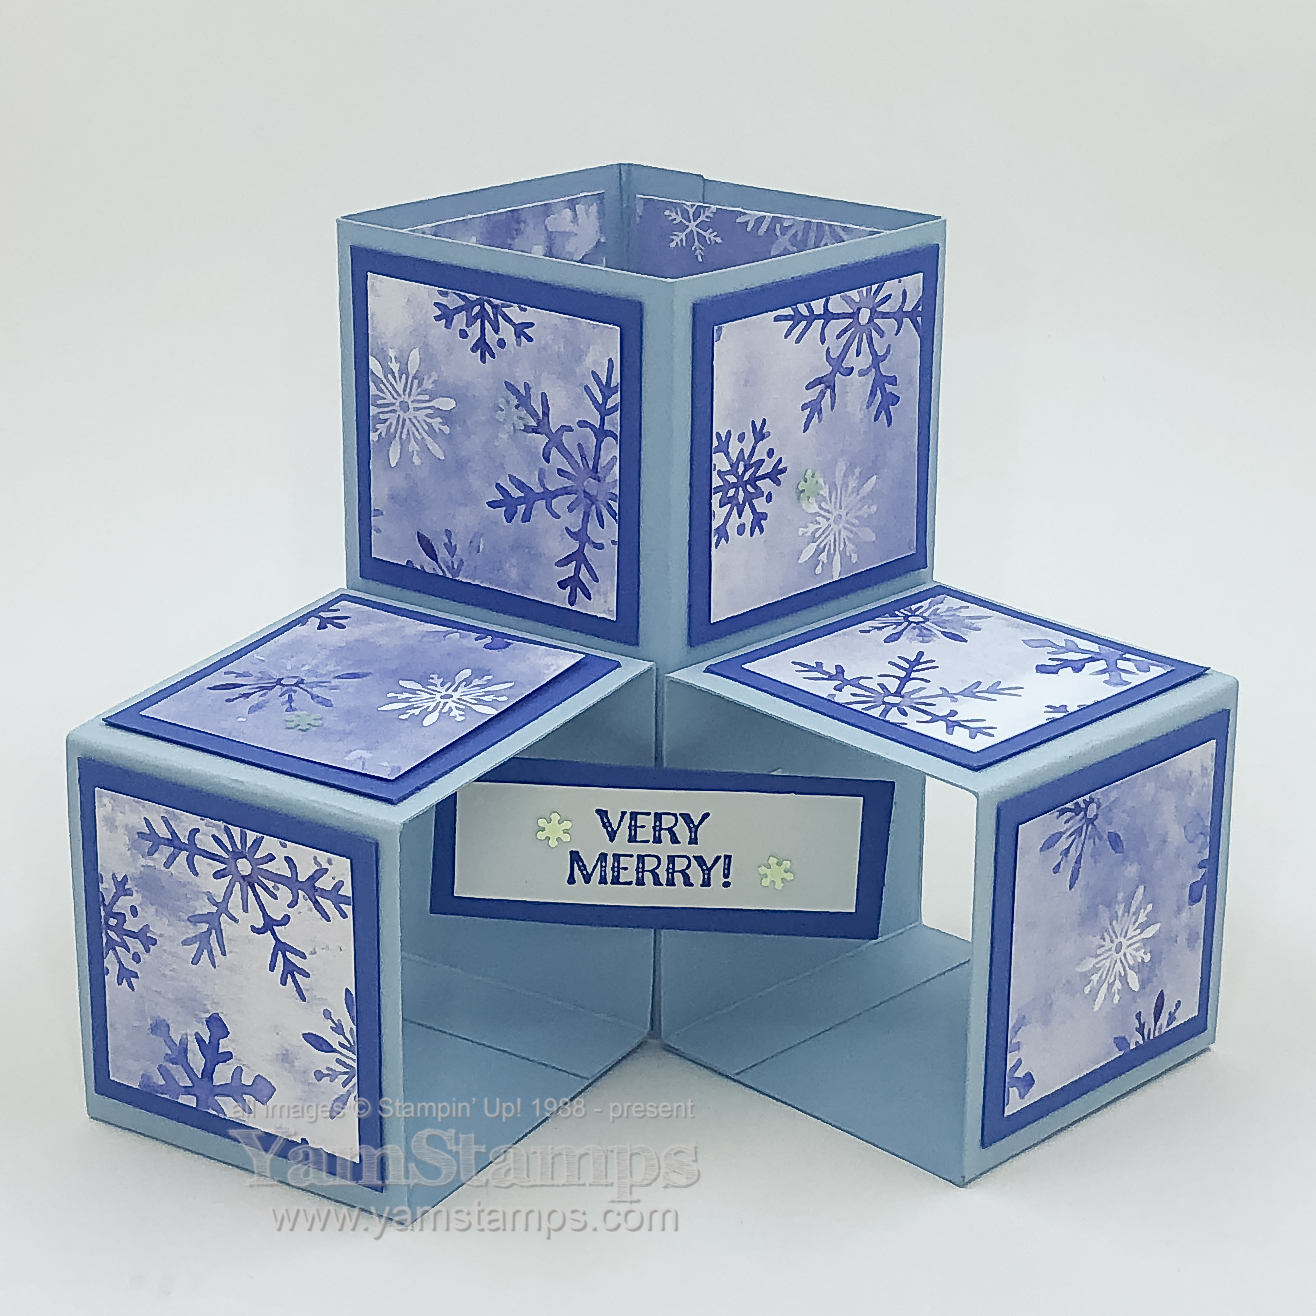
Sharing a version of a triple cube card that we made in Stampers Club and Card Class to Go. This is a fun 3D pattern, and once you’ve made one, it’s pretty straightforward (really!). I used this sentiment from the Snowflake Wishes stamp set to create a Hanukkah Card.
Hanukkah Card
The lovely thing about this design is that if you fold/flatten the bottom cubes upward, the card will fit in a medium Stampin’ Up! envelope for easy mailing! If you were at Stampers Club, you will remember that it had to be pointed out to me… LOL. I thought I’d messed it up because it didn’t fit in the card, but I was flattening the bottom boxes down vs up – so that the flat card was 6″ long rather than 4″….*sigh* If you’ve been around the Stampin’ Up! / cardmaking world for a while, this is a variation on the “2-4-6-8″ box design (your cardstock is scored at 2” increments, then folded to create a box/cube).
Here’s one where you just change out the sentiment…
I love the Snowflake Splendo(u)r Designer Series Paper that’s decorating this card, and it’s part of the Year End Closeout Sale – so it’s on sale until the end of the August-December Catalogue sales period (January 4) or while supplies last – whichever comes first.
So probably the only thing I’d change on this Hanukkah Card is the placement of the Designer Series Paper in the bottom boxes. I put it on the bottom portion – but next time I would put it on the “back” portion, to cover the little “legs” that hold the sentiment in the centre. The things you notice when you go to take photos of your projects…LOL. (Either that or next time I take the photo from a different angle…).
As well as the Year End Closeout Sale, the Clearance Rack has been refreshed – so there’s plenty of bargains to be had right now. I noticed that there are some individual Stampin’ Blends Markers up for grabs – because they’re currently only sold in pairs – so if you need a replacement or really like a certain colour you should get it while supplies last! As always, please contact me if you have any questions, or need assistance placing an order. Sometimes technology does not play nicely – believe me, I know – so if you’re having issues trying to complete an order at YamStamps.com/shop , please contact me. I can often enter orders from the “back end” of the Stampin’ Up! system for you, and still have it shipped directly to your door.
In the meantime – stay warm, happy shopping and Happy Hanukkah!
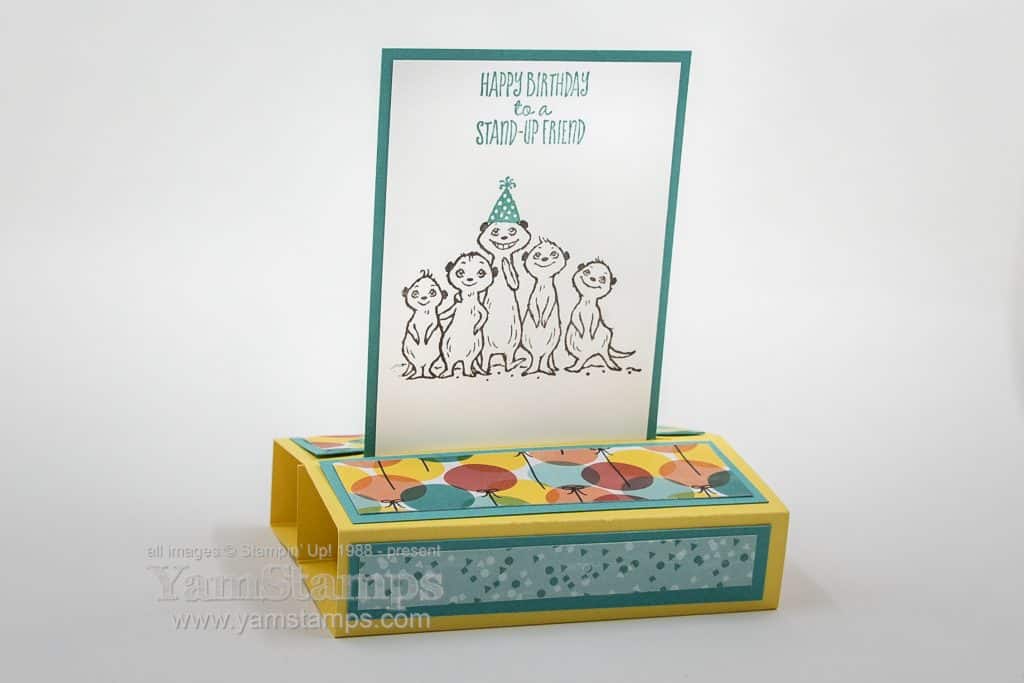
Love these meerkats – because we all need a reason to smile these days! I thought it was appropriate to make a stand alone pop up card for this card/sentiment…
Get it….stand up friend….stand up card? (The social distancing is obviously getting to me a bit more than I thought). Anyway….this card features the Sale-a-Bration Level 1 reward stamp set The Gang’s All Meer and the suuuper cute Birthday Bonanza Designer Series Paper from the Jan-June Mini Catalogue. This is one of those papers that it’s hard to pick a favourite side – since these papers are double sided. While the patterns are really functional for all sorts of cards, you are inevitably hiding a cute design on the other side (in this case I think we hid some koalas….).
I am planning on doing a facebook live for this card tomorrow (Thursday), I’ll do it on the YamStamps Facebook Page, so please “like” and “follow” the page to get notified when I go live. (Please note how close I am to a nice round number of “likes”, not that numbers are all I care about and all that it’s about, but come on). At this point I’m thinking late morning, depends on how my day is going. You know, jobs to avoid doing, dust bunnies to step around…I am actually amazed at how little I can truly get accomplished in one day, even when I’m not leaving the house – though I justify it by saying that I am on vacation (which I am)….but still. I’ll probably get a huge burst of initiative and inspiration on Sunday! LOL.
Anyway, I’ll show the construction of this card, and then I will post an instruction file in the Paper Crafting with YamStamps Facebook Group, (if you’re not a member, click on the link and request to join). Just a heads up if you want to craft along with me – You’ll need 4.5″ x 11″ piece of cardstock, plus a 3″ x 4.5″ and 2.75″ x 4.25″ (those last two measurements are off the top of my head right now, hoping I got it correct…I guess we’ll find out tomorrow). I hope that you can join me for a break in your day and make this stand alone pop up card with me live! See you then!
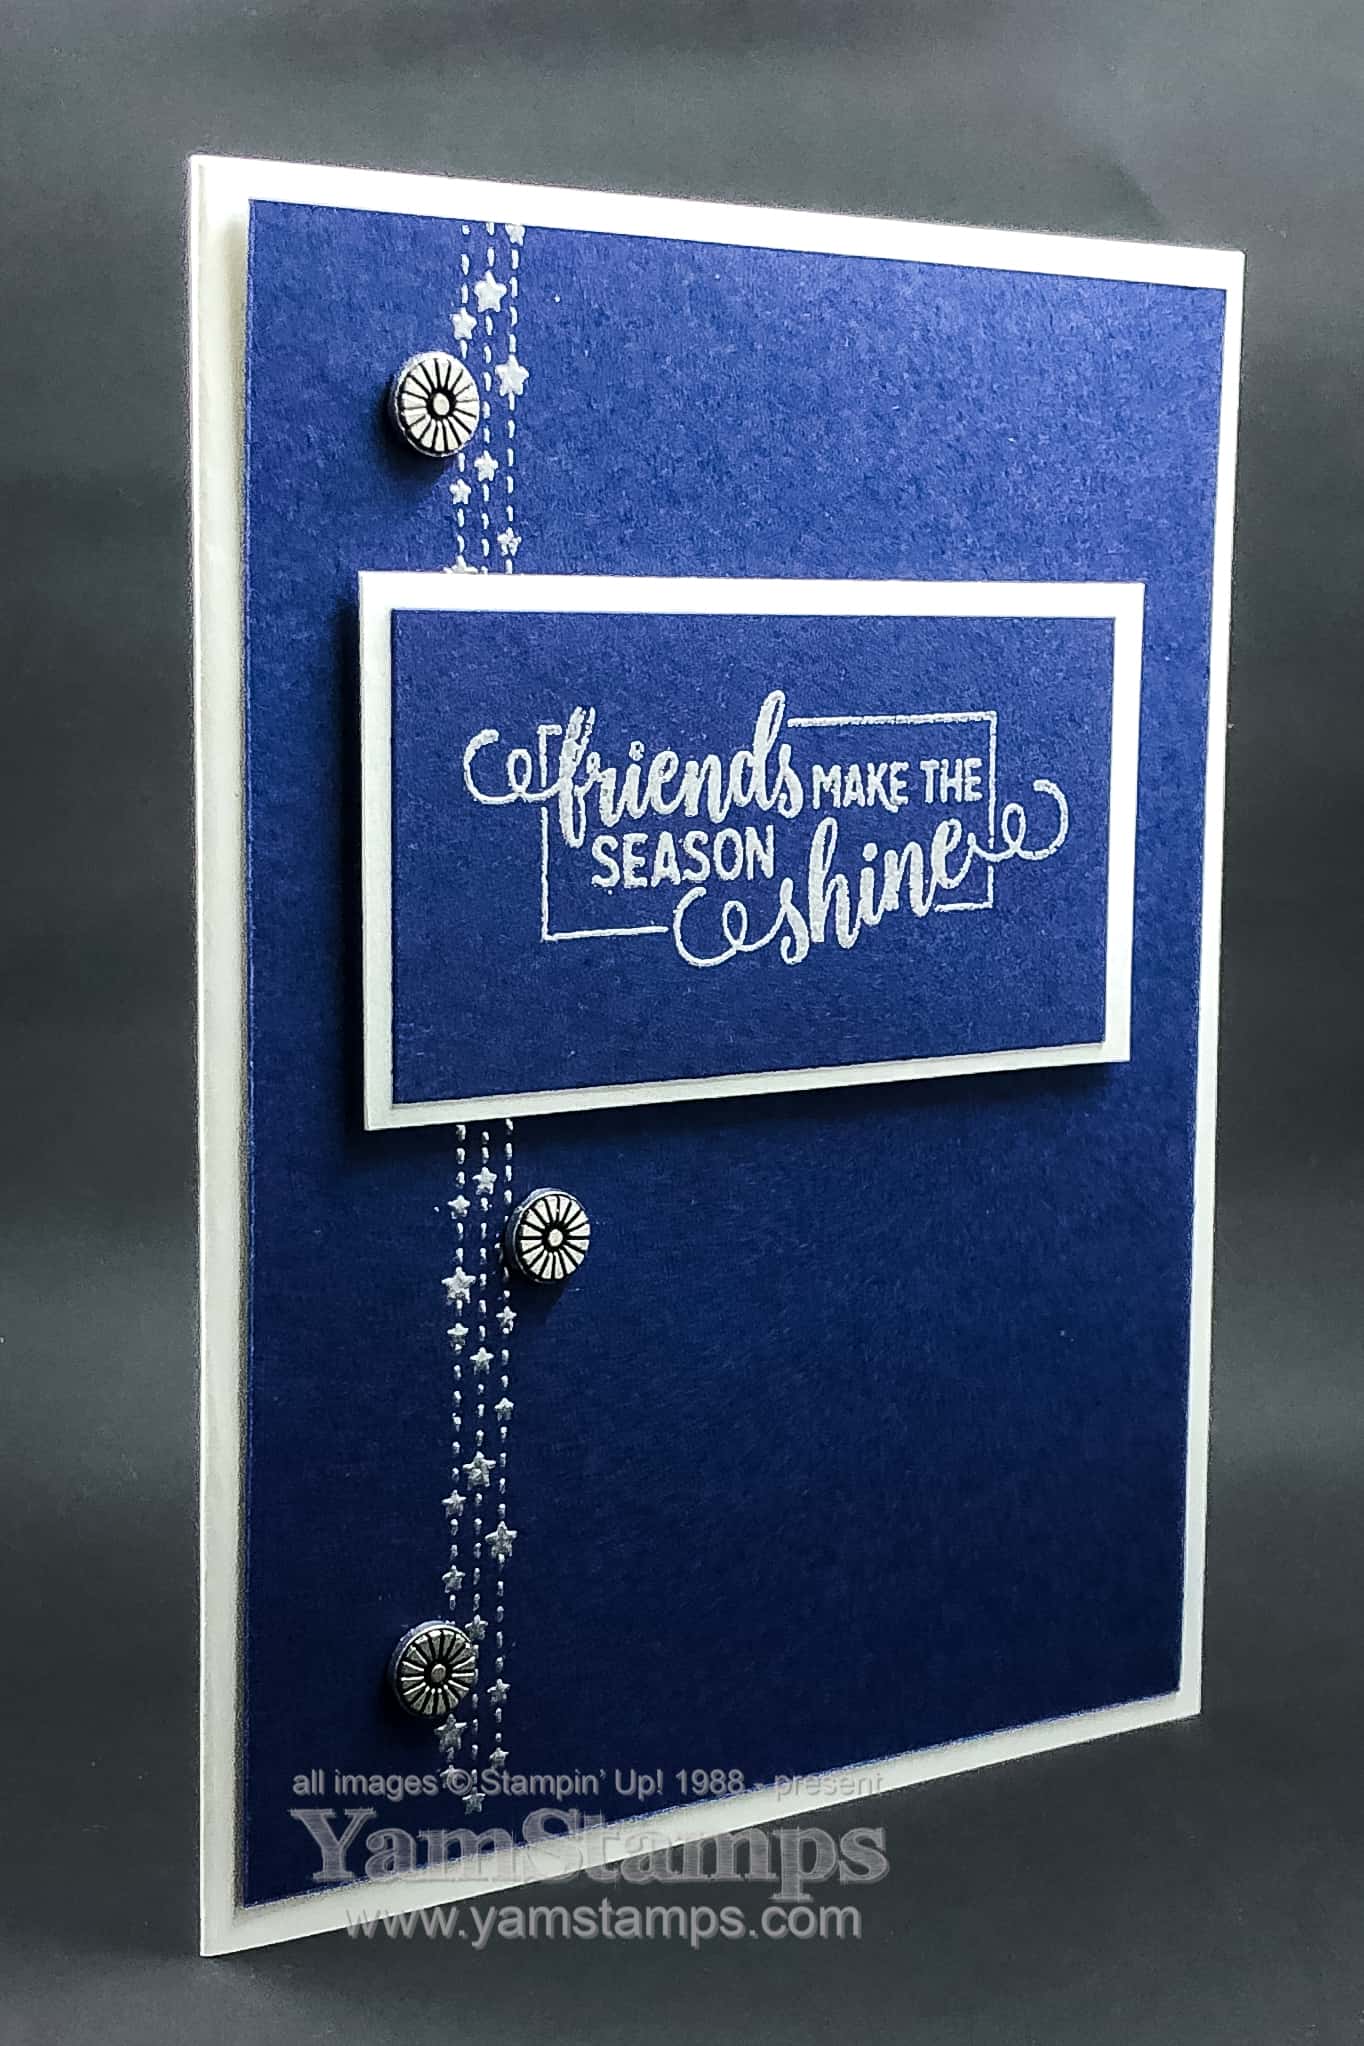
I used my favourite colour combination for this blue and silver holiday card! Plus it has some teeny stars on it – so an all around favourite for me I think. This is from the August Christmas Card Class – and I liked it so much, I included a variation of it for my regular September class too!
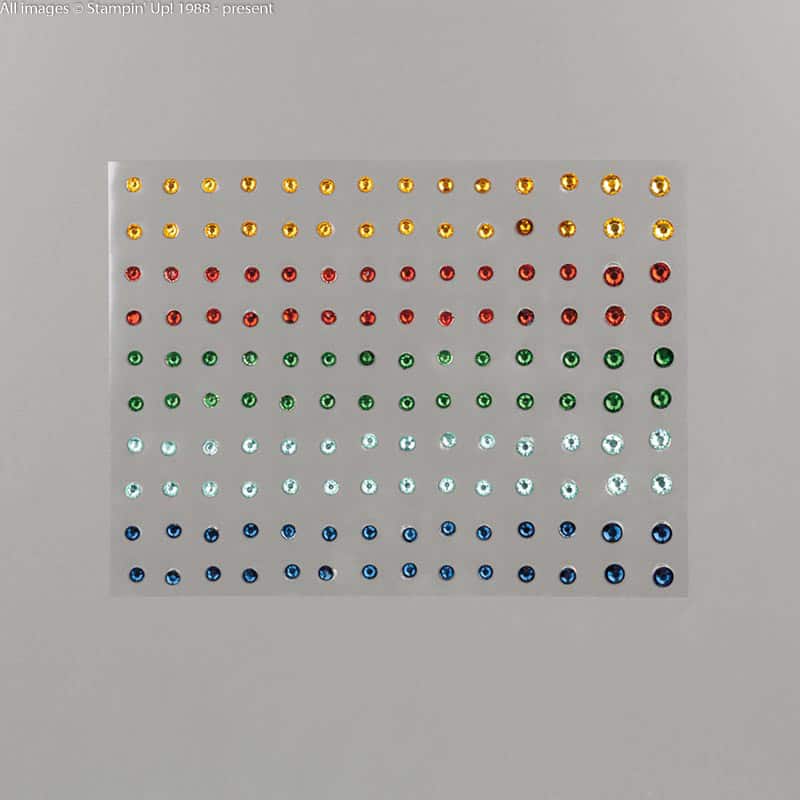
My Christmas Card Classes include product – and it’s typically a package of embellishments that we use on our cards and then class members take the remainder of their packages home to use for other projects. In August, I was only working out of the Annual Catalogue, since the Holiday Catalogue wasn’t available for customer orders yet! We used the Designer Elements in that class, and then used Clear Faceted Gems this month.
By the way – If you like bling, you’ll want to register for the October Christmas Card Class – we’ll be using the Holiday Rhinestone Basic Jewels!
This blue and silver holiday card could be used for Christmas, Hanukkah or New Years, don’t you think? The sentiment and dangling stars are from the Making Christmas Bright stamp set (the one with the Christmas bulbs!). The variety of stamps in the set means you can come up with a variety of “looks” from one stamp set. To extend the dangling stars, we used the Stamparatus to make sure the images were perfectly in line, and then stamped them twice – the sentiment hides the gap. I didn’t mind the lines running off the top of the card, but I wanted the finished effect at the bottom. (which I now realize you can’t really see well for the watermaking on the photo. Sorry!).
he image and sentiment were stamped in Versamark and then heat embossed with the Silver Embossing Powder. Heat embossing is always a winner for holiday cards in my opinion! The card is Smoky Slate, which I find really compliments any silver accents, without drawing attention away from them.
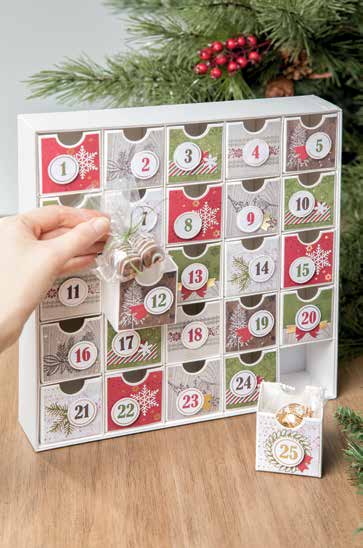
Hard to believe, but I’ve only got two more scheduled Christmas Card Classes this year! You have two more chances to make some beautiful handmade cards to give to the special people on your card list. Plus there’s an Advent Calendar Class too! Wednesday, November 13th – 1pm or 7pm – you can come to class, pick up your Christmas Countdown kit and use my stamps and ink to complete the project!
The class fee of $55 covers the kit (plus shipping/taxes) and the use of my adhesives/ink/stamps to complete the kit as per the instructions. You can contact me to register, or use the PayPal link on the YamStamps Events page. Registration & payment required by October 30th, or additional fees may apply in order to ensure that your kit will arrive in time for class.
Check out an alternative use for the kit that I shared here on the YamStamps Facebook Page! BONUS – you don’t have to use the kit for one or the other! The boxes have notches on two sides, so I’m thinking that after the Christmas season is over, I’ll flip the boxes around and use them for something else! What would you use them for?
Oh – and for my next Christmas Card share, I promise to try to show something OTHER than a blue and silver holiday card. No promises about the card AFTER that one though. hahaha!