
I made this watercolour world map card more colourful by using a tried and true technique!
When you want your cards to be even more special than usual, pull out some old favourite techniques like I did on this watercolour world map card! The name of the stamp set I used is Watercolor World, but since I’m in Canada, I reserve the right to add in the “U”.
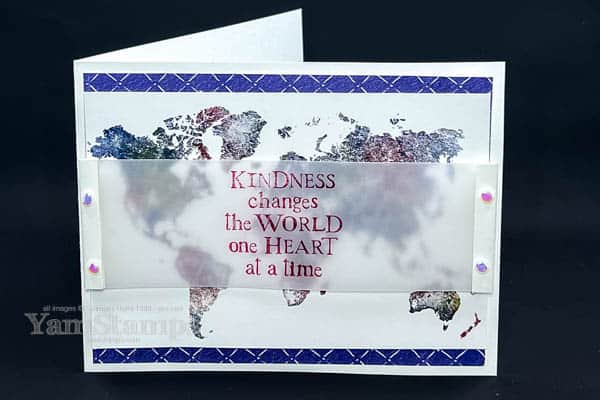
Watercolo(u)r World is a single stamp, so I guess I shouldn’t call it a set! The stamp itself has an irregular texture to it so it has the look of a watercoloured image without you having to do anything. I made it more watercolour-ish by using the “Baby Wipe” technique – or in my case, the “Make up Remover Wipe” technique since I didn’t have any baby wipes on hand.
Essentially, you just want a wet wipe that doesn’t have anything too harsh in it – so no bleach, alcohol etc!! Just add a few drops of reinker to the surface, then use that as your ink pad! For this watercolour world map card, I blotted the stamp on the inked wipe a number of times, moving it around, since it’s a fairly large stamp. This blended the inks a bit more, so you’ll want to watch what colours you choose.
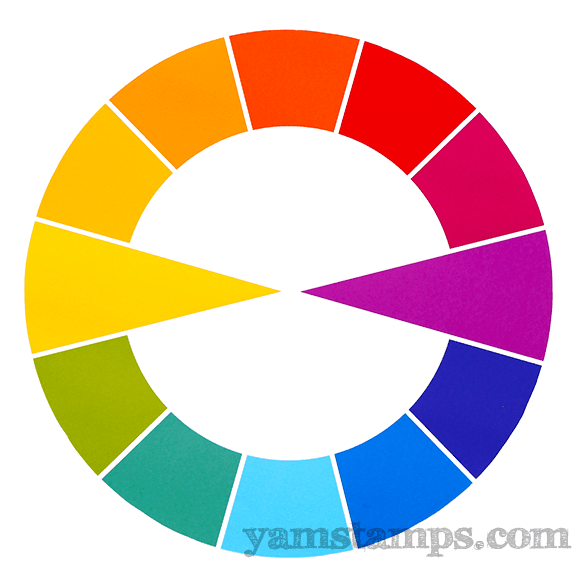
(From a non-art major…) I try to pick colours that are not opposites – so the ones that would be opposite each other on a colour wheel – like the two indicated above. These colours tend to blend together and create mud LOL! They end up brownish in tone, which is usually not the look I’m going for. I’ve also learned not to pick colours that are too close together on the wheel for these kind of techniques because they often end up looking like one solid colour.
Anyway – the reinkers I chose to use were Cherry Cobbler, Night of Navy and Crushed Curry for my watercolour world map. (I ended up picking shades of the three primary colours). Getting close to some opposite colours but if it’s a “fresh” application there’s not as much blending of tones. If you look at the image, you’ll see very little Crushed Curry – it tended to blend with the other colours and not stand out on its own. I stamped a few of these with the same wipe “ink pad” and found that the more I stamped, the more muddy/blurred the colours became.
The other tip I have is to have the dots of reinker farther apart on the wipe when using a larger stamp – that way, you just move the stamp around a bit and get the ink blend happening. When I put the dots too close together they bled together before they inked up the stamp so you couldn’t see areas of distinct different colour (which is the look I wanted). OH also – you may want to wear rubber gloves for this! I tend to pick up the wipe and daub it on the stamp to add colour where I wanted it (what can I say, I’m a little controlling that way I guess) – which worked well except for the fact that my hands were super inky afterwards!!
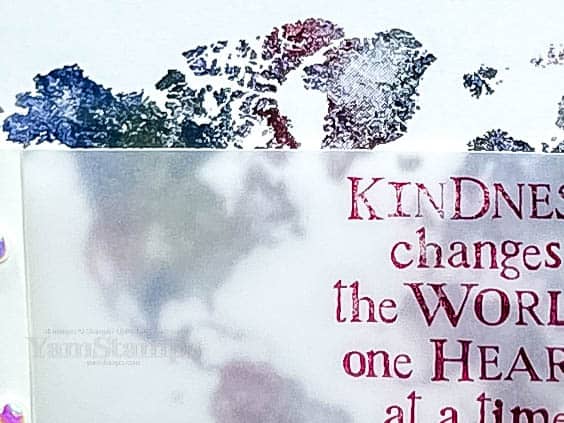
I didn’t want to hide the image, so I stamped the sentiment from the Begin with a Dream stamp set onto some Vellum Cardstock and then added that to the cardfront, using some Foam Adhesive Sheet pieces under the borders I created (to hide the attachment!). I added some Opal Rounds that reflect in similar shades (I think!) so felt like they matched the colour scheme as well.
I stamped a number of these images at the same time, so have got a copy to put into my travel journal – since I’ll be travelling again! So exciting! It’s been four years since I’ve been on a plane….so it’s taking me longer to pack than it used to. I’ll be travelling to Ireland with the Burlington Teen Tour Band – taking photos for them while they perform and sightsee! They finally get to march in the St Patrick’s Day parade in Dublin, a few years after they were initially set to do so. I will still be posting and checking messages, but it may take me a little longer than usual due to the busy schedule and time zone difference! (and jetlag, always my nemesis). I’ve never been to Ireland (though it’s been on my list of places to visit for FOREVER it seems) so I’m looking forward to it!


