Oct 14, 2007 | Announcements
 Well, okay, technically more like "YOU’RE" making a list!! LOL. It’s getting to that time of year again – so why not make it easier for your loved ones (and yourself!)?! Click on the link at the far left of the blog (image is the same as this one to the immediate left) to access the wish list. It is a WORD file. Complete it, and return it to me. I’ll contact the person you’ve indicated on the list in order to go over all your crafting "needs". Don’t forget that you can also request a gift certificate for merchandise or a class.
Please contact me if you have any questions!
Oct 11, 2007 | rubber stamping
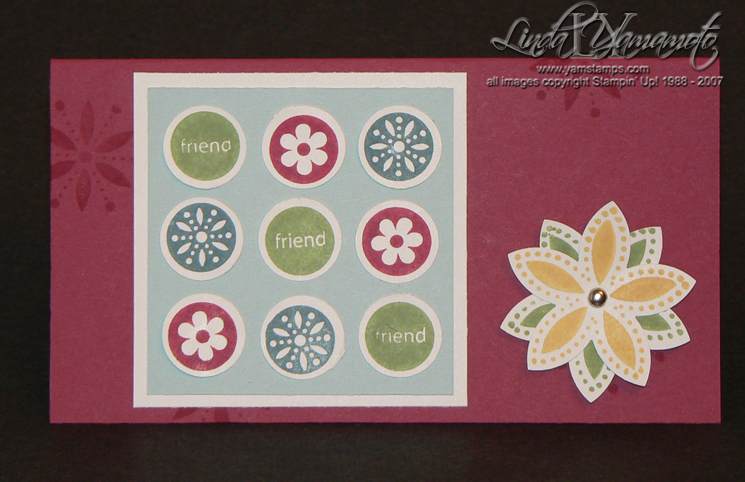
 In the Spotlight is a level 2 hostess-only set in Stampin’ Up!’s fall – winter collection ’07. [Am I the only one subjected to a bit too much Treehouse TV? Everytime I hear the name of this stamp set, I think of the children’s TV show "Timothy Goes to School"….they have "In the Spotlight" time which is like a vip day or special me day, or show & tell …. whatever they may call it at your child’s school. Anyway, I digress.]
The name aside, I love this set!! I love how I can use my Stampin’ Up! punches with it, because you may know that I don’t like fiddly time consuming cutting. This was one of the cards we did at my Stamp a Stack for World Card Making Day October 6th.
All supplies Stampin’ Up!: cardstock: purely pomegranate, whisper white & soft sky. Inks: wild wasabi, blue bayou, purely pomegranate, (yes, I am also loving those 2007-2008 "in colours"!!) so saffron. Accessories: 3/8" circle punch, 5 petal flower punch; paper piercer & silver brad.
I stamped 3 of each circle image onto scrap paper, then punched with the 3/8" circle punch (albeit some of them a little more centered than others!). Adhered these to the soft sky cardstock, and mounted onto whisper white. I quite enjoyed the fact that the white was used as the layer on this card, not as the base for the main image. Stamped the larger flower image twice, once in so saffron & once in wild wasabi, then used the 5 petal punch to make a perfect cut out. Love it!! Fast & easy. Used my paper piercer to create a hole & then fastened them together with a silver brad. Mounted onto a purely pomegranate card which was randomly stamped with another image from the set (perhaps I could have been a bit more generous with the stamping there, ah well, that will be for the next time I recreate this card!).
Don’t forget to sign up for my e-newsletter – there’s still 10 of the 12 weeks of Holiday ideas to come your way!!
Oct 8, 2007 | Uncategorized
 This is one of those stamp sets in the Stampin’ Up! catalogue that I saw and _loved_ right away. Of course, I needed to have both the sets – one set is the alphabet, the other is definitions. They can stand alone, but I think they’re fabulous paired together!
This is a smaller, square-ish card that uses a couple of my "fall back" colours. I will often turn to the pale plum / perfect plum because I think they look great together… The Stampin’ Up! Colour Coach (colour wheel) shows that they’re versions of the same colour so good for a monochromatic scheme.
Anyhoooo… I stamped 2 of the flowers from Polka Dots & Petals (a "go to" set for me) randomly on the pale plum card, stamping the outline flower using craft ink, which I then embossed with iridescent ice. On the main image, I stamped the letters in pale plum classic ink, and stamped the definition in perfect plum craft ink, which was also embossed with iridescent ice. Mounted this onto some perfect plum, but needed something "extra", so I dyed my small pretties flower using an aqua painter & pale plum classic refill ink. Added the clear rhinestone brad from the pretties kit and I was done!
Happy Thanksgiving! (or, Happy Columbus Day if you’re in the states reading this!!). Don’t forget that _today_ is actually the final day for the Simply Sent 20% off sale….I had a big brain fart (or, if I use my "mom" voice/language, a big brain "toot") earlier when I posted the final date for this sale (incorrectly) – I’ve since corrected it.
Oct 4, 2007 | Announcements
 Stampin’ Up! is celebrating World Card Making Day, Saturday, October 6th. From TODAY, Thursday, October 4th, until Monday October 8th (edited to be the CORRECT closing date, sorry), you can purchase ANY Simply Sent Kit for 20% off!! Click HERE or HERE to see the kits from the online catalogue. (Page 12 – 14) Each kit includes stamps, ink, embellishments, & instructions to complete anywhere from 10 to 20 cards (see each kit description for details).
Please contact me to take advantage of this sale! I can also accept orders in person at my stamp a stack on Saturday. If you haven’t already done so, please RSVP ASAP to attend this event!
Oct 2, 2007 | rubber stamping
 I made this Hallowe’en card despite a distinct lack of Hallowe’en stamp sets in my collection. Not that Stampin’ Up! doesn’t have any…because they do….and one is actually en route to me as I type this…
It’s not too early to be thinking about Hallowe’en….at least not when you’re a 7 year old boy. The costume decision is a big one!
In that spirit, I was playing with the oval punches to create a pumpkin. This is another of those ideas that seems to be "out there" so I am definitely not taking credit for it…but I’m not sure who originally came up with it, either!!
Anyway – I used 3 large ovals & 2 smaller ovals of pumpkin pie cardstock to come up with a somewhat pumpkin shaped figure. I used one of the flowers from the spring bouquet punch at the top of the pumpkin, hand cut a stem, and used thin strips cut with my Stampin’ Up! table top cutter. I can literally shave strips off cardstock if I so desire. Anyway, I took a couple of these strips & wrapped them around my paper piercing tool (the handle) to create those curly things you often see at the top of pumpkins. Whatever they are. The base is torn strips of creamy caramel, and the old olive features the ‘weathered’ background stamp, which I don’t seem to use often enough! I stamped the words ‘happy’ and ‘Halloween’ (from Everyday Flexible Phrases) in old olive & pumpkin pie onto a strip of the narrowest twill tape. And I meant to make them not perfectly straight. It’s whimsical. Really.
Mounted onto not quite navy for a quick Hallowe’en card, without using a specific Hallowe’en stamp set!
My October newsletter just went out; tomorrow is the start of the "Twelve Weeks of Christmas" emails, featuring a different holiday sample each week until December 25th – complete with instructions. (Yes, it really is twelve weeks until Christmas!!) Please subscribe to my newsletter (see the box at the top left of the blog) to be included in these mailings!
 Well, okay, technically more like "YOU’RE" making a list!! LOL. It’s getting to that time of year again – so why not make it easier for your loved ones (and yourself!)?! Click on the link at the far left of the blog (image is the same as this one to the immediate left) to access the wish list. It is a WORD file. Complete it, and return it to me. I’ll contact the person you’ve indicated on the list in order to go over all your crafting "needs". Don’t forget that you can also request a gift certificate for merchandise or a class.