Mar 21, 2007 | rubber stamping
 A short while ago, I participated in a swap with my upline’s group. We were to use a particular set from the spring mini. I had volunteered for a particular set, but switched (after a suggestion from my upline, Sue ) to the doodle alpha & doodle number sets, so that we could get better "coverage" of the assortment of (fantastic!) sets in the spring mini and thus more ideas. Can I just say…..when you’re doing cards, sometimes it’s a bit of a challenge to stick to letters & numbers??!!!! So thus was my task. Lucky for me, the doodle number set also includes a couple of….doodles (?!) so I did have some images to work with. The heart with wings became a focal image, and the letters "x" and "o" fulfilled my "alphabet" requirement. *phew*!! LOL. I’ll be posting more of the swap cards into the spring mini photo album as I get the chance. (maybe after I watch tonight’s "Survivor" show which I’m currently taping (well, PVRing)…I hope…I’m such a non-techno type sometimes- why do they move shows around to different nights? Just to confuse me?!)
Mar 18, 2007 | rubber stamping
 What’s with the SNOW?! At least it’s sunny today so hopefully it will encourage melting! Should have known that balmy mid-week weather was a little too good to be true….
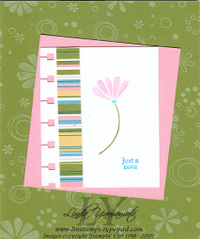
This is one of the cards we made yesterday. The scrapbook/stamping group at the Church of St. Bride in Mississauga invited me to do a workshop and we had a great time! This card uses the same colour palette as the double slider card I posted earlier, and it’s taken directly from the designer paper – we used a strip of it on this card, so you can see how it all coordinates! Featuring the petals & paisley bundle (are you sick of me raving about this yet?) – we used the petals jumbo wheel in white on the old olive cardstock; the strip of designer paper and the flower from Polka Dots & Paisley. We coloured directly onto the rubber with pretty in pink, tempting turquoise & old olive stampin’ write markers (because I love that look!). The "just a note" comes from All Year Cheer III one of my indispensible sentiments sets. We also used the spiral punch along the edge of the whisper white cardstock to create added interest. I’ll be posting more samples into the spring mini photo album, so check out the link when you get the chance. (and I promise to post cards that use sets OTHER than the petals & paisley bundle!!).
Mar 15, 2007 | Tutorial
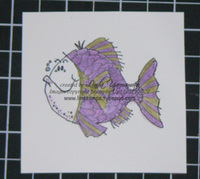
Here’s my attempt at a tutorial! Dedicated to the Mississauga gang who went through the first edition of this class!! This is a revised version that I think is easier to manage (you can let me know if you agree or not!!)
Materials: 3"x3" whisper white to be stamped with image of choice *measure width of your cello bag to be sure – I had some that were actually narrower!!
cardstock for frame: 3.5" x 3.5"
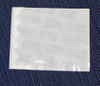
small cello bag
micro beads
sticky strip
scotch tape
To make shaker:
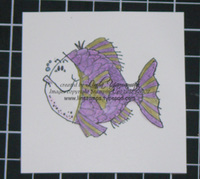
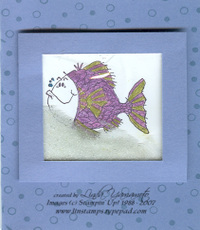
1) Stamp & colour image of choice. We used the fishy friends set and the metallic pencil crayons, blended with the blender pen (works well to smooth out the colour).
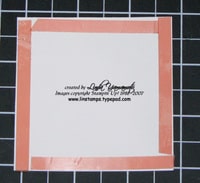
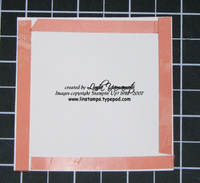
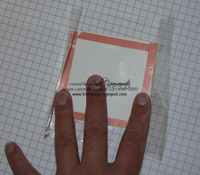
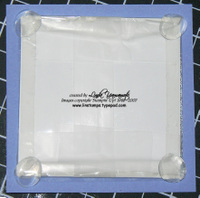
2) Apply sticky strip to the edges of the back of the image (as close as possible to edges). Leave liner on. This will keep the beads in front of the image.
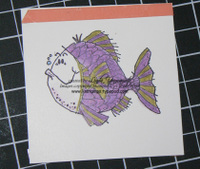
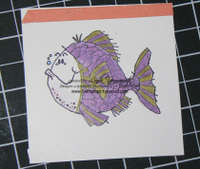
Apply a strip of adhesive along very top border of front of image. Leave liner on. This will prevent leakage of beads!
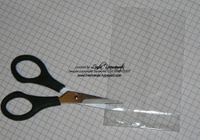
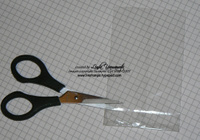
3) Cut off bottom seam of cello bag, and vertically along seam of bag to create open sheet with folds.
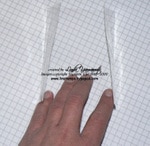
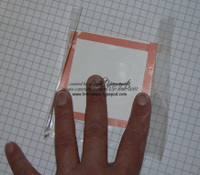
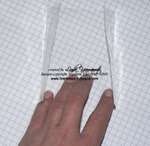
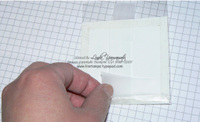
4) Remove red liner from sticky strip on back of image only & place face down in cello. (first pic: liner left on for picture purposes). Then, re-fold cello and adhere to sticky strip.
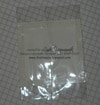
Refold along fold lines & adhere cello to sticky strip.
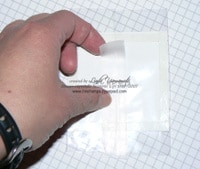
5) Apply scotch tape along back seam to ensure closure. (OK perhaps this is overkill, but I don’t want little beads all over the place when someone goes to shake the card!!)
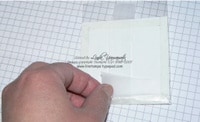
6) Fold up the bottom of the cello package & seal with scotch tape.
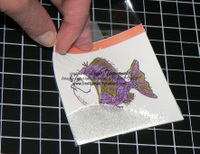
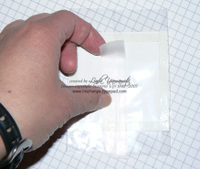
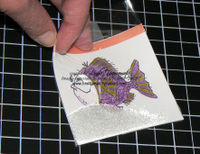
7) Insert about 1 tablespoon of microbeads in cello package. Note that the red liner is still on the front sticky strip.
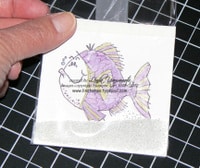
8) NOW remove the red liner from the front sticky strip, and press cello against it to seal closed.
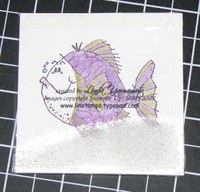
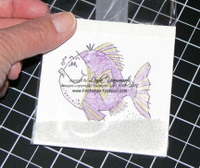
9) Fold down top of cello package & seal with scotch tape (at backside). TADA! A sealed shaker unit!
Create the frame:
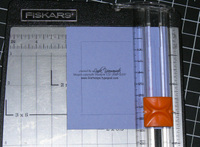
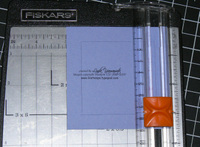
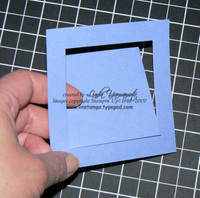
10) Use paper cutter to create frame for image. I used 3.5" x 3.5" square of brocade blue, and then cut 1/2" in from the edges to create frame. I prefer using my paper cutter when possible, vs a hobby blade….call me a klutz….
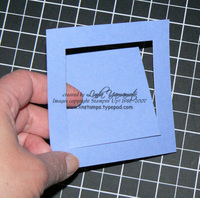
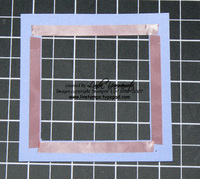
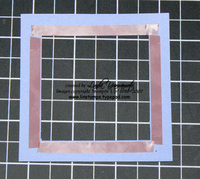
11) Apply sticky strip to inner edge of frame.
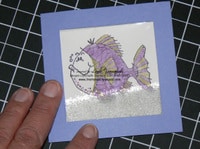
12) Remove liner & attach to shaker unit.
Construct the card
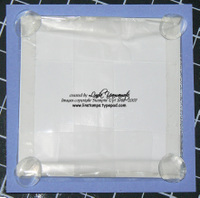
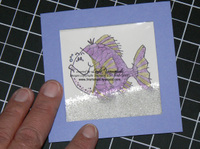
13)Apply pop up glue dots to back of package and then apply to cardfront – you’re done! We did a brocade blue card covered in the hot to dot wheel in brocade blue.
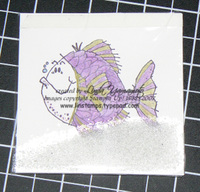
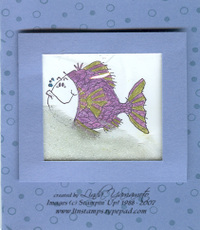 TADA! The finished product. Card is brocade blue, wheeled with the hot to dot wheel in brocade blue ink.
Mar 12, 2007 | Announcements
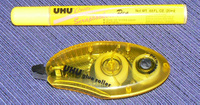 I was recently given the opportunity to try out a couple of products, in exchange for a review on my blog. Much as I love SU products, it’s always good to see what else is out there. (besides, it was a free sample! LOL). The two products were UHU glue roller & Creqtive Scrapbooker pen – liquid glue. My first instinct was to try the roller, because that’s usually my adhesive type of choice – dry & neat! Pros: It was dry & neat! I found that the adhesive held well & applied well. Con: The format I received is a disposable vs refillable. Maybe it’s from living in BC for those 8 or so years, but I can’t say that I’d purchase this item, solely for that reason, especially when there are refillable alternatives on the market. That being said, there is a refillable glue roller, so that would be the route to go, imo! The card that I made with this adhesive is under the March 1st post – the long notes card.
The other adhesive was a scrapbooker’s liquid glue. I must say that I am not a liquid glue kind of girl. (see comment under above adhesive – liquid glue is not dry, and, at least not for me, neat). That being said, it did apply easily, with a neat little chisel tip. However, messy girl strikes again and I ended up with glue on my finger tips which tended to transfer to other items or leave my finger tips stuck together… It does hold the paper well, but did not do well with the beads. I used it on the lion card that I posted back at the beginning of March. I’m now finding little beads all over the place. To be fair, though, the tube says nothing about anything other than paper, and it did do extremely well with this. It does dry a little stiff, however, so I’m not sure about “crackability” at some point. Wait, I will try in the name of testing. OK No cracking! So, if you’re constructing something out of paper/cardstock and want to be sure there’s good body to it, try the liquid glue if you’re up to it! If you have a blog and would like to try some products to review, check out Maria Filosa’s blog
Mar 9, 2007 | rubber stamping
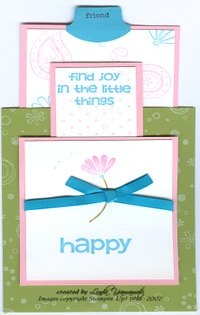
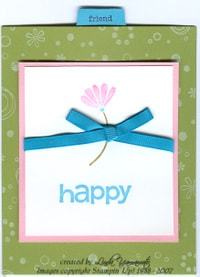 This is one of the cards we did at this week’s movers & shakers class. Everyone had a good time & was so impressed with themselves at the projects they created!! This is a double slider card, using the Polka Dots & Paisley set, plus the Petals jumbo wheel. We used the wheel with a white cartridge – love the effect. I think it looks just like patterned paper! I pulled the colour combination directly off one of the Petals & Paisleys double sided designer paper – old olive, pretty in pink & tempting turquoise. We used the stampin’ write markers directly on the flower stamp to get the three colours on the front image. The round tab punch creates the pull tab, and we used the word "friend" from the Everyday Flexible Phrases stamp set. I think if I were to do this card again, I might move the ribbon, or not include it at all…
Don’t forget to take advantage of the Spring Fling promotion – purchase the Polka Dots & Paisley stamp set, Petals wheel and the Petal & Paisley designer papers – receive anything in the Spring Mini Catalogue for 50% off! Consider purchasing the Simply Sent kit, "Remembering You" and attend the free class April 19th using this set to create a few more fantastic cards!
Mar 2, 2007 | Information
 Can’t we all use a little money saving idea every once in a while? Introducing the Frugal Friday tip (and just to keep you from getting blase about it….it won’t be here every Friday! LOL). Today’s frugal tip is stretching your stampin’ up! dollar by using up your stampin’ dimensionals! I think they’re a pretty good deal to start with….but to make them last even longer – you can cut the dimensionals in half (handy if you’re popping up a small item). After using up the dimensionals, you’ll end up with an outside "frame" which is one solid piece. I usually just snip along at intervals to create more (albeit slightly oddly shaped) dimensionals! They still do a great job at taking a project to the "next level" (haha *groan*).
Mar 1, 2007 | rubber stamping
 Ugh! March has certainly come in like a lion around these parts. Driving around the city was not that fun this afternoon! Came in from shovelling the driveway to collapse in a heap for a while. I live in a condo complex, so technically, I don’t have to shovel my own drive, but the snow clearers aren’t always swift coming to our neck of the woods, so I figured that this might increase the odds that I’ll be able to get out of my own garage tomorrow. This lion was created from the Sketch It set, with hand drawn mouth & whiskers (I know, there’s a reason that I _stamp_ my art….but it was that kind of a day!). I added earth elements beads to the bottom using a liquid glue that I’m trying out (more on that later). (*edited to add link to set & comment*) *comment* this lion has been floating around in demonstrator circles for a while, so I definitely can’t take credit for coming up with the idea (sorry, can’t give credit where credit is due at this point, either!). However, we demonstrators are great at copying great ideas!! LOL
 Created this card in the meantime to help remind me that spring is around the corner…and the spring mini catalogue is the mini of the moment!! I used the long notes in so saffron, and the Polka Dots & Paisley stamp set, which demonstrators received FREE (gotta love that) in December as a gift from Shelli Gardner (co-founder & CEO of Stampin’ Up!). I stamped the large paisley stamp in so saffron onto the card, & used the Petals & Paisleys designer series paper on the bottom part of the card. Turquoise grosgrain ribbon for accents. Used cameo coral, tempting turquoise & old olive stampin’ write markers on the flower stamp, and cameo coral on the "happy" stamp. Hodgepodge hardware belt on the grosgrain.
There’s a fantastic MARCH SPECIAL! Purchase the Polka Dots & Paisley stamp set, the Petals & Paisleys designer paper and the Petals jumbo wheel, for $48.40 (plus shipping & taxes) and be eligible to get 50% off ANY one item in the spring mini catalogue!! Hosts of workshops with $600 in sales are also eligible for 50% off any one item in the spring mini catalogue. It’s almost enough to make me not mind shovelling snow….
Feb 26, 2007 | rubber stamping
 Realized that I have to get a bday card to a friend in the UK by Thursday…..what do you think my chances are??!!! LOL. Anyway, I whipped off this birthday card by using the Sell-a-bration Just Delightful Simply Scrappin’ Kit ("they’re not just for scrapbooking!"). I used the 2 designer papers on the front of the card, threw in a scrap of bashful blue for contrast, then used the self adhesive die cuts in the kit for the features. The stamping is on the inside….I used the "It’s Your Birthday" set. It doesn’t show up very well, but I also sponged a bit of celery ink on the bottom striped paper.

This card may look familiar….I used the kissing technique with the fine lace background & big blossom sell-a-bration stamp, plus the "so very" stamp set. I used a pixie pink stampin’ write marker to create "stitch" lines around the image to help define it a bit better, and used a sponge dauber with summer sun ink for the centre of the flower.
It will be going to one of Dylan’s classmates, Kaela, who is moving to the next city (and when you’re 6 years old, that’s very far away). Playdates aren’t going to be as easy now!
OK off to see about creating some masterpieces for the upcoming movers & shakers classes!
Linda
Feb 25, 2007 | rubber stamping
 *sigh* I can’t believe Sell-a-bration is almost over….it’s one of my favourite times of the Stampin’ Up! year…. As a demonstrator, I like to be able to use all the current catalogue items to show you all the wonderful things that you can create! So, that means "out with the old, in with the new" in terms of the mini stamp sets with which I’ll be creating upcoming class projects. I’m done my swap cards, my weekend homework (I’ll post them later, since I think they’re also to be entered into a Stampin’ Up! contest), and decided to play around a bit, since I’m not watching the Oscars tonight (really, what’s the point….I only saw movies from one category…."animated", and on top of it, the film that my brother worked on, "Everyone’s Hero" wasn’t nominated). Anyway, I digress. (I know, what a surprise). Used the So Very sell-a-bration set, along with self-adhesive die cuts from the sell-a-bration Simply Scrappin’ kit Just Delightful. Oh, and used a pocket notes card, from the winter mini which will also be ending Feb 28th.
 And now….the inside of the card….. using the "chirp up" bird from the Very Punny sell-a-bration set, coloured with the Pure Colour Pencils.
So, although I am sad that sell-a-bration’s coming to an end, I can look forward to the SPRING mini and the season itself. Stampin’ Up! also has a fantastic special for the month of March – I’ll post details March 1st!!
You can still call me with your last minute winter mini or Sell-a-bration orders!! Sell-a-brate while you can!! LOL.
Feb 22, 2007 | rubber stamping
Had a great time as always last evening with Linda & friends! They gamely worked their way through the shaker card….finicky to assemble but fantastic when finished?! LOL. Here’s a sell-a-bration card that we did last evening.
The sell-a-bration stamp set is Happy Harmony. Stamped onto very vanilla with versamark (I’m so alliterate this evening) and then brushed with pearl ex powders from the Assortment II pack – we used super russet, true blue & spring green (I think!). The card front was stamped with the "spatter" type stamp from Itty Bitty Backgrounds. I think of these stamps as "must have accessories" as they have the power to instantly dress up any card! Anyway – we stamped in versamark & brushed with the blue pearl ex powder to give a subtle, elegant touch. Unfortunately, it’s so subtle & elegant that it doesn’t show up well in the scan!! The front edge of the card was torn to reveal a strip of brushed copper metallic card stock which was added to the back inside edge of the card. Simple but elegant, I think!
Sell-a-brating while I can…..

 A short while ago, I participated in a swap with my upline’s group. We were to use a particular set from the spring mini. I had volunteered for a particular set, but switched (after a suggestion from my upline, Sue ) to the doodle alpha & doodle number sets, so that we could get better "coverage" of the assortment of (fantastic!) sets in the spring mini and thus more ideas. Can I just say…..when you’re doing cards, sometimes it’s a bit of a challenge to stick to letters & numbers??!!!! So thus was my task. Lucky for me, the doodle number set also includes a couple of….doodles (?!) so I did have some images to work with. The heart with wings became a focal image, and the letters "x" and "o" fulfilled my "alphabet" requirement. *phew*!! LOL. I’ll be posting more of the swap cards into the spring mini photo album as I get the chance. (maybe after I watch tonight’s "Survivor" show which I’m currently taping (well, PVRing)…I hope…I’m such a non-techno type sometimes- why do they move shows around to different nights? Just to confuse me?!)