Jan 1, 2011 | 3D samples, Announcements
 Wishing you a very "Happy New Year"! This is the banner that I took to the CH Morning Live appearance, but I'm not sure that you could see it very well on the front of the table we were working on…so here it is again for your viewing pleasure! I used the Big Shot to die cut the pennants and the letters, so it was super easy to create. The hardest thing was figuring out how many of each letter to do – I like to do as few steps as possible, so I cut all the "E"s in one pass, etc. The Big Shot and Bigz dies are heavy duty enough to handle cutting multiple layers of cardstock easily.
Have you made your resolutions? If you've resolved to budget your crafting spending, consider signing up for my NEW online stampers & scrappers club! A six month commitment gets you exclusive online/digital content (e.g. videos, patterns, project samples/instructions). CONTACT ME to register & get more information! This offer is good anywhere in Canada.
Dec 30, 2010 | 3D samples
 I looooove these little top hat party decorations! I think they were my favourite project from my TV appearance the other morning. I showed how to make these on air, so hopefully you got to see the CH Morning Live show. (I'll also be posting a link once I get the video uploaded). What I didn't mention on air is that these can be filled with candies as party favours. I did show how you can add a curly label extra large punch out so that you can use the hat as a placecard. Easy to whip up a few of these in time for your New Years Eve party!
Dec 27, 2010 | 3D samples
 I thought I'd post this picture of one of the items I'm taking to the CH TV studios tomorrow morning – I'm slated to appear on CH Morning Live somewhere around 8:10 or 8:20 am. I've been lucky enough to have been asked to be on the show again – this time, showing some easy DIY party decoration ideas – just in time for New Year's Eve!
I'll be sure to post more pictures of the projects I'm sharing on air, and will hopefully be able to get a video of the appearance as well, so be sure to come back to www.yamstamps.com to see everything!
I'm also preparing my first newsletter of the new year, so if you haven't already, please be sure to sign up (box is at the top left of the yamstamps.com site or click here) so you don't miss all the fun & information!
Oct 29, 2010 | 3D samples
 I realized that we didn't have any pumpkin decoration for this weekend….so I stopped by the farmer's market and picked up these 3 little pumpkins which were all about the same size.
I used my Big Shot and the Serif Essentials Alphabet Dies to cut the letters BOO from a white Decor Elements sheet. Since the letters were small enough to manage easily (and since these are admittedly not permanent decorations!), I simply peeled the backing off the letters and stuck them onto the pumpkins (which I'd wiped down with a damp towel & dried). Normally, and especially with larger elements, I would use the transfer sheet to avoid getting my fingers all over the adhesive and lessen the tackiness, but hey, it's a quick holiday decoration. It was a little fiddly since the surface is not flat, but I was happy with the result. This literally took me about 5 minutes – not counting the time to purchase the pumpkins. I think I took longer choosing the pumpkins than decorating them. (and YES I took this photo myself; used my 50mm f1.4 Nikon lens. I LOOOOOVE this lens and should use it more than I do).
Stampin' Up!'s Definitely Decorative catalogue features wonderful Decor Elements designs for your home or crafting projects. I love the fact that I can buy the Decor Elements sheets, and with the help of my Big Shot, quickly create decorative elements for any occasion or surface!!! You can see the online version of the catalogue HERE. Contact me if you have questions about how to use Decor Elements, or if you'd like a hard copy of the catalogue.
Jun 24, 2010 | 3D samples
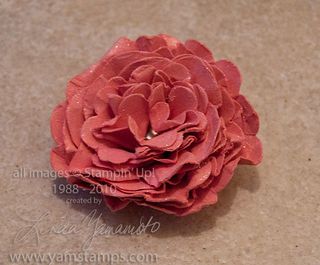 Not the kind of 3D that you need special glasses for, either! This flower was created with punches. I punched out about 3 scallop circles, 3 Fancy Flowers and 3 extra large scallop circles (coming in the new catalogue!!). I used my Crop-A-Dile to punch a hole in the centre of the flowers, then inserted a clear rhinestone brad. I spritzed the punch outs with water, and folded the circles up on themselves and basically scrunched them up, then gently unfolded them a bit so they were in the shape you see them here. I let it dry overnight, then spritzed them with some Vanilla Smooch Spritz for an extra shimmer. This was definitely easy and fun. It's a great element to add to decorate a box, or add to a special card that will be handed to the recipient in person. If you need more information or instructions, leave a comment below or email me. I will definitely be making more of these!!
Jun 15, 2010 | 3D samples, Big Shot
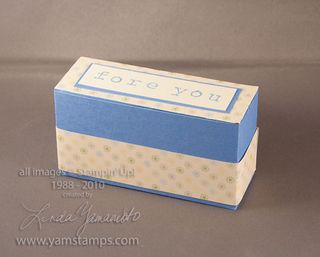 I crack me up LOL…. this is a quick box I made using the Bigz XL die – Box #2 for the Big Shot. I added some Designer Series Paper – a strip around the bottom and a strip on the lid – to add a bit more colour, and then stamped out "fore you" using the Rough Type alpha from the Summer Mini catalogue.
This box holds a number of golf tees, and you could throw in some driving range tokens, ball markers etc – great for a golfing dad?!
I've updated my classes page and it should be accessible now. Somehow I knocked it offline for a bit – sorry about that! I've added classes through the summer and am planning ahead for Stampers Club in September!

 Wishing you a very "Happy New Year"! This is the banner that I took to the CH Morning Live appearance, but I'm not sure that you could see it very well on the front of the table we were working on…so here it is again for your viewing pleasure! I used the Big Shot to die cut the pennants and the letters, so it was super easy to create. The hardest thing was figuring out how many of each letter to do – I like to do as few steps as possible, so I cut all the "E"s in one pass, etc. The Big Shot and Bigz dies are heavy duty enough to handle cutting multiple layers of cardstock easily.


