Jul 18, 2015 | cards, Stampin' Up!
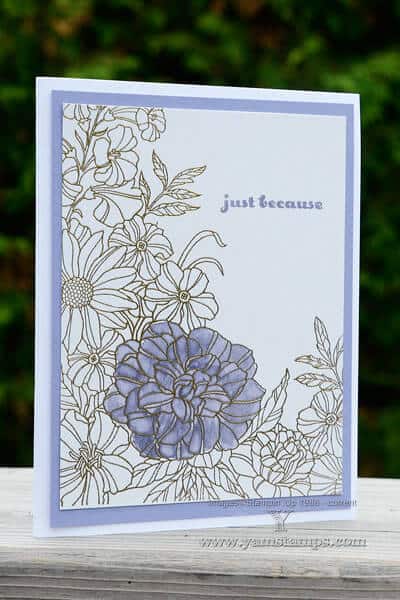 Spotlighting is a great technique to use on detailed or large outline images. This card features Stampin’ Up!’s Corner Garden stamp – which is quite beautiful on its own simply embossed in Gold Embossing Powder. I picked one portion of the image to highlight, and used the aquapainter and Wisteria Wonder reinker to watercolour the one large flower and complimented that with the sentiment from And Many More stamped in Wisteria Wonder. This technique also makes colouring a large image less time consuming – by selectively colouring one area, you can add a detail and draw attention to one portion of the image without having to colour the entire image if you’re a little pressed for time, or just want to get it done.
My upcoming classes are listed on the YamStamps Events Page – attend a class or join Stampers Club it’s a great way to learn new techniques, get ideas and build up your card stash!
Jul 14, 2015 | specials, Stampin' Up!
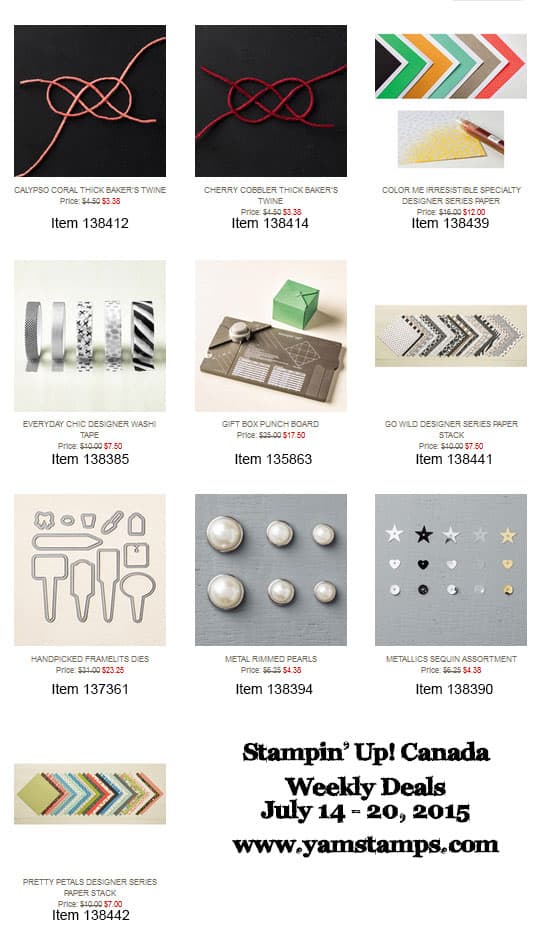
Here are the latest deals from Stampin’ Up! Canada – and there’s a bunch of great items here! Don’t forget that all the Weekly Deals have a set quantity available, and once that number has been reached, the items revert to their regular price. A number of last week’s deals were no longer available at sales prices by THURSDAY so you don’t want to wait if there’s something on this list you want! I will be placing an order TOMORROW (Wednesday, July 15th) so if you’re in the Burlington area and would like me to include your items in the order, be sure to email me ASAP. If you’re not local to Burlington (or like the convenience of to your door shipping) – there’s always the shop online option. Hard again for me to pick just one favourite this week – I do love the Gift Box Punch Board, and I love the versatility of the Colo(u)r Me Irresistible Designer Series Paper, and you know that I love framelits that coordinate with stamp images! The Handpicked Framelits coordinate with the Stake Your Claim set in the current catalogue. Please don’t hesistate to contact me if you have any questions or need assistance with your order. Happy Shopping!
Jul 10, 2015 | cards, TV/Video/Web/Tech
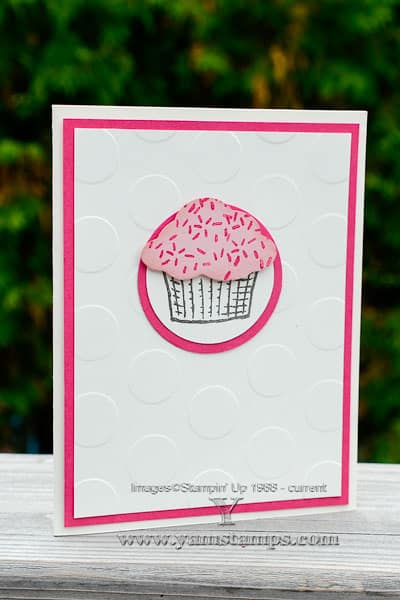
I love the coordination of Stampin’ Up!’s stamps and punches. This card features the Sprinkles of Life set (proceeds towards Ronald McDonald House Charities too!!) and the coordinating Tree Builder punch. We used it for a fun birthday card and coordinated the circular punch outs with the circles on the Polka Dot Embossing Folder dry embossed background. Of late, I really like having elements of the main image hanging over the border of the background – I think it adds more interest to the main feature.
I’ve also posted a Quick Q&A video on the YamStamps YouTube Channel – so check it out! If you have a question about Stampin’ Up! products or papercrafting, please either email me or leave a comment on the blog or on the YouTube channel, and I may use it for a future Quick Q&A video!
Jul 7, 2015 | specials, Stampin' Up!
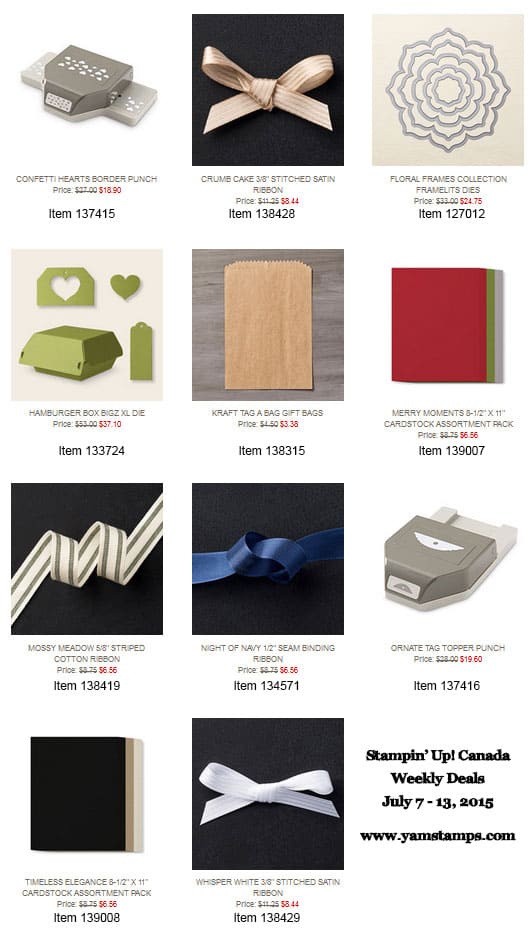
Stampin’ Up! Canada continues to offer a larger number of Weekly Deals this month! Check out this week’s grouping! I can tell what I feel I “need” more of because I’m drawn towards all the ribbon choices this time. Doesn’t that Crumb Cake Stitched Ribbon look luxurious?! I do love my Confetti Hearts Border Punch for adding an interesting edge or creating confetti for shaker cards and accents, and running right behind that – I always love a selection of framelits and the Floral Frames are so fun!
Don’t forget that there are a number of recent items on the Clearance Rack as well that you can add into your online shopping basket and have delivered to your door.
Please contact me if you have any questions or need assistance placing your order. I will be sending orders in on Thursday, so if you’re close to Burlington I can include your items with that batch if you contact me before then, and will contact you when they arrive. Happy Shopping!
Jul 6, 2015 | organizing, Stampin' Up!
For Manic Monday, I thought I could share an organization tip – because it might help the day be a little less crazy, AND it’s something you can do in a minute or less!
I have a love/hate affair going on with my stamp room. I do love it, lots of room and light, though it’s in sheer chaos most of the time – which is where the hate portion steps in. Nothing more frustrating than having to search for that item you need! Many of my friends have undertaken the “empty out the entire room, sort through everything and then put only what you love/need back into the room” approach. (You can read more about that in the Marie Kondo book, The Life-Changing Magic of Tidying Up: The Japanese Art of Decluttering and Organizing ) (and from this title, it’s SO obvious to me that I am far removed from my Japanese roots ROFLOL). I haven’t been able to muster up the courage to do that YET. In the meantime, I’m going to start using my Organizing Pinterest Board a bit more often! (Procrastinate much, me?!)
If you’re like me, when you get your new Stampin’ Up! products, you are so excited you tend to whip open the packaging to get to the fun new item inside…and then can’t find that little piece of folded paper in the chaos that gives you more information or instructions for your new item. In my case, it’s the Banner Triple Punch. Well, I did actually know where the piece of paper was, yay me, but I can see it easily getting waylaid or thrown into the recycling when I hit the “I can’t TAKE this mess anymore” level in my stamp room. Here’s my solution:
 I recently got more tape (and batteries!) for my labeller (similar but different to this one in case you’re wondering: Brother PTD200 Home and Office Labeler
 ) so have been able to use it a bit more in my office and stamp room area. I decided that the best place for information about a tool would be with the tool – so in this case, I printed a label with the size of the channels in the Banner Triple Punch, and adhered it in plain sight (though not on the top edge of the punch where I tend to grab it). Yay! No searching for the paper or trying to hold the punch by my Grid Paper to guesstimate the size – which means I’ll be faster and happier when creating something! Don’t forget though, you probably want to cut your cardstock a “smidge” narrower than the listed widths to be sure it fits snugly in the channels.
Happy Crafting!


