Mar 6, 2017 | cards, Occasions, Seasonal Catalogue, Stampin' Up!
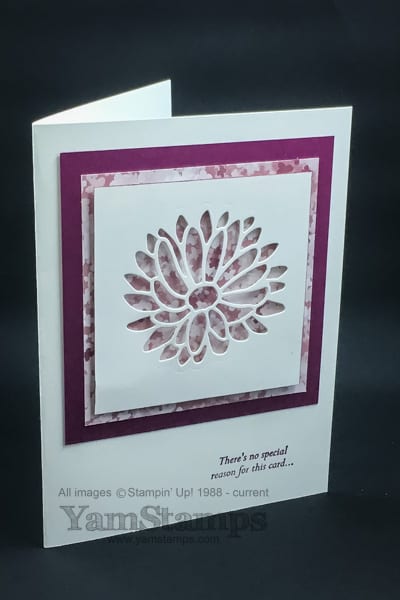
This quick negative die cut card features Stampin’ Up! Canada’s Special Reason Bundle (available with wood mount or clear mount stamps) – available in the Occasions Catalogue. When you use a negative image, you can highlight some of the patterned paper you may have in your stash! In this case, it’s the Blooms & Bliss Designer Series Paper. The tough part is picking which side of the paper to show! Keeping the paper and image as the focal points, there’s just a touch of colour on the edge of the Whisper White cardstock – you can achieve this look by running the side of the brush tip of a Stampin’ Write marker along the edge of the cardstock, or a sponge dauber with the coordinating ink. In this case, the colour is Rich Razzleberry.
One tip I can share is that as my plastic cutting pads get older, they tend to curl or bow a bit more – so sometimes running the die and cardstock through the Big Shot a few times ensures that all the little pieces are completely cut through – and the Big Shot Die Brush helps ensure they all come out easily. Another option is to use the Precision Base Plate, which has no “give” and will ensure good contact the entire time. That will ensure that your quick die cut card is truly that!
If you’re interested in learning other techniques, you can attend a card making class in person or online! We created this card during classes in the past week, but I love this quick die cut card effect, so it may make another appearance in the future, in some incarnation! Do you have a favourite set of dies that you like to use for a negative image effect? (future class attendees will appreciate if you share your faves, so they don’t keep seeing a version of this card repeatedly – haha just kidding – but just about the card – I do want to hear if you have a fave!). Feel free to leave a comment below – and don’t panic if it doesn’t show up right away – comments are moderated to avoid spam! In the meantime – be positive about negative die cuts (sorry, couldn’t resist), and contact me if you have any questions.
Mar 2, 2017 | cards, Occasions, Seasonal Catalogue, Stampin' Up!
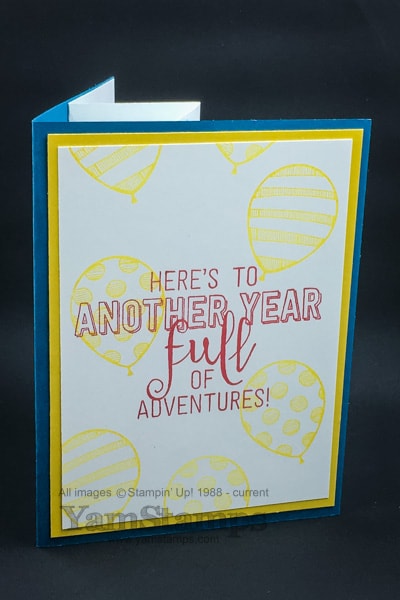
Sometimes you need an extra special or “WOW” card, and you don’t feel like making it from scratch. (If you do feel like making it from scratch, may I suggest the Clever Cards Online Class ?! You’ll get five different WOW card designs!) Here’s an easy pop up birthday card made using Stampin’ Up!’s Balloon Adventures set and Balloon Pop-Up Thinlits Dies. They’re available together in a discounted bundle…which I recommend because I love easy coordination (and who doesn’t like saving a bit of money?!). Real Red, Island Indigo and Crushed Curry combine to make a bright, fun card that’s sure to impress.
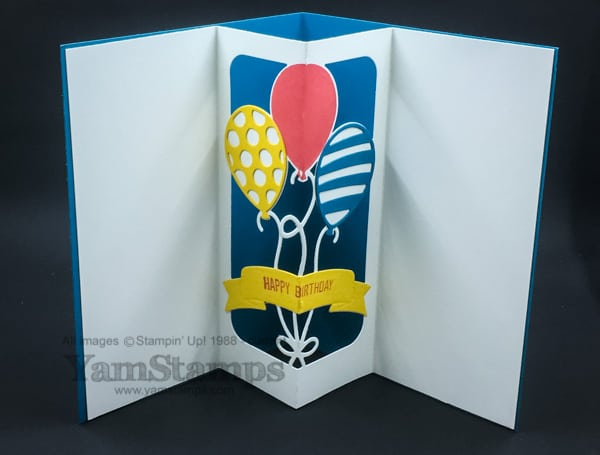
The interior pop up portion is made using a die! You score your cardstock, align the die along the score line and run it through your Big Shot. Fold along the score lines and you’re ready to complete your card! (I told you it was an easy pop up birthday card!) I like to use Tear & Tape to adhere the pop up insert securely in place (just don’t adhere the middle, otherwise the pop up won’t work!). Originally, I had stamped “Happy Birthday” directly onto the banner, but truth be told, I messed it up….so I cut another banner from a scrap of Crushed Curry Cardstock, restamped the sentiment and adhered it over top of the messed up one. It looks good either way. Well, maybe not with a messed up sentiment, but with a white banner rather than a yellow one. I added two additional die cut balloons that were adhered in place on the pop up portion, and the middle balloon is simply stamped in Real Red. The set is photopolymer, so you can re-stamp the balloon image on top again if you need more ink coverage – sometimes the score line doesn’t take the ink very well. (ask me how I know this…).
This card does take a little longer than a non-3D or non-moving part card might take to construct, but it’s just more steps, not that much more difficulty, really! A bit more time to construct a still quite easy pop up birthday card, thanks to coordinating stamps and dies, but the smile on the recipient’s face is sure to be worth it in the end! This is the kind of card that can be a gift in itself. We actually tackled this card in Stampers Club and the March Card Class! I liked this card so much I included it in both classes! If you’re needing an outing during the day or evening, consider joining us next time! See the YamStamps Events Page for upcoming events, or contact me to register for the April Card Class or to find out more about Stampers Club. Hope to see you in class soon!


