
A card that looks polished and impressive… but secretly comes together without too much fuss.
I created this card for a recent Demonstrator-Only card swap featuring products from the May-August Catalogue (which goes live to customers on Tuesday May 5!).
If you’ve ever wanted to create something that feels finished, but still works on a lower-energy crafting day, this design is one to keep in your back pocket.
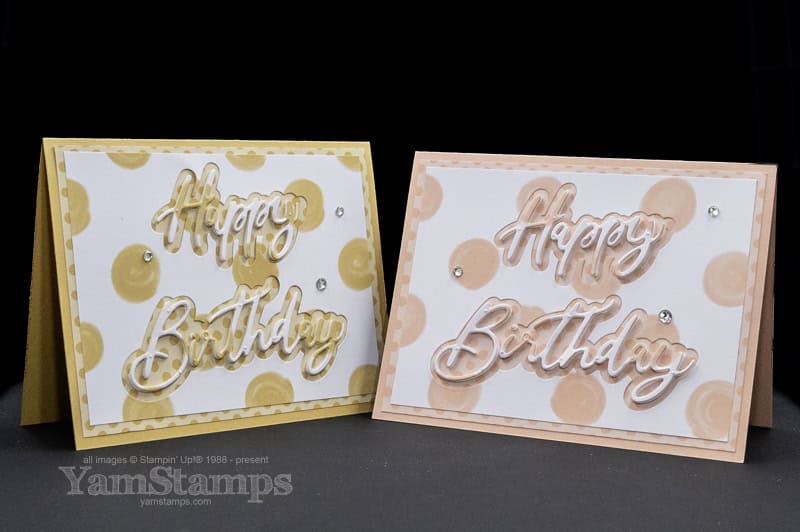
Today’s project uses Golden Glow, Crisp Cantaloupe, and the 2026–2028 In Color Painted Patterns DSP to create a coordinated layered birthday card. There’s a fully linked supply list on the YamStamps Sunday Swaps Page, but please note that the links to the items in the May-August catalogue won’t work until May 5th! Also – while it goes against everything I learned in grade school, I use “Color” because that’s how the product is labelled….
The background is created using a single sheet of Designer Series Paper! The small dot pattern is one side of the sheet, and the large dots are on the other. One 4″ x 12″ strip will create one cardfront so it’s easy to create a few of these cards at the same time.
Let the Thrifty Sentiment Be in the Spotlight
The Words & Wishes Dies really shine in this design, particularly because they are popped up on a Foam Sheet. Thrify crafting for the win – and super coordinated flow. After I die cut the background from the large dot DSP, I stuck the cut outs onto a foam sheet and then die cut the sentiment from that. When you adhere the sentiment into the negative spaces, you’ll see how the pattern flows across the words and creates cohesion! The trickiest part of this project was making sure I didn’t lose the dot to the “i”…
HINT: In my experience, the large random dot pattern is a bit more forgiving than a smaller, more solid pattern, and circles are always more forgiving than hard edges like rectangles or stripes.
Add Just Enough Sparkle
Rhinestones are one of my most favourite all around accessory to add to a project. They catch the light, draw the eye in and give that finishing touch.
Application Hints:
- Space them out
- Create a loose visual triangle
- My preference: odd numbers
One Design, Endless Variations
You may know this about me – but I don’t want to use up all my brain cells for crafting (typically I craft at the end of a work day so I don’t have many left over!!). With this one design, you can create so many looks – swap out the paper you use, swap out the colours for a whole new take. The Words & Wishes Dies have a number of coordinating sentiments and backdrops so you can swap out the sentiments as well!! That’s why I love card designs like this – paper crafting doesn’t have to be difficult to be impressive.
Your Turn
If you’ve been wanting a go-to birthday card that you can recreate without overthinking every step—this is a beautiful one to try.
Pull out your supplies, pick your colour, and give it a go.
And when you do:
- Are you leaning Golden Glow or Crisp Cantaloupe?
- Did you keep the background soft or go a little bolder?
Comment below, save this layout for later, or share your version—I’d love to see what you create.


