Mar 2, 2008 | 3D samples
 Love those sticky cuts letters….
This is totally based on a project that we did at convention last year… Stampin’ Up! is selling a 3 pack of these great tins for $12.55 (that would be 1 to give away and 2 to keep for yourself!!) Perfect for holding cards, memorabilia, photos… the possibilities are endless!
Certainly celery designer series paper, backed with chocolate chip… the sticky cuts letter (that’s a lower case "L", not a number 1 as my mother first thought…) is coated with cosmo fine glitter; flowers from the pretties kit finish off this project. The smaller flower was dyed by applying re-inker with an aqua painter. My current favourite tool, the crop-a-dile punches through this tin like butter….to create holes for the chocolate satin ribbon. That chocolate satin ribbon that we all fell in love with at Christmas time is available as part of the Theatre ribbon originals, by the way!!! (OK, so not a full roll but still, it’s there).
When you use your sticky cuts letters (or numbers, or images – there’s a heart, flower, star on the sheets as well) – you will want to peel off the white waxy backing first (the backside of the letter) and apply it to the project or cardstock, then remove the red plastic layer off the top of the letter and apply your glitter/beads/embossing powder etc. I think it’s easier to deal with that way, less mess for sure. You can also save the red liner (or for that matter, the white waxy liner) and use them as masks for sponging on a separate project! (oh, should have saved that for a Frugal Friday tip – well, maybe I’ll do a pictorial on that one some Friday).
Off to finish up the masterpieces for my classes this week – I have a FUN project for them that highlights a set from the new Occasions mini! (will be sure to post it at a later date, need to keep it a surprise for the attendees in the meantime!)
Mar 1, 2008 | Announcements
Stampin’ Up!’s Occasions mini catalogue is now in effect! Click here to browse through the online copy, or on the image of the mini in the right column on the blog. Remember that there’s 7% off all the listed prices… There’s LOTS of fantastic stuff in this one, so if you see lots of things you like, don’t forget that with your $70 merchandise order, you receive a set from the Sale-a-bration mini catalogue as well!
Looking forward to using some Occasions product at my class on Wednesday. Class registration CLOSES on MONDAY 3 March at 7pm sharp, so RSVP to make sure you don’t miss out!!
Feb 28, 2008 | 3D samples
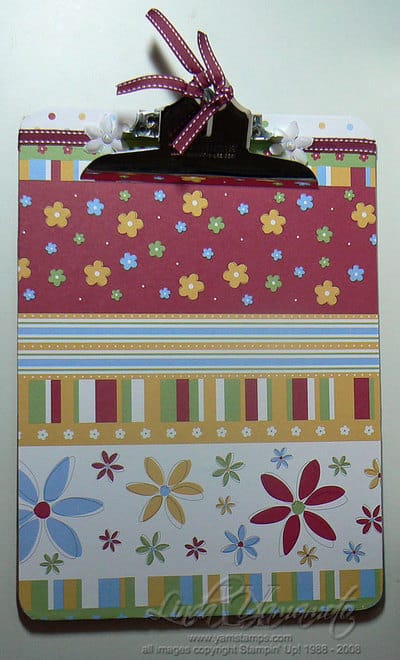 I’ve always been inspired by those who can "alter" everyday items and make them "WOW" – but I’ve also been slightly intimidated by the whole process. I’m a simple/clean stamper for the most part, and many of the altered projects I’ve seen seem so involved.
I’m taking an online course and part of our pre-class assignment was to alter a clipboard (if we wanted to). I knew that if I tried to do too much, I’d get bogged down & either never complete it, or get frustrated and set it aside, never to complete it, or get distracted and never complete it….you get the idea. So – the goal was to complete this project!! With that in mind, I chose Stampin’ Up!’s Cutie Pie Designer Series Paper. I love the bright colours, and the various patterns on this sheet makes it look like I’ve worked harder than I actually did (that’s key to most of my projects! LOL).
So….I cut the paper to fit the clipboard, nudging up to the clippy thing at the top, and adhering with some Mod Podge. I then cut 2 strips (the multi colour dots) to fit at either side of the clippy thing and used my hobby blade to trim close to the clippy thing. (I really don’t know what else to call that thing). I used my paper snips to trim around the corners of the clipboard (and anywhere where it wasn’t quite flush), then used my sanding block gently to smooth the edges.
The over achiever in me didn’t like the seam where I’d joined the two papers at the top of the board (which really weren’t _that_ bad), but I covered it with some purely pomegranate double stitched ribbon. I added flowers and half pearls from the pretties kit, because they’re pretty….and because they cover up any not so perfect cutting around the clippy thing at the top. (It’s all about the cover up). I actually used the Tombow Multi purpose adhesive that SU now carries to adhere the flowers and make sure the ends of the ribbon were tacked down. I love the little pen tip to put some glue just where I want it (especially because I tend to be a bit of a messy glue-er).
So; to answer the question – it took me less than half an hour from start to finish (and less than one sheet of the paper). TADA! Oh, and because I was so energized by this, I went on to do a chipboard book that has been sitting naked on my shelf for ages. I’m going to post pics of that in my March newsletter, so watch for that in your "inbox" next week!
Feb 25, 2008 | rubber stamping
 This features the Sale-a-bration set "So Many Scallops", which has 4 stamps that work perfectly with the scallop circle punch. The flowers were stamped in ballet blue onto whisper white cardstock, and a sponge dauber applied more mustard in the centre of the sentiment. Wild wasabi double stitched ribbon made some stems, and the pocket was formed from a 6×6 piece of rose red designer series paper. Stampin’ dimensionals give the flowers extra "pop". If you really wanted to follow through on the "Sweet of you" theme, a Ghirardelli chocolate square would also fit into the pocket. I would have put one in here….but alas, somehow my chocolate has all disappeared?! (Oh wait, there it is, on my hips!!! LOL). Don’t forget my springtime card class next Wednesday, March 5th – RSVP to reserve your spot! There’s still time to get in on Sale-a-bration with your $70 merchandise order….and the Occasions mini will be in effect March 1st!! (Have you received your copy? If not – contact me for yours!!). See you here in Burlington!!
Feb 21, 2008 | rubber stamping
 Proof that not all glitter is girly! D needed a birthday card so I needed to whip up something quickly (yet again! LOL). ***edited to add***the boy’s name starts with a "Q" so I decided it was a good chance to use a letter that usually gets left over on my alpha sheets!***
This card uses Stampin’ Up!’s Sticky Cuts Letters and Chunky Essentials black glitter. The chunky glitter is still somewhat sparkly, but reminds me almost more of sequins. I used some retired designer series paper (I _think_ this is pool party….but I could definitely be wrong!) and the stamp set "It’s Your Birthday" (which is definitely still current). Black grosgrain, and a black eyelet complete the masculine colours. I used the square punches for the tag, and added a strip of cardstock as a tab to insert the eyelet; I used a stampin’ dimensional to hold it in place.
We used sticky cuts letters & fine cosmo glitter yesterday at Stampers Club so I’ll try to post the project a little later as well. One note – if you have the fine cosmo glitter, you definitely will want to have the powder pal trays and brush as well – this stuff is so fine, you need to have some way to corral it & return it to the bottle!
 Love those sticky cuts letters….