Sam’s Day Finale
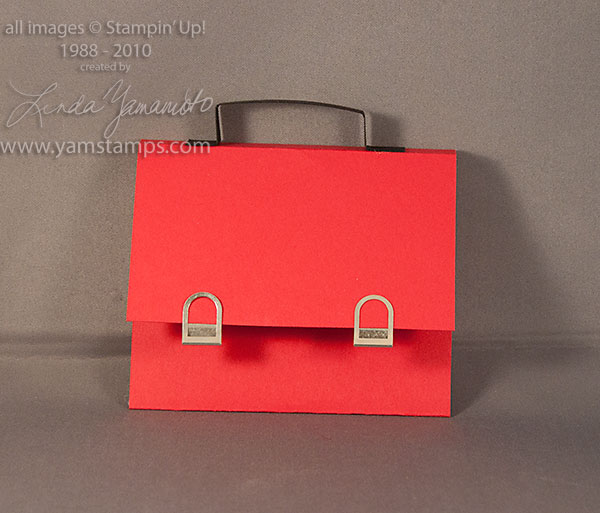
I personally love giving (and receiving!) gift cards. It allows the recipient the freedom to choose something they really want/need, and if you choose the store and make an effort with the presentation it can make a perfect choice.
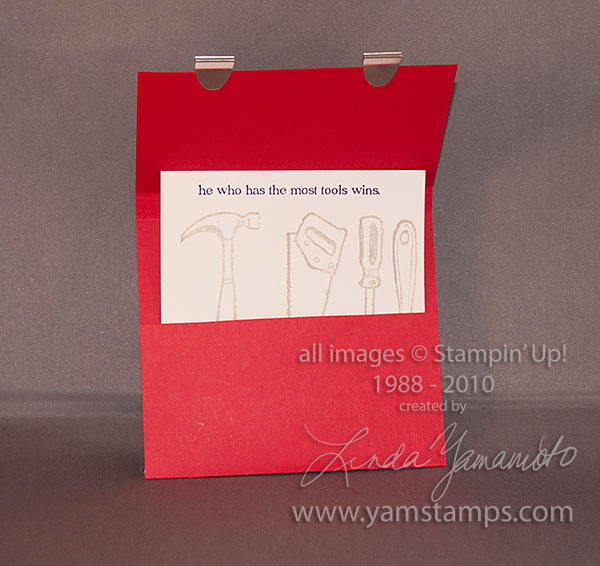
I designed this easy gift card holder for the home reno/tool person that you might be buying for. Real Red cardstock creates the toolbox, Basic Blac cardstock creates the handle and two wide clips from the Clips Assortment (p179 current Canadian Stampin' Up! Idea Book & Catalogue) create the latches. No adhesive required – just slide them on the edge of the cardstock! (I have to admit I squealed when it worked out).
The insert is created with the Totally Tool stamp set, stamped in Basic Black and Sahara Sand. The gift card could be attached to the insert or just slid in front of it in the pocket.
Contact me if you need supplies to create your own Tool Time Gift Card Holder, or place your order online here!
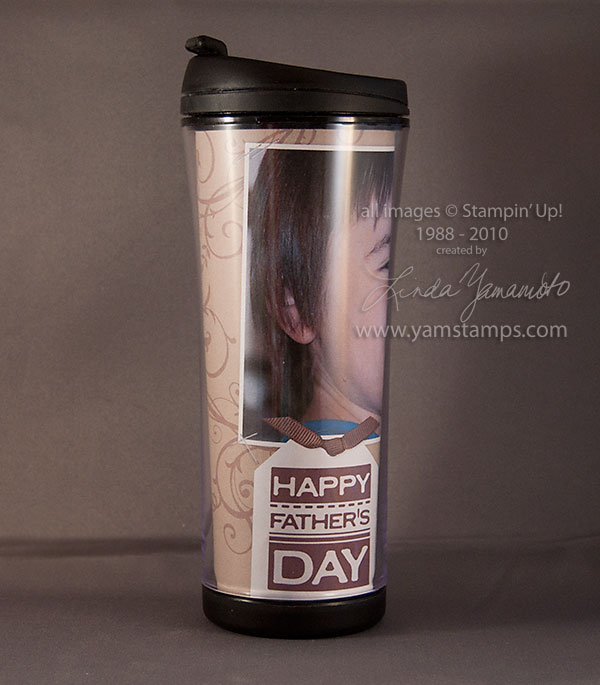 Hard to get a good shot of a cylindrical object… Anyway, this is one of the projects that might have been hard to see on the TV spot the other day. I have a collection of travel mugs – and I drink from them all the time, even at home, as I tend to wander around the house with my tea in hand. This way, if I put my drink down and walk away, when I come back (if I can remember where I left the mug…) the tea is still drinkable. This mug came from one of my fave coffee shops (think circular green logo and killer chai lattes LOL) and has a liner that you can replace. I created an 8.5" x 11" layout in My Digital Studio and printed it on regular text weight paper. I then used the original liner as a template for cutting. I was able to include features like staples and a tag with ribbon, but because they're all digital elements, the insert fits easily inside the narrow opening with no bulk. As you can tell, this insert is for Father's Day, but you can easily change the insert to suit the season / holiday / latest brag photo of family members.
If you're weeping over some of your favourite Stampin' Up! colours being retired, My Digital Studio is one way to ALWAYS have access to them! You'll be able to use designer papers, elements and accessories in those favourite colours without fear of running out of stock! Contact me for more information about My Digital Studio, or place your order online HERE.
 Come join this fun class! We'll make four coordinating birthday cards and a birthday cake box to hold everything. Alternatively, use the birthday cake box to hold your gift!
Wednesday, June 16th, 7pm cost is $25 and includes all necessary supplies. Go to the class page and click on the paypal link to reserve your spot.
See you in class!
Here's the video from my TV appearance yesterday, in case you missed it. I always worry about not having enough to show…and always run out of time!! LOL. Ah well, better to be overprepared than underprepared?!
As a result, I'll have lots of "eye candy" for you in the next little while here on the blog, as I share projects that didn't get air time yesterday.
My latest email newsletter went out yesterday. Don't miss out on the next one – be sure to subscribe! Also, while you're clicking around here, please considering clicking on "Liking" this blog (click on the little "like" thumbs up button) or "liking" the Yamstamps page on Facebook, if you're so inclined.
 Thank you CH Morning Live! I was invited back to the studios today to share some Father's Day ideas. This is the wood veneer card created using the Big Shot and Serif Essentials Dies. I applied part of a Sticky Page to the back of the wood veneer to prevent it from splitting along the grain. (I figured this out after wrecking a few letters first LOL). It works really well, though! The adhesive and liner help prevent the wood veneer from splitting while I die cut letters, and then you can peel off the plastic liner and adhere the letters to your project really easily!
Please be sure to sign up for my newsletter (click on link or go to the box at the top left corner of this page). You'll receive written instructions on how to make a stair step card, plus you'll get all the updates on my classes and new Stampin' Up! products. I'll be posting more images of the projects from my TV appearance in the next few days, so please be sure to come back here to www.yamstamps.com to see everything!
Click on these links to get to the pdf files of the retiring lists.


These items will NOT be appearing in the new Stampin' Up! Idea Book and Catalogue (which starts July 1st). Remember that stamp set supply should last til the end of June, but accessories are only available as long as supply lasts. Place your order online or contact me directly.
 Once again this year, my friends are holding Sam's Day. This fun family event raises funds for Toronto Sick Kids Hospital, specifically the James Fund, for neuroblastoma research. This year, Sam's Day is an extra special celebration as Sam has just reached 5 years cancer free!! I'm donating another Silent Auction basket full of Stampin' Up! goodies to help raise the total amount going to this worthy cause. If you're attending Sam's Day – this Saturday, June 5th, please be sure to bid!! There's a 12 x 12 scrapbook, cardstock, designer series paper, stamp sets, ink pads and a punch included, plus gift certificates for merchandise and a free class for 6 people. If you're unable to attend, please consider sponsoring me and my team of bowlers.
In the meantime, I'm prepping for my "For the Boys" card class this Wednesday evening, and on Tuesday morning, I'm slated to appear on CH Morning Live, around 8:20, so please tune in!
 I love this Textured Impressions Embossing Folder! It's called Stampin Up Elegant Bouquet. I embossed Whisper White cardstock with the folder in my Big Shot, and then used my Two Way Glue and Dazzling Diamonds glitter to add glitz to the centres of the flowers (unfortunately I don't think it shows up really well in this photo…) The "Friends" stamp is from the set Vintage Vogue which appeared in the Occasions mini catalogue and is still available for order. The "F" was cut out of a second image and mounted on top of an original image using Stampin' Dimensionals.
While the Vintage Vogue set is still available for order (117690 wood mount, 118598 clear mount), there are some retiring colour products that are already GONE FOREVER. Only Orange and Close to Cocoa 8.5" x 11" cardstocks are out of stock, and supplies of Sage Shadow 8.5" x 11" AND 12" x 12" cardstocks are exhausted as well. Many of the retiring colour products are on backorder, being shipped out as available, but you'd best place your order NOW if there's a retiring colour item you need.
I was recently interviewed by Rosie Grover of the Hamilton Spectator newspaper for a column she does featuring local small businesses. It was a fun interview (you can see it HERE) but I have to confess that the hours leading up to the interview weren't all fun….because…(further confessions)…I am a messy crafter. Rosie's innocent "Let's meet in your studio" set off a wave of a cleaning frenzy my craft room has not seen in quite a while… Since my in home classes are either held in other people's homes or in my dining room area (I really should call it the stamping room, since we don't always "dine" there…), my studio is for my personal use. I create for the classes I conduct, but I also do my own scrapbooking, cardmaking and 3D projects. (Thankfully Rosie wasn't interviewing me for the "What's on Your Desk" column she also writes. That would have taken forever).
So…since I went to all that work, I had to take a photograph of the results. And NO, I am not going to show the "before" shots. Just pretend that my room always looks like this, okay?!

The decor element that is above my bookshelf that houses my stamp sets, my 12 x 12 cardstocks and various other "stuff" that I use for crafting.
 The other side of the room with another shelving unit of "stuff" and an additional desk surface (Ikea, in case you were wondering). Until I got it last year this side had a table with boxes underneath it… My Big Shot and dies, markers and samples are housed here. The surface that my ink pads are on is a laminate countertop set on two filing cabinets that house my 8.5 x 11 cardstock and business papers.
There you go, a little sneak peek into my crafting studio. It still looks like this… really, it does…