ACK!
I'm having some major computer issues at present! I still have some online access, though…but if I'm a little slow to respond to emails, that's why… Apologies and fingers crossed that things are resolved SOON.

I'm having some major computer issues at present! I still have some online access, though…but if I'm a little slow to respond to emails, that's why… Apologies and fingers crossed that things are resolved SOON.
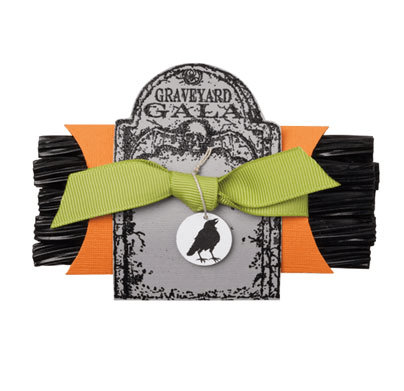 This is a cute idea for treat for a favourite trick or treater! The wrap is actually a Pillow Box die cut. The project uses the Graveyard Gala stamp set. You can see the complete list of supplies used here.
The Hamilton Holiday Stamp a Stack is just about a week away – there's still time to register!! Contact me if you have any questions, or click below to instantly register using a credit card. See details HERE
 It's that time of year – carving the pumpkin, finding and/or creating the perfect costume….not eating all the Hallowe'en candy before October 31st…LOL. A great time for photo taking, too!!
Found some sites for Hallowe'en photography tips HERE and HERE. I like the reminder to be IN as many photos as possible – too often the photographer gets "left out" of the pics (speaking from experience). This is often not discovered until said photographer is then trying to scrapbook the event/photos, and realizes that they have none of themselves. I have a whack of pictures from our trip to Disneyland and I think I appear in two of them.
Another great tip – even if you're not thrilled with how you are appearing these days (and let's face it, we're usually our own worst critics) – it's still good to be in the photos. One friend pointed out that up until a while ago, the only photos of her showed her hiding behind her hand. Not very memorable for herself or for her family (nor very scrapbook-worthy LOL).
In the meantime, I share with you a photo from a few years ago. Remember – even if your photo isn't technically perfect, it can still capture the moment and the memories! I like to take photos in the same spot each year to show the changes and growth. The little ghost here is definitely a bit bigger now! All right – back to the jobs at hand….now where did I put the rest of that candy??!!
 Build-a-Bear products are available in Stampin' Up!'s Holiday Mini Catalogue!! They're fun, no matter what your age. Today seemed like a good day to show some cute birthday projects made with Build-a-Bear items, in honour of Theodore "Teddy" Roosevelt, born on this day in 1858. The teddy bear was created and named in his honour after the then President was on a hunting trip and refused to shoot a captive bear (he ordered it released instead).
The invitation features the Bigz die Stampin' Up bear; the candy box is made with the Fabulous Favours box and Pawsitively Embosslit die, and birthday hat is made from a paper cone and embellished with the Lil' Paws Embosslit die. If you need more information on these items or projects, feel free to contact me! See here for the complete instructions on creating these birthday projects.


Parties have never been easier! This week, the Pirates Party Kit and Princess Party Kit are the featured deals. Regularly $23.99, they are only $13.99 until October 31st. Each kit contains invites and envelopes, decor and favours for eight people.
Act quickly, because this deal is on for less than a full week – only until the end of the month!
You can place your order online or contact me directly.

Just a reminder that if you'd like to get the Mini Library Clips (featured in this Cool Kids Simply Scrappin' sample), 1/2" Library Clips, Basic Jumbo Grommets or Circle Designer Brads, be sure to act on it today! Don't miss out – this deal gets pulled at 11:50 am ET tomorrow (Monday). You can place your order online here – don't forget that your $50 online order earns you the instruction kit for this month's Class To Go.
The new Deals of the Week will be announced tomorrow afternoon, so be sure to come back to www.yamstamps.com to see what it is!
and check it twice…. (click on image to open the file).
My mailing list received this earlier in the week, but I'm also posting it here in case you missed it or (*gasp*) aren't signed up for my email newsletters LOL. (If you want to be signed up, go to the top left of the yamstamps blog).
This is a wish list for Canadian Stampin' Up! customers (sorry, I can only sell to those in Canada, if you need a demonstrator in another country, check out www.stampinup.com for availability in your area). Enter your desired items, indicate an amount for a gift certificate you'd like, and then email it to me. I will get in touch with your contact person to help fulfill your wishes! Return it by November 25th to ensure plenty of shopping time before the winter holidays for your loved ones.
If you have trouble accessing the wishlist (it's a Word document) please contact me. Happy shopping!!

Stampin' Up!'s Sweet Treat cups are so neat! This tricky Hallowe'en card comes complete with a treat… I designed this one so that the recipient could easily access the candy in the cup without totally destroying the card! Use the 1-3/4" circle punch to create openings in the image, Basic Black cardstock & Only Orange card. Adhere the sweet treat cup to the back of the image by using mini glue dots on the top rim. Don't remove the adhesive cover on the back of the Sweet Treat cup rim. Adhere the image to the Basic Black cardstock with a strip of Sticky Strip along the top & bottom only. Create a tag by re-stamping the image & trimming so it can slide between the image and black cardstock. Use the tag corner punch and horizontal punch to finish the tag effect. Position this over the hole you punched in the card – tada! (oh, don't forget to fill the cup….LOL). The jumbo wheel on the bottom of the card is Haunting Hill, and the image is from Sweet Centres – both from Stampin' Up!'s Holiday Mini Catalogue.
I've got a busy weekend plan – finalizing designs for the Holiday Stamp a Stacks, creating a Hallowe'en costume, trying not to eat all the Hallowe'en candy before it's supposed to be given out…. but if you have any questions, please feel free to contact me – or if you need some crafting supplies, don't forget that you can shop 24/7 at www.yamstamps.stampinup.net!
 This is another swap card that I recreated, and I apologize as I am no longer sure who designed this originally… It's a beautiful card, isn't it?! This is the Level 2 Hostess stamp set Asian Artistry. You can't purchase it…you can choose it for free if when you host a qualifying workshop (in this case, total merchandise sales of $395 or more). The Old Olive cardstock pieces have been dry embossed with the Backgrounds 1 Big Shot Texturz Plates.
Week 4 of the Twelve Weeks of Christmas went out yesterday – please contact me if you didn't receive it!! (or sign up for my newsletters at the top left of the blog if you haven't yet!)

A version of this was in my Twelve Weeks of Christmas email earlier. (By the way, the next one is en route to email boxes as you read this – don't miss out – sign up at the top left of the blog!)
Club members requested to do this card "in person" – always makes it easier to "get" the instructions. For this card, we used Barely Banana cardstock, with Bella Bleu designer series paper and the Stampin' Up! set Great Friend which tends to be a "go to" stamp set for me. I really like the sentiment and images. This card fits in a Stampin' Up! medium envelope (the "standard" card size), but will be a bit bulkier in weight.
Learning by hands-on is one of the best ways to retain techniques, in my opinion. If you'd like to have a chance to do this, please consider attending one of my classes or events. Another great option – host a class in your own home with your friends and family. Contact me for more information!


