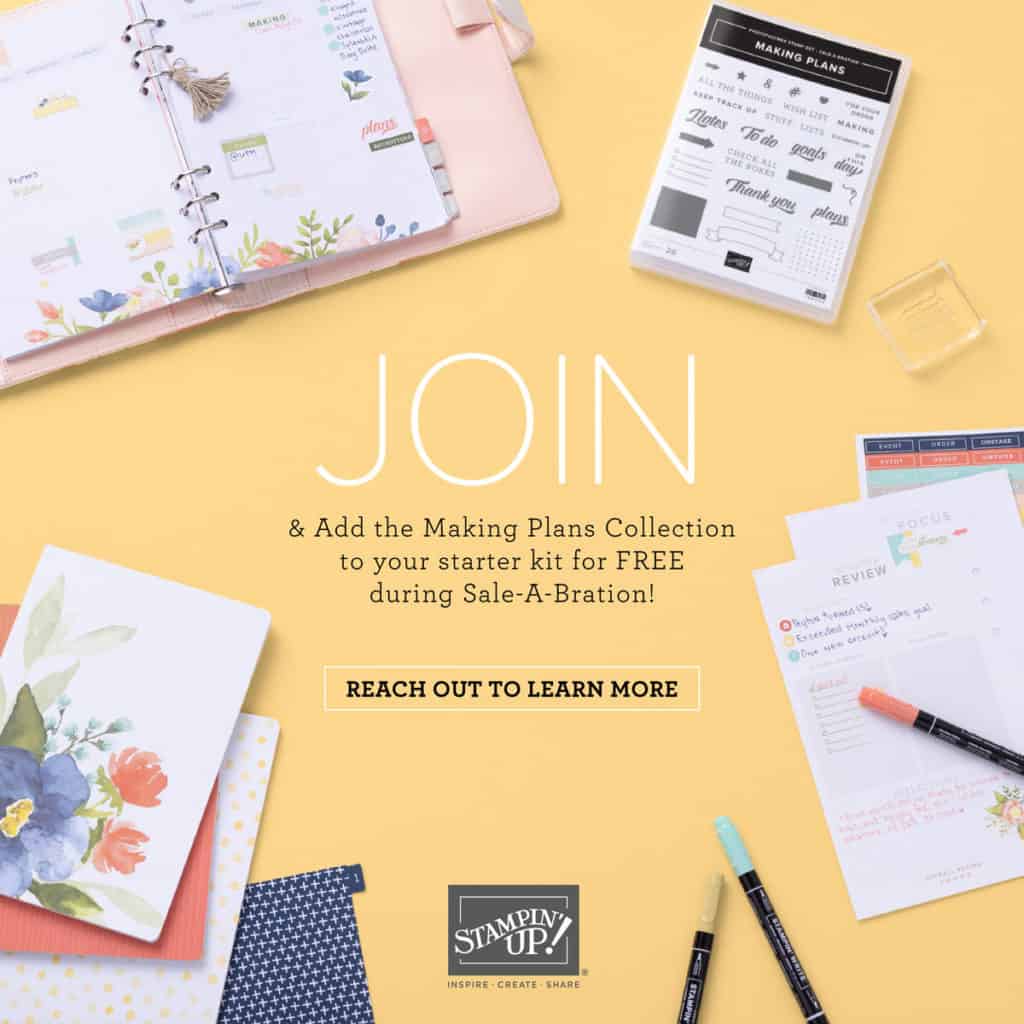
The Making Plans Collection is available for free in July & August while supplies last!
I am an admitted planner addict. I love planners and I typically have at least 3 on the go. (Yes, probably too many). I have one for my healthcare job, one for my Stampin’ Up! business and one for almost everything else. So I was happy to be able to preorder the Making Plans Collection last month! Demonstrators were able to buy this before it was available this month as part of the Sale-a-Bration Starter Kit.
It’s an undated 18 month planner that you assemble (check out my video showing it below), plus an exclusive stamp set, stickers and 3 notebooks. I actually have to “use” the stickers and not hoard them. This is what I keep telling myself….LOL.
One more reminder – all Sale-a-Bration items are available while supplies last – and that includes this planner. So if you’d like this bonus on top of the deals in the starter kit (check out more information here), don’t hesitate!
Happy Planning! Please feel free to contact me if you have any questions about the Making Plans Collection, the starter kit, or any advice as to how I can stop the need to purchase more calendars and planners?!
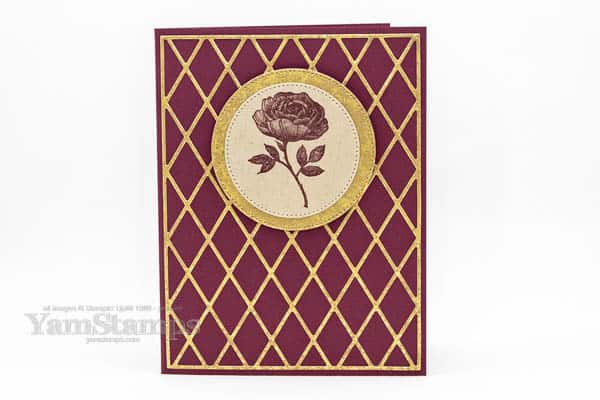
Check out this simple and elegant rose card using a free stamp set!
If you’ve checked out the YamStamps site on a semi-regular basis, you may have spotted that some of my favourite designs are towards the clean & simple end of things – so this elegant rose card is definitely in that category.
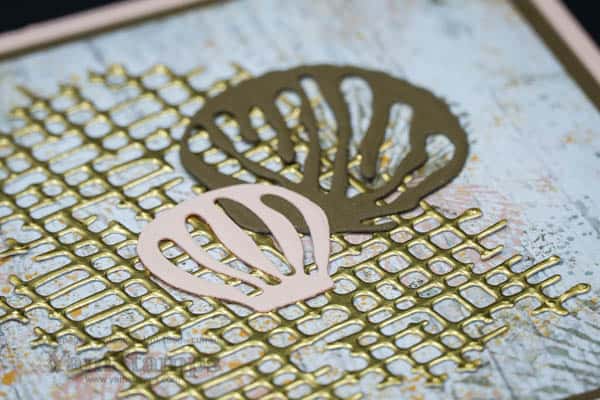
Elegant Rose Card
This elegant rose card was super easy to make, which also makes me love it more! Just two tones – Merry Merlot and Gold. The Gold is the Distressed Gold Specialty Paper from the Annual Catalogue. I LOVE this paper – it’s got the metallic sheen, but it’s not super bright. I used Merry Merlot Cardstock, and then Merry Merlot ink for the rose image. Monochromatic colour schemes just make everything easy.
The rose is from the Wonderful World stamp set – and you can select it for FREE during July & August Sale-a-Bration with a $120 CAD product purchase – it’s part of the Wonderful World Bundle – which includes the Wonderful World stamp set and coordinating Designer Series Paper. The majority of Sale-a-Bration items are available to select with a $60 product purchase, but there are a few items that are only available at the $120 threshold (and Wonderful World is one of them).
The lattice is from the Organic Beauty Dies, and before die cutting, I put an Adhesive Sheet on the back of the Distressed Gold sheet. That way, once it was cut, I just had to peel the liner away and I could easily attach the lattice to the card. Bonus – I have lots of little distressed gold diamonds that I could use on another project. (Or to decorate the envelope and inside of the card if I want!). I don’t want to waste any of this paper if possible!
The image on this elegant rose card is on Crumb Cake Cardstock and mounted on a Merry Merlot circle. They’re die cut with the stitched circles from the Stylish Shapes Dies. I liked using Crumb Cake rather than Basic White or Very Vanilla because it felt a little softer and more in the colour scheme/distressed theme.
If you’re interested in getting your hands on this bundle, a reminder that Sale-a-Bration items are available during July & August – but only while supplies last. You can shop online 24/7 anywhere in Canada at https://yamstamps.com/shop or you can message me for assistance placing an order or if you’d like to pay by etransfer.
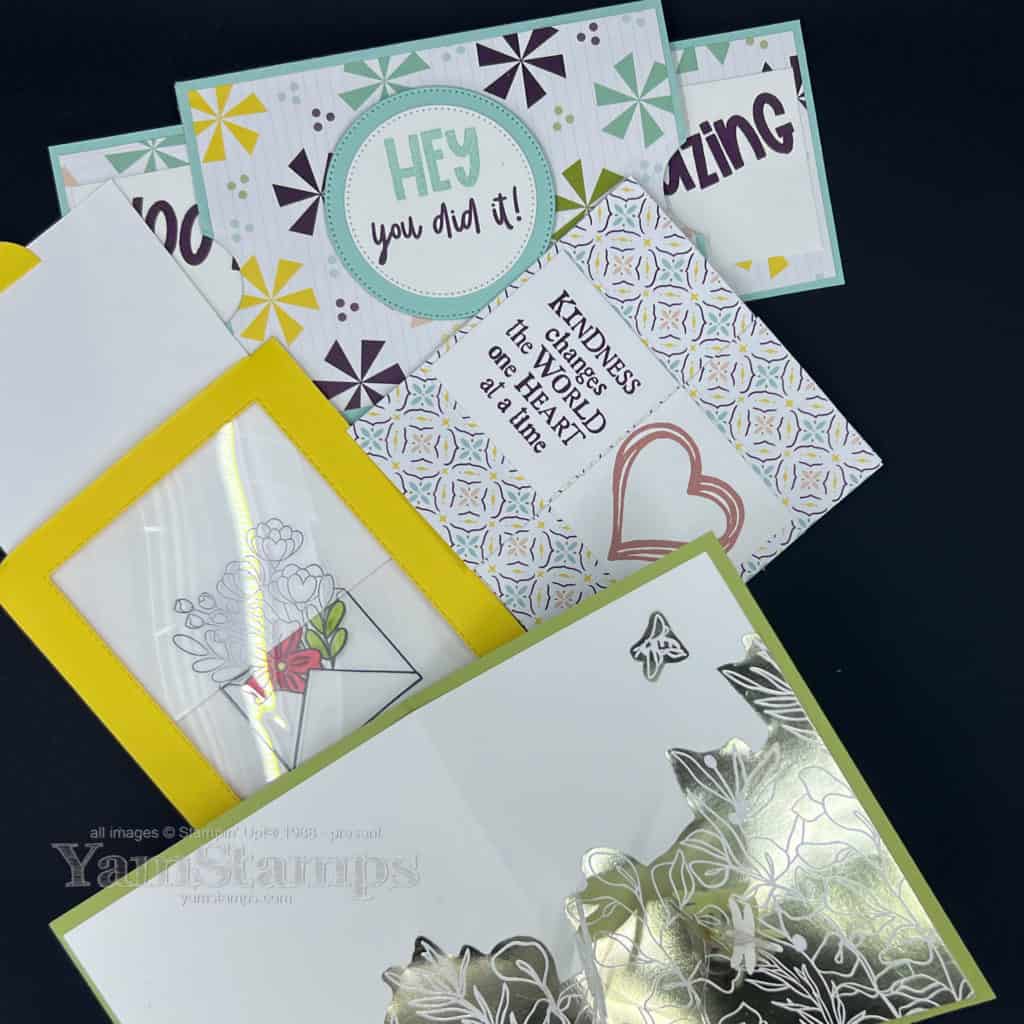
My latest online class, Cards That Move You is set to launch Thursday 14 July 2022!
I have been working hard behind the scenes on a new online class which will be available next week – and Early Bird Pre-Launch pricing is available now! You’ll be able to save money on the class fee if you sign up now for Cards That Move You.
Cards That Move You Online Class Projects
Like most of my online classes, you’ll be able to use supplies that you have on hand in your craft room. (….but I won’t stand in your way if you need to get new products either LOL!). My focus for these cards was that they had to have some sort of movement element, had to fit in a regular Medium Stampin’ Up! envelope, and didn’t have to require much beyond the basic paper crafting tools (trimmer/scorer, scissors, adhesive). Now, I do use a die when I made one of the cards, but it isn’t a make or break kind of thing – you could definitely use scissors or a trimmer instead (and I mention this). You can use dies and punches to decorate your projects, though – but again, use what you have on hand. Other supplies you’ll want – cardstock, patterned paper, acetate/window sheets and a strong adhesive.
Check out this video that shows the projects that are included in the Cards That Move You online class!
Cards That Move You – video highlight
(Actually, you should check out the reel on Instagram and make sure you have your sound on – I have the most fun picking what songs to use!)
Like all my online classes, when you purchase the Cards That Move You class, you’ll have lifetime access (or reasonable facsimile?!) to the class videos. Check out the class page, and feel free to contact me if you have any questions. Remember that Early Bird Pricing ($20 for lifetime access) runs until 13 July 2022 (Wednesday) and class opens 14 July 2022. Hope you’ll join us in class!
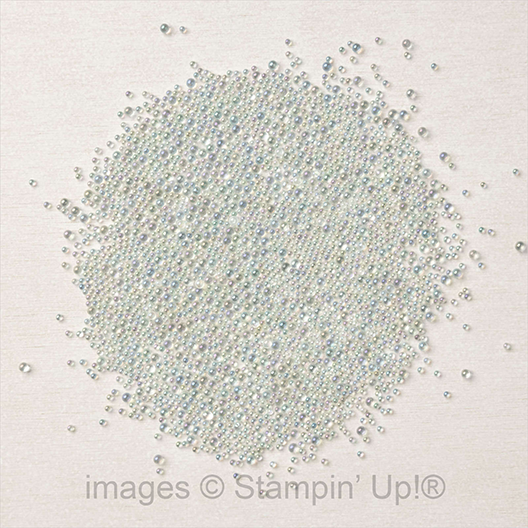
Make an easy and elegant decorative beaded element to dress up your next card or project!
Have you seen the Effervescent Elements in Stampin’ Up! Canada’s 2022-2023 Annual Catalogue? They’re one of my favourite new products! I used them to create a beautiful decorative beaded element for a recent card design.
Effervescent Elements
Word of warning, though. If you’re going to use these, you’ll want to work with them inside a box lid or something that will contain them – because they TRAVEL. I used the tray from the new Embossing Kit (available starting tomorrow in the Stampin’ Up! July-December 2022 Mini Catalogue).
I used them to create a beautiful decorative beaded element on a card that I designed featuring new product from the July-August Sale-a-Bration catalogue (starting tomorrow too!).
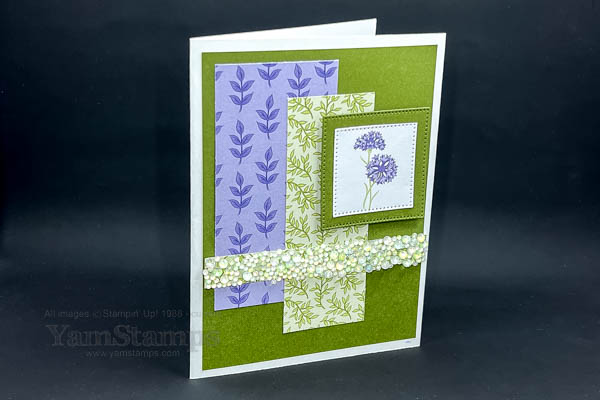
The card was for a recent Demonstrator-only card swap. I feature some of the cards I receive in these swaps on the Sunday Swap Feature on the YamStamps Facebook Page and on the Sunday Swap Page here on the YamStamps site. Here’s the card I made – featuring the Wonderful World Designer Series Paper that is part of the bundle that you can select for free with a $120 product purchase during July and August Sale-a-Bration.
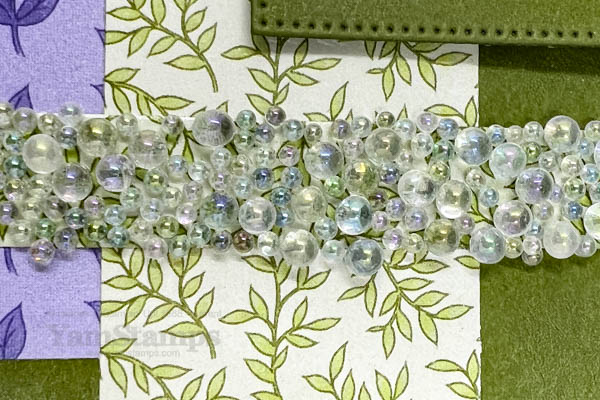
I used an adhesive sheet to cover the Designer Series Paper, and then after cutting to the size I wanted, I removed the liner and added the beads onto the sticky surface. I liked using the patterned paper underneath because I think it adds extra dimension to the beaded piece – plus if I happen to lose any beads, it still looks pretty and the gap isn’t overly obvious because of the underlying pattern.
decorative beaded element close up
I tend to like shiny things but I also dislike any crafting that’s too messy (glitter being the prime suspect here) – so the Effervescent Elements beads are okay in my books – as long as I use them in my powder tray or a box lid. Even if they run away a bit, I can pick them up and put them back into the container without too much of a fight.
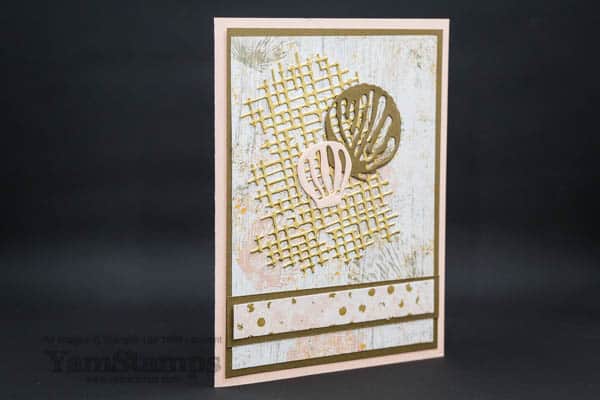
Die cuts and Designer Series Paper make for a serene summer beach card!
Summer Beach Card
Stampin’ Up! Canada has some great products that make for easy crafting – which is perfect for this time of year. I used items from the Texture Chic Suite (also available in French) to create this summer beach card!
Summer is definitely the time for some easy crafting. Paper crafting is great because you can travel with the supplies (OK, not all your supplies, but you can pick out a few key ones). If you wanted to make multiples of this summer beach card, you could do your prep ahead of time and then just assemble wherever you are. Another option – Stampin’ Up! Kits Collection is a great way to have some portable crafting supplies that you can take with you to the cottage, camping or just to the backyard! We are in the last few days of the Buy One, Get One at 50% off kits collection sale, so it’s a great time to stock up on kits – great for having on hand for rainy days, travel, or for gifts for crafty (or even the not so crafty) friends!
I hope that you are able to spend some time this long weekend enjoying the weather. As for me, this summer beach card may be as close as I’m getting to water in the next while….I would usually be enjoying some time poolside, but we have to replace our pool liner (discovered when the winter cover came off)…so we are waiting for our new liner (and the people who can install it). *sigh*
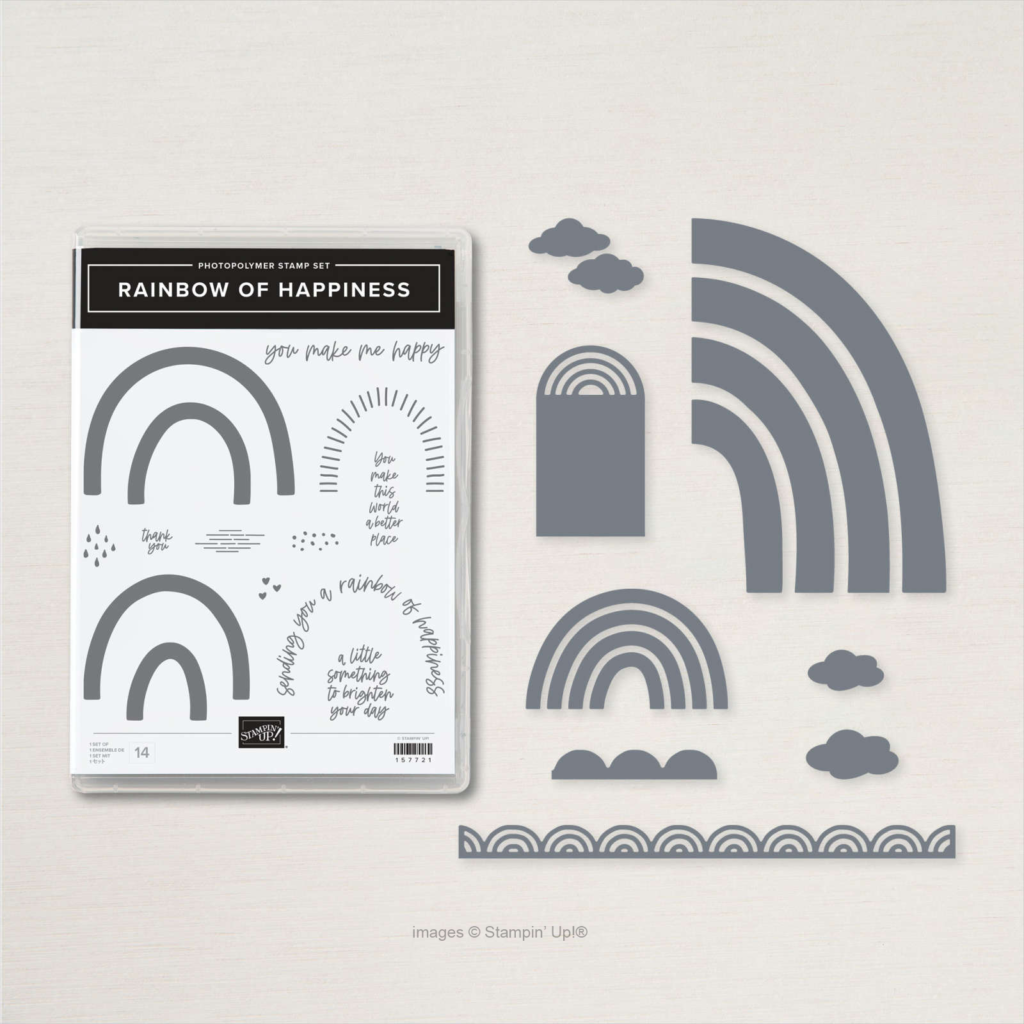
I love rainbows, and this bundle has made me happy! ONE THING – if you love this bundle as well, and would like these products before they retire, PURCHASE THEM SEPARATELY right now. The Brilliant Rainbow Dies are 50% off as part of the Last Chance Sale. Add them to your cart, and then add the Rainbow of Happiness Stamp Set. Cheaper than the discounted bundle!
OK – second thing on the Three Things I’m Going to Miss list…
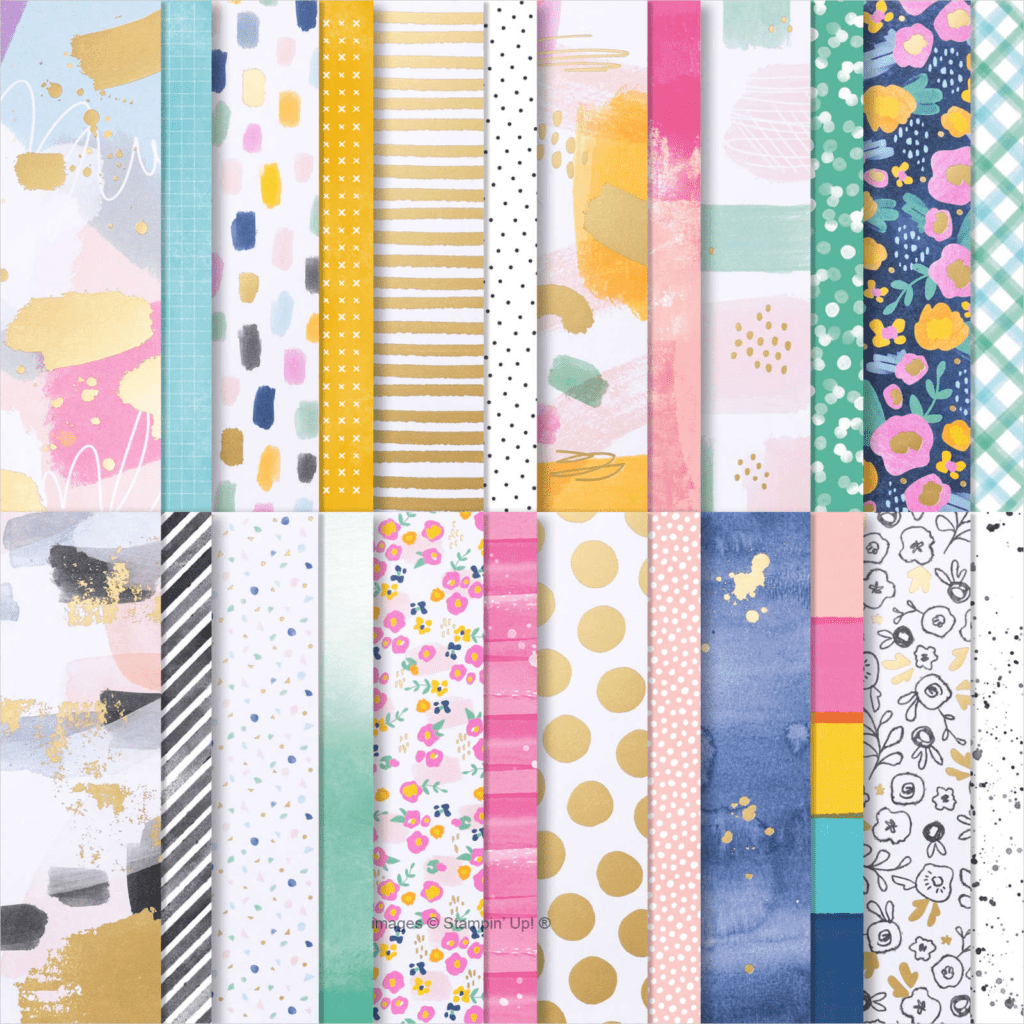
I don’t think you can ever go wrong having a stash of randomly patterned paper in your craft room – great for backgrounds on cards or scrapbook pages, and the variety of patterns you get in this package covers a whole lot of potential card making! Plus it’s got a great combination of bright and cheery and monochromatic colours and there’s some cute ephemera and coordinating cards and envelopes to go with it!
Last but not least on the Three Things I’m Going to Miss list…
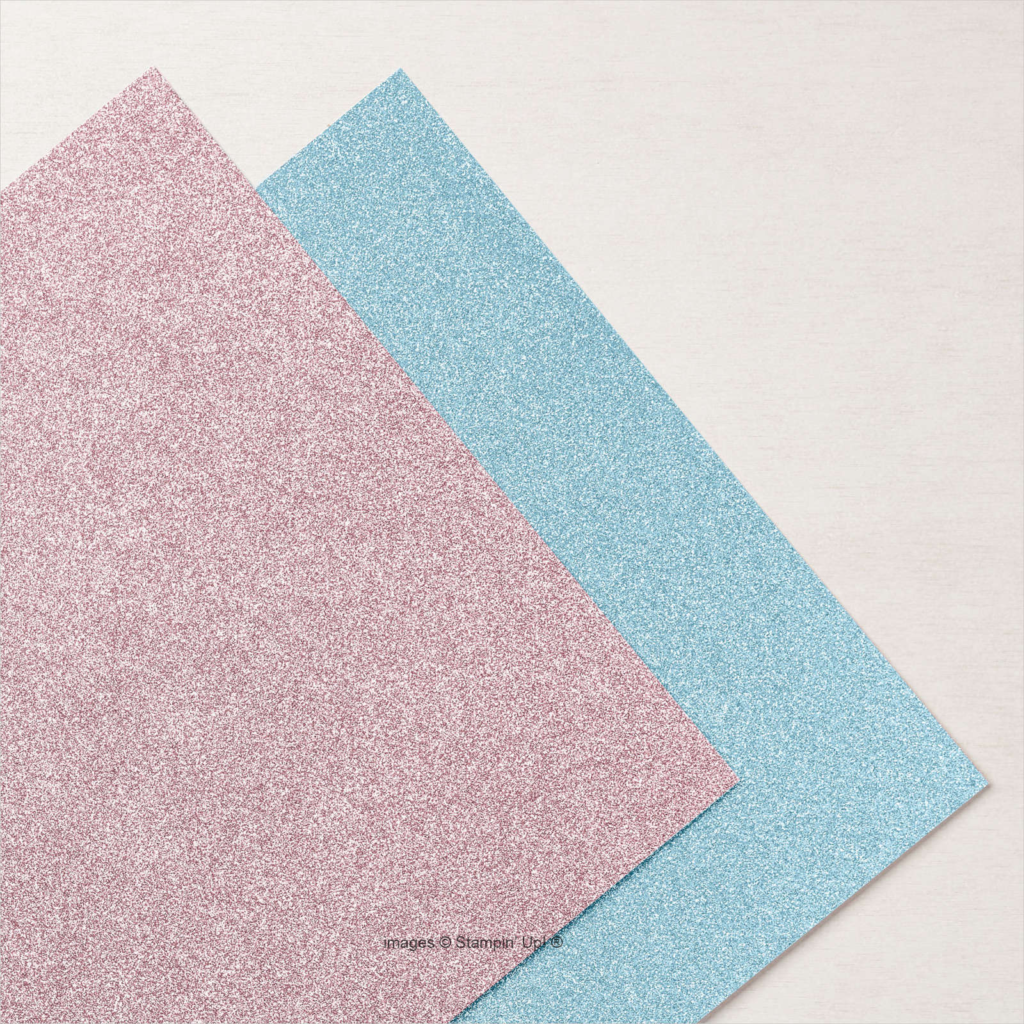
Well, duh. It’s shiny. LOL (plus it’s currently on sale).
Did anything on my Three Things I’m Going To Miss list cross with yours? Don’t forget that all retiring product is available until 30 June 2022 or until supply is exhausted – whichever comes first – so don’t miss out! Shortcut to shop is yamstamps.com/shop or you can message me if you’d like to pay by etransfer or need assistance placing your order.
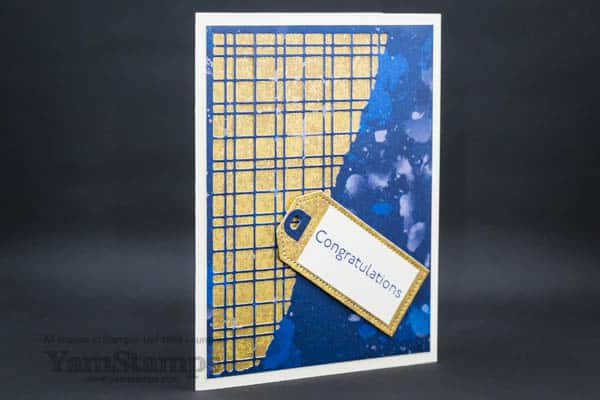
It’s that time of year – make sure you have a Congratulations Card in your stash!
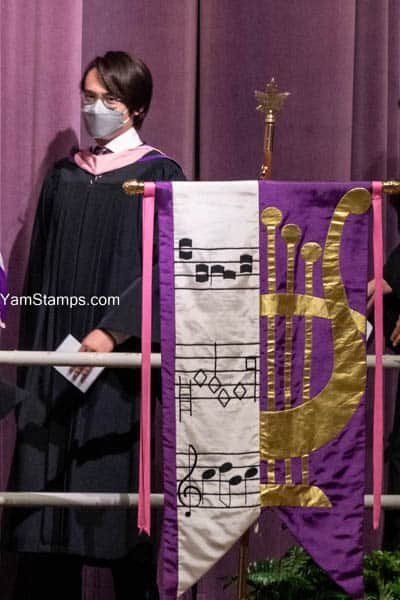
As we approach the end of June, it’s the time for graduations – so we made this congratulations card in Stampers Club this month. Of course, there’s many reasons to send a congratulations card, but I guess I am thinking of grads, since my son just finished his university degree! We just attended his convocation at Western earlier this week, and so happy that we were able to be there in person. I was thinking that he got a little lucky with the timing (weird to say that, I know), but honestly – he was able to have a “normal” first year; the pandemic started in his second year so things changed part way through and into third year, and fourth year they were able to resume a lot of their in person classes and groups, including an in person convocation ceremony.
(one of the many photos taken the other day…)
So here’s the card (right, you’re here for the crafting LOL). Featuring some new catalogue product, including something that I need to reorder already…
Congratulations Card
I absolutely love the Distressed Gold Specialty Paper! (So much so that I have to put it on my next order going in because I’m down to scraps). Even though it’s in the background, it still stands out because of the design of the card. The foreground paper is from the Sun Prints Designer Series Paper, and it’s die cut with the Split Card Textures Dies. I die cut a Tailor Made Tag from the bottom right corner of the Distressed Gold Paper (because it’s hidden behind the DSP) before using Multipurpose Liquid Glue to tack the the Gold Paper and DSP together. I die cut the tag reinforcement from a scrap of the Sun Prints Paper. The sentiment is from the Art Gallery stamp set, and is stamped in Starry Sky ink.
I am drawn to the shiny objects LOL, so the Distressed Gold Paper was an easy pick for this card design, and I also love the Sun Prints Papers….plus the Sun Prints include a bit of a purple tone, and Western’s main school colour is purple!
one more photo of the grad for good measure…
Stampin’ Up! does have some other stamp sets that include the word Congratulations (including A Grand Kid, Peaceful Moments, Celebrate Sunflowers, the new Breaking News and more…) so there’s lots of options for your Congratulations Card – whether it be for a graduation, promotion, wedding, baby or whatever life event you’d like to celebrate! (For me, right now, I think it’s “You made it to today, yay you!). Shortcut to shopping is yamstamps.com/shop or you can send me a message if you’d like assistance placing an order or would like to pay by etransfer and have the order shipped directly to you.
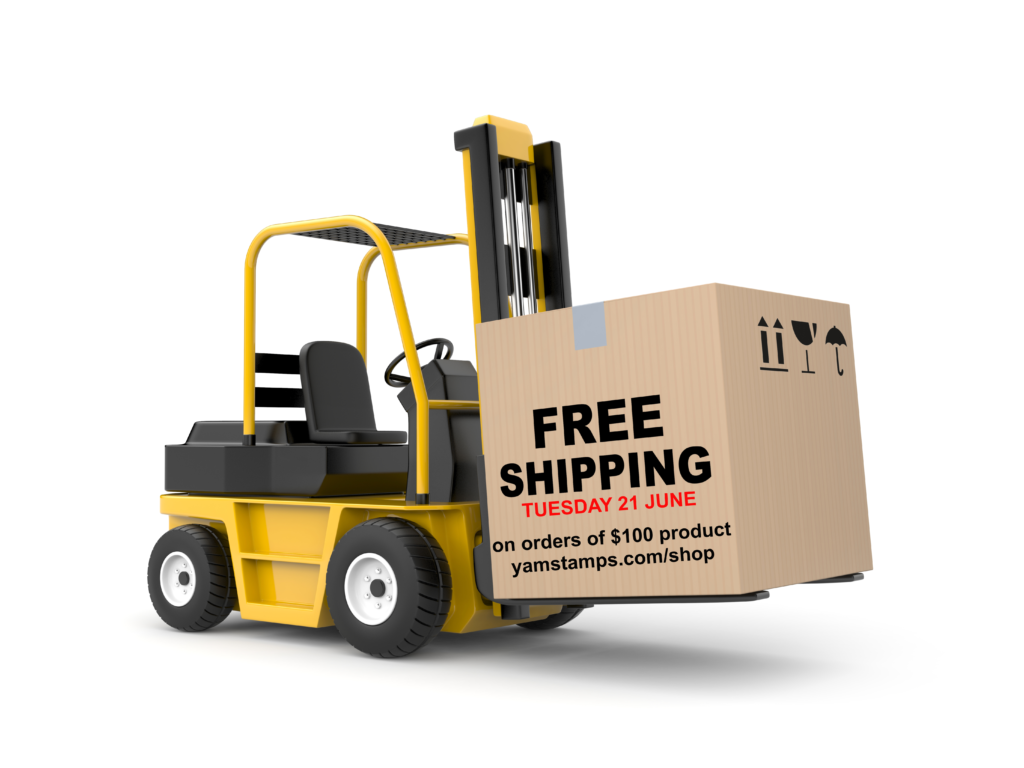
Stampin’ Up! Canada is offering free shipping today only! Order $100CAD product (before taxes, after discounts applied) and pay no shipping costs. Shortcut to shopping with me is yamstamps.com/shop.
If you have a smaller list of things you “need”, and can pick up your order in Burlington, contact me by 6pm today and I will include your order in a group order going in this evening – so everyone will qualify for free shipping! Everybody wins 🙂
Don’t forget that the Kits Collection BOGO 50% off sale continues until the end of June – purchase one kit, get the second one at half price! If you purchase these today, remember that the $100CAD threshold is after discounts applied. (Oh, darn, must pick out more merchandise…LOL).
As always, if you have any questions, need assistance placing an order, or would like to pay by etransfer, contact me and I’ll be happy to help!
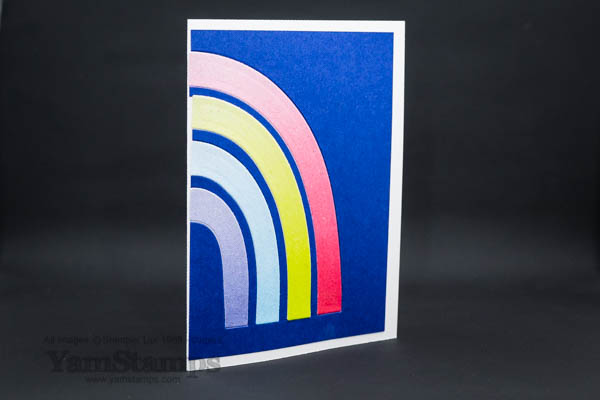
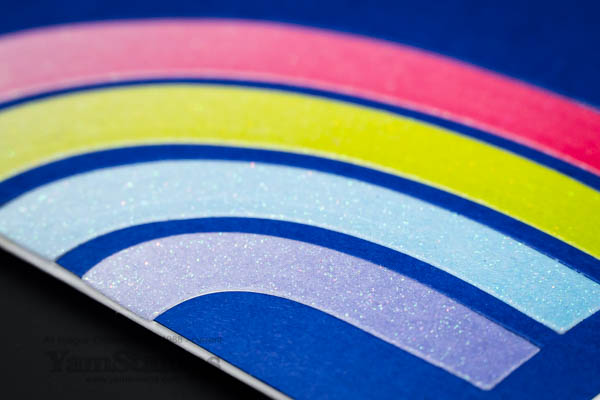
I’m always Chasing Rainbows! Combining some retiring and some new product on a simple, sparkly card
I thought this was such a pretty card – I love the rainbow theme!
Chasing Rainbows Card
It’s a super simple design but I wanted the sparkly rainbow arcs to stand out on my Chasing Rainbows Card. The Brilliant Rainbow Dies are from the January-June 2022 Mini Catalogue, and they’re retiring at the end of this month (or if they sell out before then). (That’s the “old” on this card). They’re part of the Last Chance Sale – and they’re 50% off!! Such a deal! If you want to get the coordinating Rainbow of Happiness stamp set, which is also retiring, you’ll want to purchase these separately – it’s the best deal because of the sale. Bundles typically offer a 10% discount on regular catalogue prices and are usually the more cost effective way of buying coordinating products – but it’s actually more expense than the separate items right now!
The arcs themselves are the 2022-2024 In Color Glimmer 6″ x 6″ Papers (well, 4/5 of them – since this rainbow only has 4 arcs). That’s the “new” on this card! Since this was one of our Stampers Club cards, I was able to cut a bunch of arcs at the same time and then everyone got one arc of each colour. So, yes, not always in ROYGBV order. (Though my sample is…LOL). Sample shows Sweet Sorbet, Parakeet Party, Tahitian Tide and Orchid Opulence.
I guess the something “blue” if we are going with that theme is the background – it’s the new In Colour Starry Sky. I positioned the rainbow die with the cutting edge off the side of the cardstock so that it left an open end at the edge. I liked that it looks like we are seeing this half of the rainbow, and not literally half a rainbow.
close up to show the glimmer of the Chasing Rainbows Card!
I love the ombre effect on this glimmer paper….and I love that the glitter doesn’t come off all over the place. I love shiny stuff, but I tend to be a bit of a messy crafter, and so I need all the help I can get to try to contain the chaos and mess. I have actually started to use Liquid Glue a little more often these days – often because it’s right there, and I do like the ability to move things around a bit before they’re totally adhered in place. I still end up with glue on my fingers though LOL.
Shortcut to shop is https://yamstamps.com/shop – be sure to check out the Last Chance Sale and grab these dies to make chasing rainbows even easier! Remember that retiring product is available until 30 June or until supply is exhausted. Don’t miss out!