Mar 20, 2017 | cards, Sale-A-Bration, Stampin' Up!
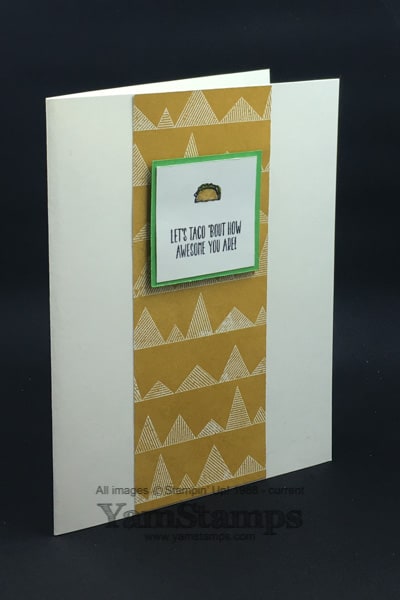
I love a good laugh, and food puns are fun! “Let’s taco ’bout how awesome you are!” This card features images and words from the Tasty Trucks stamp set (143300), which is one of the Sale-a-Bration items you can select for free with each $60 (CAD) merchandise order. The patterned paper is from the Urban Underground Specialty Designer Series Paper. I thought it had kind of a southwestern feel to it (though my friends in the southwest might disagree…). A quick bit of colouring with Stampin’ Write markers (yay small images means QUICK) and the card is good to go! These were my February thank you cards for customer orders.
Sale-a-Bration is on for just a bit longer – it ends on March 31st, so if you want to grab any Sale-a-Bration items, best get them while you can, especially since they are as supply lasts. (Bad Food Puns Alert)“I donut want you to miss out!” In fact, the tin and the Glimmer Paper from the second release (featured on this card, which is travelling to its new home in BC…) are already unavailable for ordering. If you are looking to grab the Starter Kit deal, you’ll also want to act sooner rather than later because traditionally, the last day of Sale-a-Bration sees the website for online sign ups bogged down with everyone trying to get in at the last minute – which is stressful! If you have any questions about the starter kit, or having your own Stampin’ Up! business, you can always contact me for a chat, or check out the information on this page.
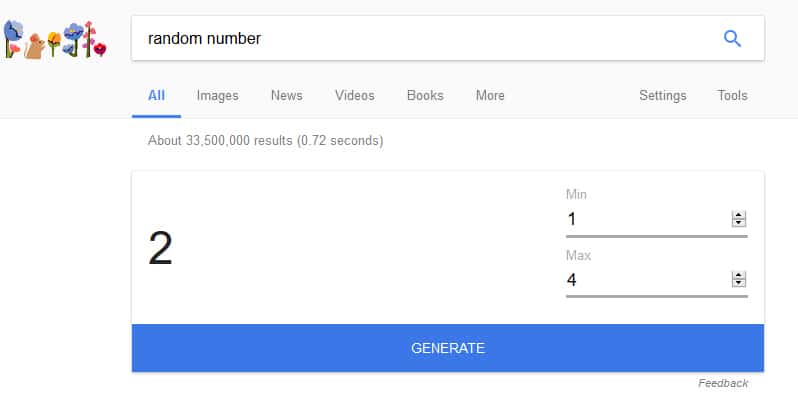
In other news, I’m (food puns alert) eggcited to announce the winner of the St Patrick’s Day Contest! (OK I promise I will stop with the puns….for now…). The colour of the shamrock was indeed Emerald Envy! Thank you to the people who commented on the blog, even with the tight deadline. The random number generator picked…
and the second commenter was Cheryl! Congratulations Cheryl, I’ll contact you to arrange getting a package of Emerald Envy cardstock to you!
I know you may be sad about the impending end of Sale-a-Bration, but don’t worry – April will be awesome. I’ll be celebrating 15 years as a Stampin’ Up! demonstrator so will be wanting you to share in the fun! You’ll want to be subscribed to the YamStamps Newsletter as well as keeping an eye here on the YamStamps Blog so you don’t miss out! (OK I was really tempted to say so you don’t MISO out…but I figured that might be one food pun too many…)
Mar 17, 2017 | cards, contest, Occasions, punch art, Stampin' Up!
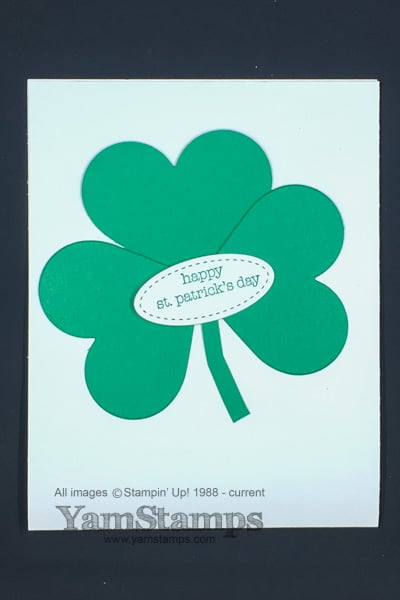
Happy St. Patrick’s Day to you! This is a really quick St Patrick’s Day card – created with the Sweet & Sassy Framelit Dies, Stitched Shape Framelit Dies, and the Teeny Tiny Wishes stamp set which is available in clear mount or wood mount.
Do you have the luck of the Irish?? One lucky commenter will win a package of cardstock! To enter, comment below and answer this question: What colour cardstock was used for the shamrock? (HINT: it’s a Stampin’ Up! colour….and like Stampin’ Up! colours coordinate, this colour’s name coordinates with today). Answer by midnight eastern time March 17, 2017 to be included in the draw! Good luck!
Mar 15, 2017 | cards, Sale-A-Bration, Stampin' Up!
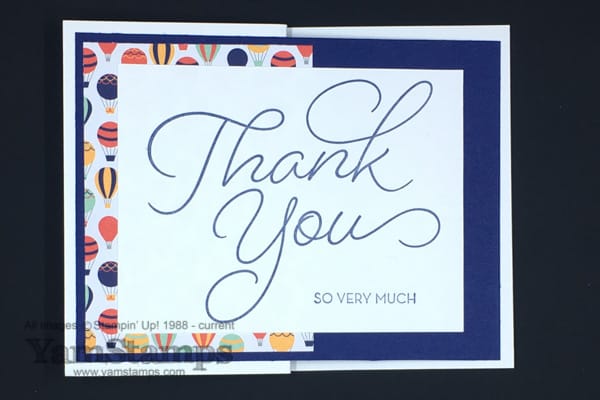
I love large sentiments that can stand on their own. This simple thank you card is a perfect example of this! The sentiment is from So Very Much – a Sale-a-Bration free choice option available in wood or clear mount. The Designer Series Paper, Carried Away, is used on this card as well, and is another option for a free Sale-a-Bration choice. These are available until the end of March, or while supplies last. The gold and white tin is already unavailable as the supply has been depleted.
This may appear as a very simple thank you card, but the design and fold make it a little different. It’s a Z Fold card, so a side fold card where the front panel is folded back on itself. For this design, the Night of Navy background piece covers the “usual” front of card, but is only adhered to the folded back front portion. It just makes it a bit more unusual and eye catching, I think. If you are interested in learning some other interesting folds and tricks to make your cards stand out, consider registering for the Clever Cards Online Class – there are five different patterns in the class, complete with instructions, photos and videos.
This card is currently making its way to customers who placed a product order with me in January of this year. I always make them “reusable” – so my note inside is on a post-it note, which can be removed so that the recipient can “regift” the card! It’s a simple thank you card that simply keeps on giving! If you’re curious to see the March design in person (so am I since I haven’t designed it yet LOL), don’t forget to place an order before the end of the month! If you’re placing an order online, be sure to check off the box that says YES, I’d like to receive updates on products, promotions and upcoming events from Stampin’ Up! when you are creating your account so that your information is passed on to me – that way, I can follow up with you and send your thank you card to you in the mail! If you click no, unfortunately I get absolutely no information, so I have to send a virtual thanks into the atmosphere since I have no clue who has placed the online order. Of course, you can always email me and I can place the order for you. You have just over two weeks left to get a free Sale-a-Bration item with each $60 in product ordered, or an extra two free stamp sets with $165 product for $135 in the Starter Kit – so please don’t delay! The last day of Sale-a-Bration sees the Stampin’ Up! ordering system bogged down with everyone trying to get in at the last minute – so avoid the rush and don’t be disappointed! Contact me if you have any questions.
Mar 8, 2017 | cards, Stampin' Up!
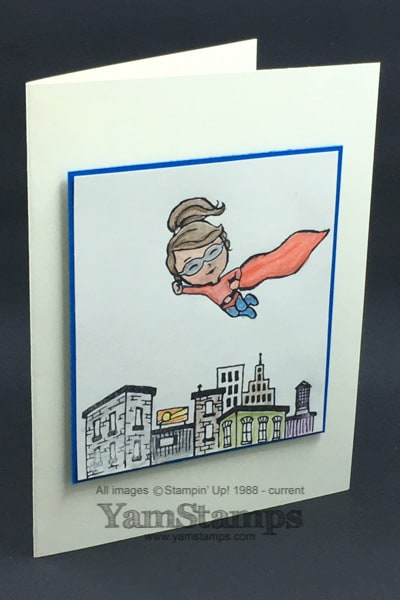
Happy International Women’s Day! Thought I’d share this quick Super Hero card with you to celebrate the occasion. This is not just an International Women’s Day Card, it could be a mother’s day card, a “yay for you” card, an encouragement or congratulations card…. It features Stampin’ Up!’s Everyday Hero set. All the character pieces are mix and match – the body, the head (there’s a woman and a man) and the cape, and the set is photopolymer, so you can see through the stamps to line up your images easily.
I chose to use Very Vanilla cardstock for this card, along with Archival Basic Black ink. I coloured the images with the Watercolour Pencils, along with a little use of the Blender Pen. For these images, I chose to colour with them traditionally, and then used the blender pen to smooth out the coloured areas. I was a little impatient so had a bit of bleed because I ran over some stamped areas before they were totally dry…but as I always say….if the person who receives your handmade card criticizes it, they don’t deserve it!! hahaha. Besides, it’s an International Women’s Day Card, what’s not to like?!
I’m looking forward to getting together with some of my favourite women in the next while. There’s my demonstrator group called the “Eh” Team; we’ll be having an online and in person get together in March, and a group of us will be going to the Stampin’ Up! event in Toronto in April. There’s my Stampers Club peeps, who regularly get together the third Monday (usually…those stat holiday Mondays can mess that up at times!), and there’s the Monthly Card Class people who mix and match up each month. A craft night is a great way to get together with other women (and men, though my group right now is mainly women). Do you have a regular group of friends that get together to do things? Why not have a craft night one time? Contact me – there’s lots of variations and options on a crafting event. We can make a superhero card just like this International Women’s Day Card!
To whom would YOU send an International Women’s Day Card? Let me know! I have a few candidates for mine – high on the list – my grandmother and my mother (both teachers, did the grammatical form of the first sentence give it away?)! Guess I’d better make a few more cards…LOL. My mission is also to send more cards – I’m planning on sending a lot of my blog sample cards on to good homes to be reused – hence my encouragement to have people comment here on the YamStamps blog!
Mar 6, 2017 | cards, Occasions, Seasonal Catalogue, Stampin' Up!
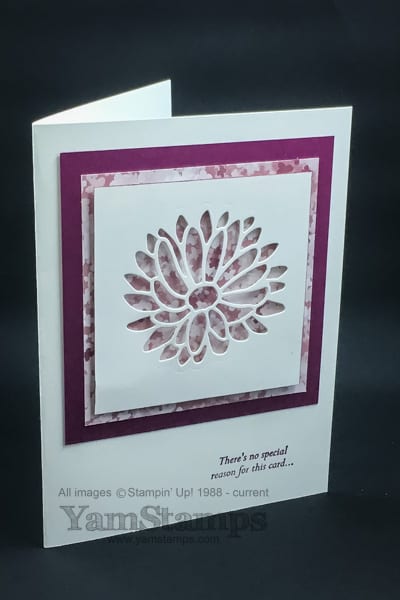
This quick negative die cut card features Stampin’ Up! Canada’s Special Reason Bundle (available with wood mount or clear mount stamps) – available in the Occasions Catalogue. When you use a negative image, you can highlight some of the patterned paper you may have in your stash! In this case, it’s the Blooms & Bliss Designer Series Paper. The tough part is picking which side of the paper to show! Keeping the paper and image as the focal points, there’s just a touch of colour on the edge of the Whisper White cardstock – you can achieve this look by running the side of the brush tip of a Stampin’ Write marker along the edge of the cardstock, or a sponge dauber with the coordinating ink. In this case, the colour is Rich Razzleberry.
One tip I can share is that as my plastic cutting pads get older, they tend to curl or bow a bit more – so sometimes running the die and cardstock through the Big Shot a few times ensures that all the little pieces are completely cut through – and the Big Shot Die Brush helps ensure they all come out easily. Another option is to use the Precision Base Plate, which has no “give” and will ensure good contact the entire time. That will ensure that your quick die cut card is truly that!
If you’re interested in learning other techniques, you can attend a card making class in person or online! We created this card during classes in the past week, but I love this quick die cut card effect, so it may make another appearance in the future, in some incarnation! Do you have a favourite set of dies that you like to use for a negative image effect? (future class attendees will appreciate if you share your faves, so they don’t keep seeing a version of this card repeatedly – haha just kidding – but just about the card – I do want to hear if you have a fave!). Feel free to leave a comment below – and don’t panic if it doesn’t show up right away – comments are moderated to avoid spam! In the meantime – be positive about negative die cuts (sorry, couldn’t resist), and contact me if you have any questions.
Mar 2, 2017 | cards, Occasions, Seasonal Catalogue, Stampin' Up!
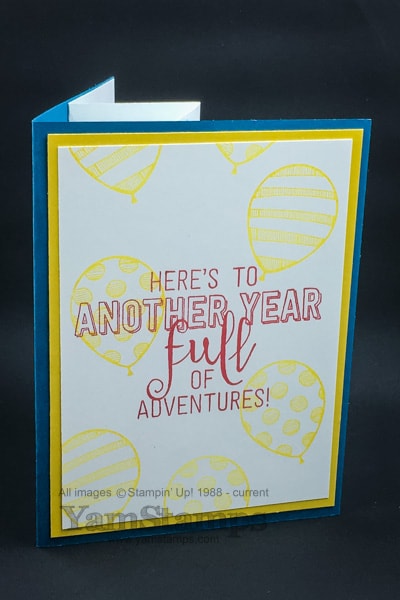
Sometimes you need an extra special or “WOW” card, and you don’t feel like making it from scratch. (If you do feel like making it from scratch, may I suggest the Clever Cards Online Class ?! You’ll get five different WOW card designs!) Here’s an easy pop up birthday card made using Stampin’ Up!’s Balloon Adventures set and Balloon Pop-Up Thinlits Dies. They’re available together in a discounted bundle…which I recommend because I love easy coordination (and who doesn’t like saving a bit of money?!). Real Red, Island Indigo and Crushed Curry combine to make a bright, fun card that’s sure to impress.
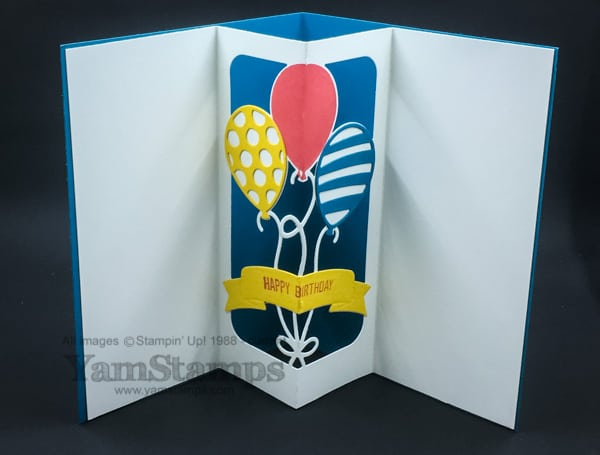
The interior pop up portion is made using a die! You score your cardstock, align the die along the score line and run it through your Big Shot. Fold along the score lines and you’re ready to complete your card! (I told you it was an easy pop up birthday card!) I like to use Tear & Tape to adhere the pop up insert securely in place (just don’t adhere the middle, otherwise the pop up won’t work!). Originally, I had stamped “Happy Birthday” directly onto the banner, but truth be told, I messed it up….so I cut another banner from a scrap of Crushed Curry Cardstock, restamped the sentiment and adhered it over top of the messed up one. It looks good either way. Well, maybe not with a messed up sentiment, but with a white banner rather than a yellow one. I added two additional die cut balloons that were adhered in place on the pop up portion, and the middle balloon is simply stamped in Real Red. The set is photopolymer, so you can re-stamp the balloon image on top again if you need more ink coverage – sometimes the score line doesn’t take the ink very well. (ask me how I know this…).
This card does take a little longer than a non-3D or non-moving part card might take to construct, but it’s just more steps, not that much more difficulty, really! A bit more time to construct a still quite easy pop up birthday card, thanks to coordinating stamps and dies, but the smile on the recipient’s face is sure to be worth it in the end! This is the kind of card that can be a gift in itself. We actually tackled this card in Stampers Club and the March Card Class! I liked this card so much I included it in both classes! If you’re needing an outing during the day or evening, consider joining us next time! See the YamStamps Events Page for upcoming events, or contact me to register for the April Card Class or to find out more about Stampers Club. Hope to see you in class soon!