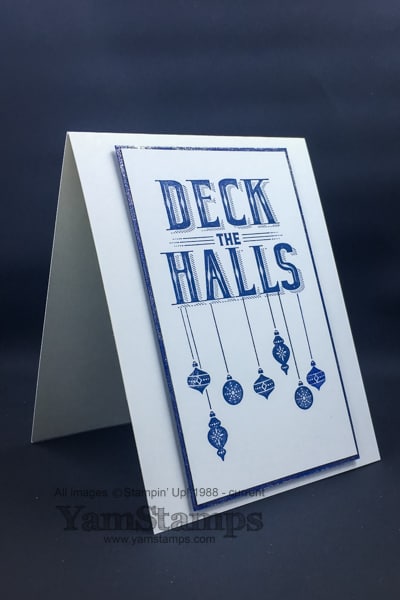
Believe it or not, I’ve already held two Handmade Christmas Card classes already this summer – this is a card we made at the last class. Clean and simple design, blinged up with the Wink of Stella Glitter Brush (which apparently is hard for me to photograph…). Navy and white is a classic colour combination, and goes well with a clean layout, I think. Stampin’ Up!’s Carols of Christmas is the featured stamp set, and if you purchase a starter kit in July you will receive this set for FREE in the bonus Essentials Kit that includes some great tools for papercrafting (all in all a $94 value). This is on top of the value already packed into your choice of $165 worth of product for $135 and necessary business supplies to get you started! More information here.Start selecting your product here.
Your other option is to wait until August, and this set will be available for purchase in either wood mount or clear mount, or in a bundle with the coordinating Card Front Builder Dies. I’ll be posting a link to those items in my online store in August. If you purchased $60 in product in July, you’ll also have that coupon code to use in August – so it’s a great time to get your supplies for YOUR handmade Christmas card!
A hint on this card – when I made this prototype, I ended up lining up the first set of ornaments a little too far to the left, so when I stamped the second set, I ended up with a gap at the right side of the words (under the S…) – so everyone in the class was advised to start their ornaments a bit further towards the centre. I saved this handmade Christmas card by cleaning the stamp, then colouring in just one of the ornaments with the brush end of a Night of Navy Stampin’ Write marker. This way, I was able to stamp a single ornament at the right side so I didn’t have a funny gap.
Some class attendees already have EIGHT handmade Christmas cards in their stash….no pressure or anything….haha! If you’re not quite ready for Christmas cards, consider attending the Monthly Card Class instead. We do 4 different cards, for various occasions, and all required supplies are included in your $20 class fee. First Wednesday of each month – check the YamStamps Events page for upcoming dates. If you DO want to make a handmade Christmas card….or 4….the next Christmas card class is August 17th, a Thursday evening at 7pm. You have the option of the Basic Class Fee – $20 for all supplies to create that evening’s cards, or the Basic+ Class Fee, which includes all the supplies PLUS the featured product for that class. The July class featured the Wink of Stella Glitter Brush on all the projects. The August class will feature the new Silver and Gold Edged Ribbon – participants who choose the Basic+ option will receive half a roll of each product that evening, in addition to the class supplies required. You can contact me to register.
In other news….not sure if you saw it on my Instagram feed or the YamStamps Facebook page, but I road tripped to St Thomas this past weekend! I did a class for Jenny and her friends, which was a lot of fun, and Jenny decided to take advantage of the July special and purchase the starter kit as well – so she’s now part of my demonstrator group known as the “Eh” Team! So fun! More fun on the way home – I drove across town to check out the Jumbo statue, as advised by everyone at the class! St Thomas is the city of trains – in fact, the last time I was in the area was for the Day Out with Thomas (as in Thomas the Tank Engine) a number of years ago with my son (who is now 17….so you can imagine it’s been a while). Anyway. The life sized Jumbo statue is in place to memorialize the real life Jumbo the elephant from the P.T. Barnum circus, who was sadly struck & killled by a train while in St Thomas. He really was a huge elephant! It was a little detour before I headed safely home again. I realize I need to work on my selfie skills a little more….but here’s the proof, as I squinted into the sun to get the shot…
I was also hurrying to get the photo before the other visitors were in my shot! I don’t often travel this far to do a class, but I do enjoy getting out to meet new people at events like this if time and schedule permit. That is definitely one of the best perks of this “job”. I’m looking forward to more travel – to Stampin’ Up!’s On Stage event in Salt Lake City for one, where I’ll be joined by quite a few of my “Eh” Team members this fall! If I play my (greeting?!) cards right, I will be able to earn a gift card for travel as well! In the meantime, I’m off to come up with some creations for August’s class. Hope to see you there!
Wow time flies when you’re busy….and look, it’s already time for a handmade Christmas card! OK, well, maybe not quite…. However, there is nothing like getting a jump on your holiday cards, especially if you’re hoping to create your own! Some smart YamStamps customers have already started by attending last month’s Christmas Card Class! This is one of the cards we created using the Be Merry Designer Series Paper that is available in the Stampin’ Up! Annual Catalogue.
There’s a few thrifty tricks on this card – the backing layer for the sentiment is die cut with one of the Lots of Labels framelits dies from the backing cardstock, and the strip of complimentary designed paper is actually the flip side of the mittens designed paper. Stampin’ Up!’s Designer Series Papers have coordinating colours and patterns so it’s easy to mix and match without having to think too hard! Perfect for summer crafting. Or anytime crafting for me, really.
If you are looking to increase your stash of handmade Christmas cards, you can register to attend the next class! July 25th is the next installment, and each project will also use the Clear Wink of Stella Glitter Brush in the design. For the Christmas Card Classes, you’ll have the option of the “BASIC” Class Fee, which will cover all supplies required for the 4 cards, or the “BASIC+” Class Fee, which will also include the featured product for that class. For example, July is the Wink of Stella brush, August is going to be the Gold & Silver Edged Metallic Ribbons. September onwards will be announced once we get a look at the upcoming Holiday Catalogue! Check out the upcoming dates and other events on the YamStamps Events Page.
Don’t forget that every purchase of $60 or more in product during July will earn you a $6 coupon to spend in August!(See this post for all the details on the July promotions), You can shop anytime in the YamStamps Online Stampin’ Up! Canada store and have your product delivered to your door. If you live in Quebec, or need assistance placing your order, please contact me and I will place the order for you (and still have it delivered to your door). If you purchase a starter kit in July, you’ll get a new Christmas stamp set, which will really help you to create your own handmade Christmas Card!Get the Carols of Christmas set as part of your Essentials bonus kit (again, see this post for details as well as the stamp set images). You can find out more about being part of my demonstrator team here, or start picking your starter kit products here!
See? Really NO excuse for not getting started! Ho Ho Ho!
OK Remember when I mentioned having some technical difficulties at Christmas? Well….they’ve been resolved, so THIS is what you were supposed to see on Christmas Day….better late than never??!!! Belated holiday greetings from me, with help from the musical group Pentatonix!
and a holiday throwback musical interlude to enjoy when you are crafting….I LOVE their version of this song!
You may know that I sing in a choir, and we do a lot of a cappella singing (unaccompanied), so I love this group, and what better gift than to share greetings with all of you?! Better late than never? (much like some of the Christmas cards I’m still sending LOL).
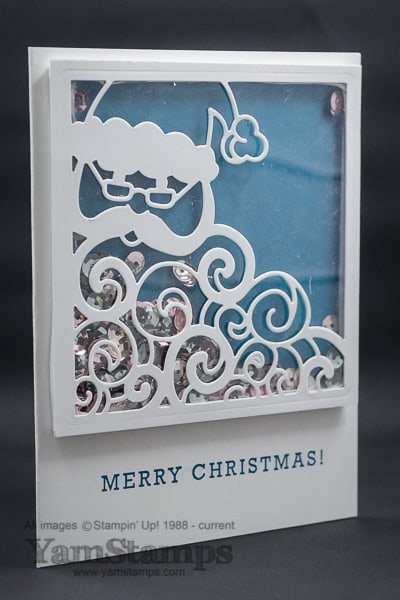
Here’s a holiday card to complete the belated greeting…a shaker card featuring the Detailed Santa Thinlits that are still available, even though the Holiday Catalogue is finished. Ho Ho Ho!
OK back to crafting – more samples to come later this week!
So my personal preference for cards tends to run towards clean & simple….if you can’t tell. I had a couple of designs for Christmas cardst this year that I thought I’d share here, especially since most of the recipients won’t get theirs by Christmas Day…..LOL!
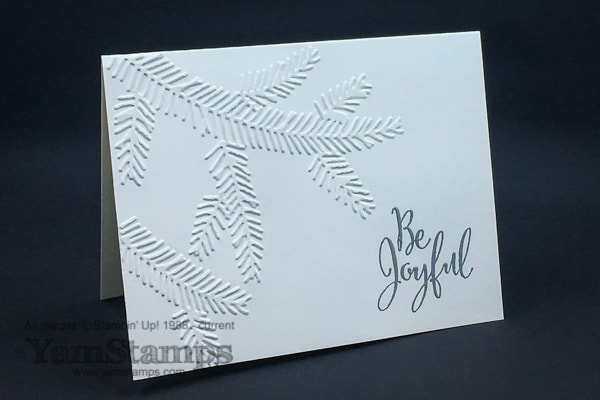
I loved the clean look of this design….though it may not look as impressive in the photo LOL. I used Thick Whisper White cardstock (I _love_ that cardstock, especially for a card without additioinal layers on it) and embossed the words in Silver. It features the Pine Bough Embossing Folder (on sale as part of the Year End Closeout), and the sentiment is from Merriest Wishes – which is available in wood mount, clear mount (on sale) or as part of a bundle with the Merry Tags Framelits (framelits on sale)- again, either in wood or clear. **If you like clear mount, your best deal is to buy the set and framelits SEPARATELY because with the sale pricing it ends up being LESS than the discounted bundle. If you like wood mount, your best deal is the bundle.**
So here are some of my tips for bulk card making…..or “Linda’s Learn From My Mistakes List”. (I will post this here as a reminder for myself….and perhaps repost it early next Christmas Card Season?!)
Figure out how many cards you need in advance and figure out how much you will need in terms of supplies. (Hence two designs for me as I ran out of Very Vanilla cardstock.) (This has sadly reinforced my stockpiling paranoia).
You can score an 8.5″ x 11″ sheet of cardstock at 4.25″ lengthwise BEFORE cutting the sheet crosswise in half at 5.5″ to create two scored cards of 5.5″ x 8.5″. (I cut, then scored twice as many times as I needed to.)
Do “batch” processing. I actually DID do this… Cut all the cardstock at one time, dry emboss all the cardstock at one time, stamp all the cardstock etc. rather than creating each card in individual steps. The only thing you can’t batch do? Heat embossing. Get that done before the ink dries! Since my Pine Boughs card didn’t have much else to be done on it, it wasn’t too much of a chore to heat emboss the outside & inside sentiments one card at a time.
One last tip – think about thickness and bulk if you’re going to be mailing your cards – don’t want to get dinged for extra postage or risk cards getting caught in the processing machines, so think about how many layers and how many dimensionals you want to use on your design!
I am hoping to have a Christmas message for you up on the blog here tomorrow but there are some behind the scenes glitches that may interfere…so fingers crossed. Otherwise, I hope that you are able to spend some time with friends and family over the next few days. Thank you for being a YamStamps reader, and Merry Christmas!
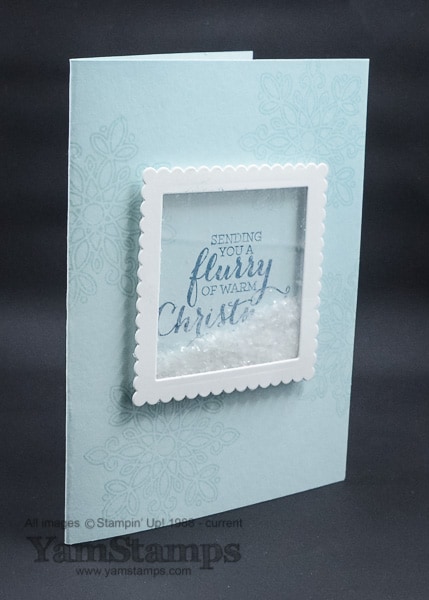
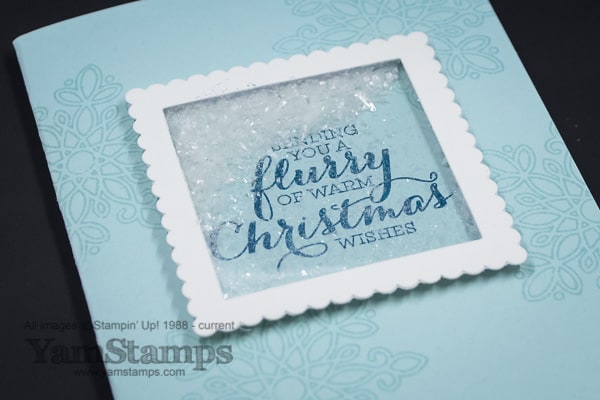
Shaker cards are so much fun and really catch the eye of the recipient! Stampin’ Up!’s Foam Adhesive Strips make it easy to make dynamic cards like this. The strips can be cut to custom lengths, and have adhesive on two sides, automatically creating a 3D effect. They’re used on this card behind the frame that was cut with the Layering Squares Framelits – this allows room for the enclosed items to move about. There’s a square of Window Sheet to contain the Mica Flakes, and a little of the flakes goes a long way! Right now the Mica Flakes Trio Pack from the Holiday Catalogue is on sale as part of the Year End Clear Out, while supplies last, so you can stock up! Don’t know if you can tell in these images, but I was a little too enthusiastic with the amount of flakes I put into my window…so the words get buried in snow. Kind of like my driveway these days…. The images and sentiment on this card are from the Flurry of Wishes stamp set.
I hope that things aren’t too crazy for you in the lead up to Christmas Day! School is continuing until tomorrow so it really feels like it’s full out until the weekend for everyone. I will be posting on the blog over the holidays, so please come back to see what’s new. I’ll have a fun post on Christmas Day and a Boxing Day special as well. In the meantime, keep warm, keep crafting (I’m STILL working on my cards….don’t judge!!) and keep the spirit!
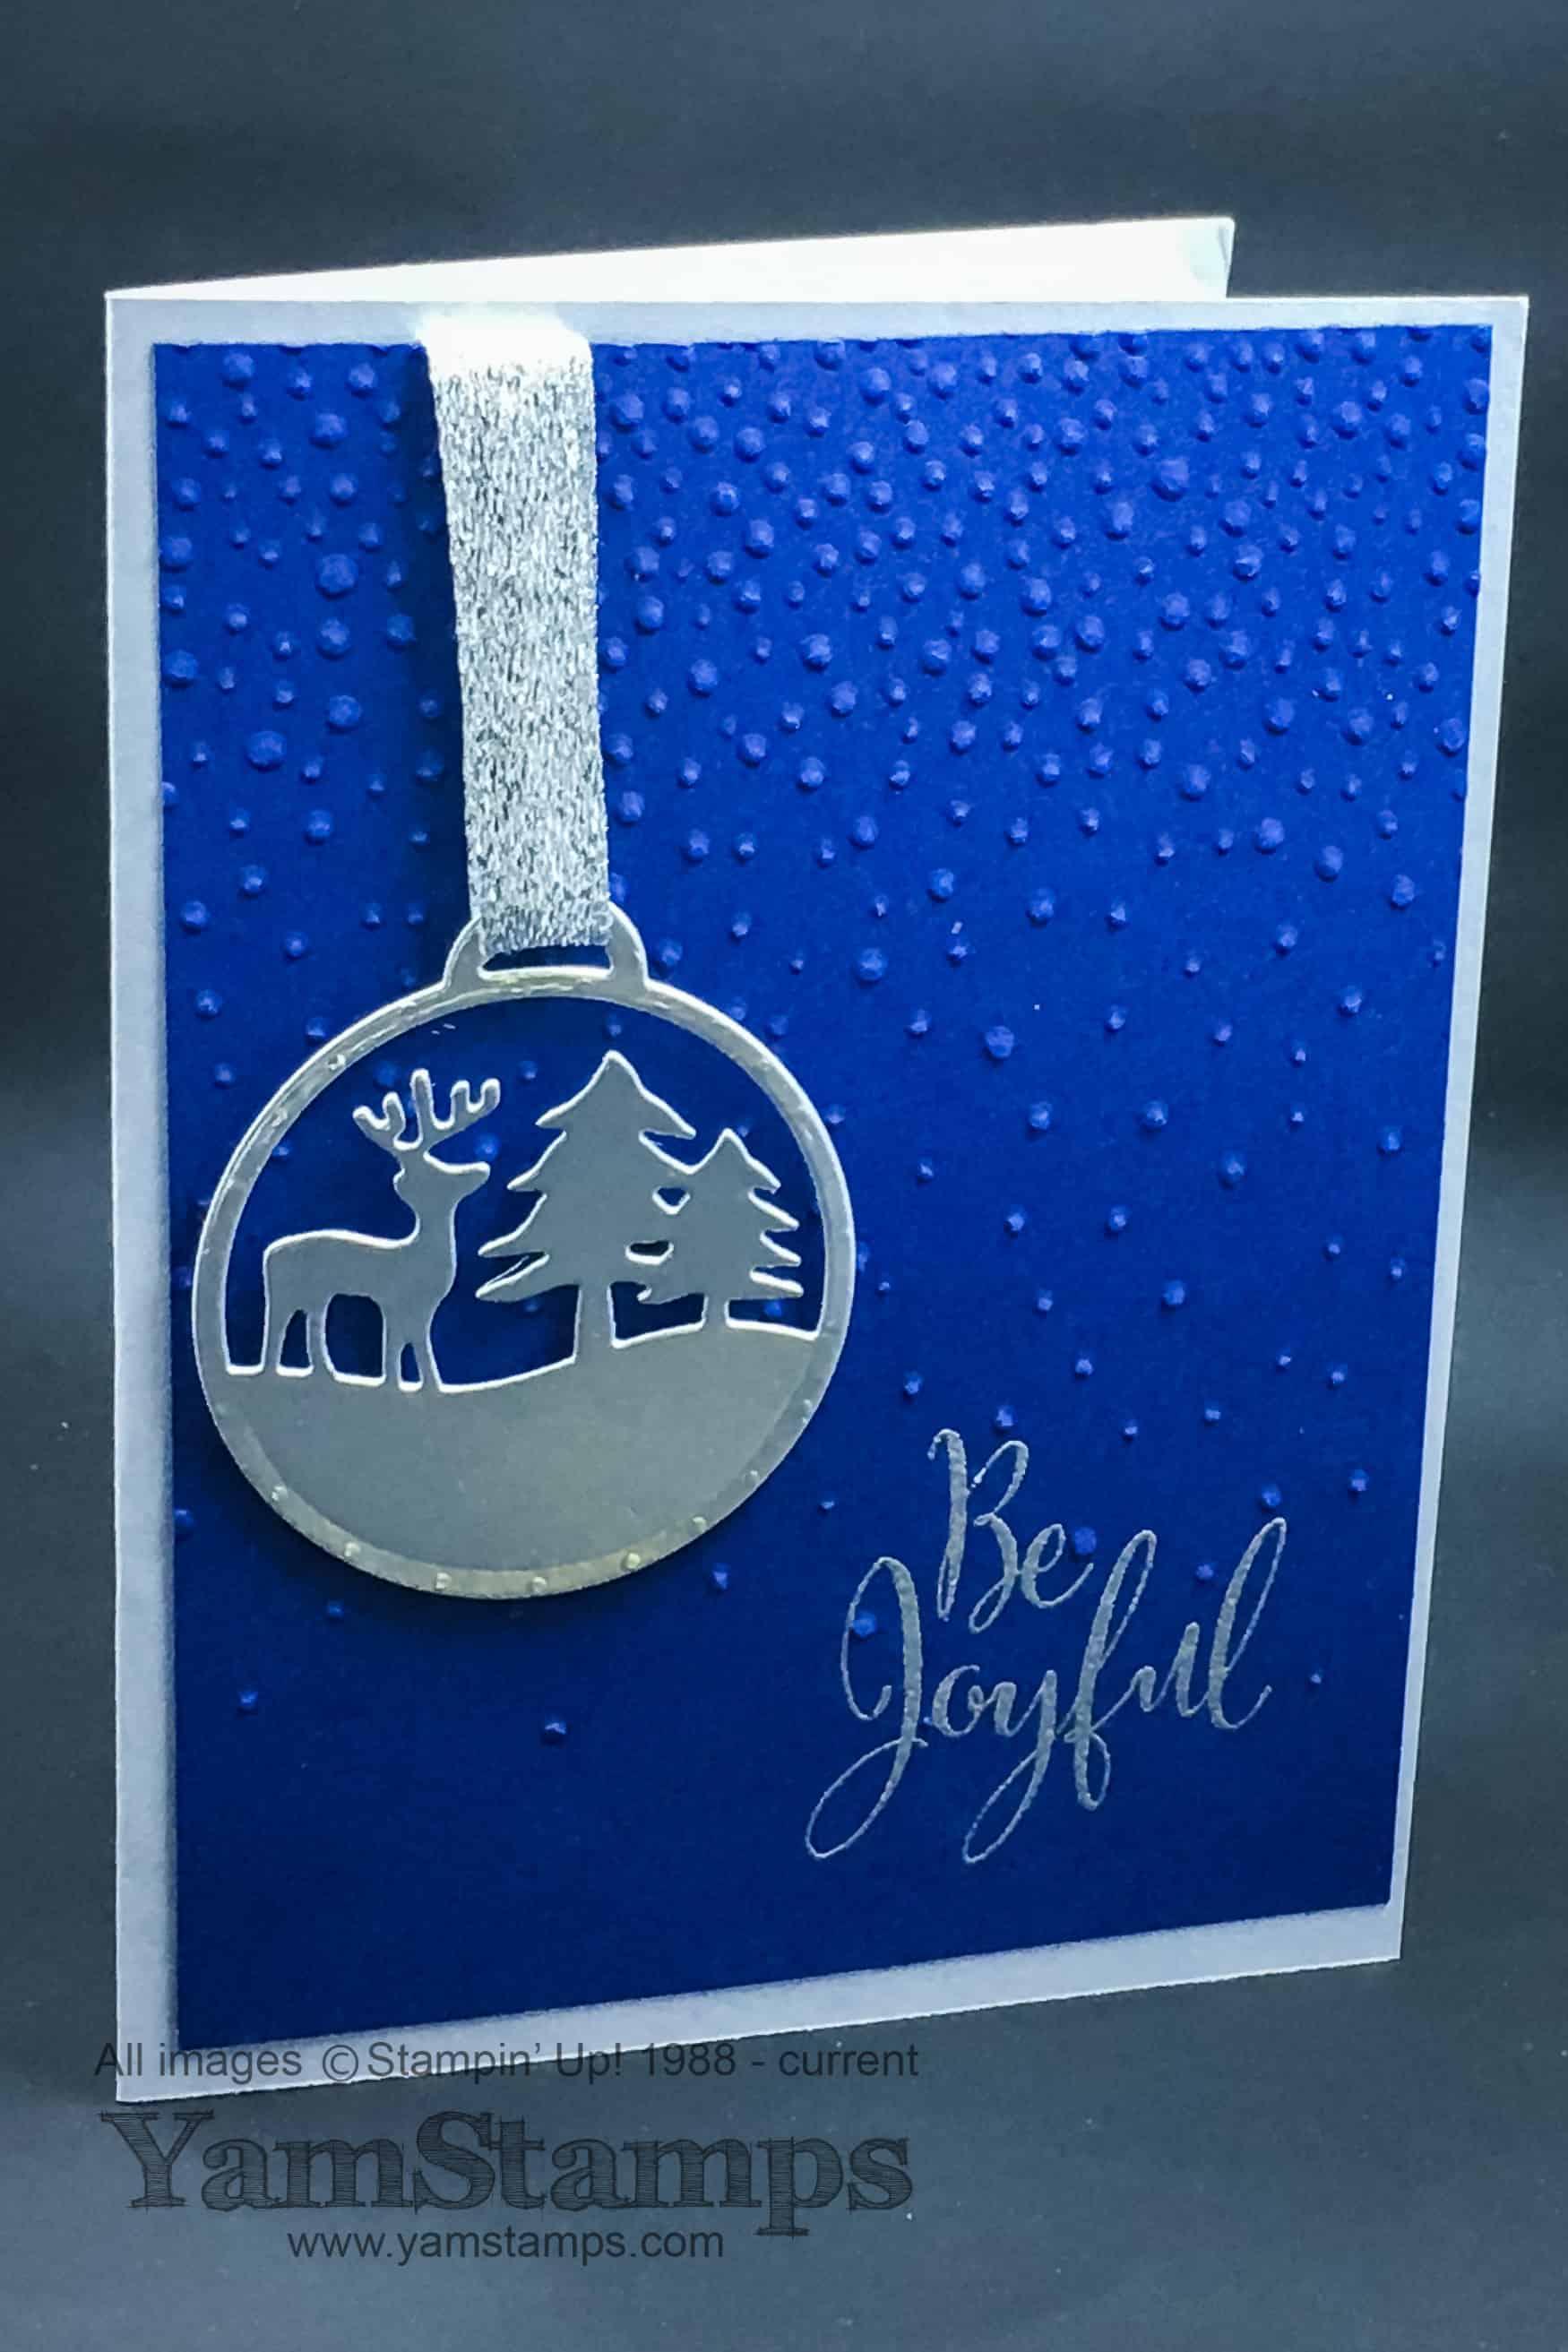
I love the sentiment Be Joyful…and I do love the script of this stamp as well! It’s from the Stampin’ Up! set Merriest Wishes – available in Wood Mount or Clear Mount- special pricing as part of the Year End Closeout right now! Of course, you could also get a discount by purchasing the set as part of a wood mount or clear mount bundle, packaged with the Merry Tags Framelits Dies (special pricing). OK when I tax my brain and do the math, if you like clear mount, your best deal is to buy the stamps & framelits separately and take advantage of the Year End Closeout pricing. If you like woodmount, your best deal is the buy the bundle. *phew* I’m exhausted now.
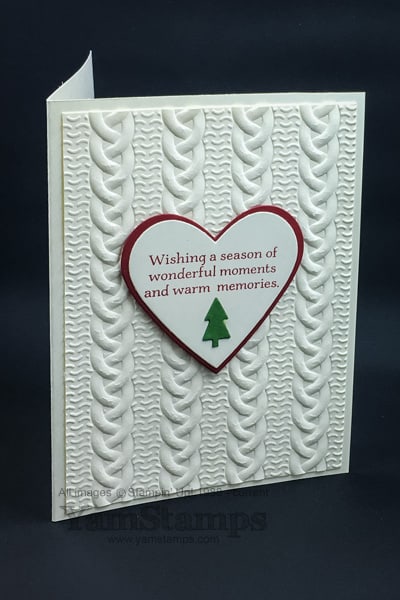
Anyway! This is an easy card to whip up if you’re still in the midst of creating cards to send. (*guilty*). The silver ribbon is from the Glitter Ribbon Combo (special pricing) and the Night of Navy cardstock is embossed with the Softly Falling Embossing Folder, which is one of my favourite background folders right now.
If you placed an order with me in the last few months, you should be receiving your Occasions and Sale-a-Bration catalogues in the mail anyday now! I will check in with you to be sure they arrived. If they didn’t, or you want to be sure you don’t miss out, please add your information on this form – I will follow up with you and get you hardcopies of these lovelies!!