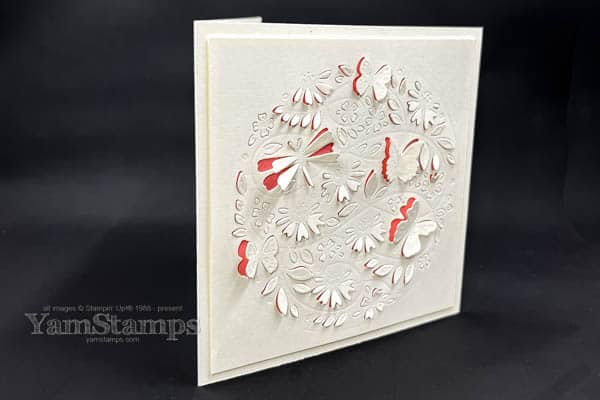
Create a Pretty Pop Ups Card using the Stampin’ Up! Pretty Pop Ups Dies!
This pretty pop ups card is much more easy to create than you might think – all it takes is one pass through the Stampin’ Cut & Emboss Machine to make this intricate looking card!
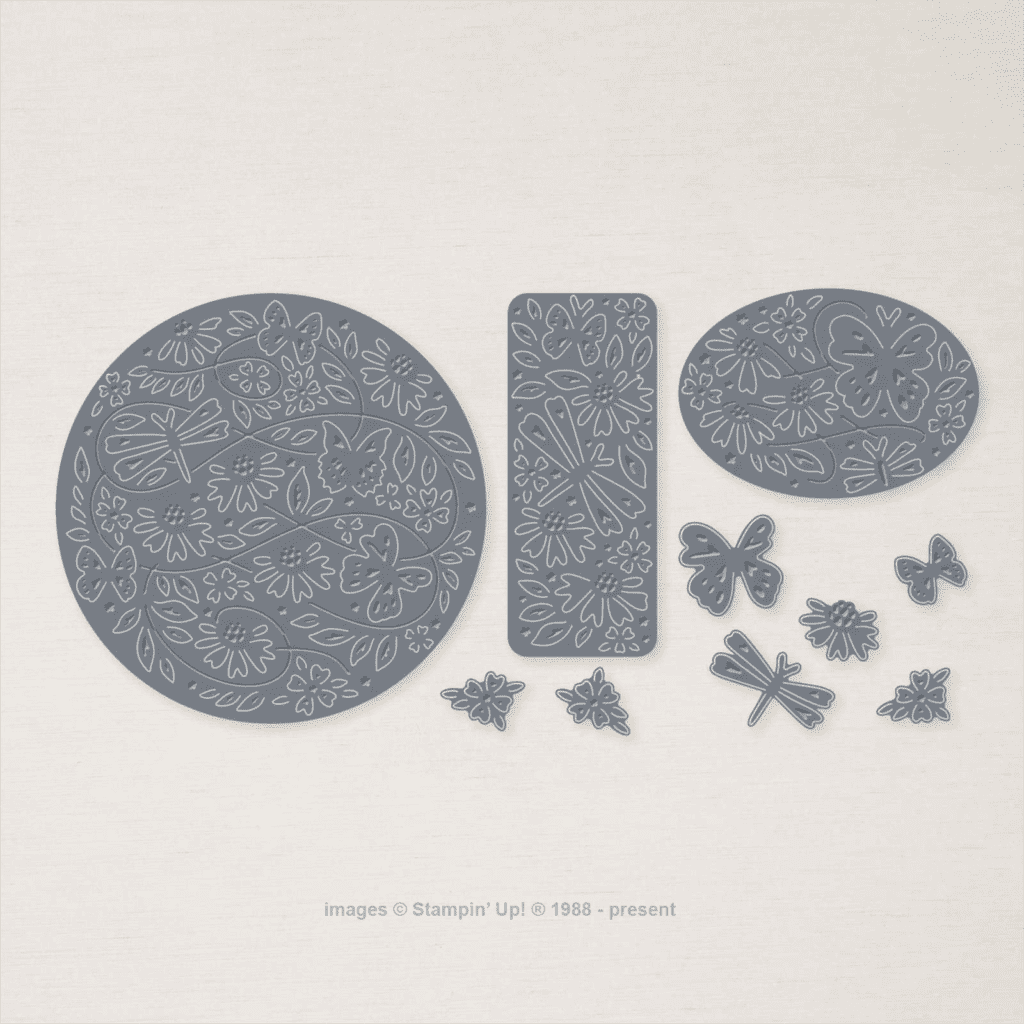
The Pretty Pop Ups Dies are a set of dies that create partial die cuts, and they emboss too! There’s additional individual pieces that can be used to accent the main dies.
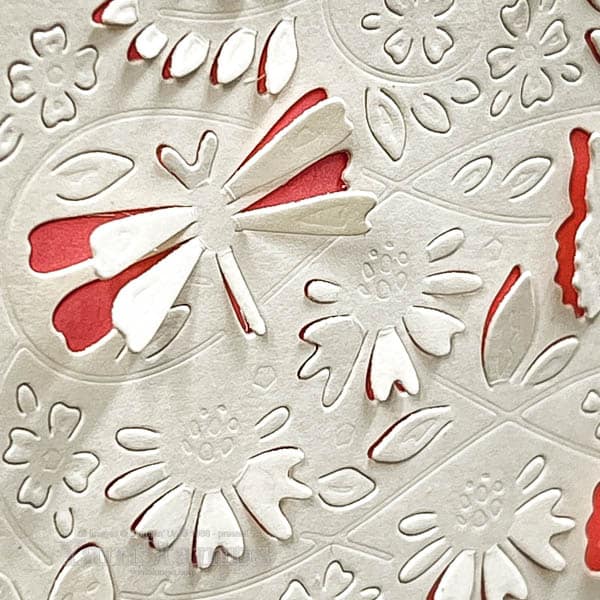
Honestly, the thing that takes the most time on this relatively quick card is “fluffing up” the cut sections! I started by running my die brush tip attachment for my Take Your Pick Tool on the backside of the die cut, then used my fingers or bone folder to make a more firm crease.
Stampin’ Up! Canada Pretty Pop Ups Dies
I wanted a more monochromatic look for this pretty pop ups card, but I wanted that colour accent to catch your eye – a pop of colour for the pop up!
I used Very Vanilla as the main cardstock, then the pop of colour comes from Polished Pink Cardstock – though obviously you could choose whatever colour you prefer! I cut the Accent cardstock slightly smaller than the die cut piece to keep the focus on the hint of colour through the die cut areas, rather than having a coloured border around the edge (which I often use as a design element).
I always like easy and effective projects – so this ticks the boxes for me! If you want a project that takes a little more time and effort, though, may I suggest that you sign up for my Fantastic Fancy Folds Online Class? It’s currently in Pre-Launch pricing – so you save $10 off the regular $30 (Canadian) price if you register by the end of Wednesday 10 August. The class page will be available on Thursday 11 August. It features four different fun folds that look impressive but aren’t as difficult to make as you might think…though they will take a bit longer to create than this Pretty Pop Ups Card! (but since I’m the one offering the class, it’s still not going to be overly complicated!) Click on the link to get more information about the class and to register, and as always, please contact me if you have any questions!
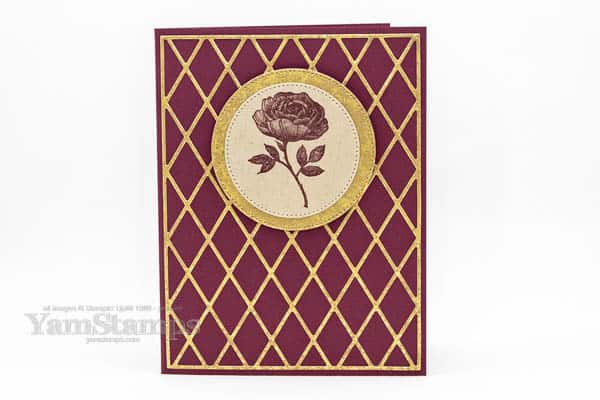
Check out this simple and elegant rose card using a free stamp set!
If you’ve checked out the YamStamps site on a semi-regular basis, you may have spotted that some of my favourite designs are towards the clean & simple end of things – so this elegant rose card is definitely in that category.
Elegant Rose Card
This elegant rose card was super easy to make, which also makes me love it more! Just two tones – Merry Merlot and Gold. The Gold is the Distressed Gold Specialty Paper from the Annual Catalogue. I LOVE this paper – it’s got the metallic sheen, but it’s not super bright. I used Merry Merlot Cardstock, and then Merry Merlot ink for the rose image. Monochromatic colour schemes just make everything easy.
The rose is from the Wonderful World stamp set – and you can select it for FREE during July & August Sale-a-Bration with a $120 CAD product purchase – it’s part of the Wonderful World Bundle – which includes the Wonderful World stamp set and coordinating Designer Series Paper. The majority of Sale-a-Bration items are available to select with a $60 product purchase, but there are a few items that are only available at the $120 threshold (and Wonderful World is one of them).
The lattice is from the Organic Beauty Dies, and before die cutting, I put an Adhesive Sheet on the back of the Distressed Gold sheet. That way, once it was cut, I just had to peel the liner away and I could easily attach the lattice to the card. Bonus – I have lots of little distressed gold diamonds that I could use on another project. (Or to decorate the envelope and inside of the card if I want!). I don’t want to waste any of this paper if possible!
The image on this elegant rose card is on Crumb Cake Cardstock and mounted on a Merry Merlot circle. They’re die cut with the stitched circles from the Stylish Shapes Dies. I liked using Crumb Cake rather than Basic White or Very Vanilla because it felt a little softer and more in the colour scheme/distressed theme.
If you’re interested in getting your hands on this bundle, a reminder that Sale-a-Bration items are available during July & August – but only while supplies last. You can shop online 24/7 anywhere in Canada at https://yamstamps.com/shop or you can message me for assistance placing an order or if you’d like to pay by etransfer.
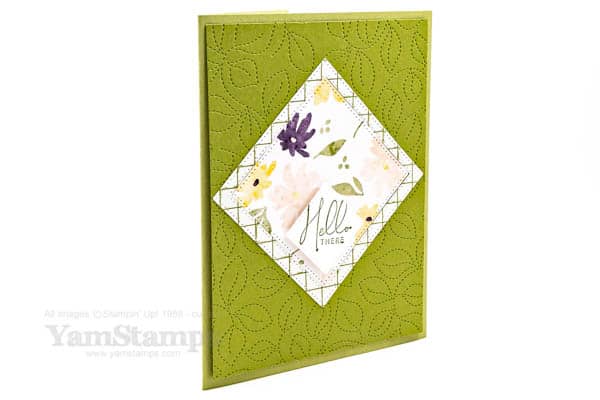
This easy Hello There Floral Card is perfect for brightening someone’s day
Hello There Floral Card
I love the new Stylish Shapes Dies that are in the Stampin’ Up! Canada 2022-2023 Annual Catalogue, and we used them to create a fun frame effect on this Hello There Floral Card that we made in Stampers Club in May.
Frugal Friday Tip….the frame and main image are the reverse sides of the same piece of Designer Series Paper! I die cut the largest square with the lattice design up. I then flipped that square over so the floral side was up, and then die cut the next smaller square. The die has a stitched edge on it, so I wanted the main stitched area to be the “right way” (indented) on the floral piece. It’s reverse on the inner edge of the lattice patterned frame, but I don’t mind that as much. This paper is the Design a Daydream Designer Series Paper – and it’s a huge package of 48 sheets which you can only select with your Stampin’ Rewards. You earn Stampin’ Rewards when you place a single order with product of $200 or more – this could be a workshop order where many people place orders at one time (like for my Stampers Club), a single person order, or in my case, a single Demonstrator order…LOL.
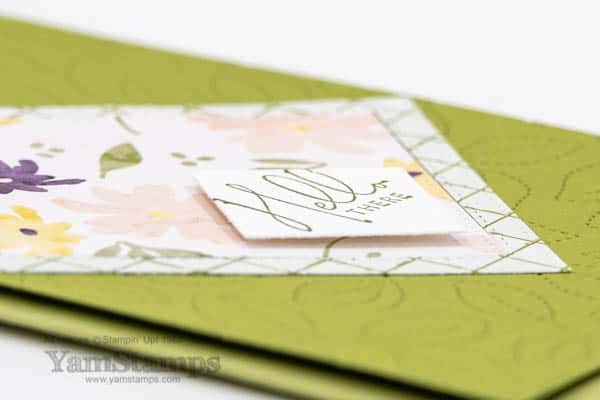
Hello There Floral Card Closeup
I thought I’d tie in the stitched theme on my Hello There floral card by using the Stitched Greenery Die on the background. This is one of my favourite dies because it adds texture and interest but doesn’t take away from the main focal element! I stamped the sentiment from the Nature’s Prints stamp set on a small square and then adhered it at the same angle with some Stampin’ Dimensionals to give it some lift.
If you’d like to join our Stampers Club, our next get together will be Monday 13 June. We continue to meet virtually at this time via Zoom. The one good thing about meeting by Zoom is that we can record the sessions and members have ongoing access to the recordings in our Members Only site. The other good thing is that if you don’t live close to Burlington Ontario, you can still join, since all I have to do is mail your class packet to you, and you can join us virtually too! Contact me if you’d like to join us for a 6 month membership. You can get more information on the YamStamps event page, or you can message me if you have any questions.We’d love to have you join us!
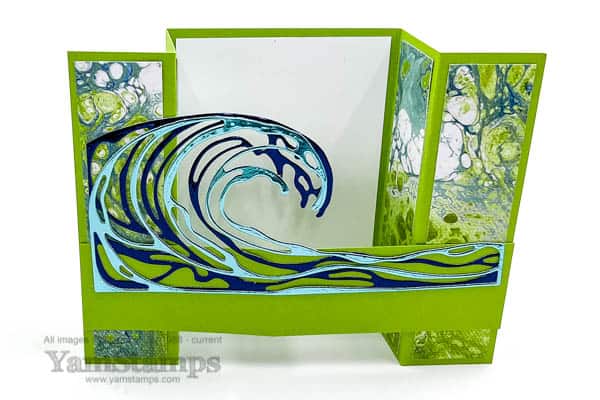
Waves of the Ocean is a Limited Time offering from Stampin’ Up! – available while supplies last or until 2 May 2022. It features the Waves of Inspiration Stamp Set and coordinating Waves Dies (also available together in a discounted bundle). These items are a sneak peek from the 2022-2023 Annual Catalogue. Other items available in this collection during the Promotion Period are the Waves of the Ocean Designer Series Paper featured on the side panels of this bridge card. They are actual images from acrylic pours that one of the Stampin’ Up! Concept Artists created – and they’re gorgeous. I die cut the wave images from the Blue Foils that were available in this collection and I love the effect. Unfortunately, the Foil sheets are sold out and no longer available. Also no longer available – the Rhinestone Wave Basic Jewels. So if you like the look of this Designer Series Paper – don’t hesitate, because you may miss out!
What I like about this Bridge Card design is that it fits into a regular Medium Stampin’ Up! envelope (the “usual” card sized envelope) but it’s a little fancier than your average card! We made this card in Stampers Club last month, and one tip when you’re making this card in advance – if you only stick down one side of the bridge strip, you can still easily write or decorate the middle panel, then stick the other side down when you’re ready to send it.
Our Stampers Club continues to meet virtually at this point in time, and the bonus to this is that out of towners can easily join in on the fun! The other bonus is that if any club member has to miss our usual get together, the recordings are available in our member site so can be watched later. We will likely meet in person again in the future, but may try to figure out a way to do a hybrid version so that there’s an option for those who can’t travel easily to Burlington! If you’d like to join Stampers Club, or have any questions, please contact me. You can find more information on club on the YamStamps Events Page as well. New members can start during any month –though if you want to join us starting in April, you’ll need to contact me ASAP so that I can prepare your class package in time!
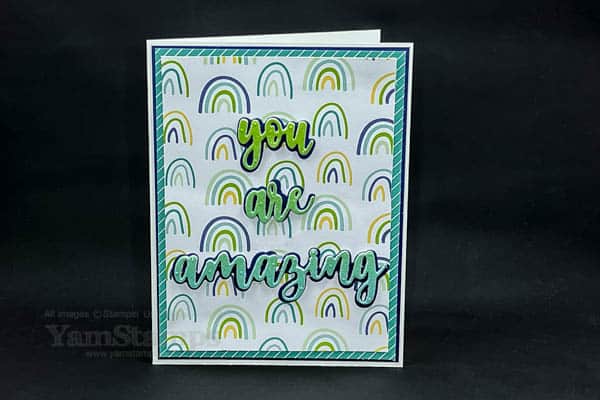
We can all use a little encouragement sometimes, right? This “You Are Amazing” Card will surely give a boost to the recipient.
You Are Amazing Card
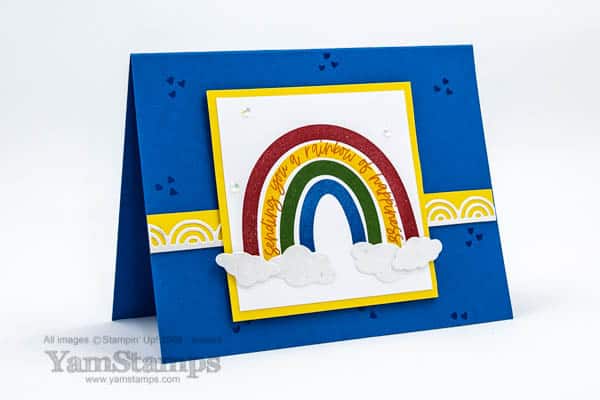
I pulled out my favourite Sale-a-Bration item for this one while I still can – the Sunshine & Rainbows Designer Series Paper. I’m also partial to blues and greens, so loved the colours in this particular sheet of paper. I used two layers of Designer Series Paper, and then die cut the words (from the Amazing Thanks Dies) from a sheet of Rainbow Glimmer Paper. I put a piece of Foam Adhesive Sheet on the back of the Glimmer Paper before I ran it through my Stampin’ Cut & Emboss Machine so that the letters would stand out. Plus, the foam sheets have adhesive on both sides, so it was super easy to mount the words on the backing silhouettes before placing them on the cardfront.
Have you been checking out the Sunday Swap Shares on the YamStamps Facebook Page? I also share details of what products were used (or what I -think- was used based on examining the cards LOL) on the YamStamps Sunday Swap Page. Since there’s one more Sunday in February, I may be able to squeeze out one more post that includes the Sunshine & Rainbows Paper…ha!
This was a pretty easy card to create – I think that the most difficulty I had was positioning my dies to be sure that I could catch the rainbow gradient on the words. I love how it coordinates with the sheets of the Designer Series Paper!
If you would like to grab some free Sale-a-Bration products (or a couple of free stamp sets in your Demonstrator Starter Kit), you’ll have until 28 February to do so. Shortcut to shopping is yamstamps.com/shop. Please feel free to message me if you have any questions!
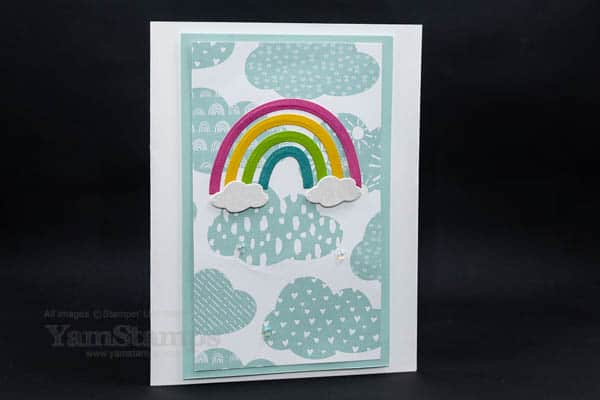
I love how using different patterns and items from the same coordinating suite of products can give a different look and feel to projects! Today’s die cut rainbow card has a softer feel than the previous rainbow cards I shared with you.
This one used the Mother of Pearl Specialty Paper, Brilliant Rainbows Dies (though not for the the rainbow!) and Iridescent Rhinestones like today’s project. Definitely a more bold colour theme
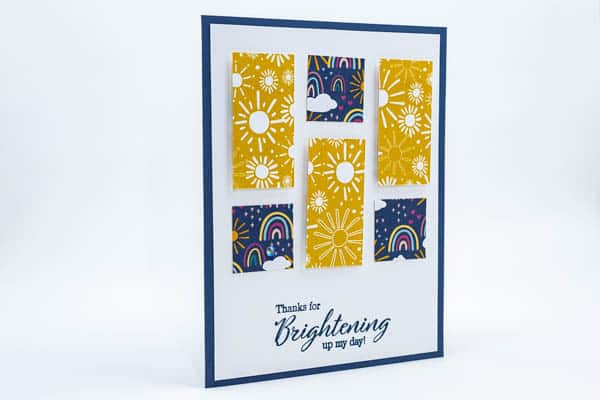
This one used the same Designer Series Paper – just different patterns! Also more bold and bright than today’s share. By using smaller pieces of the paper it’s a little more subtle. A little.
I guess I also like the rainbow theme because it’s going to be a few months until we see some around my home…and it’s a colourful theme, unlike the solid white/grey theme happening outside my window!
We are nearing the end of January (hard to believe) and a reminder that Sale-a-Bration runs only for two months – January and February only. If you’d like to grab the Sunshine & Rainbows Designer Series Paper, it’s one of the Sale-a-Bration freebies you can select with a $60CAD product order, but you’ll want to order before 28 February to be sure that you get some before it’s gone!