May 20, 2009 | rubber stamping
 Although I do know of golfers who claim that golf is a year-round sport… Personally, I have always been a bit of a fair-weather golfer.
This card features the "And Many Mower" Stampin' Up! set. I chose to use the golfer image rather than the lawn mower…lol. A touch of Manchester designer series paper helped me to figure out the colour scheme for the card and adds a decorate touch. The image was coloured with stampin' write markers on very vanilla cardstock.
Have trouble coming up with masculine cards? Don't think the males in your life would always appreciate cards or scrapbook projects with flowers or butterflies? Come to the "For the Boys" class – Wednesday June 3rd, 7pm, here in Burlington ON. RSVP required, cost is $15 and includes all supplies and envelopes for 4 masculine-themed cards. You can use the handy paypal link or contact me directly; I'll give you directions when you register. See you then!
May 16, 2009 | Big Shot, rubber stamping
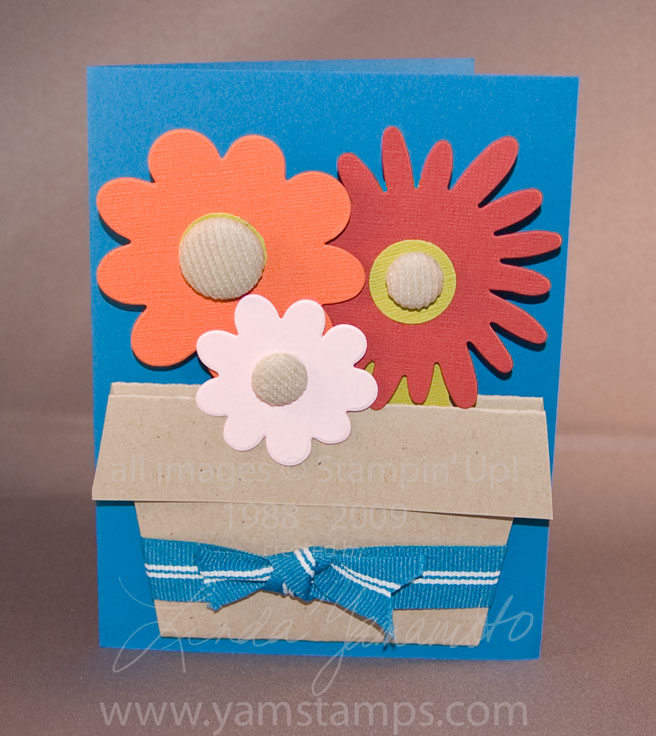
 Consider this a bouquet of flowers in apology for my blogging absence!!
This cute flowerpot was one of the projects at Stampers and Scrappers Club. We used the Big Shot Originalz Die – Flower Layers #3 to create the In Colour flowers - Riding Hood Red, Tangerine Tango and Pink Pirouette. We used the textured 12" x 12" cardstock (well, except the Pink Pirouette because I'd already used that up on another project lol). Kiwi Kiss was the background. I used 1/2" circles on the larger flowers to anchor the kraft corduroy buttons. The flowers were adhered to a strip of textured kiwi kiss cardstock, and the flower portion can be removed from the pot and used as a bookmark! I think the Pacific Point card really makes everything jump out at you as well.
Don't forget that the In Colours will be gone at the end of June, to make room for NEW In Colours in the new Idea Book & Catalogue in July. It's a great time to stock up on the textured cardstock right now with the buy 3 get 1 free special… Contact me if you have questions or need to build up your cardstock or designer series paper stash!
Apr 30, 2009 | rubber stamping
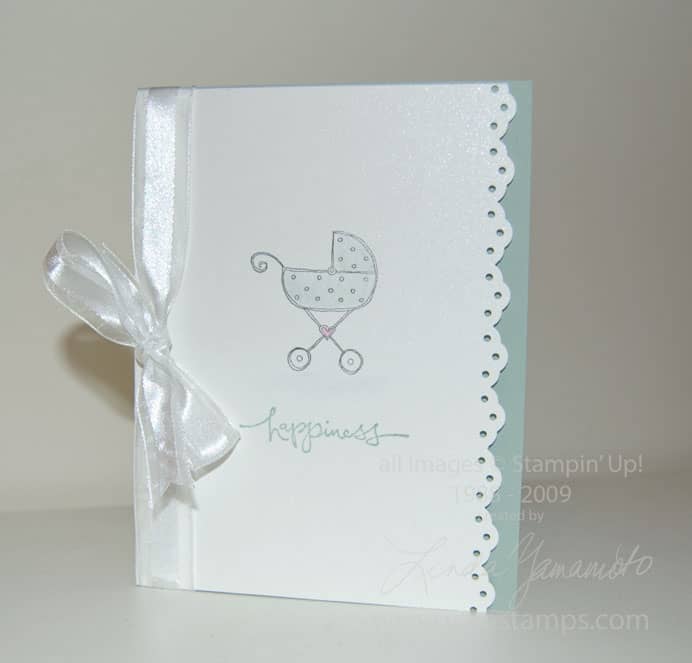
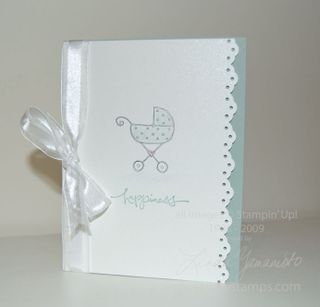 I love using Stampin' Up!'s shimmery white cardstock, and it's fantastic for more simple cards. It just gives it an extra "wow" without distracting too much. If you click on the image, you might be able to see the shimmer a bit better.
For this baby card the shimmery white is offset by a sage shadow insert, highlighted by the eyelet border punch. I used sage shadow as the accent colour (since this is for a "gender yet unknown" baby!). White organza ribbon holds everything together. The stamps used were Warm Words ("happiness") and Fun and Fast Notes. I used my watercolour crayons (sage shadow, pixie pink, almost amethyst for the grounding shadow) and blender pen to colour in the baby buggy image. I chose to use the blender pen over the aquapainter because I wanted a bit more control over where the colour went. Yes, I have control issues…..lol
This is the last post for April – wow! I managed a post a day (well, essentially, other than that one that didn't schedule correctly…lol). But wait, there's more! May is going to bring lots of fun things in the Stampin' Up world…and it's (Inter)National Scrapbooking Month!! Stay tuned to celebrate!
Apr 22, 2009 | rubber stamping
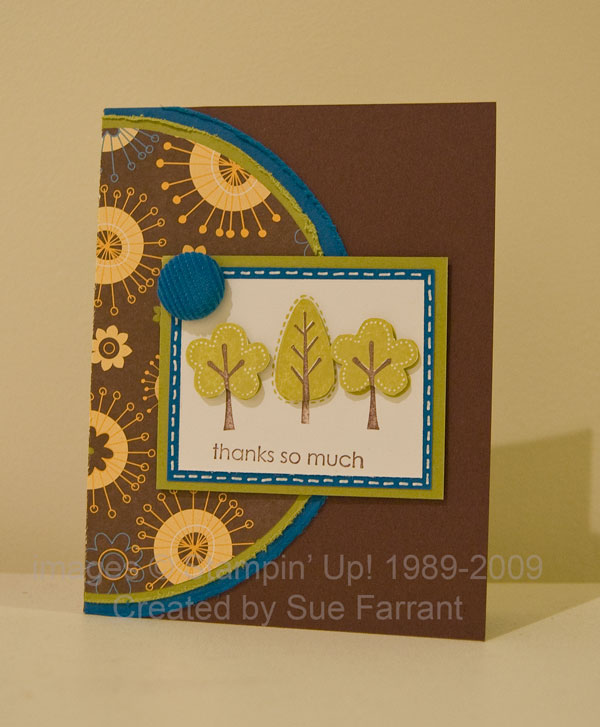
 Thought I'd share this swap card created by my friend Sue. She uses the Stampin' Up! set Trendy Trees (on my wish list…) and the Good Morning Sunshine Designer Series Paper. I love the combination of Kiwi Kiss and Pacific Point with the Chocolate Chip!!! Lots of details on the card – the distressing on the circles (cut with the lovely new Circle Scissor Plus), the popped up trees, the faux stitching around the image and the Pacific Point corduroy button. All adds up to a "wow" card! It was great to get this in the card swap as I don't have this set…yet…lol
Happy Earth Day and Happy Professional Administrator's Day…
Apr 21, 2009 | rubber stamping

Another quick card from the mini Stamp a Stack from Stampin' Saturday. We used the image from Pun Fun (attendees got to choose which one worked for them) and then coloured in with stampin' write markers. I just used a bit of real red on the heart and some sahara sand for shadow. It's hard to see in the photo, but the larger white cardstock was run through the Big Shot with a Texturz plate. This example uses the mini dots but we also found that the larger dots were fun and tended to be even more noticeable. A length of real red ribbon around the bottom and then onto a Summer Sun card for contrast!
Thanks for looking. I'll be updating my classes and events page in the next bit so be sure to check back and see what's on!
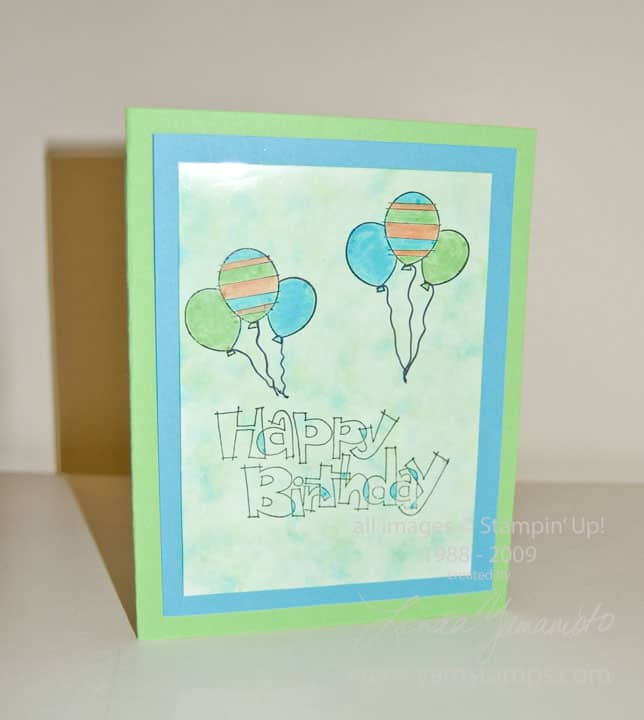
Apr 20, 2009 | rubber stamping
 Another Stampin' Saturday card – from the "mini stamp a stack". We used the polished stone technique to create the pattern on the glossy cardstock. Stamps are from the Bitty Birthday and Outlined for Fun sets. We used stampin' write markers to colour the images as well.
Polished stone requires glossy cardstock and rubbing alcohol (isopropyl alcohol), cotton pads (makeup removal pads), ink pad reinkers and a well ventilated room. I also like to use rubber gloves to keep my hand from getting too inky. Wet a cotton pad with rubbing alcohol, and add drops of reinker to the pad, placed fairly close together. Dab the cotton pad repeatedly over the glossy cardstock to get the effect. If you rework an area while it's still wet, you tend to get a more muted effect, if you let an area dry before going over it again, you get more distinct "spots". Once it's dry you can stamp on top of it!
A reminder that the three payment option for the demonstrator starter kit ends this month – if you'd like more information, please contact me or RSVP to attend my information evening next Wednesday!

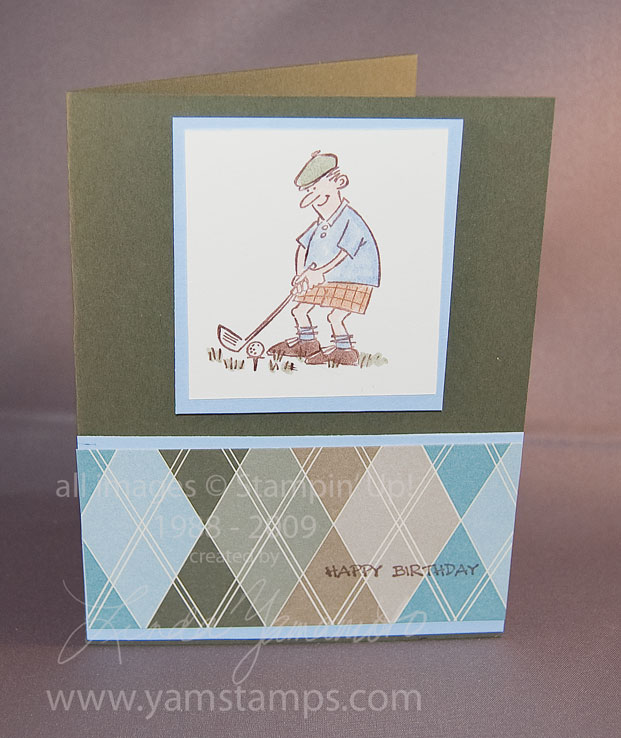 Although I do know of golfers who claim that golf is a year-round sport… Personally, I have always been a bit of a fair-weather golfer.