Oct 20, 2007 | rubber stamping
 Time for another Hallowe’en card. (and yes, I spell it with the apostrophe, always have, always will)
Stampin’ Up!’s punches make this card an easy one! The spiral punch, used on both sides of a black strip of cardstock, creates the filmstrip look. I used the 1 3/8" square punch for the film windows, and, as anyone who has taken a class with me knows, I firmly believe in stamping first, THEN punching. That way, I can make sure that the image is (more or less!) centred.
The images are from the set "Batty For You", except for the "Happy Hallowe’en" cat image, which is from the Level 1 hostess set "Party Punch". The large background stamp Weathered seemed to go with the Hallowe’en theme.
In the meantime, I am going to start working on this year’s Hallowe’en costume, a ghost. It’s a repeat from a couple of years ago, but D has decided that’s what he’d like to be! Off to find all that white material…..
Oct 11, 2007 | rubber stamping
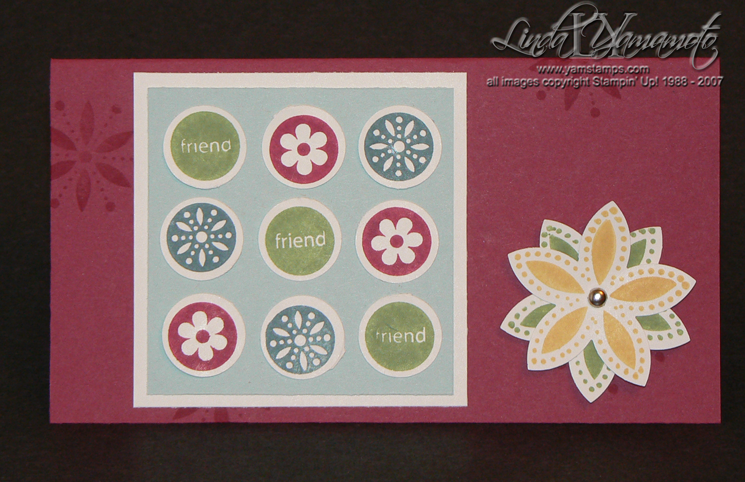
 In the Spotlight is a level 2 hostess-only set in Stampin’ Up!’s fall – winter collection ’07. [Am I the only one subjected to a bit too much Treehouse TV? Everytime I hear the name of this stamp set, I think of the children’s TV show "Timothy Goes to School"….they have "In the Spotlight" time which is like a vip day or special me day, or show & tell …. whatever they may call it at your child’s school. Anyway, I digress.]
The name aside, I love this set!! I love how I can use my Stampin’ Up! punches with it, because you may know that I don’t like fiddly time consuming cutting. This was one of the cards we did at my Stamp a Stack for World Card Making Day October 6th.
All supplies Stampin’ Up!: cardstock: purely pomegranate, whisper white & soft sky. Inks: wild wasabi, blue bayou, purely pomegranate, (yes, I am also loving those 2007-2008 "in colours"!!) so saffron. Accessories: 3/8" circle punch, 5 petal flower punch; paper piercer & silver brad.
I stamped 3 of each circle image onto scrap paper, then punched with the 3/8" circle punch (albeit some of them a little more centered than others!). Adhered these to the soft sky cardstock, and mounted onto whisper white. I quite enjoyed the fact that the white was used as the layer on this card, not as the base for the main image. Stamped the larger flower image twice, once in so saffron & once in wild wasabi, then used the 5 petal punch to make a perfect cut out. Love it!! Fast & easy. Used my paper piercer to create a hole & then fastened them together with a silver brad. Mounted onto a purely pomegranate card which was randomly stamped with another image from the set (perhaps I could have been a bit more generous with the stamping there, ah well, that will be for the next time I recreate this card!).
Don’t forget to sign up for my e-newsletter – there’s still 10 of the 12 weeks of Holiday ideas to come your way!!
Oct 2, 2007 | rubber stamping
 I made this Hallowe’en card despite a distinct lack of Hallowe’en stamp sets in my collection. Not that Stampin’ Up! doesn’t have any…because they do….and one is actually en route to me as I type this…
It’s not too early to be thinking about Hallowe’en….at least not when you’re a 7 year old boy. The costume decision is a big one!
In that spirit, I was playing with the oval punches to create a pumpkin. This is another of those ideas that seems to be "out there" so I am definitely not taking credit for it…but I’m not sure who originally came up with it, either!!
Anyway – I used 3 large ovals & 2 smaller ovals of pumpkin pie cardstock to come up with a somewhat pumpkin shaped figure. I used one of the flowers from the spring bouquet punch at the top of the pumpkin, hand cut a stem, and used thin strips cut with my Stampin’ Up! table top cutter. I can literally shave strips off cardstock if I so desire. Anyway, I took a couple of these strips & wrapped them around my paper piercing tool (the handle) to create those curly things you often see at the top of pumpkins. Whatever they are. The base is torn strips of creamy caramel, and the old olive features the ‘weathered’ background stamp, which I don’t seem to use often enough! I stamped the words ‘happy’ and ‘Halloween’ (from Everyday Flexible Phrases) in old olive & pumpkin pie onto a strip of the narrowest twill tape. And I meant to make them not perfectly straight. It’s whimsical. Really.
Mounted onto not quite navy for a quick Hallowe’en card, without using a specific Hallowe’en stamp set!
My October newsletter just went out; tomorrow is the start of the "Twelve Weeks of Christmas" emails, featuring a different holiday sample each week until December 25th – complete with instructions. (Yes, it really is twelve weeks until Christmas!!) Please subscribe to my newsletter (see the box at the top left of the blog) to be included in these mailings!
Sep 24, 2007 | Announcements, rubber stamping
 Saturday was the Stampin’ Up! regional seminar in Hamilton. So happy to have a Stampin’ Up! event right in my backyard! (OK, well, at least in the same area code). I was lucky enough to be selected to be a helper at the event (pic is of me & my fellow helpers & SU staffer Darlene who kept us in line). So….as a result…..I have NOTHING to show you in terms of the make & takes from the regional, since I was wandering around the floor helping during the stamping times. Well, I could have taken a picture of the packets of cardstock & accessories that I brought home… but that wouldn’t be very exciting. The plan is (ahem) for me to finish these at some point in time & post them here. (and now that it’s in cyberspace, I’ll have to follow through….).
 That’s not to say that I have nothing to show you at all… This is the FANTASTIC swap that my downline Lara Moore did. Isn’t it great? She created a soother using the tag punch, slot punch and circle punch. It’s one of those things that you look at and say HEY why didn’t I think of that??!! What you may not be able to see from this photo is that the soother is "popped" up to give it that 3D effect. Love it.
Aug 27, 2007 | Announcements, rubber stamping
 This is one of the love notes we made at stampers club. Using the so saffron textured love note as the base, we added flowers for interest. The punched out flowers are layered onto a wasabi flower which looks like foliage. The gold brads act to hold the flowers together & to add interest. We simply layered the flowers, and stabbed through the centre (carefully!) with the paper piercing tool and the foam mat from the tool kit, then inserted the brads.
Last chance to get 30 of these wonderful love notes with your purchase of the three for you punch box is this Friday, August 31st. (See the flyer for more information) Contact me to get yours!!
Aug 19, 2007 | rubber stamping
 This is a card we did at Stampers Club last week. It was our first get together & we had a lot of fun! For stampers club members, check your email as I will be sending the password for the stampers club blog.
That won’t stop me from sharing this card with everyone, though!! This features the Sidekick Sayings Hostess Stamp Set. This is a Level One Hostess set offered by Stampin’ Up! (all stampers club members would qualify to receive this, which is why I used it in our class!). This is a simple card, using shimmery white cardstock (though you may not be able to see the shimmer); blue bayou cardstock, double stitched soft sky ribbon, and flower (dyed in soft sky using the aquapainters) & half pearl from the pretties kit. (Love my pretties). We used the aquapainters to add a touch of colour. Next time I make this card, I think I’ll try the textured cardstock as the base – I think it could add a little something without overwhelming the whole design. I’ve been playing with my textured love notes from the three for you punch kit special, and I’m really liking how the textured cardstock just adds a little something special to whatever project I’m creating!

 Time for another Hallowe’en card. (and yes, I spell it with the apostrophe, always have, always will)


