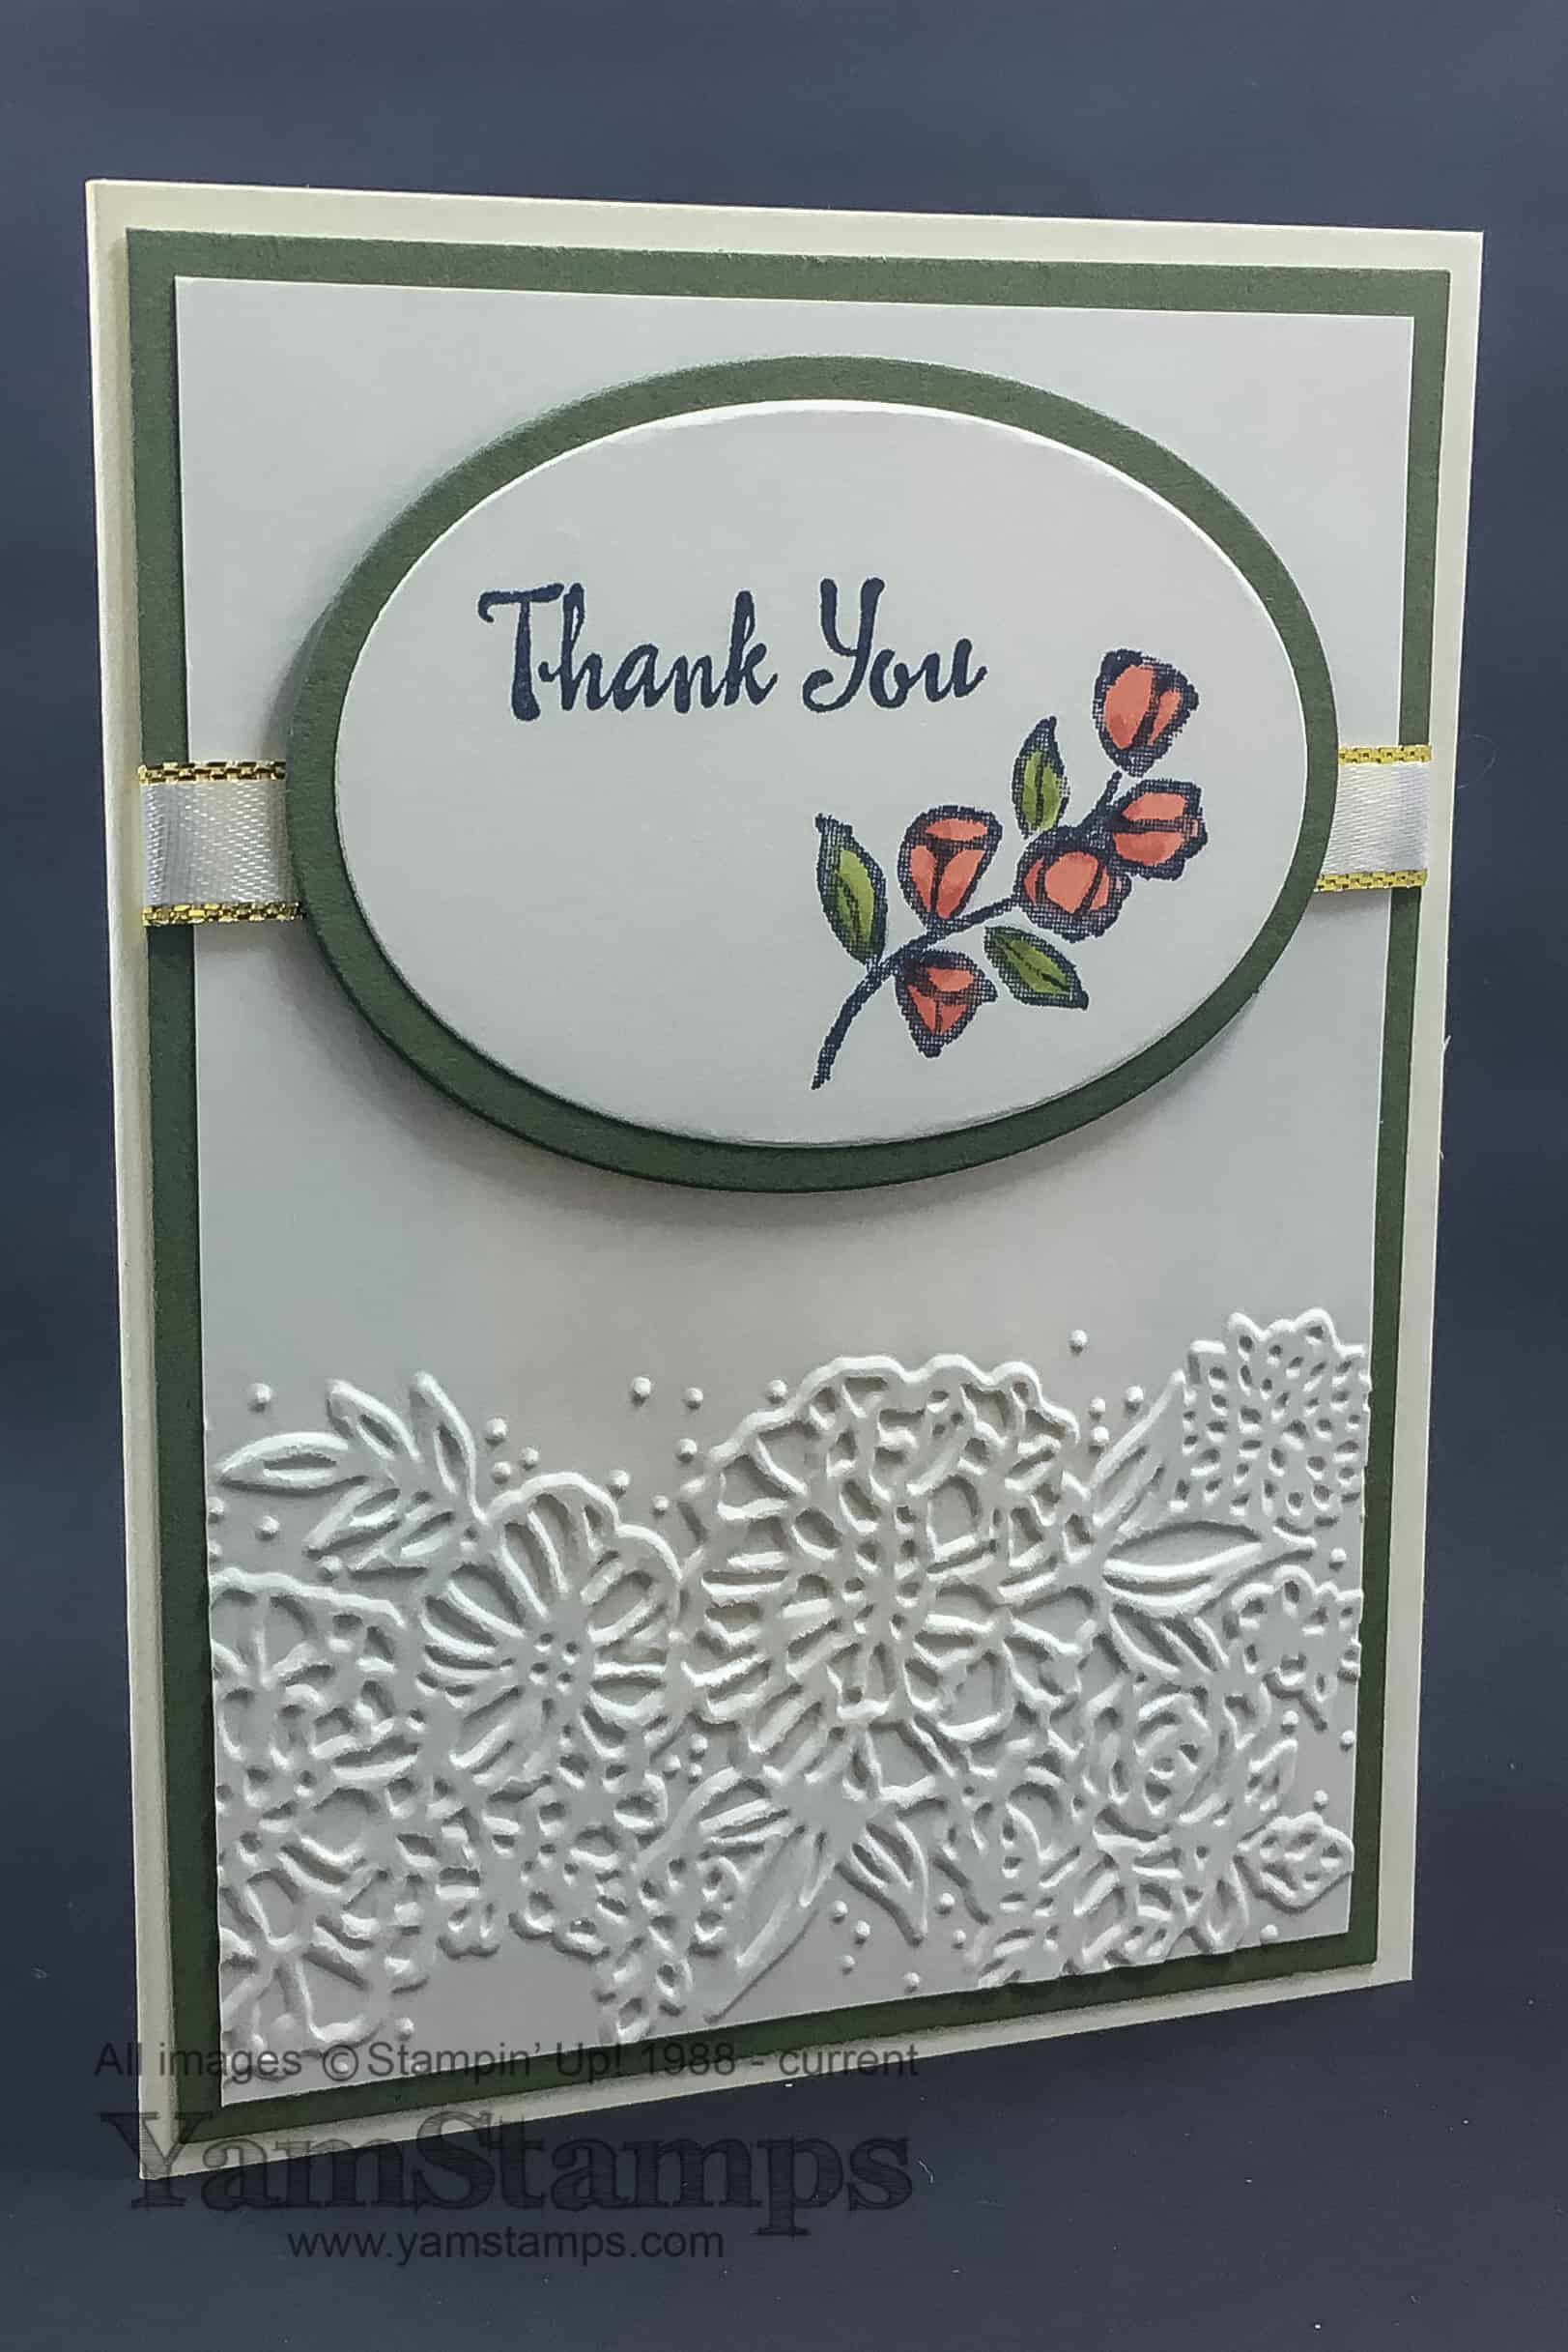
Today’s Sunday Swap Card Share is a best wishes card, created by Helen Hansen-Henderson. Though it’s a simple layout (love those), the details make it even more interesting. The card uses the First Froststamp set, which is available in red rubber wood mount or red rubber clear mount, or with the Frosted Bouquet Framelits in a discounted wood mount bundle or clear mount bundle. I love the window cut out of the cardstock textured with the Corrugated Embossing Folder that reveals the images from the stamp set, and the layers of die cut images over the stamped image. These items are in the Stampin’ Up! Holiday Cataloguewhich is now in effect. This set has a few sentiments in it – not just for the Christmas season, and the images could be used year round as well.
I hope you have a great Sunday, and a great run day if you’re participating in one of the Terry Fox Runs being held around Canada. I know that they were up really early getting things set up for the runners along the waterfront here in Burlington, and it was humid early on, so hopefully everyone takes it easy and stays well hydrated!
I’m finishing up final prep – it’s a busy week here – Stampers Club on Monday, and then Christmas Card Classes on Wednesday afternoon and Thursday evening. I split the times this week because the evening of the third Wednesday of the month is my demonstrator group meeting. This month will be more of a “hybrid” type meeting as some people will be here in Burlington in person, and some will be joining us online. Maybe I should be asking for best wishes for my prep this week?! LOL Upcoming events are listed on the YamStamps Events Page, so you can check out what’s happening locally, but I also have some online class options as well. Please contact me if you have any questions or want to register for an upcoming event.
Happy New Catalogue Day!The Stampin’ Up! Canada Holiday Catalogue is now “live” and up for ordering. Demonstrators have had access to the catalogue since last month, including an opportunity to preorder merchandise, so it’s been fun playing with new products, but hard to wait to share! Today I’m sharing a wintery card with you to celebrate. Oh and I’m not going to say ANYTHING about the humidity level, because I jinxed it last time I talked about it. Thank goodness the air conditioning is working in here, that’s all I can say….
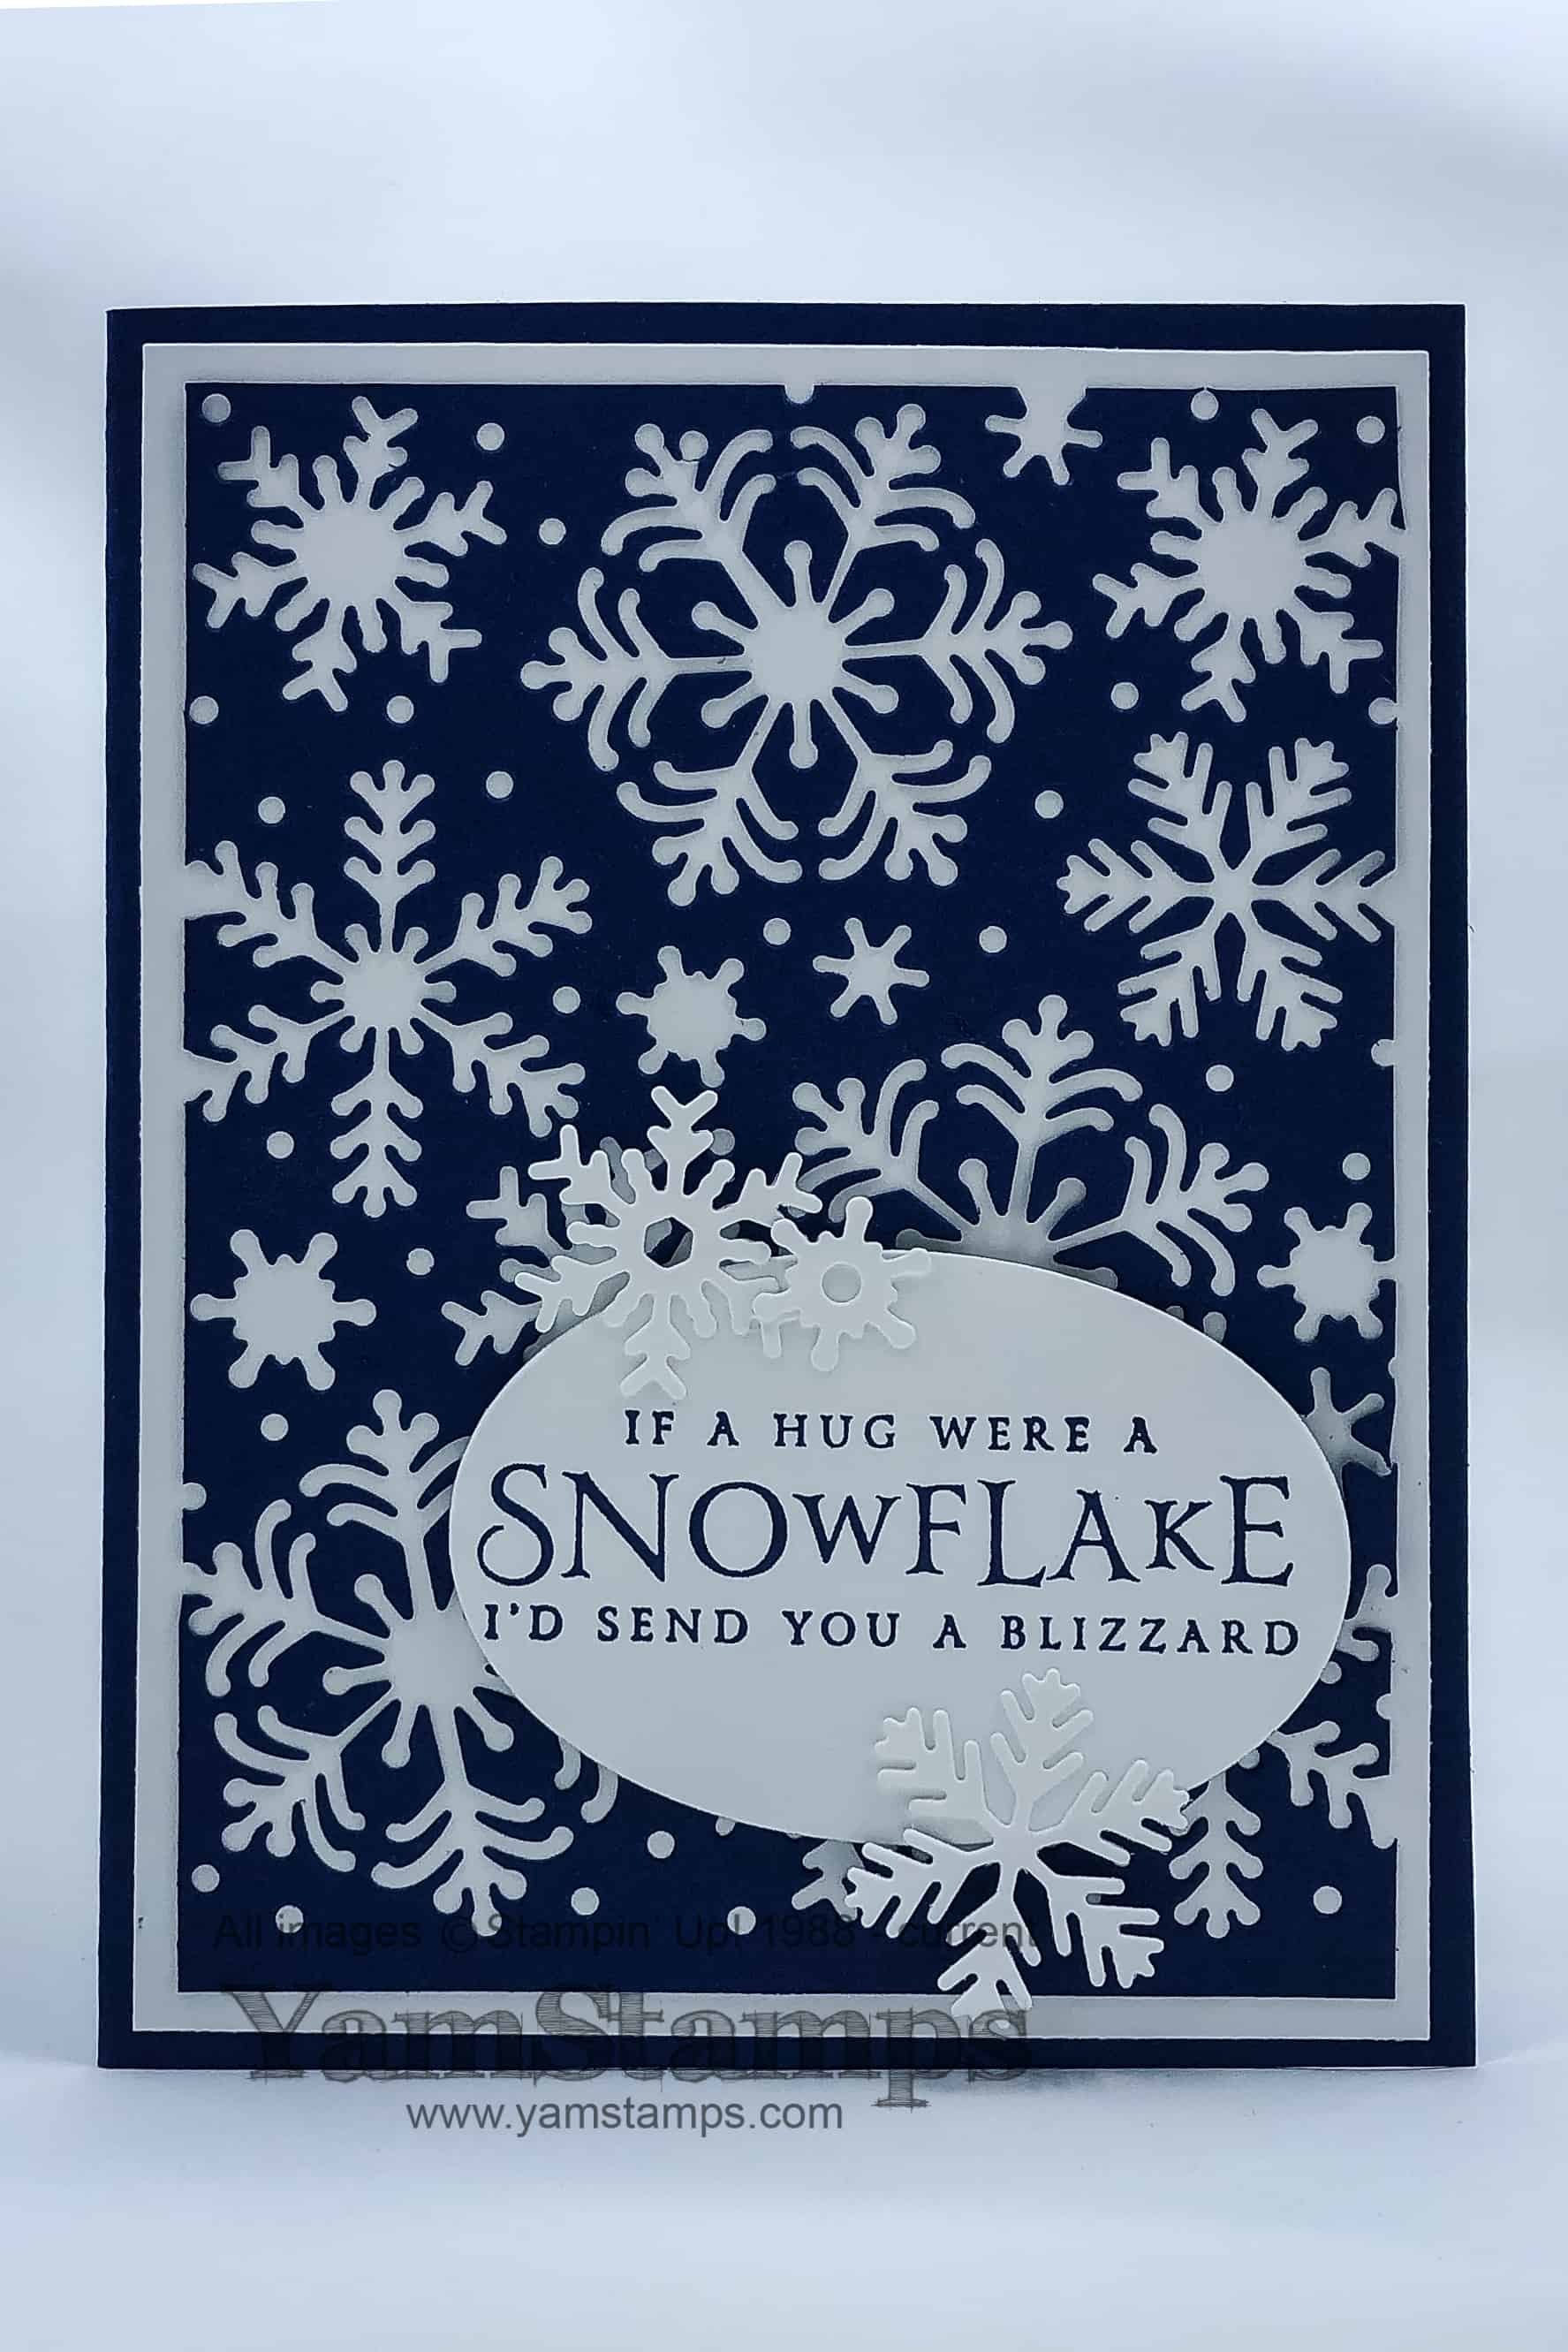
This card was created using the new Beautiful Blizzard bundle. The Beautiful Blizzard stamp set comes in either red rubber clear mount or red rubber wood mount stamps, and coordinates with the Blizzard Thinlits Die. Purchase the wood mount bundle or clear mount bundle and save 10% off the individula prices of the stamp set and die. The Blizzard thinlit die is a single die, so I used it on the background Night of Navy cardstock. I ran it through with Whisper White cardstock as well to get the snowflakes that accent the Layering Ovalwith the sentiment. This is one of my favourite items in the new holiday catalogue! Hint: with some of the dies that have more details or more cuts, I often like to run the die through in one direction, then turn it 90 degrees and run it through again. This way, if my plastic cutting sheets have any bowing or areas that might not contact as well, I figure it makes up for that. The other thing to get a good cut – use the Precision Base Plate.
There are so many fun holiday products – and it’s not just Christmas stuff – there’s also Hallowe’en and autumn choices, and seasonal vs “holiday” items too. If you still need a copy of the new catalogue and don’t have a demonstrator that you’re already working with, you can contact me about getting a copy. If you are looking to make holiday cards, September’s Christmas Card Class will be using the Santa’s Workshop Enamel Shapes as the featured product. Your class fee of $30 will include all the supplies required to create 4 different holiday cards, and each one will use the accents as decoration. You’ll use some of your package on the cards in class, and take the rest home for your own creative projects! Please contact me to reserve your spot – ASAP as I need to order the product ahead of time to ensure it will arrive in time for class. Class Dates: Wednesday, September 19 at 1pm or Thursday, September 20 at 7pm. See the YamStamps Events Page for other dates and classes! In the meantime – happy shopping!
Getting ready for the holidays! While I’m excited about the upcoming long weekend (yay for summer), I’m also prepping for that big winter occasion….. First though – if you’d like a copy of the upcoming Stampin’ Up! Holiday Catalogue, please complete this form before the end of Monday if possible…. They’ll be mailed out from head office starting in August, and I need to get my list finalized before the end of July.
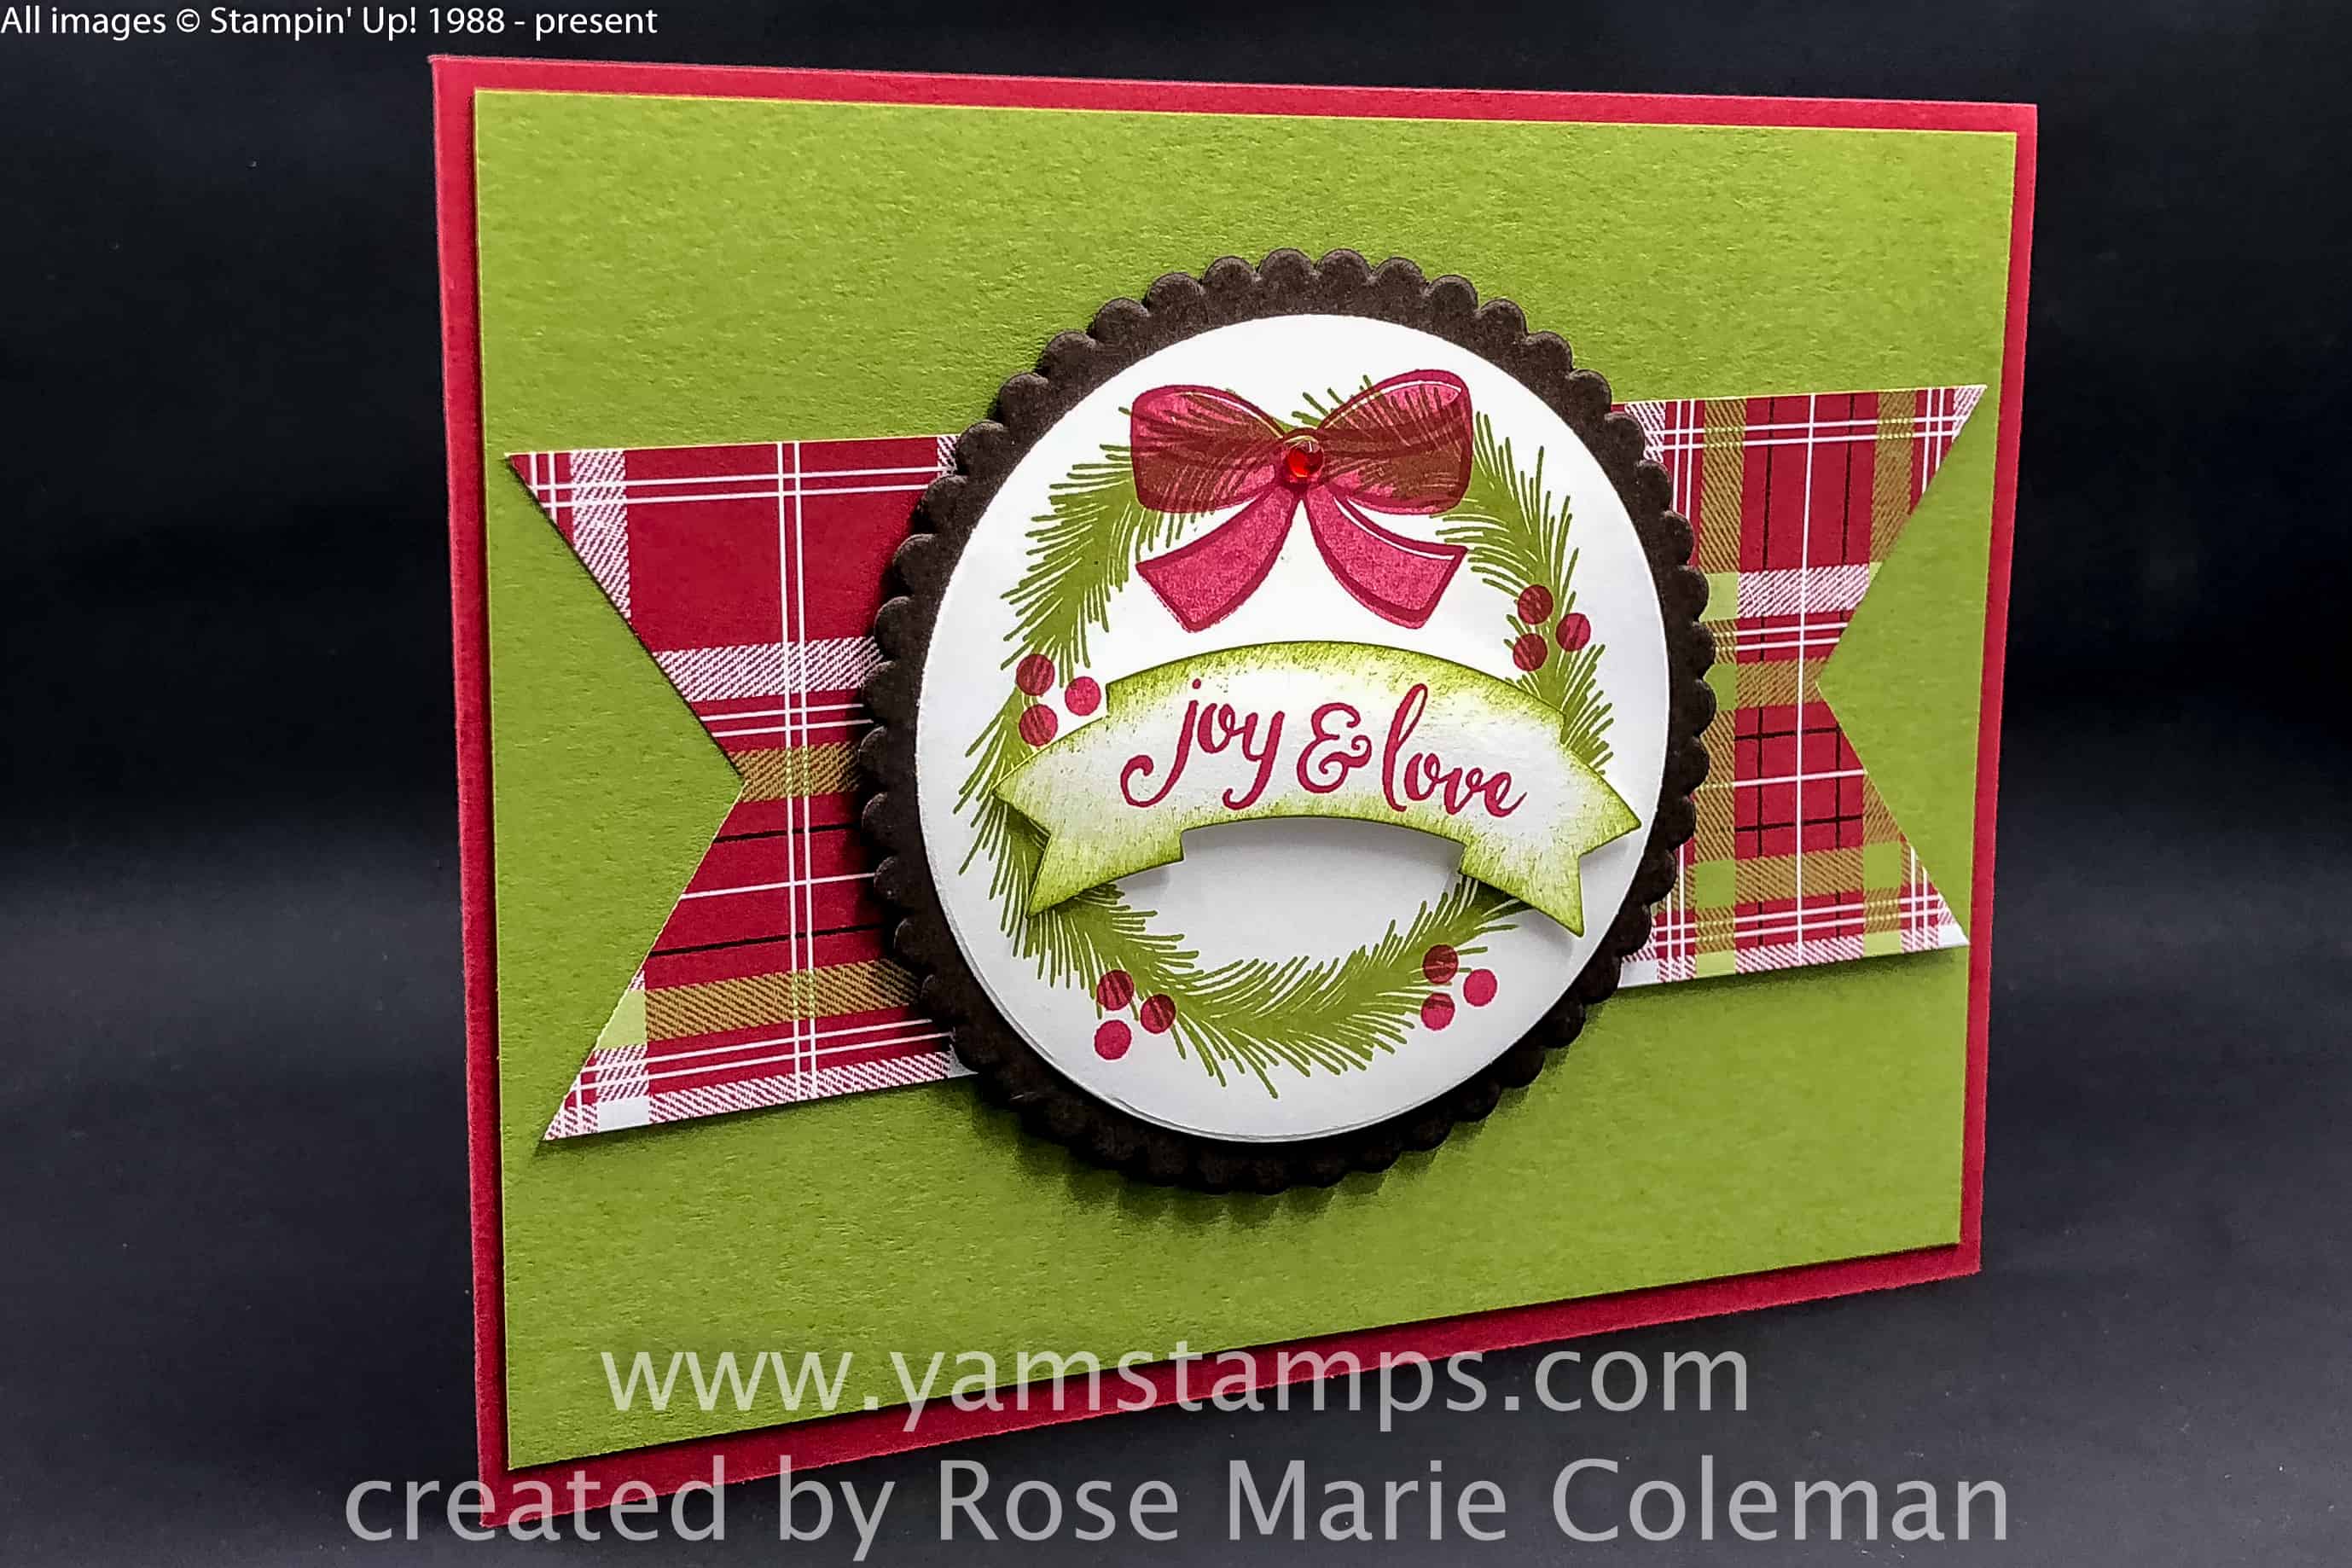
Since it’s Sunday, it’s time for another Swap Card Share! In the spirit of this post, I’m sharing a holiday card that I received in a recent swap – from Rose Marie Coleman.
This card features the Stampin’ Up! set Mistletoe Season, which is in the Annual Catalogue (no need to wait for the Holiday Catalogue to get a start on those cards!). There is no wreath image in this set, but there are fir boughs, which you can use to create a wreath shape, which is what was done on the main image here. It also uses the Under the Mistletoe Designer Series Paperwhich was the featured product in my July Christmas Card Class. If you missed out on the in person class, be sure to “like” and follow the YamStamps Facebook Page for the announcement of the Online Version of the class – plus a bonus Facebook Live card!
If you’re in the Burlington, ON area, I hope you can join me for an upcoming in person class – there’s the Monthly Card Class that’s happening THIS Wednesday, August 1st at 1pm or 7pm (cost is $20 for 4 different all occasion cards), and the August Christmas Card Class on August 22 at 1pm or 7pm. The August Christmas Card Class featured product is going to be a set of 10 Watercolour Pencils, which are available in August as part of a special promotion (more details will follow on August 1st). Cost for class supplies only – $20, cost for class supplies PLUS a set of the Watercolour Pencils is $40. Contact me to register for the class. Deadline for registration and payment is Wednesday, August 8th if you want the pencils (after the 8th, pencils may still be available, but there will be an additional $25 fee to cover expedited shipping to ensure that your pencils arrive in time). Otherwise, basic class registration deadline is August 20th. Events and Classes are listed on the YamStamps Events Page. Hope to see you in class – whether in person or online!
I spent the past few days in London ON for the Stampin’ Up! “On Stage” event for demonstrators. It was so much fun, a fair bit of work (since I’m on the Events Committee) but so worthwhile! Demonstrators got a peek at the upcoming Annual Catalogue! So exciting…but also a little sad, when we see what products won’t be returning. The retiring list highlights all the Stampin’ Up! Last Chance items – things you will want to order or stock up on before they’re gone!
Here is the downloadable pdf list for Annual Catalogue and Occasions Catalogueproducts
Here is the sortable spreadsheet for Annual Catalogue and Occasions Catalogue products
Here is the easiest option – the link to the retiring products in the YamStamps Online Stampin’ Up! Store – yamstamps.com/retiring2018 The online store will be the most up to date place to check what items are still available to order.
IMPORTANT THINGS TO KNOW:
1) Retiring Stamp Sets have guaranteed availability until May 25th, after which time they are while supplies last 2) All other Retiring Product is while supplies last
3) You may notice that ALL ink pads and reinkers are on the retiring list. Stampin’ Up! is revamping the ink pad design as well as the colour offerings to keep the Stampin’ Up! palette current and up to date. This is also why the Stampin’ Write markers are on the list. All the reinkers that are listed are for colours that will NOT be in the upcoming catalogue due to the Colour Revamp.
Colours that are leaving:
Always Artichoke
Chocolate Chip
Elegant Eggplant
Island Indigo
Marina Mist
Perfect Plum
Pink Pirouette
Rose Red
Soft Sky
Tangerine Tango
Tempting Turquoise
Wild Wasabi
Wisteria Wonder
2016-2018 In Colours
Dapper Denim
Emerald Envy
Flirty Flamingo*
Peekaboo Peach
Sweet Sugar Plum
See that asterisk beside Flirty Flamingo? That’s because it will be coming back as part of the core Stampin’ Up! Colour Collection!
Colours being reformulated:
Basic Black
Basic Grey
These colours will return to regular dye based ink pads, rather than the Archival Ink Pads (don’t worry, there will be other Archival ink options available)
AVAILABILITY
For individual colour items – classic ink pads in current design and refills are guaranteed until May 7th, and then available as supplies last
For any colour collections (Brights, Neutrals, Regals, Subtles), all cardstocks, all Stampin’ Write markers, embellishments and the Colour Caddy (ink pad storage) – availability is while supplies last.
If your favourite colour is on the Retiring List, you may want to stock up on supplies. Again, you can head straight to the Retiring Product spot in the YamStamps Online Stampin’ Up! Canada Store by typing in http://yamstamps.com/retiring2018 or access the whole store by simply typing http://yamstamps.com/shop
As always, please feel free to contact me if you have any questions or concerns, or need assistance placing your order. I will also post more about On Stage later this week!
Happy Valentine’s Day! I get to spend the day doing things I love to do! We are having a make-up date today for the February Card Class that was supposed to happen last Wednesday, but was weather delayed. I thought I’d share this video from last year when I was on Halton Insider, showing some quick and easy Valentine’s Day decorations. If you want to see more videos, please be sure to subscribe to the YamStamps YouTube channel. I do still post videos….in fact, I should be due to upload something in the near future. (that’s not really a teaser, that’s more of a “make sure this is on my to do list” thing LOL).
So with the lead up to the holidays plus my trip away, my pre-planning did not always go according to…well….plan. I also seem to forget how much time zone changes throw me. While I am able to be up at the “usual” time (or close to it), many of my waking hours seem to be in a zombie-like state (or more so than usual LOL) on my return to my “home zone”. However, that being said, I would not trade my recent time away for anything!
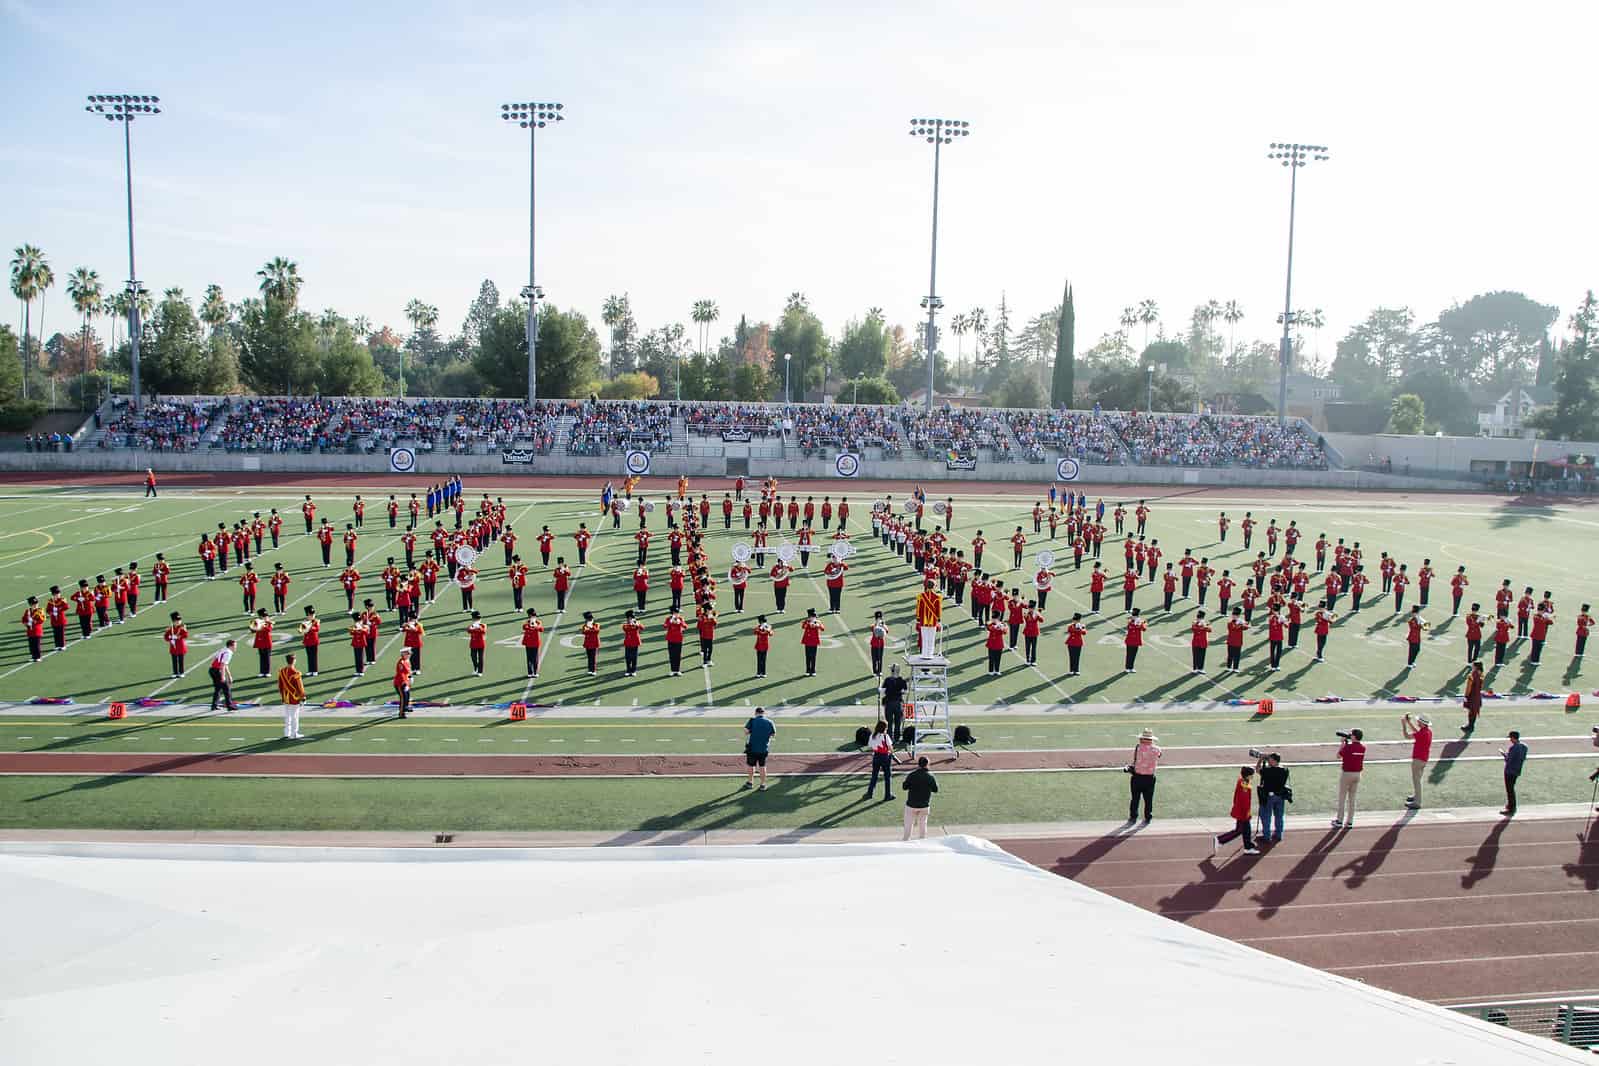
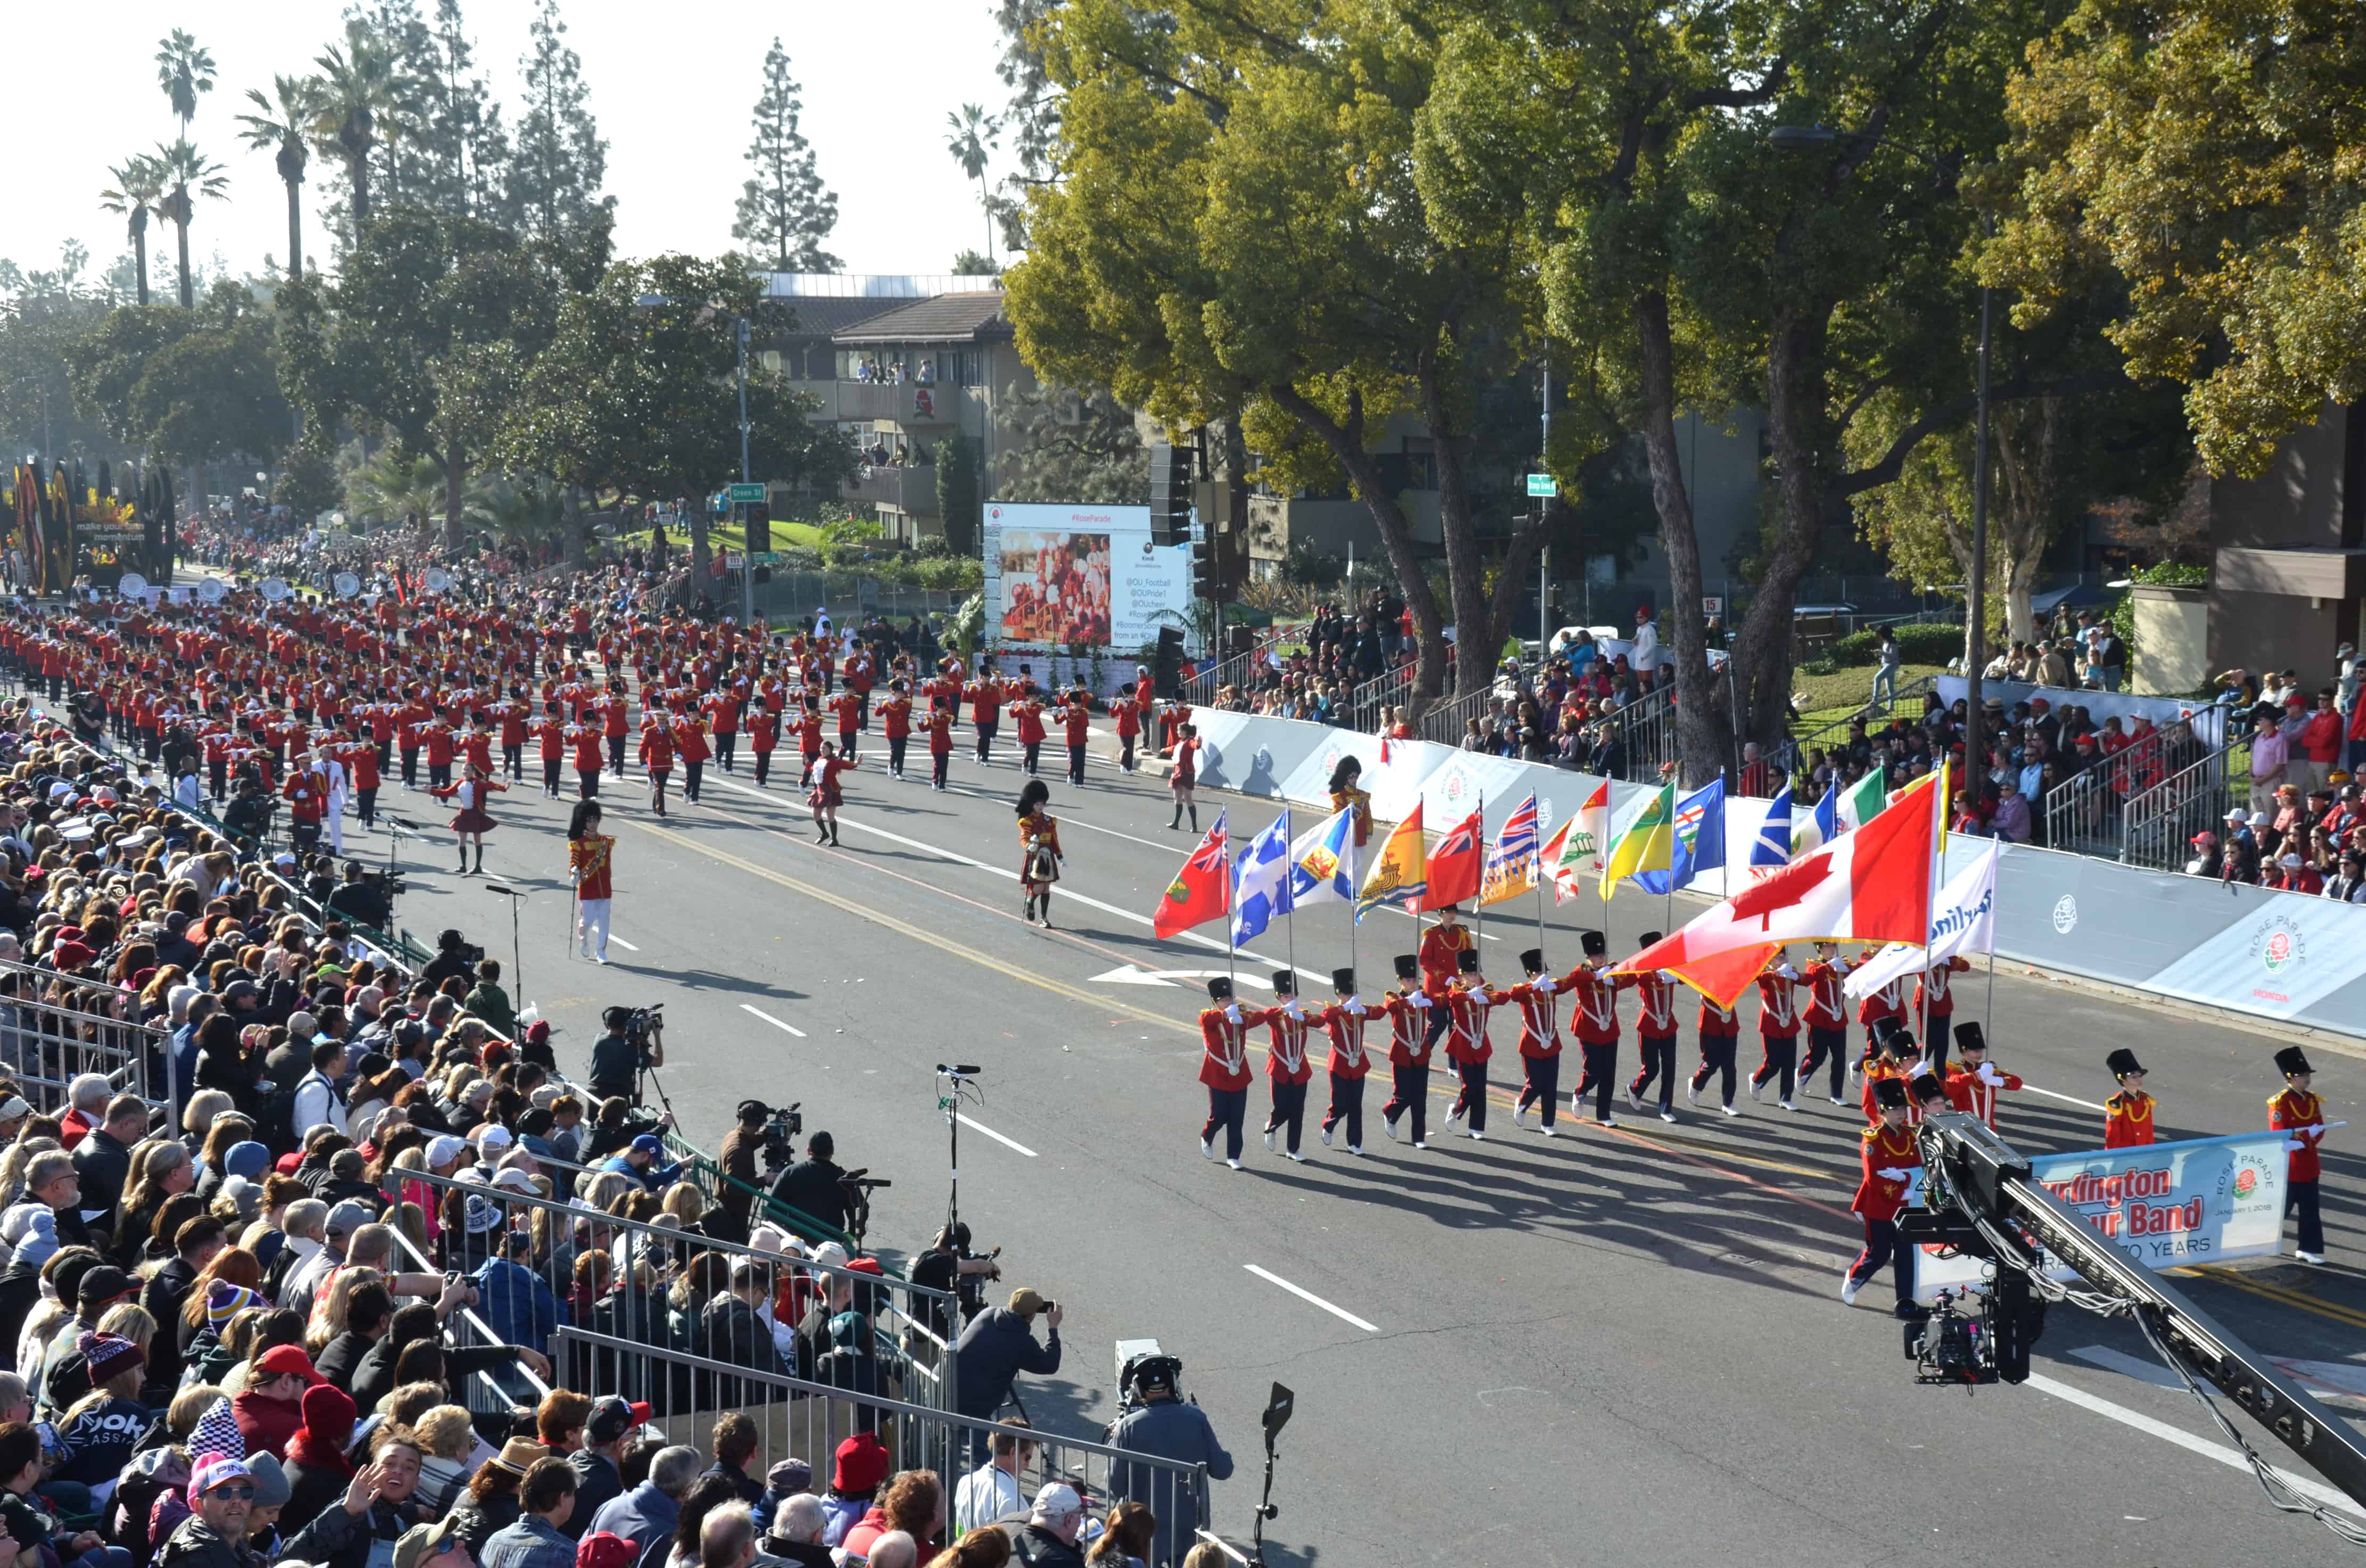
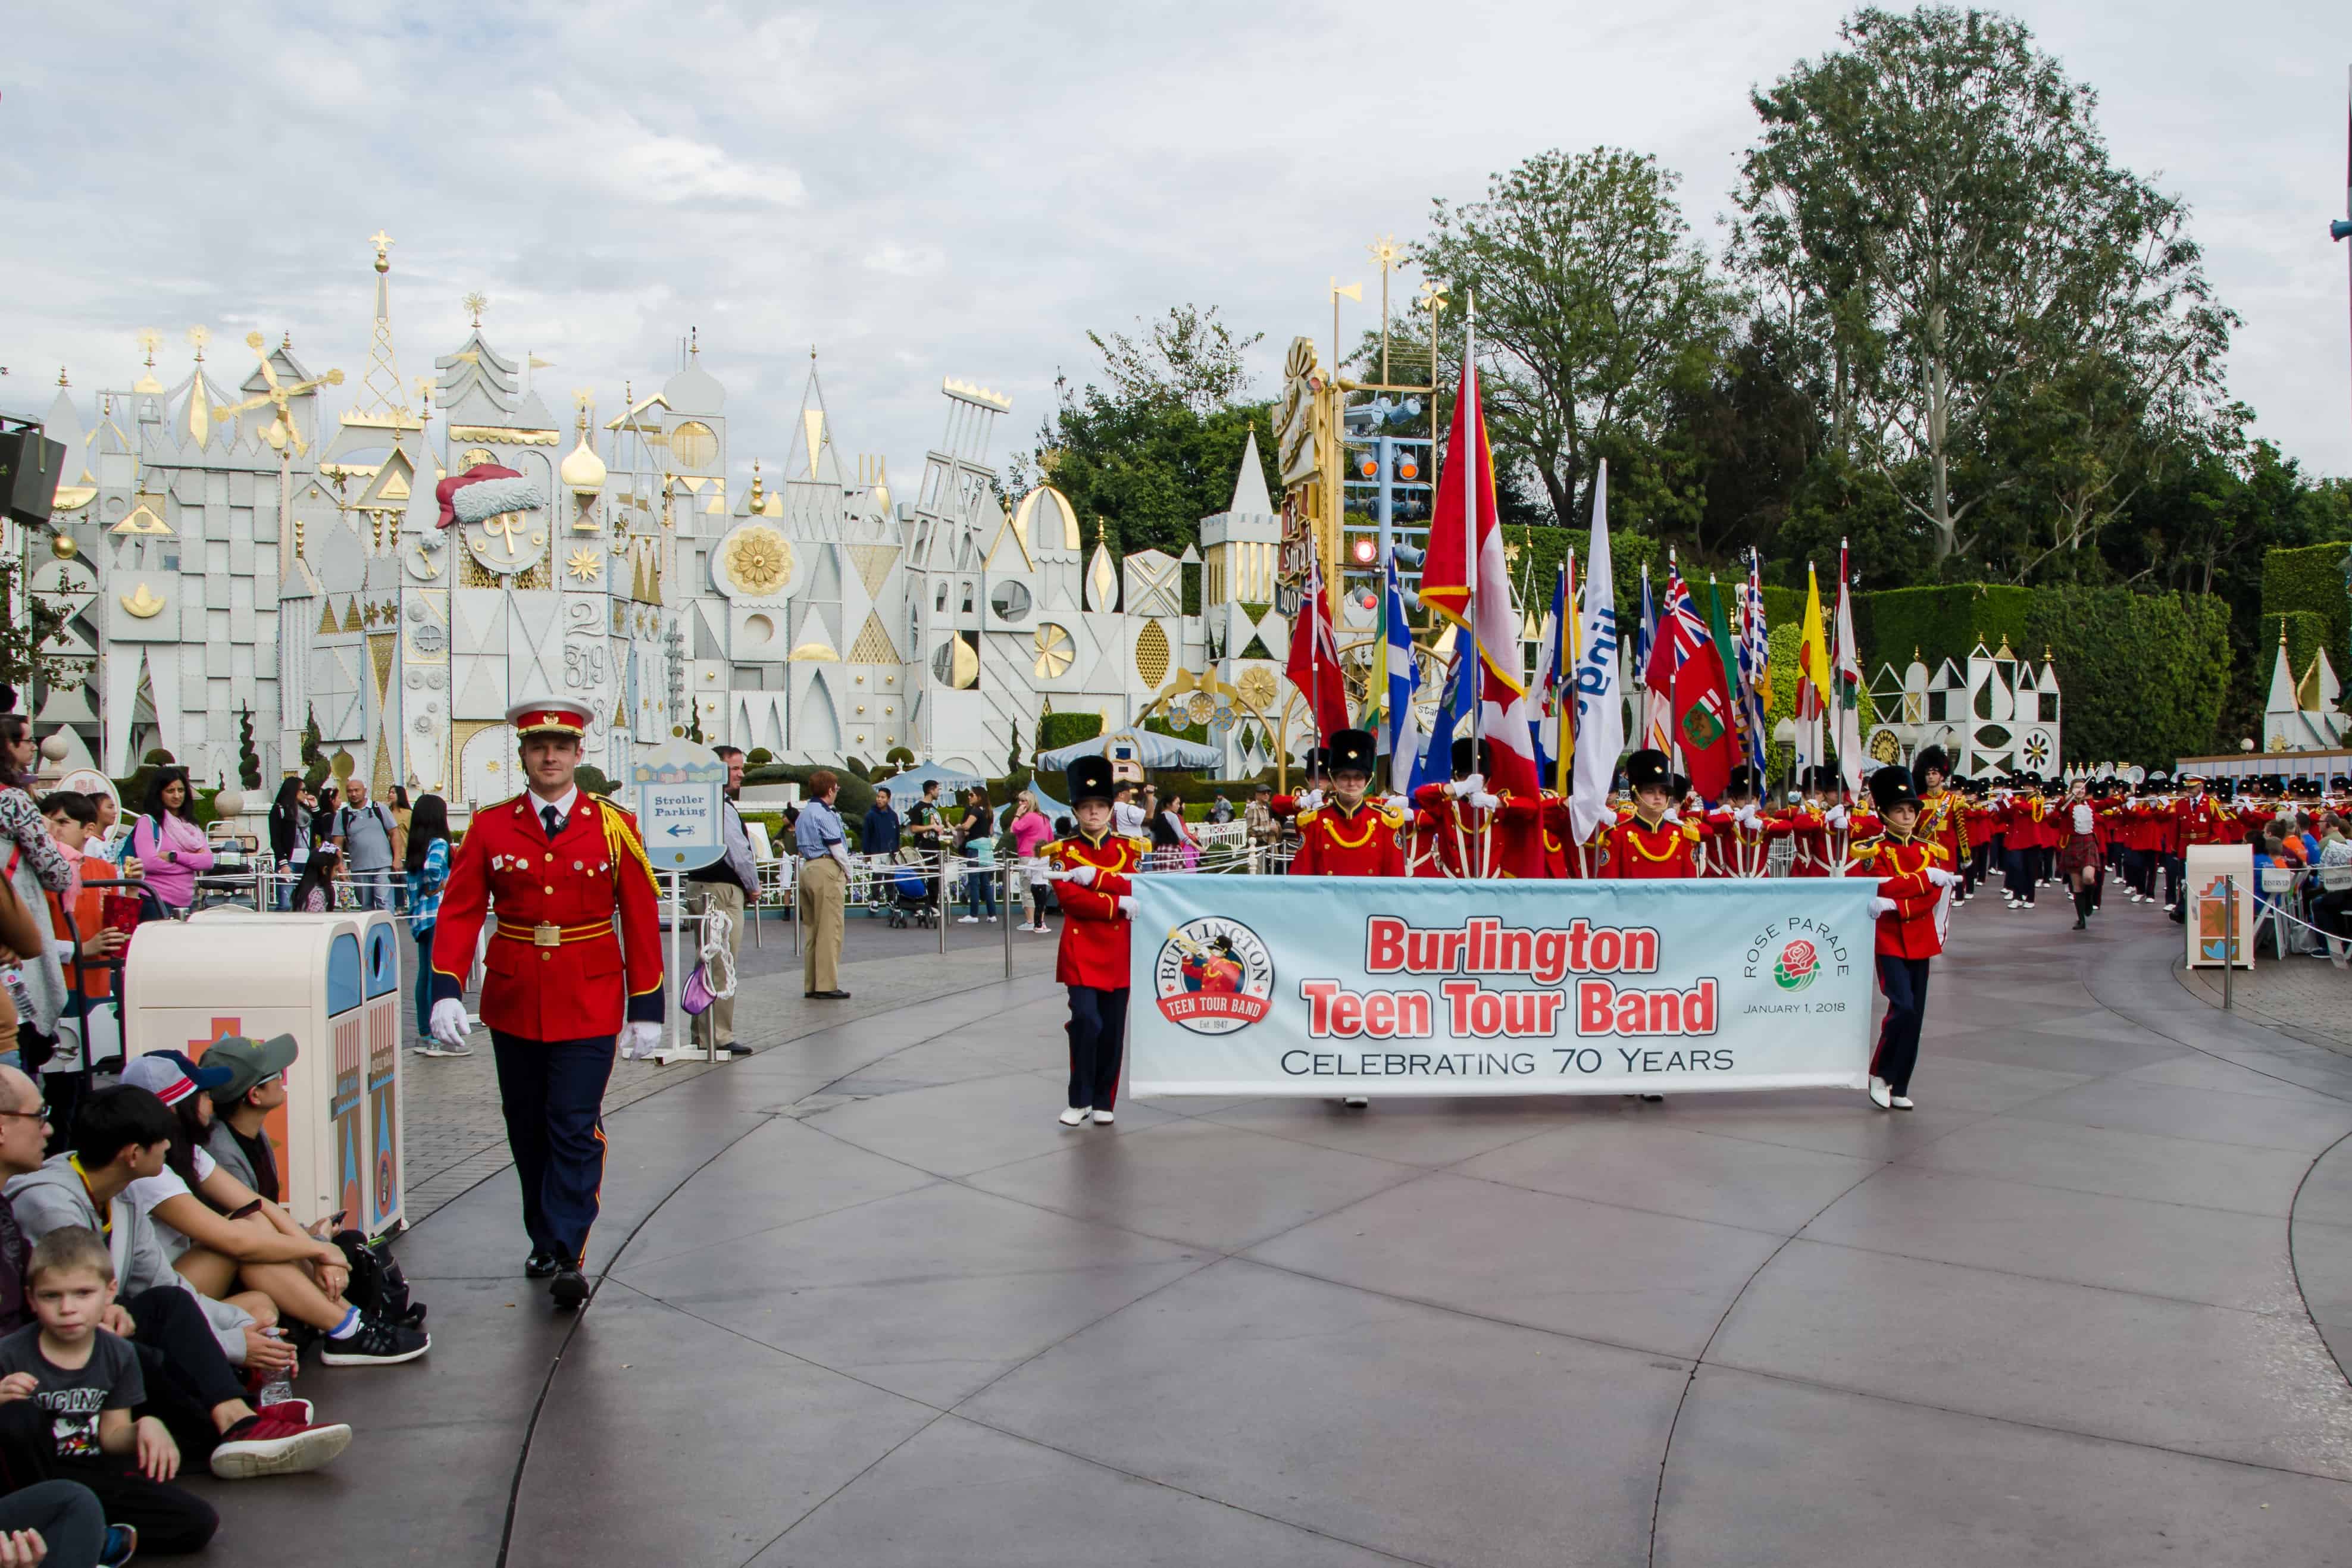
If you live in Burlington ON, or somewhere close by, you probably have heard of the Burlington Teen Tour Band. I was actually a member when I was a teenager, so it’s a joy for me that my son is currently a member of the same organization. After a detailed selection process, they were invited to the Rose Parade in Pasadena California, for January 1, 2018 (the band’s FIFTH time to this historic event!). I was fortunate enough to attend as one of the band photographers and as a chaperone. So from December 26th to January 5th, I got to hang out with some of my favourite teens and adults! This was a busy trip, but it was great to be in the sunshine….we missed the record cold temps of Burlington during our absence (sorry not sorry), and there were some definite once in a lifetime kind of experiences happening.
The band getting ready to perform at Pasadena Bandfest.
The band at the parade. (thanks Andrea, fellow photographer for this capture).
The band performing at Disneyland – last performance of the tour (what a way to finish!)
Sidenote – the band has red jackets that members and chaperones usually have to wear when out and about. Georgia was one of the teams in the Rose Bowl game – and their greeting to fellow Georgia Bulldogs fans is apparently to bark at them….which kind of threw a number of us when this happened while we were touring around California – until we figured out why strangers would bark at us (and until they figured out we were NOT from Georgia! LOL).
Now that we’re home again, the laundry is done and the bags are almost all put away (I’m a little slow on that one…), the house will be ready for Stampers Club tomorrow and it’s back to the regular grind. Well, technicially it was back to the grind last week, but it was definitely a dazed stumble-through week for me. Let’s hope this week gets a bit better.
I’ve sent out a number of Occasions and Sale-a-Bration catalogues to people, but if you still need one, let me know. I am in the midst of following up with those on my mailing list, to be sure that they actuallyarrived…. You can see the online versions here, but there’s nothing like having a hard copy in hand, I know. Until the end of March, select free merchandise with each $60 product purchase, get extra product for hosting a party with qualified sales, and get 2 free additional stamp sets if you purchase the Demonstrator starter kit! Contact me for more details or to book a date!