Mar 2, 2017 | cards, Occasions, Seasonal Catalogue, Stampin' Up!
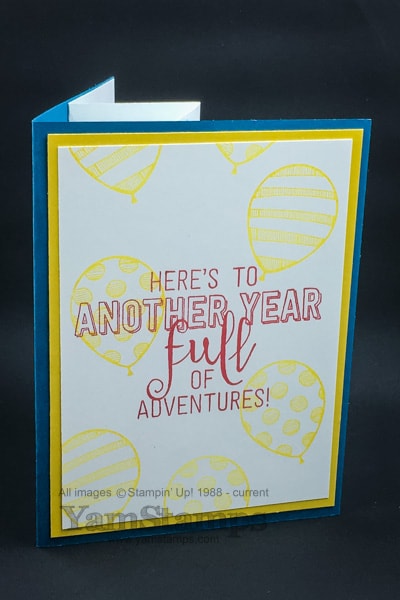
Sometimes you need an extra special or “WOW” card, and you don’t feel like making it from scratch. (If you do feel like making it from scratch, may I suggest the Clever Cards Online Class ?! You’ll get five different WOW card designs!) Here’s an easy pop up birthday card made using Stampin’ Up!’s Balloon Adventures set and Balloon Pop-Up Thinlits Dies. They’re available together in a discounted bundle…which I recommend because I love easy coordination (and who doesn’t like saving a bit of money?!). Real Red, Island Indigo and Crushed Curry combine to make a bright, fun card that’s sure to impress.
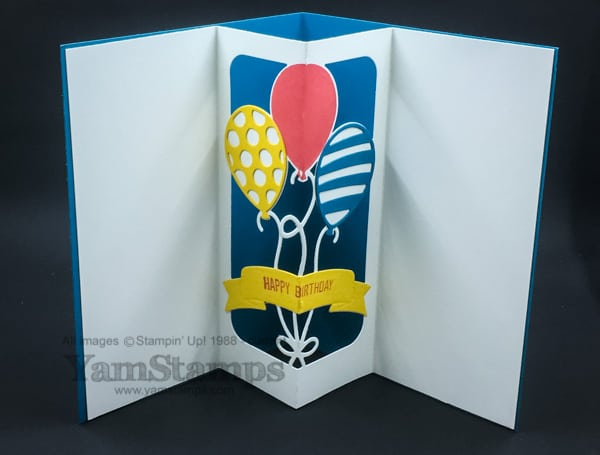
The interior pop up portion is made using a die! You score your cardstock, align the die along the score line and run it through your Big Shot. Fold along the score lines and you’re ready to complete your card! (I told you it was an easy pop up birthday card!) I like to use Tear & Tape to adhere the pop up insert securely in place (just don’t adhere the middle, otherwise the pop up won’t work!). Originally, I had stamped “Happy Birthday” directly onto the banner, but truth be told, I messed it up….so I cut another banner from a scrap of Crushed Curry Cardstock, restamped the sentiment and adhered it over top of the messed up one. It looks good either way. Well, maybe not with a messed up sentiment, but with a white banner rather than a yellow one. I added two additional die cut balloons that were adhered in place on the pop up portion, and the middle balloon is simply stamped in Real Red. The set is photopolymer, so you can re-stamp the balloon image on top again if you need more ink coverage – sometimes the score line doesn’t take the ink very well. (ask me how I know this…).
This card does take a little longer than a non-3D or non-moving part card might take to construct, but it’s just more steps, not that much more difficulty, really! A bit more time to construct a still quite easy pop up birthday card, thanks to coordinating stamps and dies, but the smile on the recipient’s face is sure to be worth it in the end! This is the kind of card that can be a gift in itself. We actually tackled this card in Stampers Club and the March Card Class! I liked this card so much I included it in both classes! If you’re needing an outing during the day or evening, consider joining us next time! See the YamStamps Events Page for upcoming events, or contact me to register for the April Card Class or to find out more about Stampers Club. Hope to see you in class soon!
Feb 26, 2017 | cards, Sale-A-Bration, Seasonal Catalogue, Stampin' Up!
Do you prefer Glimmer Paper or Glitter? While I love glitter, I don’t always love the mess it leaves – which is why I really love Stampin’ Up!’s Glimmer Paper. It’s an easy way to add all the glitter and shine with less fuss and mess.
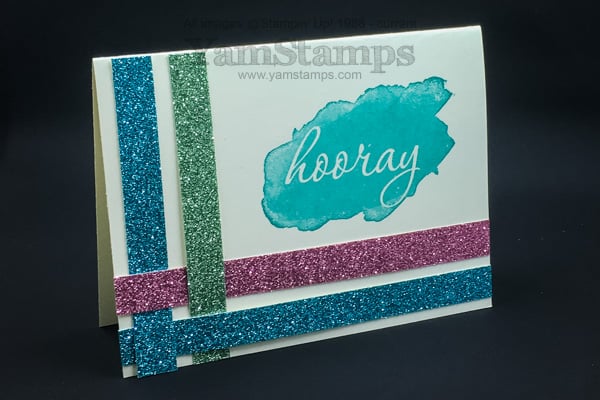
This project showcases an easy way to use Glimmer Paper. Glimmer Paper is perfect for adding shine to your paper crafting with less mess than loose glitter. While you will still likely find some stray glitter here & there after you use it, it’s not nearly as invasive! The paper is a little heavier than regular cardstock and has a slightly waxy backing on it, so I like to use Tear & Tape to adhere it in place. If you’re more patient than me, you may choose to use the Multipurpose Liquid Glue. I’m more of a get it done and get going type of crafter, not to mention somewhat messy, so dry adhesives tend to work better in my crafting corner.
This fun card features two of the second release Sale-a-Bration products. Reverse Words has two negative image words, and the 12 pack of 6″ x 6″ Glimmer Paper is perfect for cardmaking or scrapbook page accents. Some other samples were seen in this post. I used the sample from the Second Release Sale-a-Bration flyer as a jumping off point for this card. If you’re attending one of my events this week, you’ll get a chance to make this card as well! The image is stamped in Bermuda Bay, and then strips of the Glimmer Paper are woven at the edge of the card as an accent. Not only is this an easy way to use glimmer paper, it’s an easy way to build up your card stash! You could make a stack of these cards with different main images for a variety of occasions.
The Sale-a-Bration Glimmer Paper comes in a package of 12 sheets of 6″ x 6″ in 3 colours – Bermuda Bay, Mint Macaron and Sweet Sugarplum, and is available as a free choice with each $60 product order until March 31. Stampin’ Up! also offers packages of two 12″ x 12″ sheets in Dazzling Diamonds, Real Red, Blushing Bride, Gold, and Silver. With so many options, and so many easy ways to use Glimmer Paper, there’s no excuse not to add a little glitter to your projects! If you need to build up your supply of shiny objects, head to the YamStamps Online Stampin’ Up! Canada store to stock up!
So what’s your preference – glimmer paper or glitter? (HINT – I’m going to be randomly rewarding people for “class participation”….aka commenting on the YamStamps Blog Posts….).
Feb 9, 2017 | cards, Occasions, Sale-A-Bration, Seasonal Catalogue, Stampin' Up!, TV/Video/Web/Tech
Have you seen Stampin’ Up!’s Falling In Love Designer Series Paper? This is a gorgeous set of papers, double sided, with lots of bokeh effects and images. It’s hard to pick which side to use! (Good thing there’s duplicates!). They make a great background for a simple card.
This is a version of the card that I showed on Cogeco’s Halton Insider the other day. I realize that you have to be within the Cogeco Halton viewing area to catch the show (6pm, repeated the next day at 630). I am working on a way to get the recordings into a format I can share! The other night I actually did a facebook live video on the YamStamps page where I showed my TV screen!! (The recording is posted if you wanted to check it out). Much like at Christmas time, we recorded 5 segments in a row, featuring different projects, that will be aired during the shows this week.
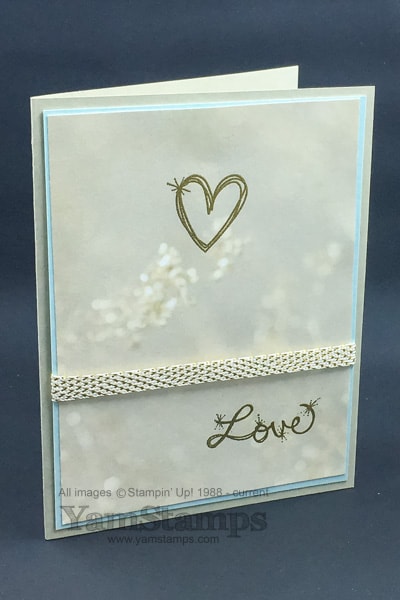
Essentially, you heat emboss the graphic and word of your choice from the Love Sparkles set (available in clear or wood mount) with Gold Embossing Powder. I did an extra thin border for the matting piece in Soft Sky (rather than using a traditional 1/4″ larger piece of cardstock, I did 1/8″ larger), and then wrapped it with some of the gorgeous Metallic Woven Ribbon in Gold. You can get the ribbon for free with a $60 product order until the end of March for Sale-a-Bration! (Download the Sale-a-Bration catalogue here and the upcoming new releases here!). This makes a clean, simple and elegant card – perfect for Valentine’s Day, wedding, anniversary or “just because” kind of card!
I am putting the finishing touches on the Clever Cards Online Class and it will be open for registration in the next couple of days. It’s a great class (if I say so myself LOL) that will break down the construction of a few “fancy folds” type cards that you will be able to decorate for the occasions when you want to give a card that will really WOW the recipient! I’ll post the official release here on the YamStamps Blog so please be sure to come back to the site!
Dec 24, 2016 | cards, Christmas, Seasonal Catalogue, specials, Stampin' Up!
So my personal preference for cards tends to run towards clean & simple….if you can’t tell. I had a couple of designs for Christmas cardst this year that I thought I’d share here, especially since most of the recipients won’t get theirs by Christmas Day…..LOL!
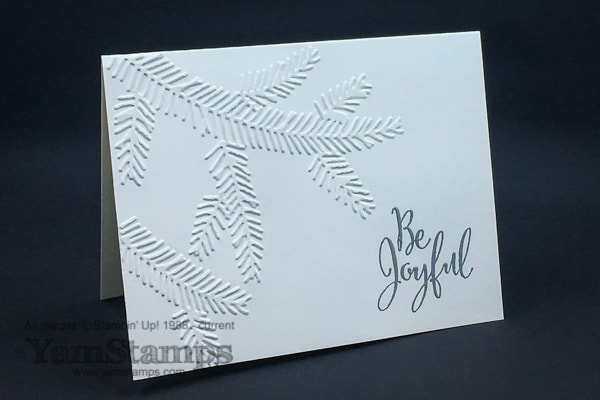
I loved the clean look of this design….though it may not look as impressive in the photo LOL. I used Thick Whisper White cardstock (I _love_ that cardstock, especially for a card without additioinal layers on it) and embossed the words in Silver. It features the Pine Bough Embossing Folder (on sale as part of the Year End Closeout), and the sentiment is from Merriest Wishes – which is available in wood mount, clear mount (on sale) or as part of a bundle with the Merry Tags Framelits (framelits on sale)- again, either in wood or clear. **If you like clear mount, your best deal is to buy the set and framelits SEPARATELY because with the sale pricing it ends up being LESS than the discounted bundle. If you like wood mount, your best deal is the bundle.**
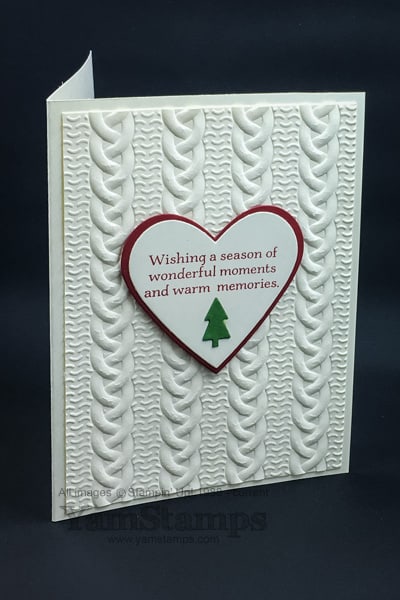
This is a version of a card designed for a class earlier this year. I love the Cable Knit Dynamic Embossing Folder and the depth it brings to projects! Used the Sweet & Sassy Framelits and added a tree selectively cut from the Outdoor Adventures Framelits. The sentiment is from Peaceful Pines. This was my first design that I started creating.
So here are some of my tips for bulk card making…..or “Linda’s Learn From My Mistakes List”. (I will post this here as a reminder for myself….and perhaps repost it early next Christmas Card Season?!)
- Figure out how many cards you need in advance and figure out how much you will need in terms of supplies. (Hence two designs for me as I ran out of Very Vanilla cardstock.) (This has sadly reinforced my stockpiling paranoia).
- You can score an 8.5″ x 11″ sheet of cardstock at 4.25″ lengthwise BEFORE cutting the sheet crosswise in half at 5.5″ to create two scored cards of 5.5″ x 8.5″. (I cut, then scored twice as many times as I needed to.)
- Do “batch” processing. I actually DID do this… Cut all the cardstock at one time, dry emboss all the cardstock at one time, stamp all the cardstock etc. rather than creating each card in individual steps. The only thing you can’t batch do? Heat embossing. Get that done before the ink dries! Since my Pine Boughs card didn’t have much else to be done on it, it wasn’t too much of a chore to heat emboss the outside & inside sentiments one card at a time.
One last tip – think about thickness and bulk if you’re going to be mailing your cards – don’t want to get dinged for extra postage or risk cards getting caught in the processing machines, so think about how many layers and how many dimensionals you want to use on your design!
I am hoping to have a Christmas message for you up on the blog here tomorrow but there are some behind the scenes glitches that may interfere…so fingers crossed. Otherwise, I hope that you are able to spend some time with friends and family over the next few days. Thank you for being a YamStamps reader, and Merry Christmas!
Dec 22, 2016 | cards, Christmas, Seasonal Catalogue, Stampin' Up!
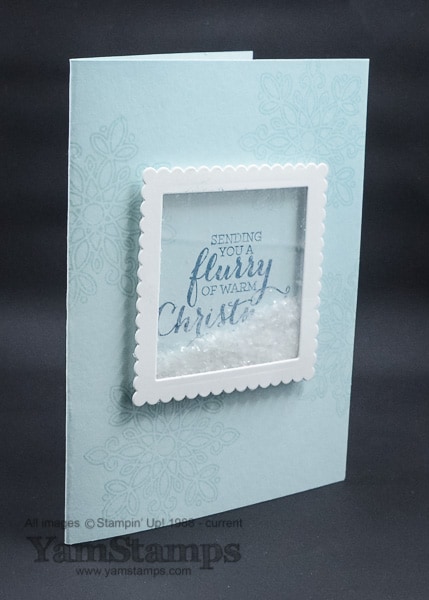
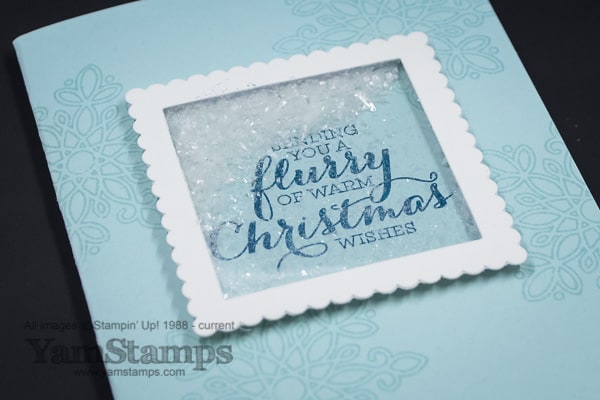
Shaker cards are so much fun and really catch the eye of the recipient! Stampin’ Up!’s Foam Adhesive Strips make it easy to make dynamic cards like this. The strips can be cut to custom lengths, and have adhesive on two sides, automatically creating a 3D effect. They’re used on this card behind the frame that was cut with the Layering Squares Framelits – this allows room for the enclosed items to move about. There’s a square of Window Sheet to contain the Mica Flakes, and a little of the flakes goes a long way! Right now the Mica Flakes Trio Pack from the Holiday Catalogue is on sale as part of the Year End Clear Out, while supplies last, so you can stock up! Don’t know if you can tell in these images, but I was a little too enthusiastic with the amount of flakes I put into my window…so the words get buried in snow. Kind of like my driveway these days…. The images and sentiment on this card are from the Flurry of Wishes stamp set.
I hope that things aren’t too crazy for you in the lead up to Christmas Day! School is continuing until tomorrow so it really feels like it’s full out until the weekend for everyone. I will be posting on the blog over the holidays, so please come back to see what’s new. I’ll have a fun post on Christmas Day and a Boxing Day special as well. In the meantime, keep warm, keep crafting (I’m STILL working on my cards….don’t judge!!) and keep the spirit!
Dec 16, 2016 | cards, Christmas, Seasonal Catalogue, specials, Stampin' Up!

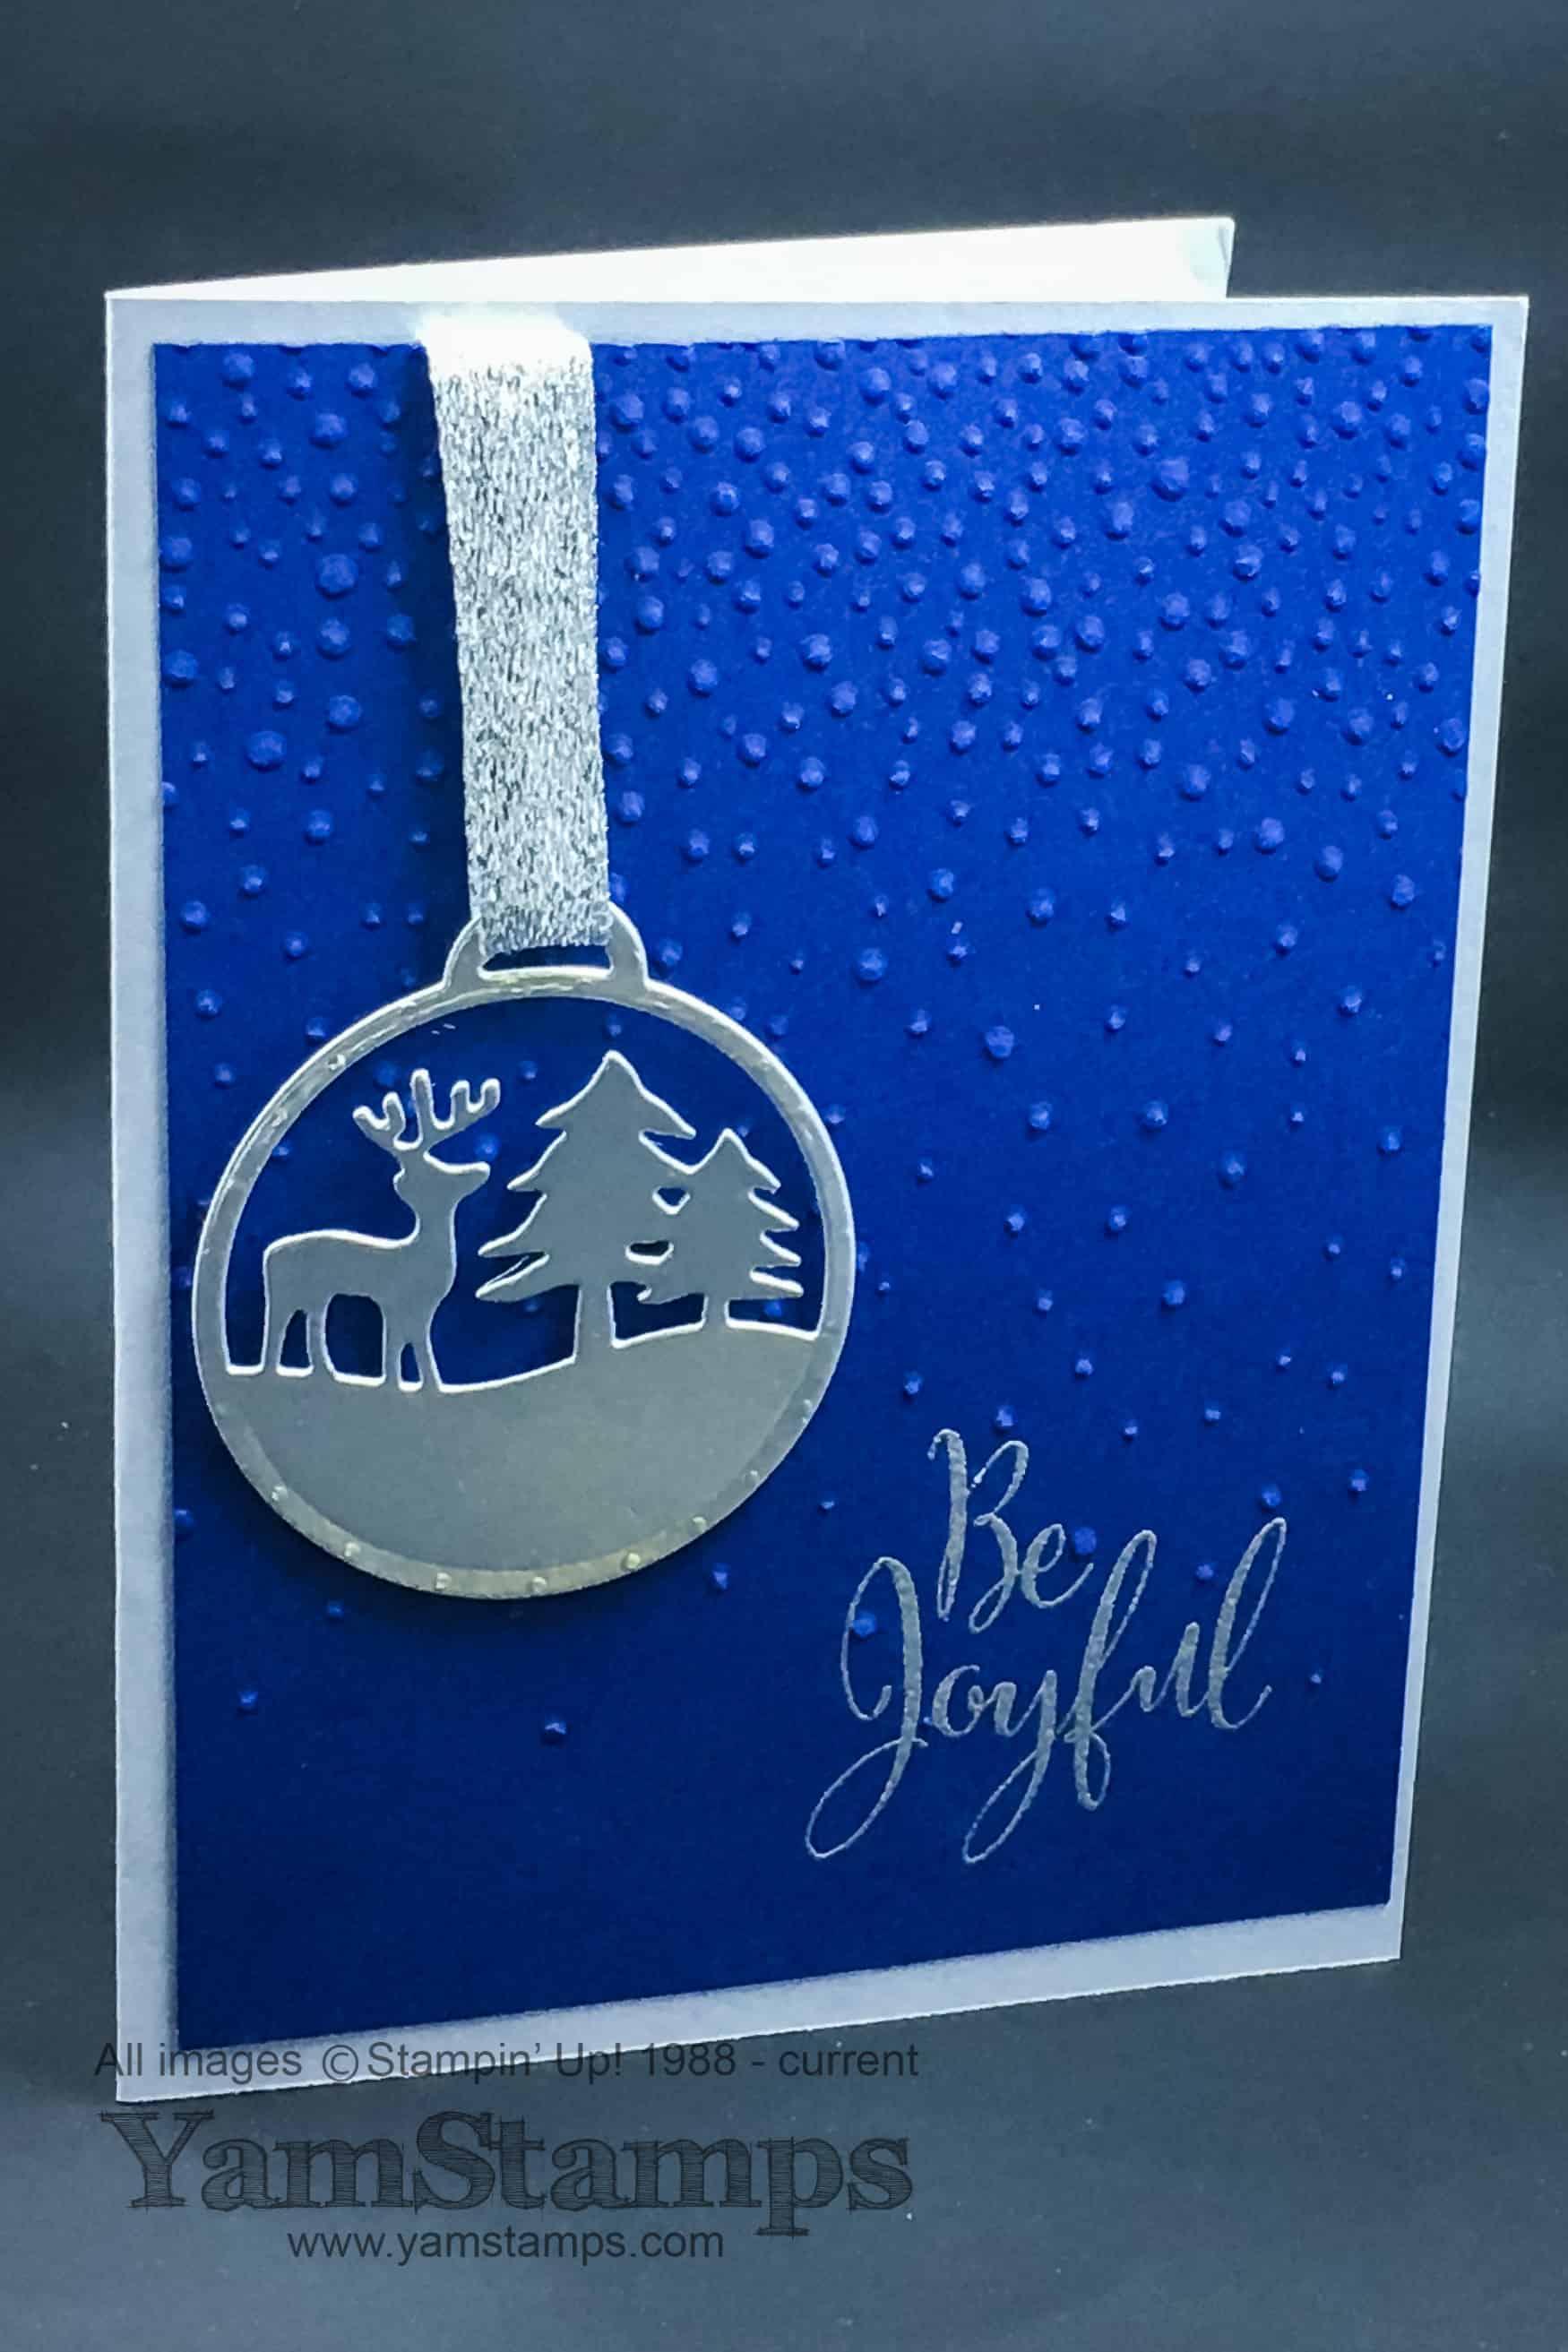
I love the sentiment Be Joyful…and I do love the script of this stamp as well! It’s from the Stampin’ Up! set Merriest Wishes – available in Wood Mount or Clear Mount- special pricing as part of the Year End Closeout right now! Of course, you could also get a discount by purchasing the set as part of a wood mount or clear mount bundle, packaged with the Merry Tags Framelits Dies (special pricing). OK when I tax my brain and do the math, if you like clear mount, your best deal is to buy the stamps & framelits separately and take advantage of the Year End Closeout pricing. If you like woodmount, your best deal is the buy the bundle. *phew* I’m exhausted now.
Anyway! This is an easy card to whip up if you’re still in the midst of creating cards to send. (*guilty*). The silver ribbon is from the Glitter Ribbon Combo (special pricing) and the Night of Navy cardstock is embossed with the Softly Falling Embossing Folder, which is one of my favourite background folders right now.
If you placed an order with me in the last few months, you should be receiving your Occasions and Sale-a-Bration catalogues in the mail anyday now! I will check in with you to be sure they arrived. If they didn’t, or you want to be sure you don’t miss out, please add your information on this form – I will follow up with you and get you hardcopies of these lovelies!!