More for your viewing pleasure….
Stampin' Up!'s co-founder & CEO, Shelli Gardner, was on US TV recently, showing a number of handcrafted holiday place settings – here's the link to watch: http://studio5.ksl.com/?nid=61&sid=4573672

Stampin' Up!'s co-founder & CEO, Shelli Gardner, was on US TV recently, showing a number of handcrafted holiday place settings – here's the link to watch: http://studio5.ksl.com/?nid=61&sid=4573672
 There's a new video on my Stampin' Up! business website at www.yamstamps.stampinup.net – click on the image to head over there & watch the creation of this cute Hallowe'en project! It's the featured project in the bottom left corner.
I'm busy behind the scenes getting ready for a super busy November, plus trying to take pics of the FANTASTIC swap cards I recently received – lots of holiday ideas that I'll be sharing in the next little while (so come back soon, or subscribe to the feed so you don't miss it).
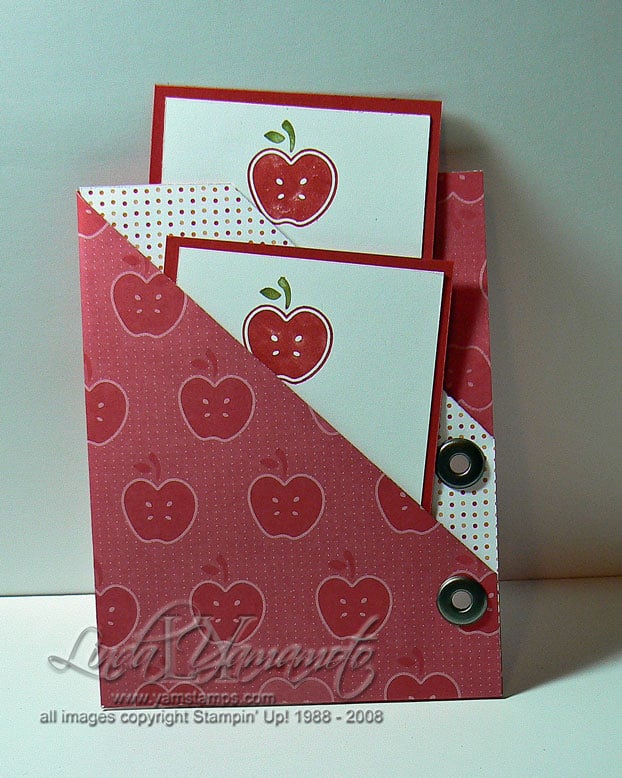
 The May video tutorial is here (just under the wire!). This one features my version of a double pocket card. I had promised the video so that club members (OK and anyone who watches!) could get a handle on how we did this. I think that the sound and lighting are better on this month, and I've learned how to do the "speed up" effect… feel free to leave feedback or ask questions! Photo is of the version that I think will become the "Thank you teacher" gift at the end of the school year! One tag can easily be converted to a gift card holder by using the slot punch, and the thank you note can be written on the other tag!
Even with my editing, the video is almost 5 minutes long, so grab a cuppa while you watch (or better yet, grab some designer series paper, jumbo eyelets and your crop-a-dile and play along!!) Enjoy 🙂
TADA! The promised video is here….this is as good as it gets at this point in time… I’m going to have to work on the lighting and the audio for future videos, though – because the camera is behind me, my voice didn’t pick up very well. (hard to believe, I know); I tried brightening the video and think perhaps I overdid it…ah well, it’s a learning curve. Hopefully this will inspire you to try this project – just in time for Mother’s Day!
This coordinates with the Wonderful You watercolour card from my last post… Ingredients are all Stampin’ Up – Very Vanilla cardstock (8.5 x 11), Stems & Silhouettes jumbo wheel with Pretty in Pink jumbo cartridge, rose wide grosgrain ribbon, pewter hodgepodge; for tag – Wonderful You stamp set, Mellow Moss ink, Going Grey ink; small & large tag punches; vanilla & regal rose cardstock.
Here’s the photo of the project, because it doesn’t get shown off as well as it should… (click if you need to see a larger version)


And…here’s the video. Feel free to leave (gentle!) feedback here on the blog.
 HA made it just in time…still Easter here! LOL) OK here we go – trying out a new toy of mine! Here’s a video of an Easter slider card made with Stampin’ Up!’s Loads of Love and Loads of Love Accessories sets. I am not talking in this one, because I’m concentrating on what I’m doing….LOL. I angle the card at the end so you can kind of see the mechanics of the card. Kind of. Supplies: Almost Amethyst cardstock, Creamy Caramel Cardstock (torn for mountain effect), basic black cardstock (for road); white gel pen (for lines on road); almost amethyst ink sponged onto whisper white cardstock for sky. Image stamped with basic black ink & coloured with blender pens & stampin’ pastels; Zig painty pen on hubcaps & bumpers; caramel gingham ribbon. Slot cut with paper cutter, word window punch used to create slider portion that truck is mounted onto. Enjoy, and feel free to leave feedback!! Here’s hoping it works…..
Techno goof that I am….a whole bunch of older posts were burped up if you are on feed or email; some behind the scenes tweaking is at fault – I apologize…
Regular posts will resume shortly!!


