Warning: Undefined array key "file" in /home4/yamstamp/public_html/yamstamps/wp-includes/media.php on line 1788
Warning: Undefined array key "file" in /home4/yamstamp/public_html/yamstamps/wp-includes/media.php on line 1788
Happy August to you! I hope you had a great long weekend. (Or a great regular weekend if you are not in Canada…) The month started yesterday, but there’s some new things starting today in the Stampin’ Up! Canada world!
There are new choices for Sale-a-Bration rewards until the end of August! These are items from the regular catalogues, however, they have special item numbers that indicate they are Sale-a-Bration freebies. These are in addition to the Sale-a-Bration items that are in the catalogue and available while supplies last. Please note that the Soft Sea Foam/Pool Party Cards & Envelopes, and the Tree Farm Dies are no longer available.
Did you know that each week I send out an e-newsletter with paper crafting information and inspiration? The first Tuesday of each month is the big multiproject newsletter – so the August one will be sent out around 1pm Eastern time this Tuesday! You’ll get step by step project tutorials exclusive to the newsletter, plus the latest information from the YamStamps / Stampin’ Up! Canada world – but only if you’re signed up. Click here, on the image above, or use the sign up box at the top right of the page! New subscribers also receive access to an exclusive paper crafting video tutorial. See you in your inbox!
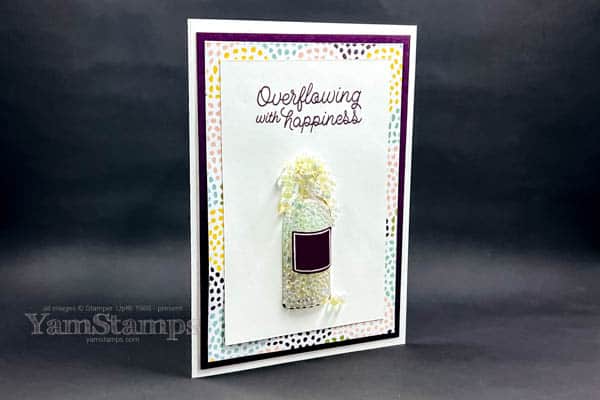
The domes have adhesive on both sides of their frame edges, so one side sticks to the underside of the cardstock hole, and then the other side can be put against your other layer or another piece of cardstock to seal the dome closed. For this card, once I’d stamped the sentiment in Blackberry Bliss, I punched out the bottle shaped hole, and then inserted the dome into place. I filled the dome with Effervescent Elements and then sealed it closed with a piece of Window Sheet. If I was more confident with how I could line up my backing Design a Daydream Designer Series Paper, I could have just put that in place. But I’m not. So I didn’t. Aiming for success!!
fun card for a celebration – close up
Once my bottle was sealed, THEN I placed everything onto the backing Designer Series Paper (and Blackberry Bliss cardstock layer). Once it was on the cardfront, I then used my Multipurpose Liquid Glue at the top and a bit at the bottom of the bottle. I used the fine tip end so I could “draw” with the glue and control where the beads ended up. I sprinkled on some more Effervescent Elements over the wet glue and patted them into place, then let everything dry.
You get a lot of those beads in a container of the Effervescent Elements, so you can use them freely on your projects! For this card, I wanted the bottle to seem like it was overflowing, so I packed them into the dome. If you would rather, though, you could put in less and create a shaker card with more movement to it. That’s the fun when you’re making your own cards – you can customize them however you’d like and to suit the recipient!
If you’re interested in learning new techniques or creating on a regular basis, I have a few options available right now. One is my Virtual Stampers Club – open to anyone in Canada. We meet monthly and create four different projects together. Over a six month membership period, you’ll be able to spread out your crafting purchases and receive host benefits (aka free product) once during that time! Check the YamStamps Events Page for more information, or contact me.
My other option is an Online Class. I have a number of Online Classes available, and aim to produce one each month. The most recent one was Cards That Will Move You, and I’m working on another Fancy Fold Class for my August release. If you’re on the YamStamps Mailing list, you’ll be notified when classes are available or on sale! You can learn at your own pace and will have lifetime access to the class videos. Check the YamStamps More Page for more information, or contact me.
I shared a quick post on Facebook the other day and the response was pretty divided. Is It Too Early for Christmas Cards?
For Stampers Club I like to start sharing one holiday card a month starting with the July-December Mini Catalogue. We made our first card during our last session. I shared a prep photo on the YamStamps Facebook Page…which made some people wonder Is it too early for Christmas Cards?
the photo that sparked a debate…
So the caption was “It has begun….#ChristmasIsComing”. There were a number of comments in either direction – a few thought it was too early, and few loved it. What do you think?
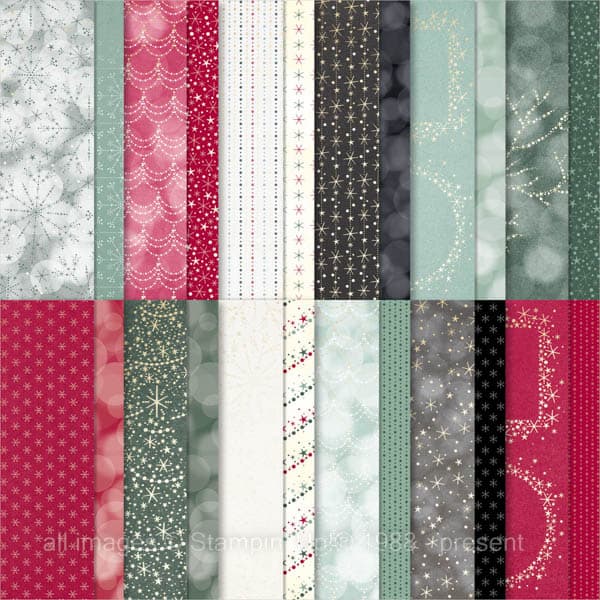
Is It Too Early for Christmas Cards? Well, this is the card we created in Stampers Club. I love the Lights Aglow Specialty Designer Series Paper! It’s a 6″ x 6″ package with metallic elements as part of the design…which means I will be attracted to it because it’s shiny…
There are some patterns and frames that are just pretty and don’t scream “HOLIDAY PAPER” so I like to think that for those of you who answer the question “Is it too early for Christmas Cards” with “Yes”, there’s some options if you grab this paper now!
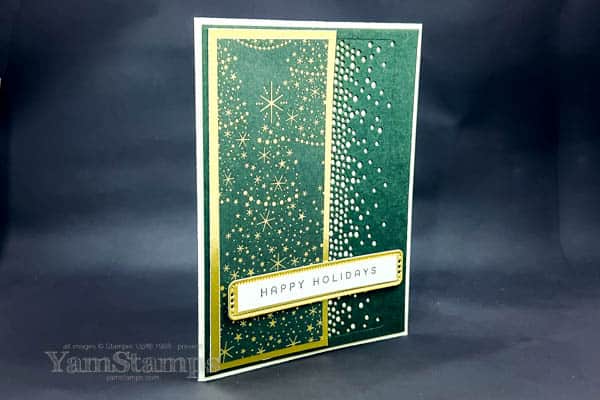
This is the card we created. Straightforward and simple.
Lights Aglow Happy Holidays Card
To highlight the gold in the Designer Series Paper, it’s mounted onto a strip of Gold Foil Sheet. I cut the label from the centre of the gold piece since nobody will see the hole once the card is assembled. The “Happy Holidays” sentiment from the Brightest Glow stamp set (also available in French – Moments Lumineux) fits onto a strip of cardstock that is the right size for that label. The dies for the label and the detailed punch out are from the glow dies, available in a discounted bundle with the stamp set (English discounted bundle and French discounted bundle available)
The “easy” button for these products is actually the Lights Aglow Suite Collection. Honestly, when I did my demonstrator preorder in June, I did not purchase the whole suite. Now I’m wondering why I didn’t! Well, if you (and I) decide to purchase it this month or next, we will all qualify for Sale-a-Bration benefits too – we get 3 SAB products at the free with $60CAD product level, or 1 SAB product at the $60 level and 1 at the $120 level. So maybe that was my unconscious strategy… Shortcut to shopping is yamstamps.com/shop or you can message me if you’d like to pay by etransfer or need assistance placing your order. Ships to your door in Canada!
The Making Plans Collection is available for free in July & August while supplies last!
I am an admitted planner addict. I love planners and I typically have at least 3 on the go. (Yes, probably too many). I have one for my healthcare job, one for my Stampin’ Up! business and one for almost everything else. So I was happy to be able to preorder the Making Plans Collection last month! Demonstrators were able to buy this before it was available this month as part of the Sale-a-Bration Starter Kit.
It’s an undated 18 month planner that you assemble (check out my video showing it below), plus an exclusive stamp set, stickers and 3 notebooks. I actually have to “use” the stickers and not hoard them. This is what I keep telling myself….LOL.
One more reminder – all Sale-a-Bration items are available while supplies last – and that includes this planner. So if you’d like this bonus on top of the deals in the starter kit (check out more information here), don’t hesitate!
Happy Planning! Please feel free to contact me if you have any questions about the Making Plans Collection, the starter kit, or any advice as to how I can stop the need to purchase more calendars and planners?!