Taking a moment to give thanks to those who served and sacrificed on this Remembrance Day.
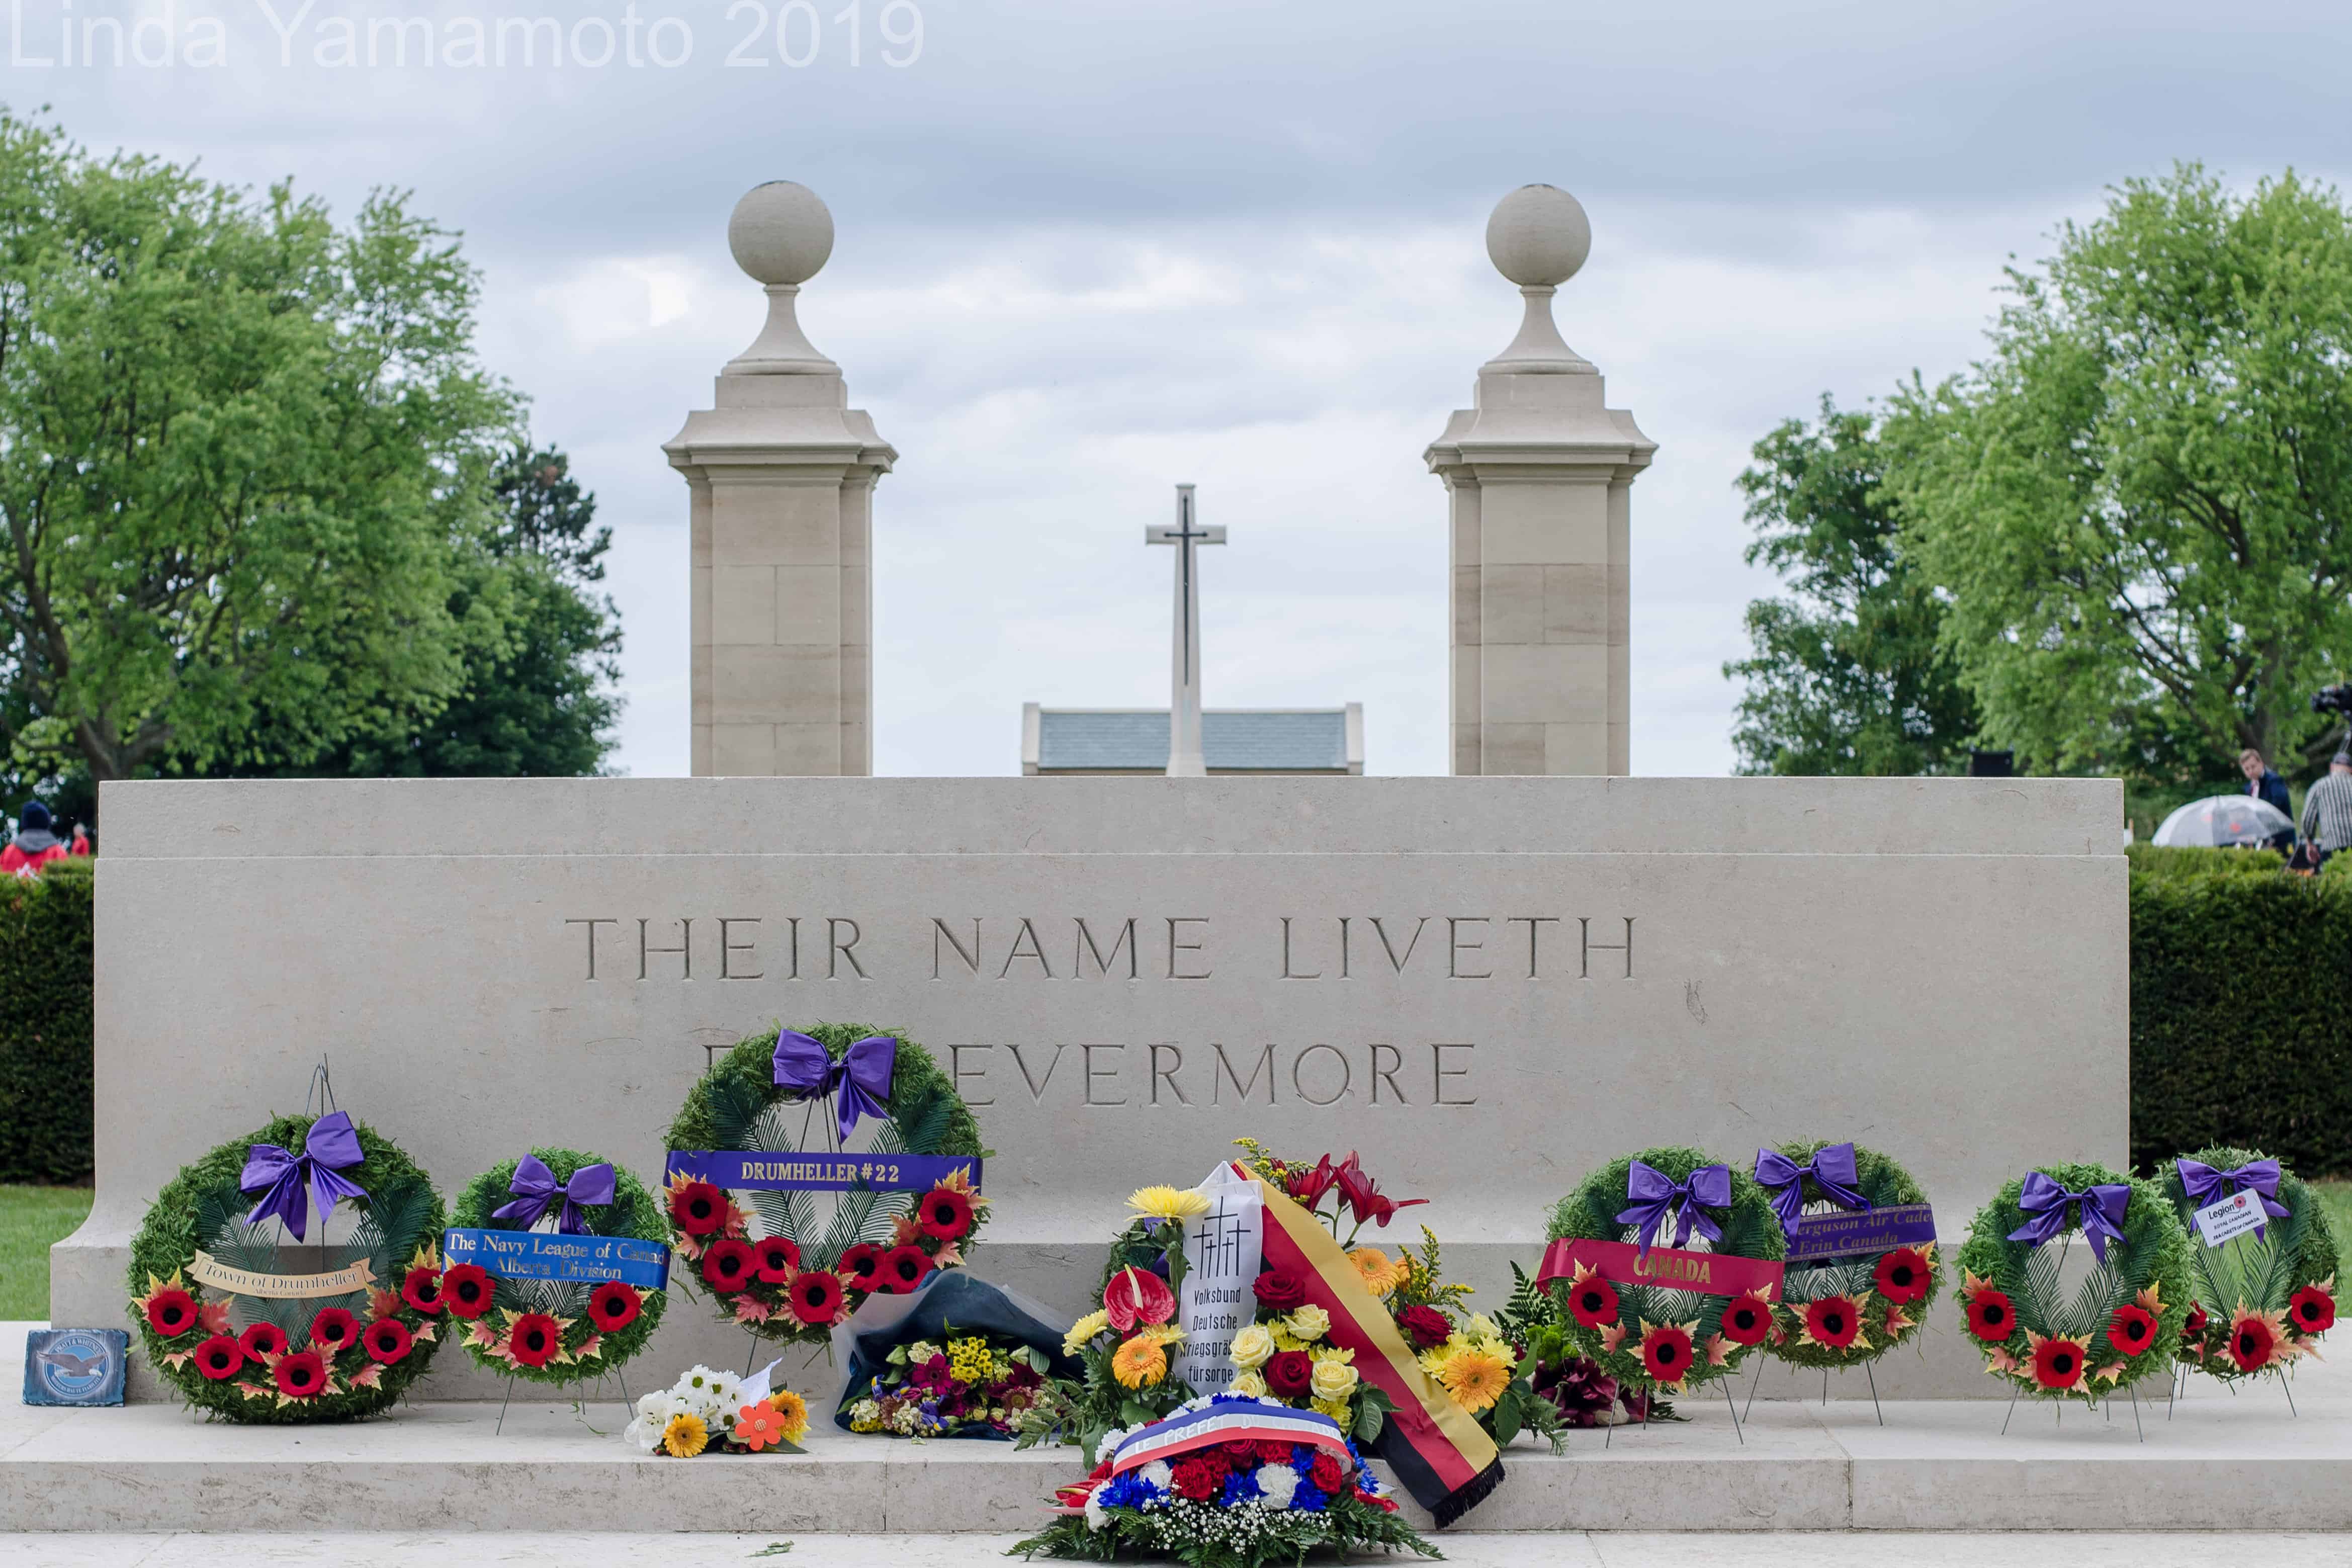
Bény-sur-Mer Canadian War Cemetery, France
This year I travelled with the Burlington Teen Tour Band to England and France. The band was invited to take part in the commemoration of the 75th Anniversary of D-Day. Along with performances, the band also visited a number of museums and sites, including the Juno Beach Centre, and significantly, the Canadian War Cemetery at Bény-sur-Mer in Normandy, France.
Prior to the trip, each person was given a set of dogtags, which were fundraisers for the Juno Beach Centre. The dogtags included one engraved with our name, and one engraved with the name and information for a fallen soldier who was buried at Bény-sur-Mer. Band members were tasked with doing research on their fallen soldier ahead of the trip. This made it a bit more personal, and during our visit to the cemetery, you could hear band members talking about going to visit the grave of “their” soldier. Many left tokens or messages from themselves or family members of the soldiers themselves. We actually made two visits to the cemetery – once during an official commemoration ceremony, and then once again – because the band members really wanted the opportunity to spend more time there. They also had the opportunity to speak with a number of veterans and families who were visiting the cemetery at the same time who shared their personal stories of the war.
This was such a significant trip for everyone who was able to take part – and it truly helped us to know that “freedom is not free”. As one band member recently said – “We will always remember to never forget”. I am sure that going forward, Remembrance Day will have a particular significance for everyone involved.
Sunday Swap Share was missed last week as I was having some technical difficulties….but happily (and fingers crossed) these are all sorted now and it’s back to business as usual.
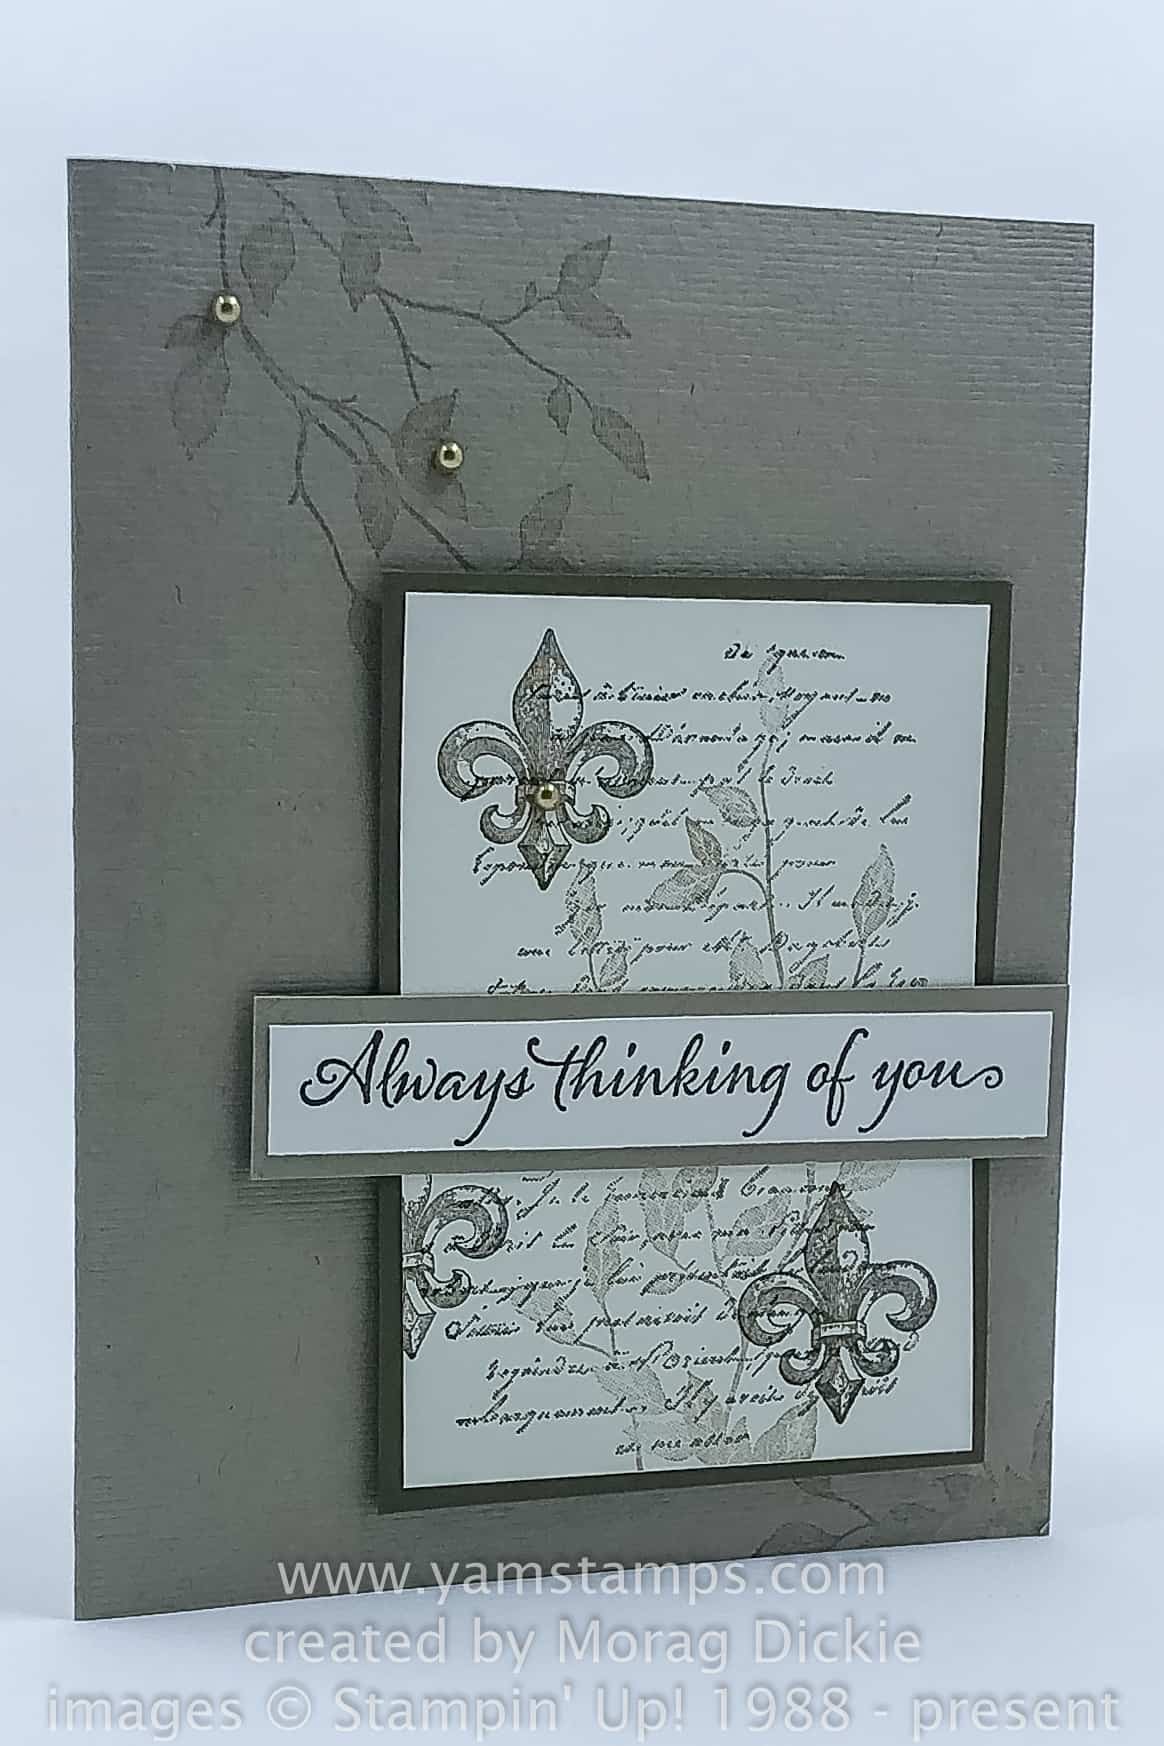
This Sunday’s Swap Share is from my friend Mo Dickie. She’s been a Stampin’ Up! Canada Demonstrator from the start, and took me under her wing when I moved back to Ontario from BC, which I truly appreciated. I have some wonderful and lasting friendships because of SU!
Mo’s card uses the Very Versailles stamp set, which is one I shockingly do not own. Yet. LOL! I love the elegance of this card!
I’m not always great with the collage-type images, but this is a design that I could easily copy – and that’s part of the point of swapping and sharing – getting ideas and reproducible designs! I think one of the secrets of this successful design is the way Mo used different ink strengths to create more depth.
I was fortunate enough to visit France earlier this year, but didn’t make it to Versailles. Still on my list of things to do/visit – so I guess I will have to be sure to go back to France at some point! (I know, nothing like being a little greedy….)
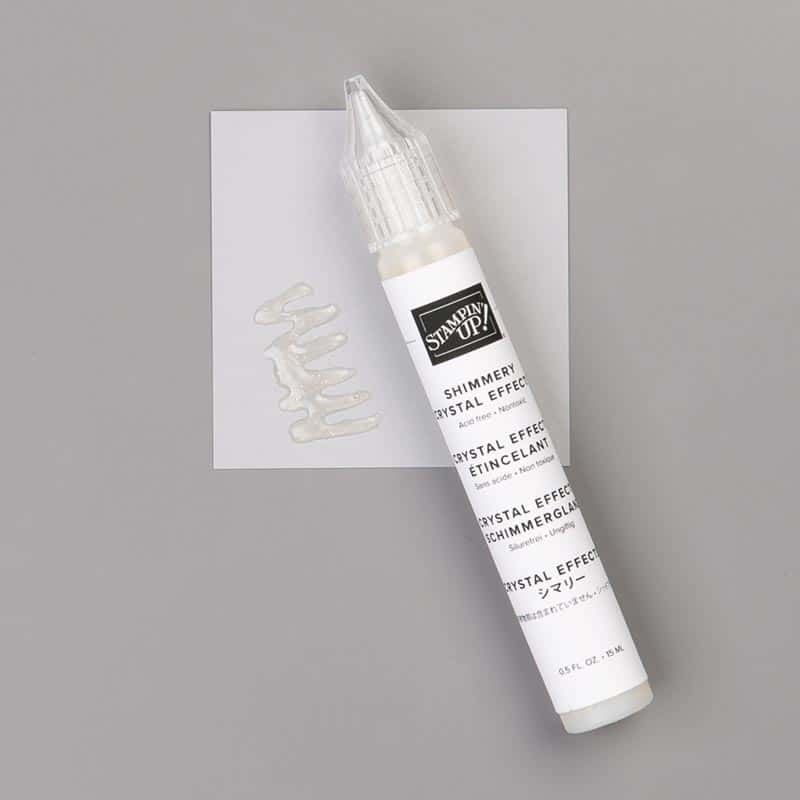
Class is a great way to try out some stamps and crafty items that you may not already own. My last Burlington ON Christmas Card Class is scheduled for Wednesday, November 27th at 1pm or 7pm. For these special classes, the class fee is slightly higher, but on top of the regular class supplies, you’ll receive a full sized product that you will use for some of your class projects, and then take the rest home. November’s Christmas Card Class includes a bottle of Shimmery Crystal Effects, which we will use to add some more glitz to our cards. You can contact me to register/pay to reserve your spot!
Starting in the new year, I will be doing some more product based classes, so be sure to check the YamStamps Events Page, and be subscribed to the YamStamps Newsletters to get notified!
Hi! I’m recovering from tech trauma…I had website issues earlier this week, and then had some issues when trying to do a scheduled Facebook Live. It seems like all is well now (fingers crossed) so hoping it’s going to be back to “business as usual”.
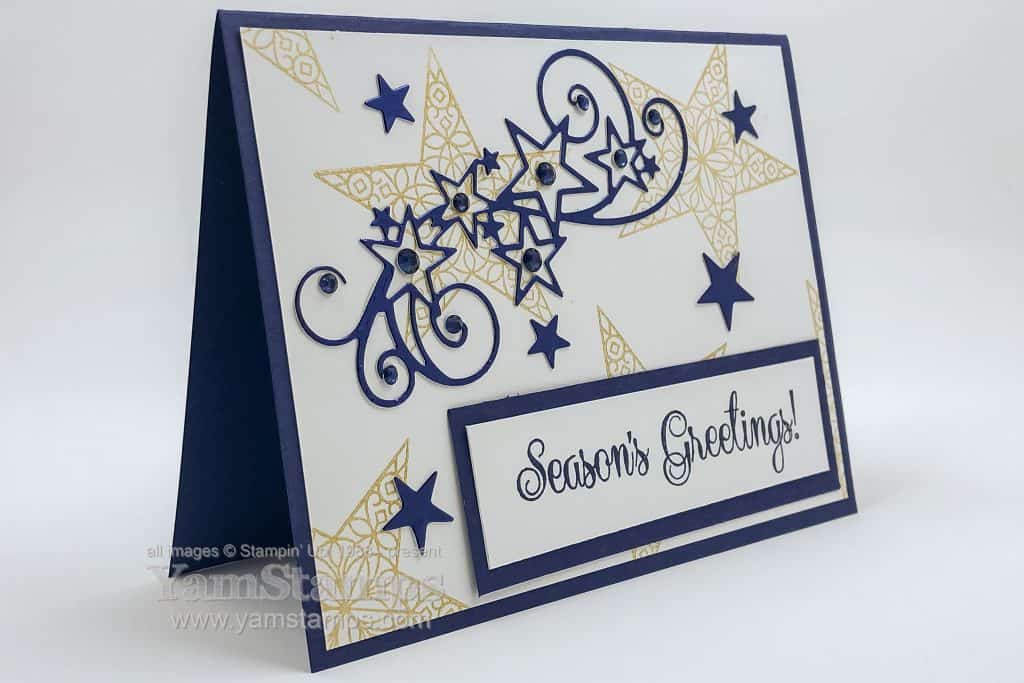
I bring you another starry card…but this time it’s GOLD and blue, rather than silver and blue, because I can only handle so many changes at one time.
The stars in the background are stamped with the Golden Giltz Delicata Metallic Ink Pad. Just a heads up – these ink pads will NOT be carrying over – so if you want the Gold or Silver ink pad, you’ll want to place an order ASAP before they are all gone – gold is already on low inventory notice and copper is already gone (I just saw that when I was linking things up here!).
November’s Christmas Card Class is scheduled for November 27th at 1pm or 7pm. Everyone will receive a bottle of Shimmery Crystal Effects – we’ll use a bit for our projects and then you’ll have the rest of the bottle to glitz up your other projects at home! It’s sure to be a glittery class. You can contact me to register by November 13th – cost is $30 and includes all supplies required (including adhesives). I wonder if I’ll be able to design yet anotherstarry card in blue for that one?!
Check out the YamStamps Events Page to see what else is being offered. I’ll be working on finalizing the start of my 2020 Events Calendar and will get that published soon. In the meantime, sign up for the YamStamps Mailing List by using the box at the top right of this page, or click here. You’ll get notifications of upcoming classes and events as well as the weekly paper crafting ideas and information, so you won’t miss out!
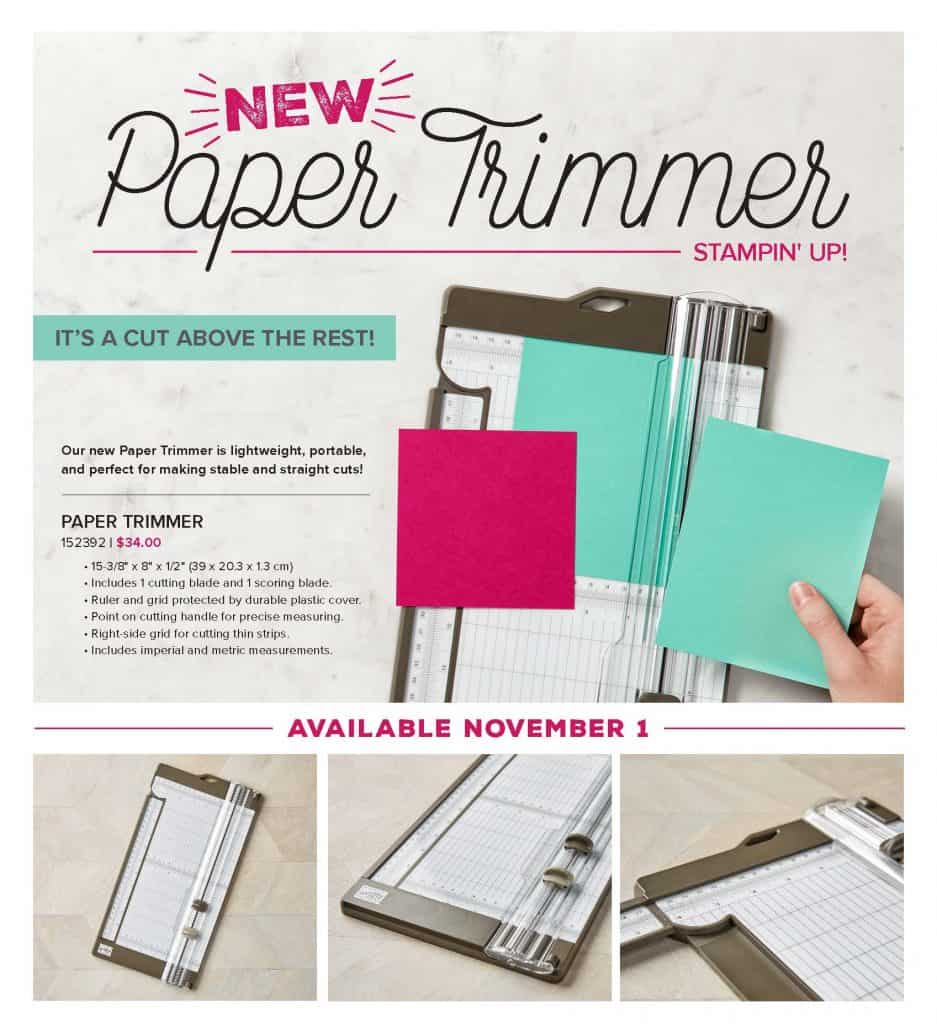
Stampin’ Up!’s new Paper Trimmer is available for customer orders today! It has a cutting blade and a scoring blade – and its size can accommodate 12″ x 12″ sheets. I’ve had mine for a few weeks now (demonstrators were able to order this in October) and I am quite liking it!
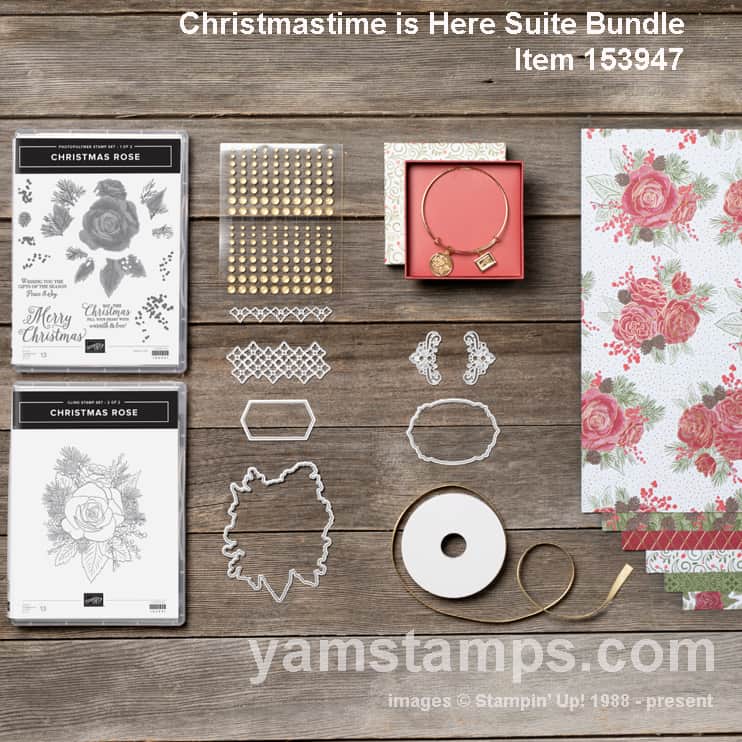
Next Up….while supplies last (no firm end date) – the Christmastime is Here suite! First of all – do you instantly start singing the song in your head?! I do….
If you guessed the bracelet, you’d be correct. Even though it’s gold tone and I’m more of a silver tone girl, I love that it coordinates with a lot of the bangle bracelets that I already have (it’s Alex & Ani style)
By the way – you may notice that the large rose die fits the Designer Series Paper – so if you don’t feel like doing two step stamping? Just die cut the paper that’s already done!
You can click on the links to see the specific items or use the shortcut yamstamps.com/shop to get to the YamStamps Online Stampin’ Up! Canada store. You can also message me if you need assistance placing an order or have any questions.
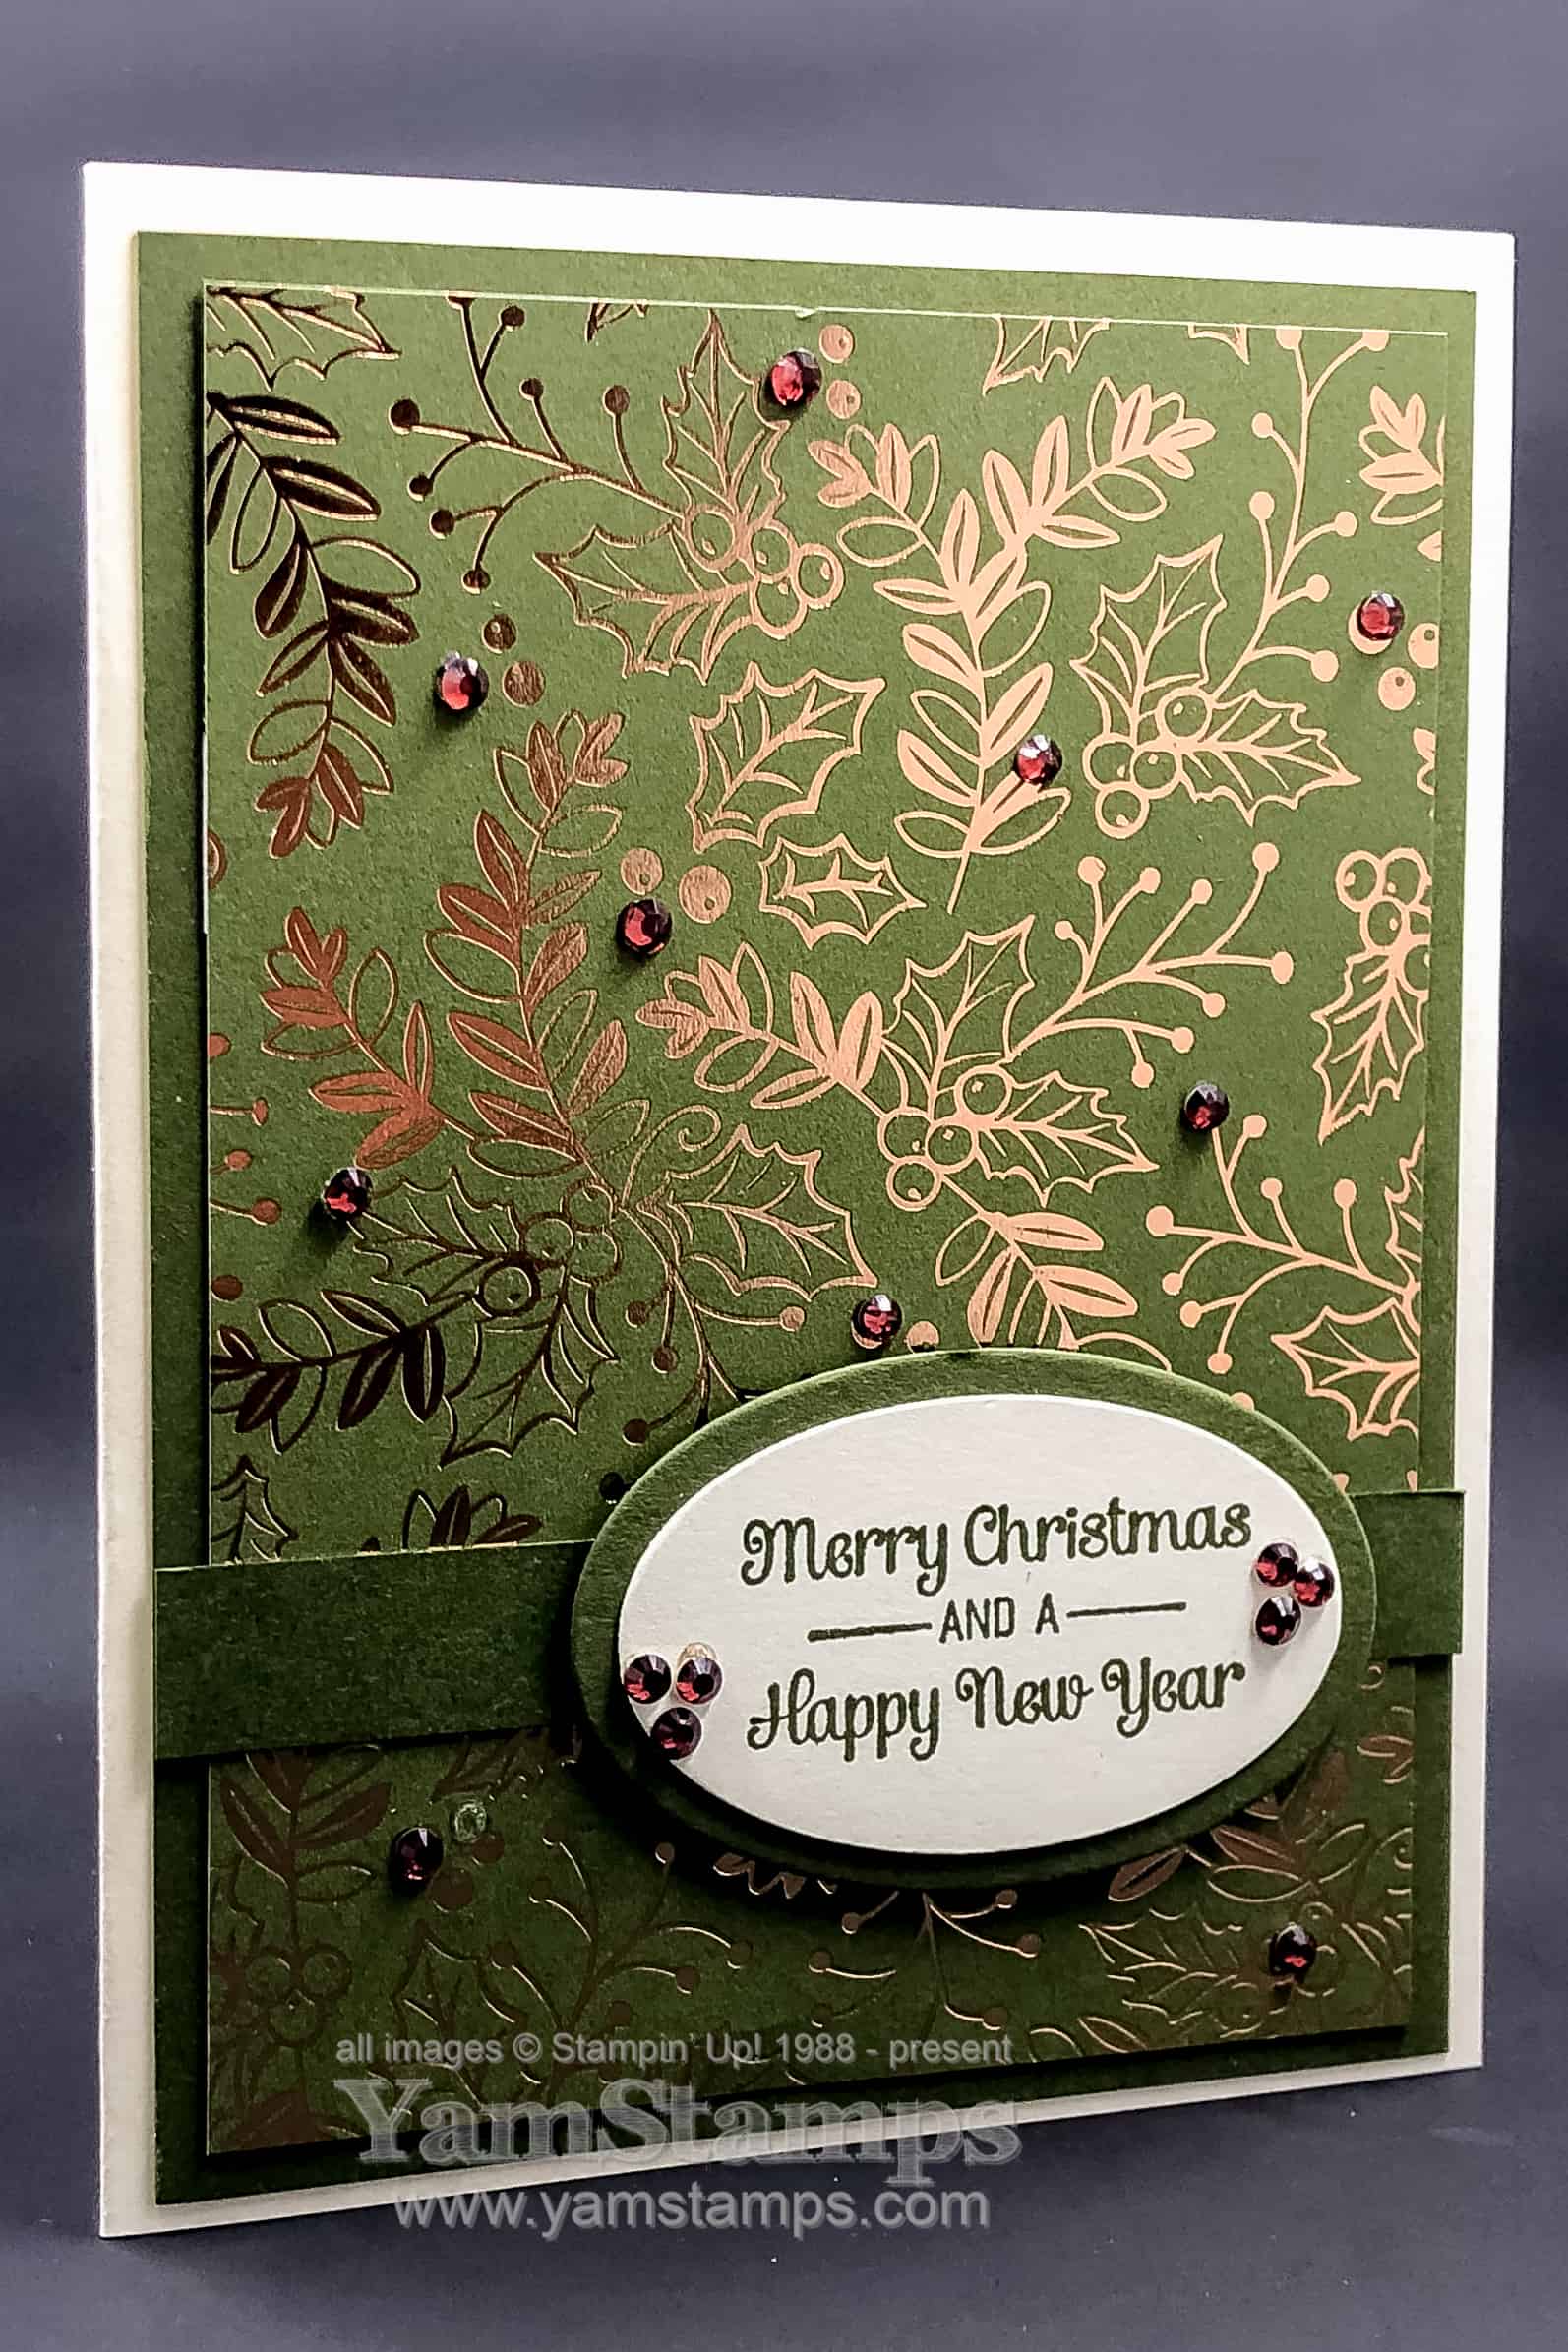
Here’s a beautiful and easy Christmas Card for you! We made this as part of the October Christmas Card Class. Participants received a full package of Holiday Rhinestone Basic Jewels along with all their other class supplies. We used some rhinestones for our projects and then they took the rest home. Or they chose not to put them on their projects and reserved the right to do so later! LOL
I love the Brightly Gleaming Specialty Designer Series Paper from the Stampin’ Up! Holiday Catalogue. It’s featured on this quick card, which is blinged up a little to give it a little more glamour. (More glamour optional, of course).
According to the paper description, the green colour used is Mossy Meadow, so I used Mossy Meadow Cardstock and Mossy Meadow Ink to coordinate. I also used Very Vanilla Cardstock for the main card and sentiment. I like using Vanilla or White as the cardbase because it’s light enough to write on for the inside of the card, and it’s pretty neutral. I tend to use Whisper White more often than not, so have to “remind” myself to use Very Vanilla too! It’s appropriate for this card, I thought, since the Mossy Meadow has more warm/yellow tones. (Plus Very Vanilla is one of the colours also used in these patterns!)
The sentiment is from Itty Bitty Christmas – not all the images are itty bitty…and then it’s die cut with the Layering Ovals Dies. Frugal Friday Fanatics will probably realize that the backing oval of Mellow Moss is cut from the centre of the backing cardstock. If I was totally clever, I would have cut that belt strip from the centre of the backing cardstock, but I know my limits…so cut that from a scrap of Mellow Moss Cardstock instead.
I actually went a little overboard with the rhinestone accents and ended up removing some…and when I posted this picture I realized I hadn’t managed to scrape the glue dot off along with one of the rhinestones. Can you find the spot I missed? (Well at least the one spot I can see right now, who knows, there may be more). I’ll be sure to remove it before I put the card in a matching Very Vanilla envelope….otherwise the recipient won’t be able to get it out!
If you’d like to join me – there’s ONE more Christmas Card Class coming up – November 27th, in Burlington ON. See the YamStamps Events Page for details, and contact me to register. Otherwise, if you’re on the YamStamps Mailing List, you’ll be receiving the next installment of the Twelve Weeks of Christmas project emails next Wednesday – starting on 3D projects/gifts and packaging! Of course, I will also still be sharing other beautiful and easy Christmas Cards here on the YamStamps blog – because we’ve got a bit more time before Christmas arrives!
Yes, you CAN heat emboss with the regular Stampin’ Up! inks – but it is easier if your ink pad is well inked, and you need to work fairly quickly to get the powder to adhere to the wet ink. I did a Facebook Live showing this technique in the YamStamps Facebook Group. Join our group and then check out the video here.
I have to admit that Terracotta Tile has surprised me – I use this colour more than I expected! Out of the 2019-2021 In Colours, it was the one that I figured I would use the least – because the blues are definitely my favourite tones….but hey, it’s always good to go outside your comfort zone I guess?!
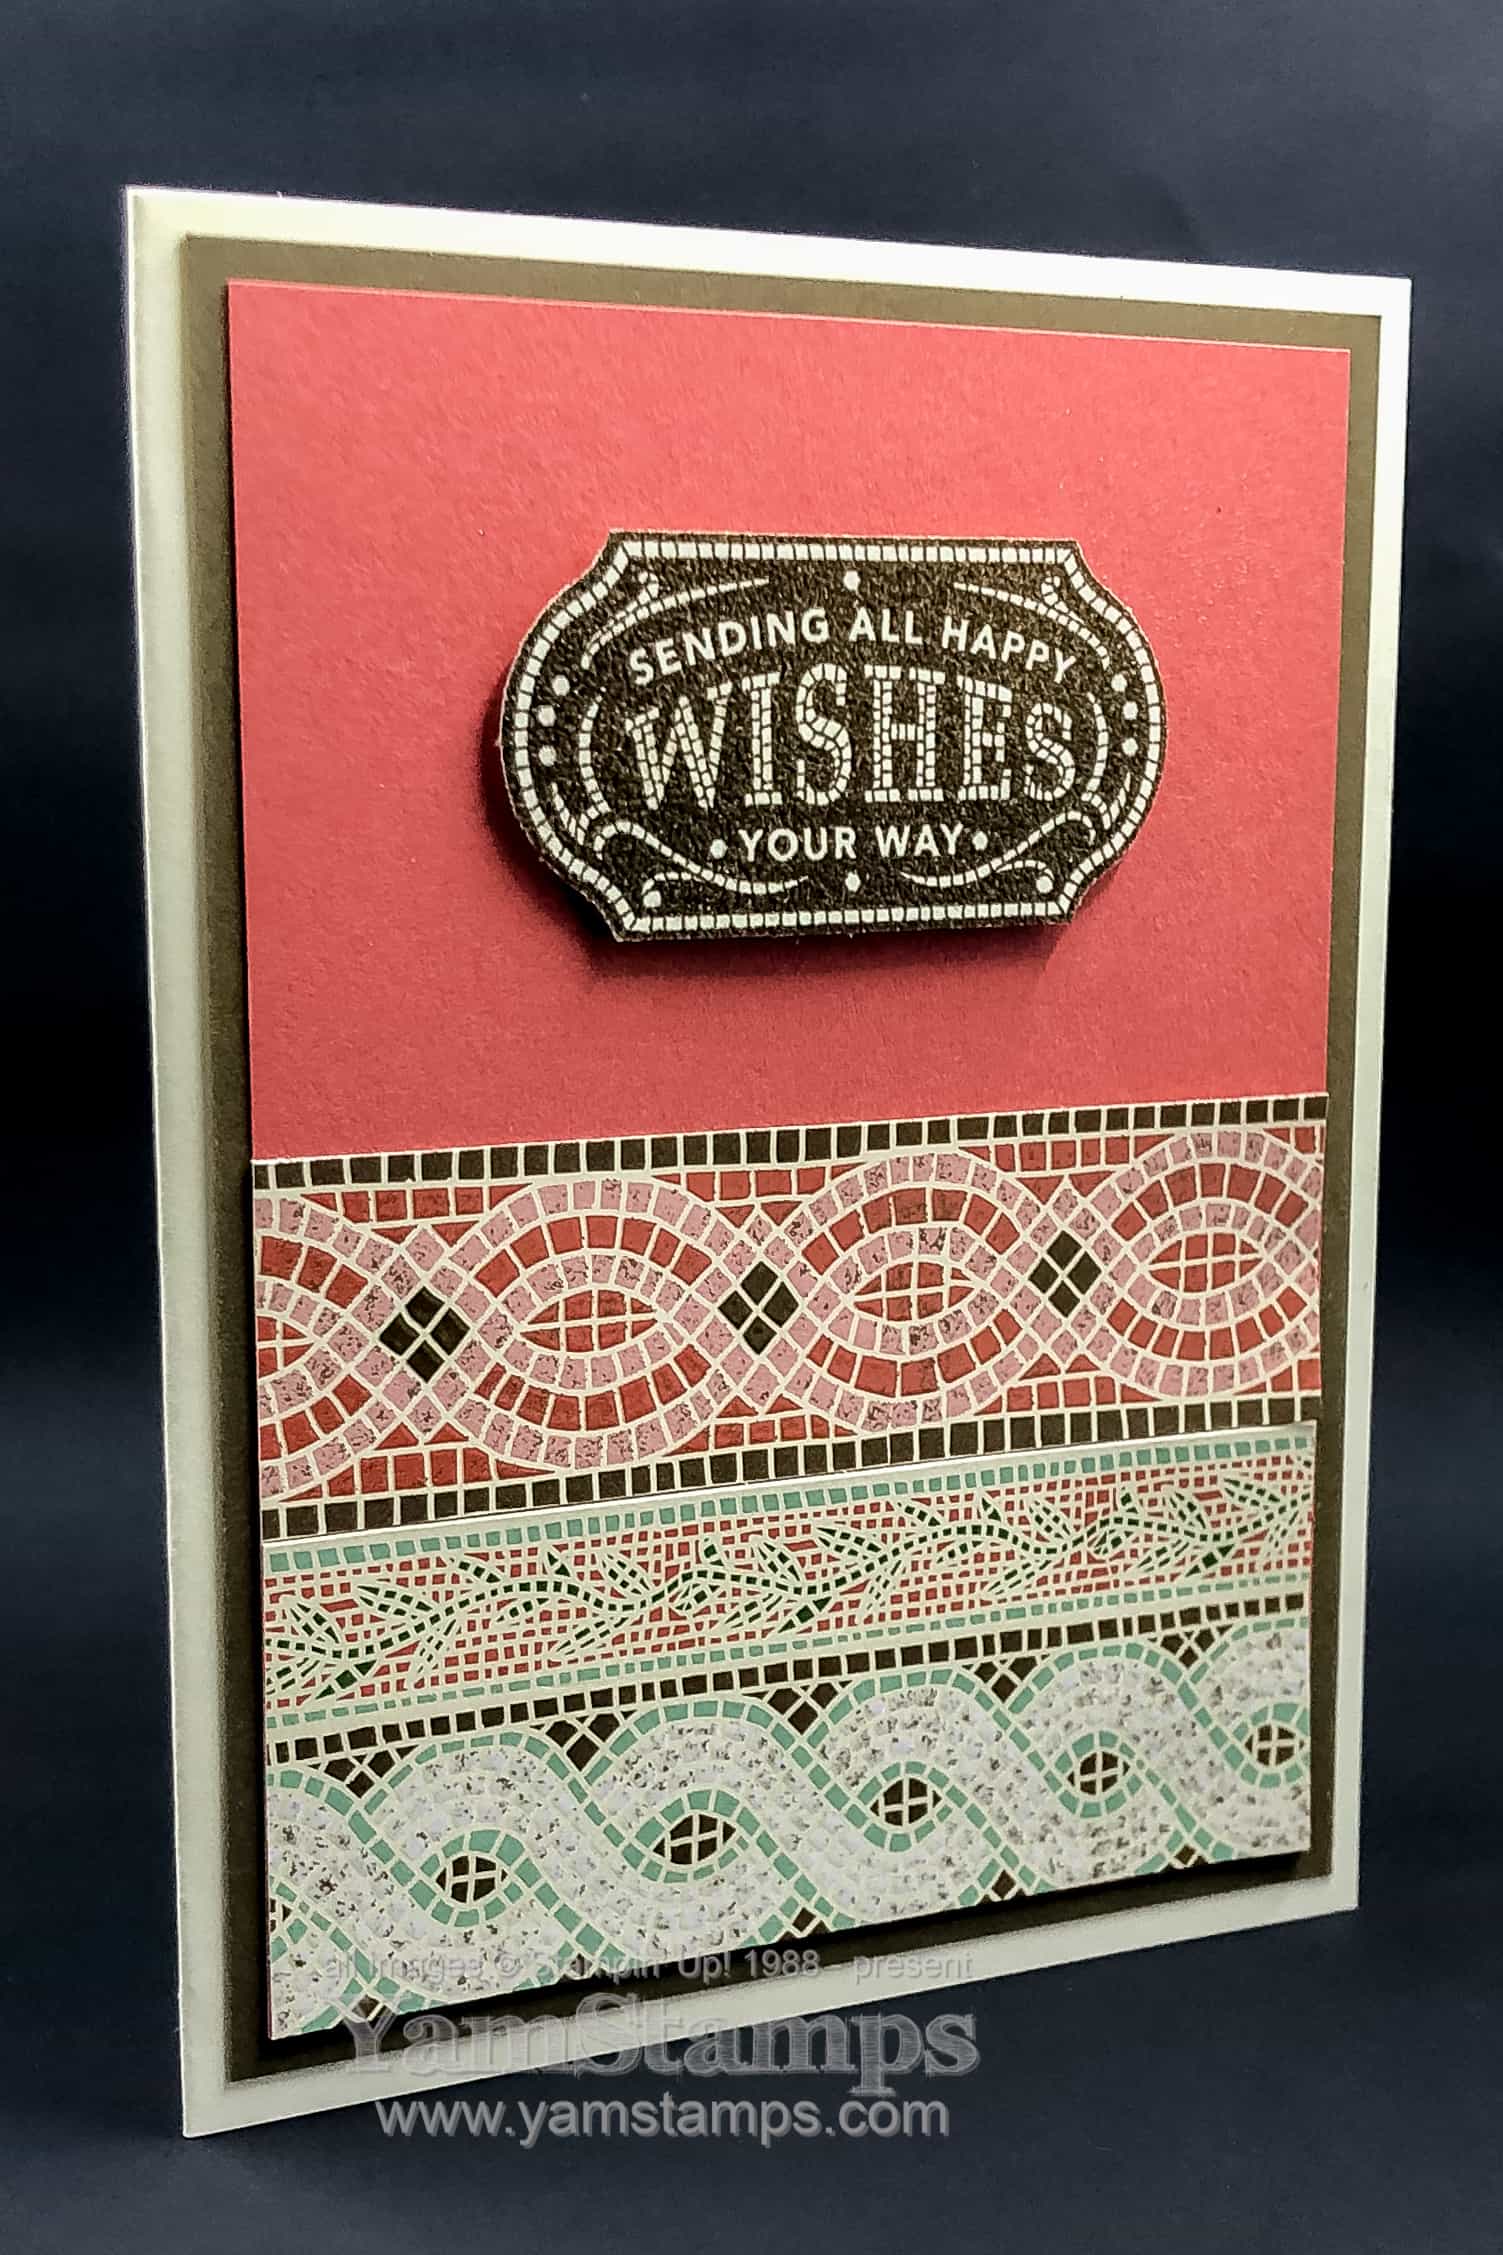
If you’d like to try out different stamp sets, tools and techniques, consider coming to a class with me! We make four different card projects and use a variety of colours (well at least I try to design them that way LOL) and tools to make them. It’s a great way to “try before you buy” or simply just try! Check out the YamStamps Events Page for upcoming classes in the Burlington ON area. If you can’t make an event, consider getting a group together and I will travel to you! (well, within reasonable driving distance in the southern Ontario area….message me if you’re not sure about what my mileage limits are – because I’m not sure either! haha). If you can’t make a class in person, I do have a couple of online classes (see YamStampsMore for more information), and of course you can always check out the YamStamps site, Facebook Page, Instagram and YouTube (working on that one a bit more soon) accounts for project inspiration and tutorials – like this Cheater Mosaic Card!
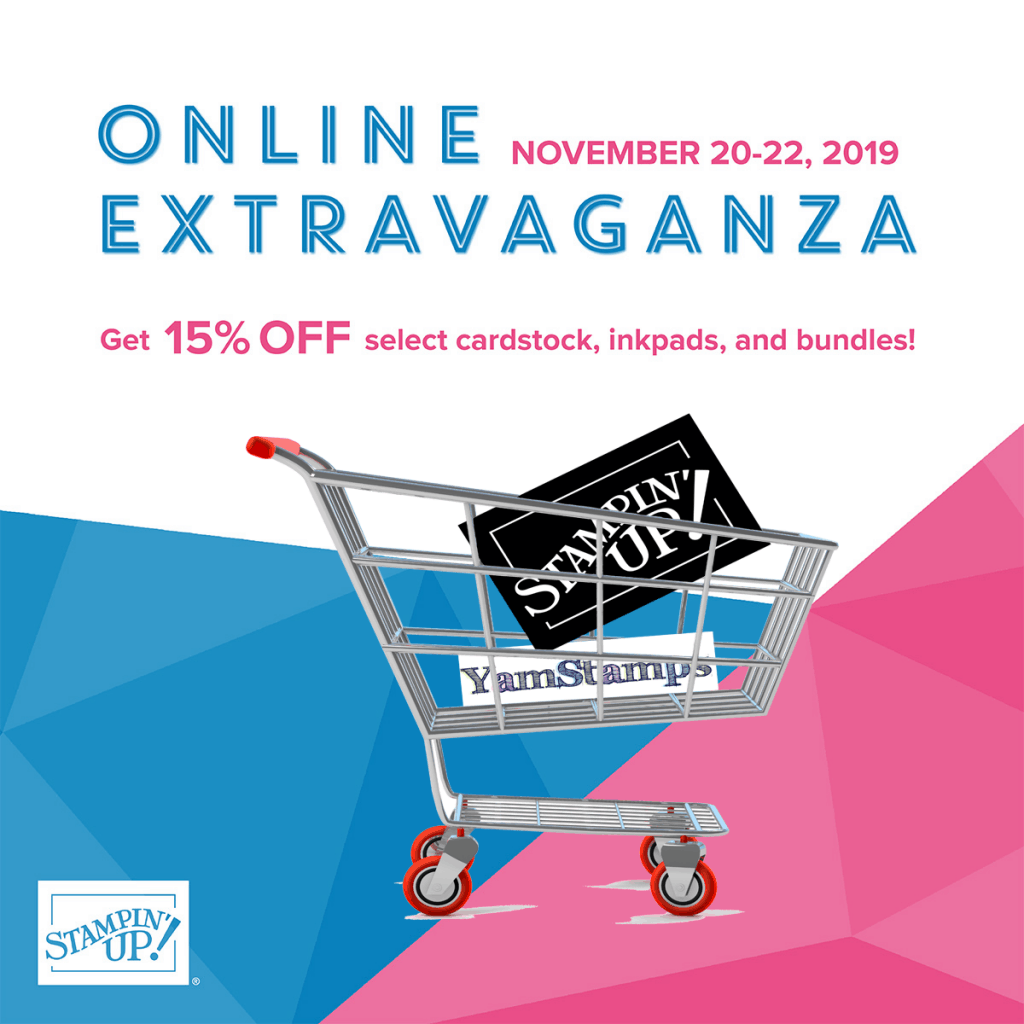
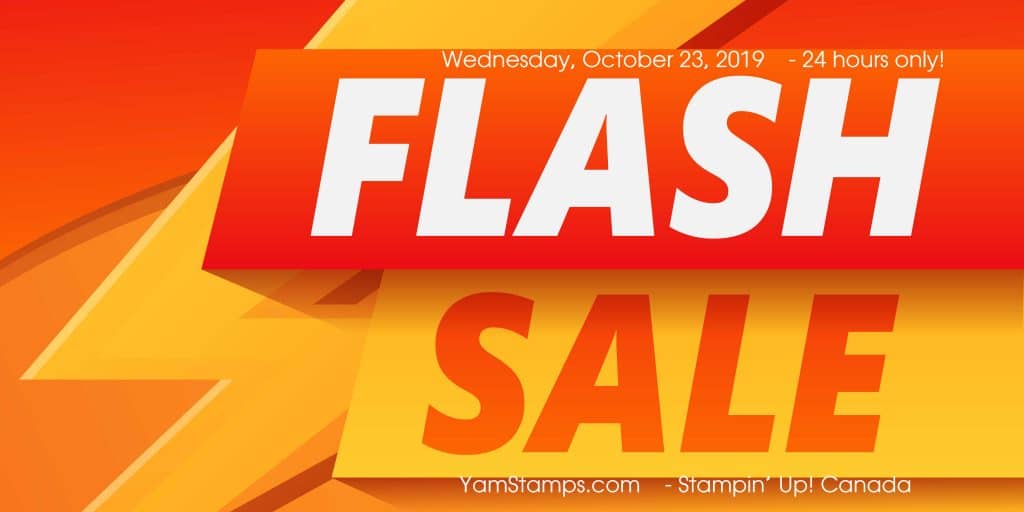
Shortcut to shopping is yamstamps.com/shop ! This sale starts Wednesday, October 23rd in the wee hours (12 am Mountain time) and ends at 11:50 pm Mountain Time – which is actually 1:50 AM October 24th Eastern time – but don’t delay and miss out on the deals! Quebec customers and those wanting assistance placing their orders, please contact me!
In the meantime – happy shopping – and happier shopping on Wednesday!
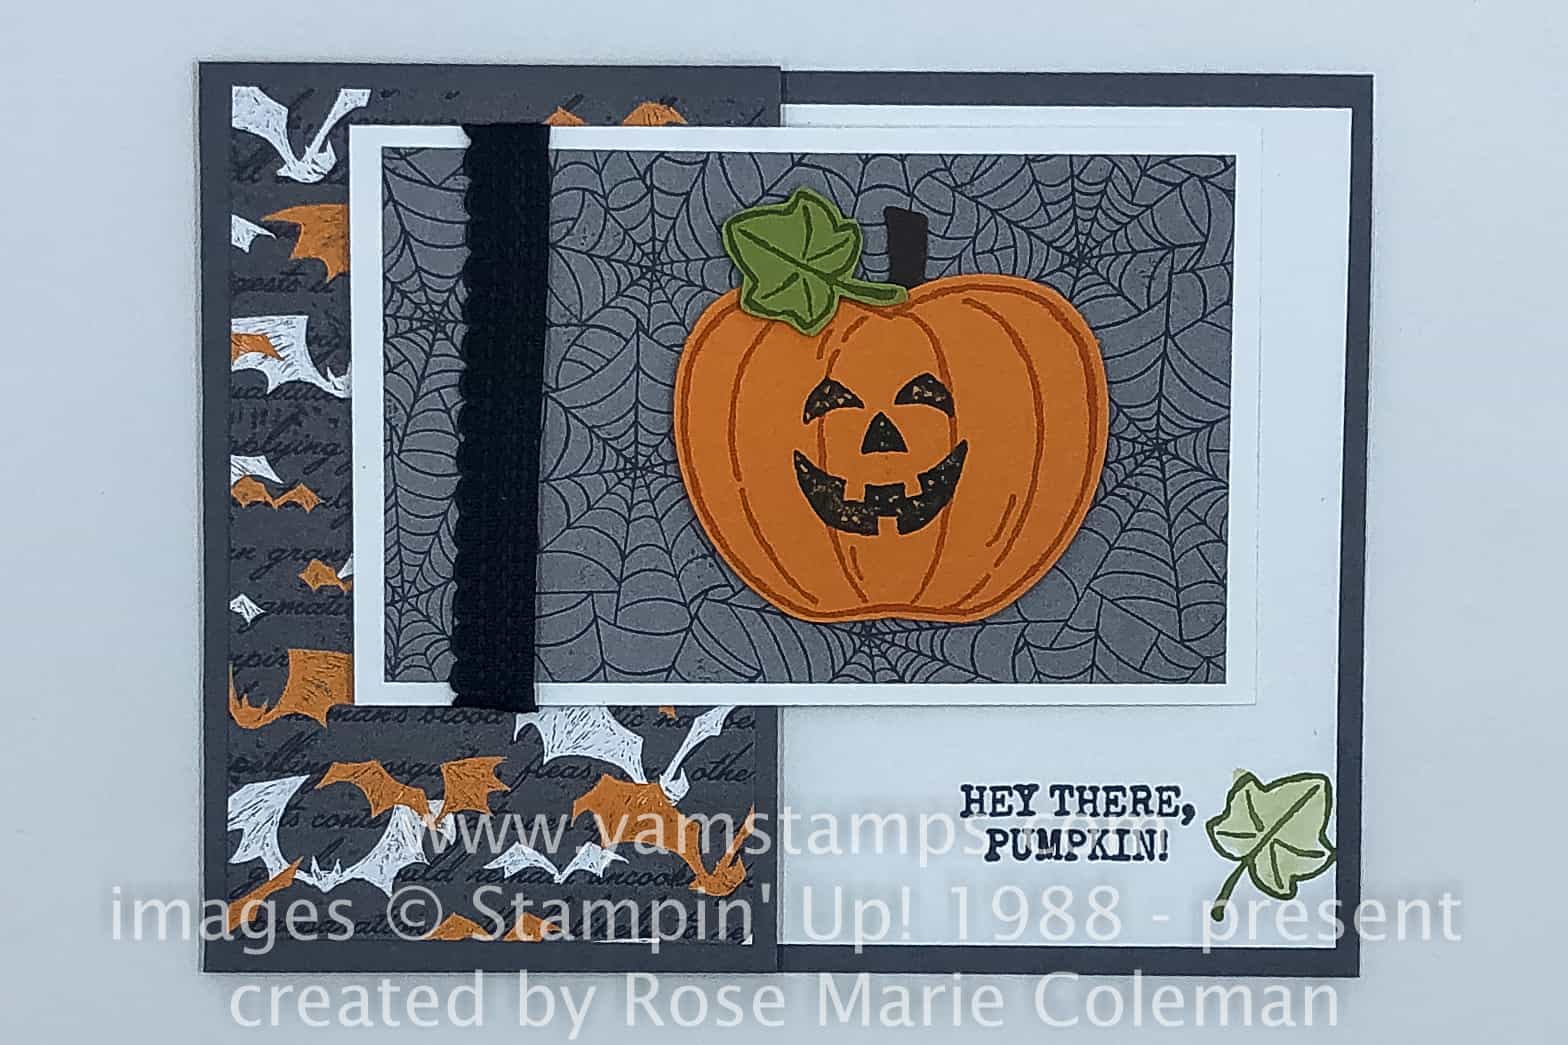
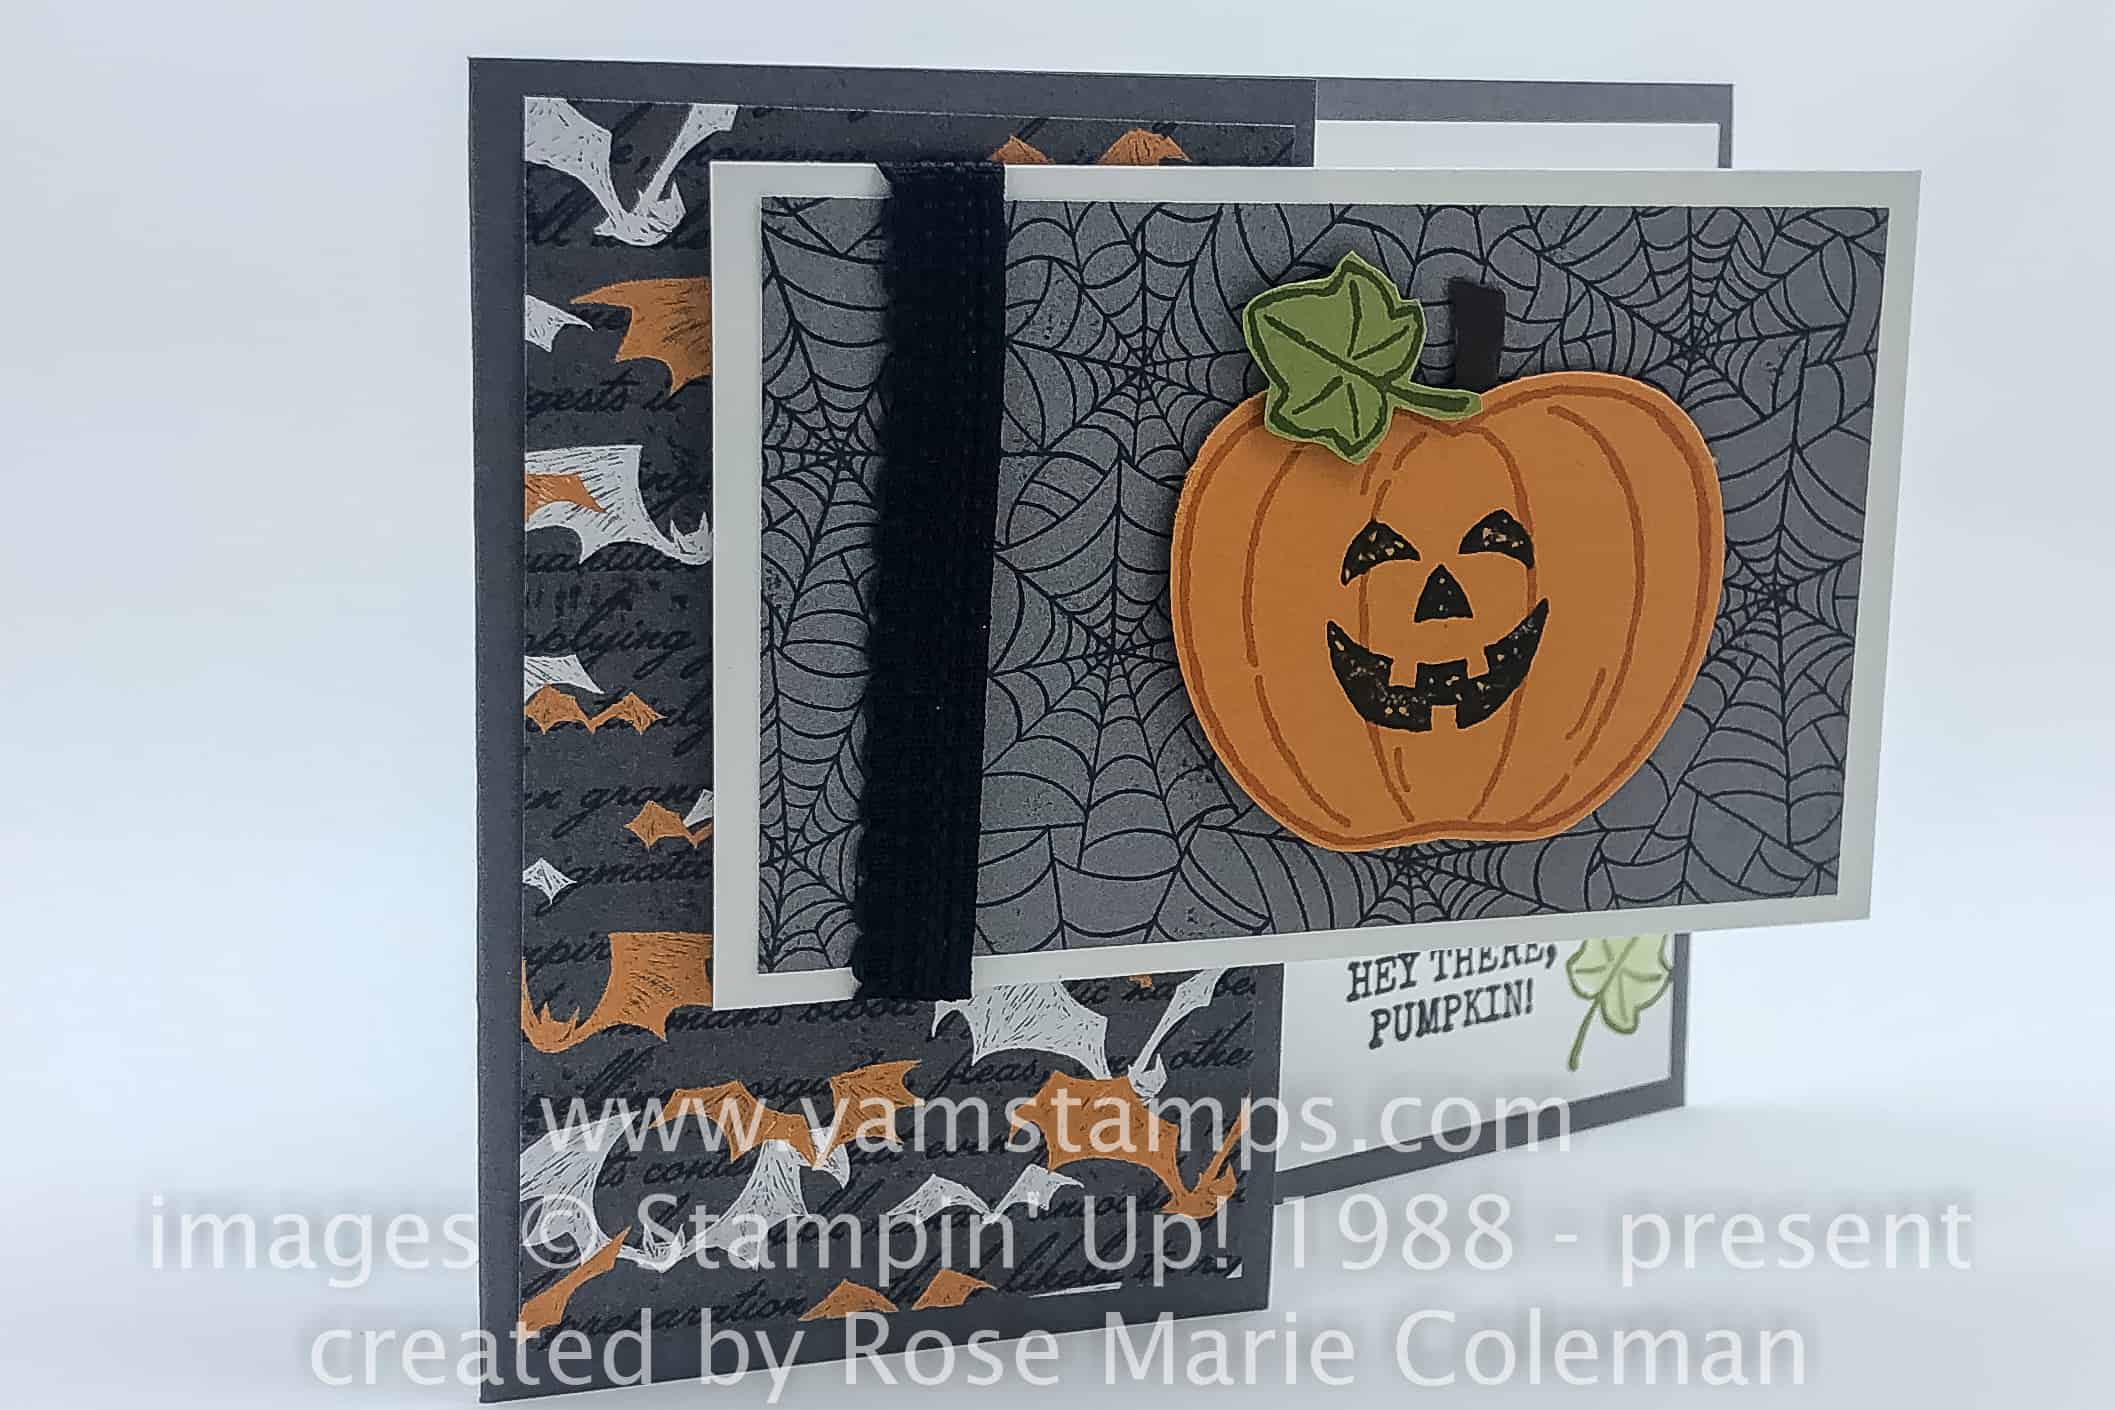
A cute Halloween card to showcase as today’s Sunday Swap Share.
Isn’t it fun? Created by Rose Marie Coleman, this Halloween card showcases the Harvest Hellos Bundle, which includes Harvest Hellos stamp set and the coordinating Apple Builder Punch, which obviously can double as a Pumpkin Builder Punch! Remember that the bundle is discounted so you save a little money on the coordinating products too!
It’s a bit of a fun fold card as well – easily created by cutting the cardstock to 4.25″ x 11″, folding in half and then cutting off a portion of the front of the card. The Monster Bash Designer Series Paper adds even more interest! This cute card would be great to give to your favourite trick or treater!
If you’re looking for seasonal inspiration outside of Halloween, don’t forget that YamStamps Newsletter Subscribers are currently enjoying the Twelve Weeks of Christmas series. This extra newsletter is my way of thanking subscribers – each week brings a different holiday project. We’re showcasing card ideas right now, but will move on to gifts and packaging inspiration in the next few weeks. You can subscribe to the YamStamps Newsletter here, or go here for more information. If you’d like in person inspiration, check out the YamStamps Events page if you’re local to Burlington Ontario. Come to a class, or get a group of friends together and I will bring the class to you! Contact me if you’d like more information or want to see what dates I have available.
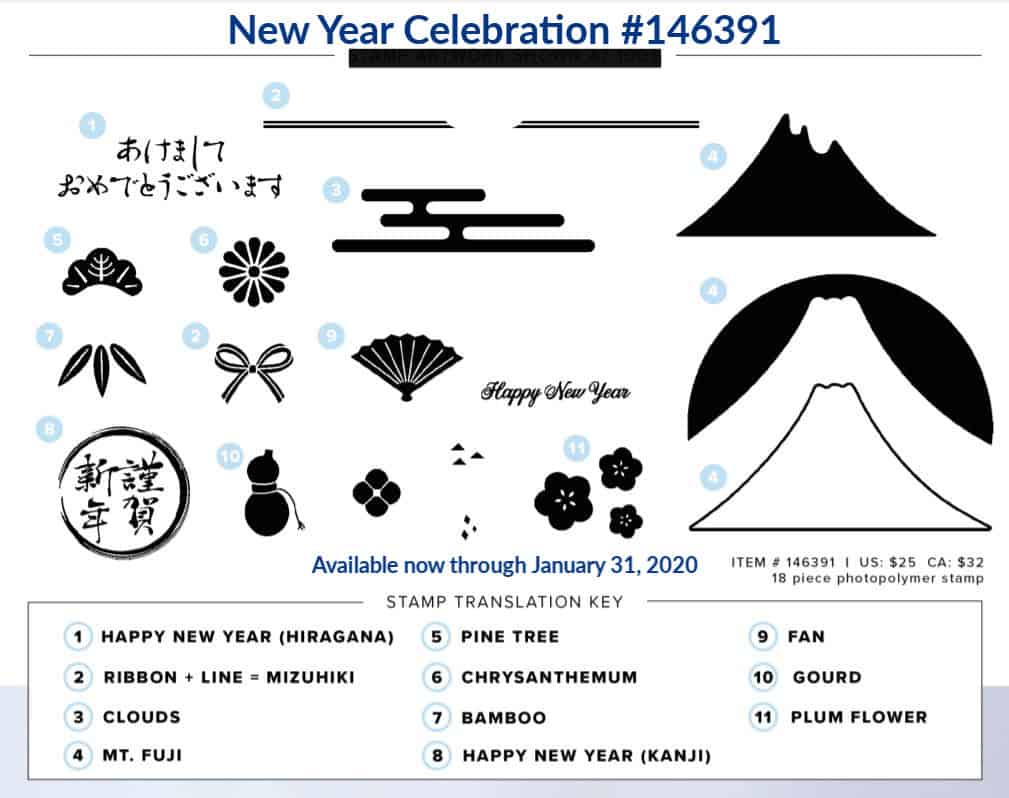
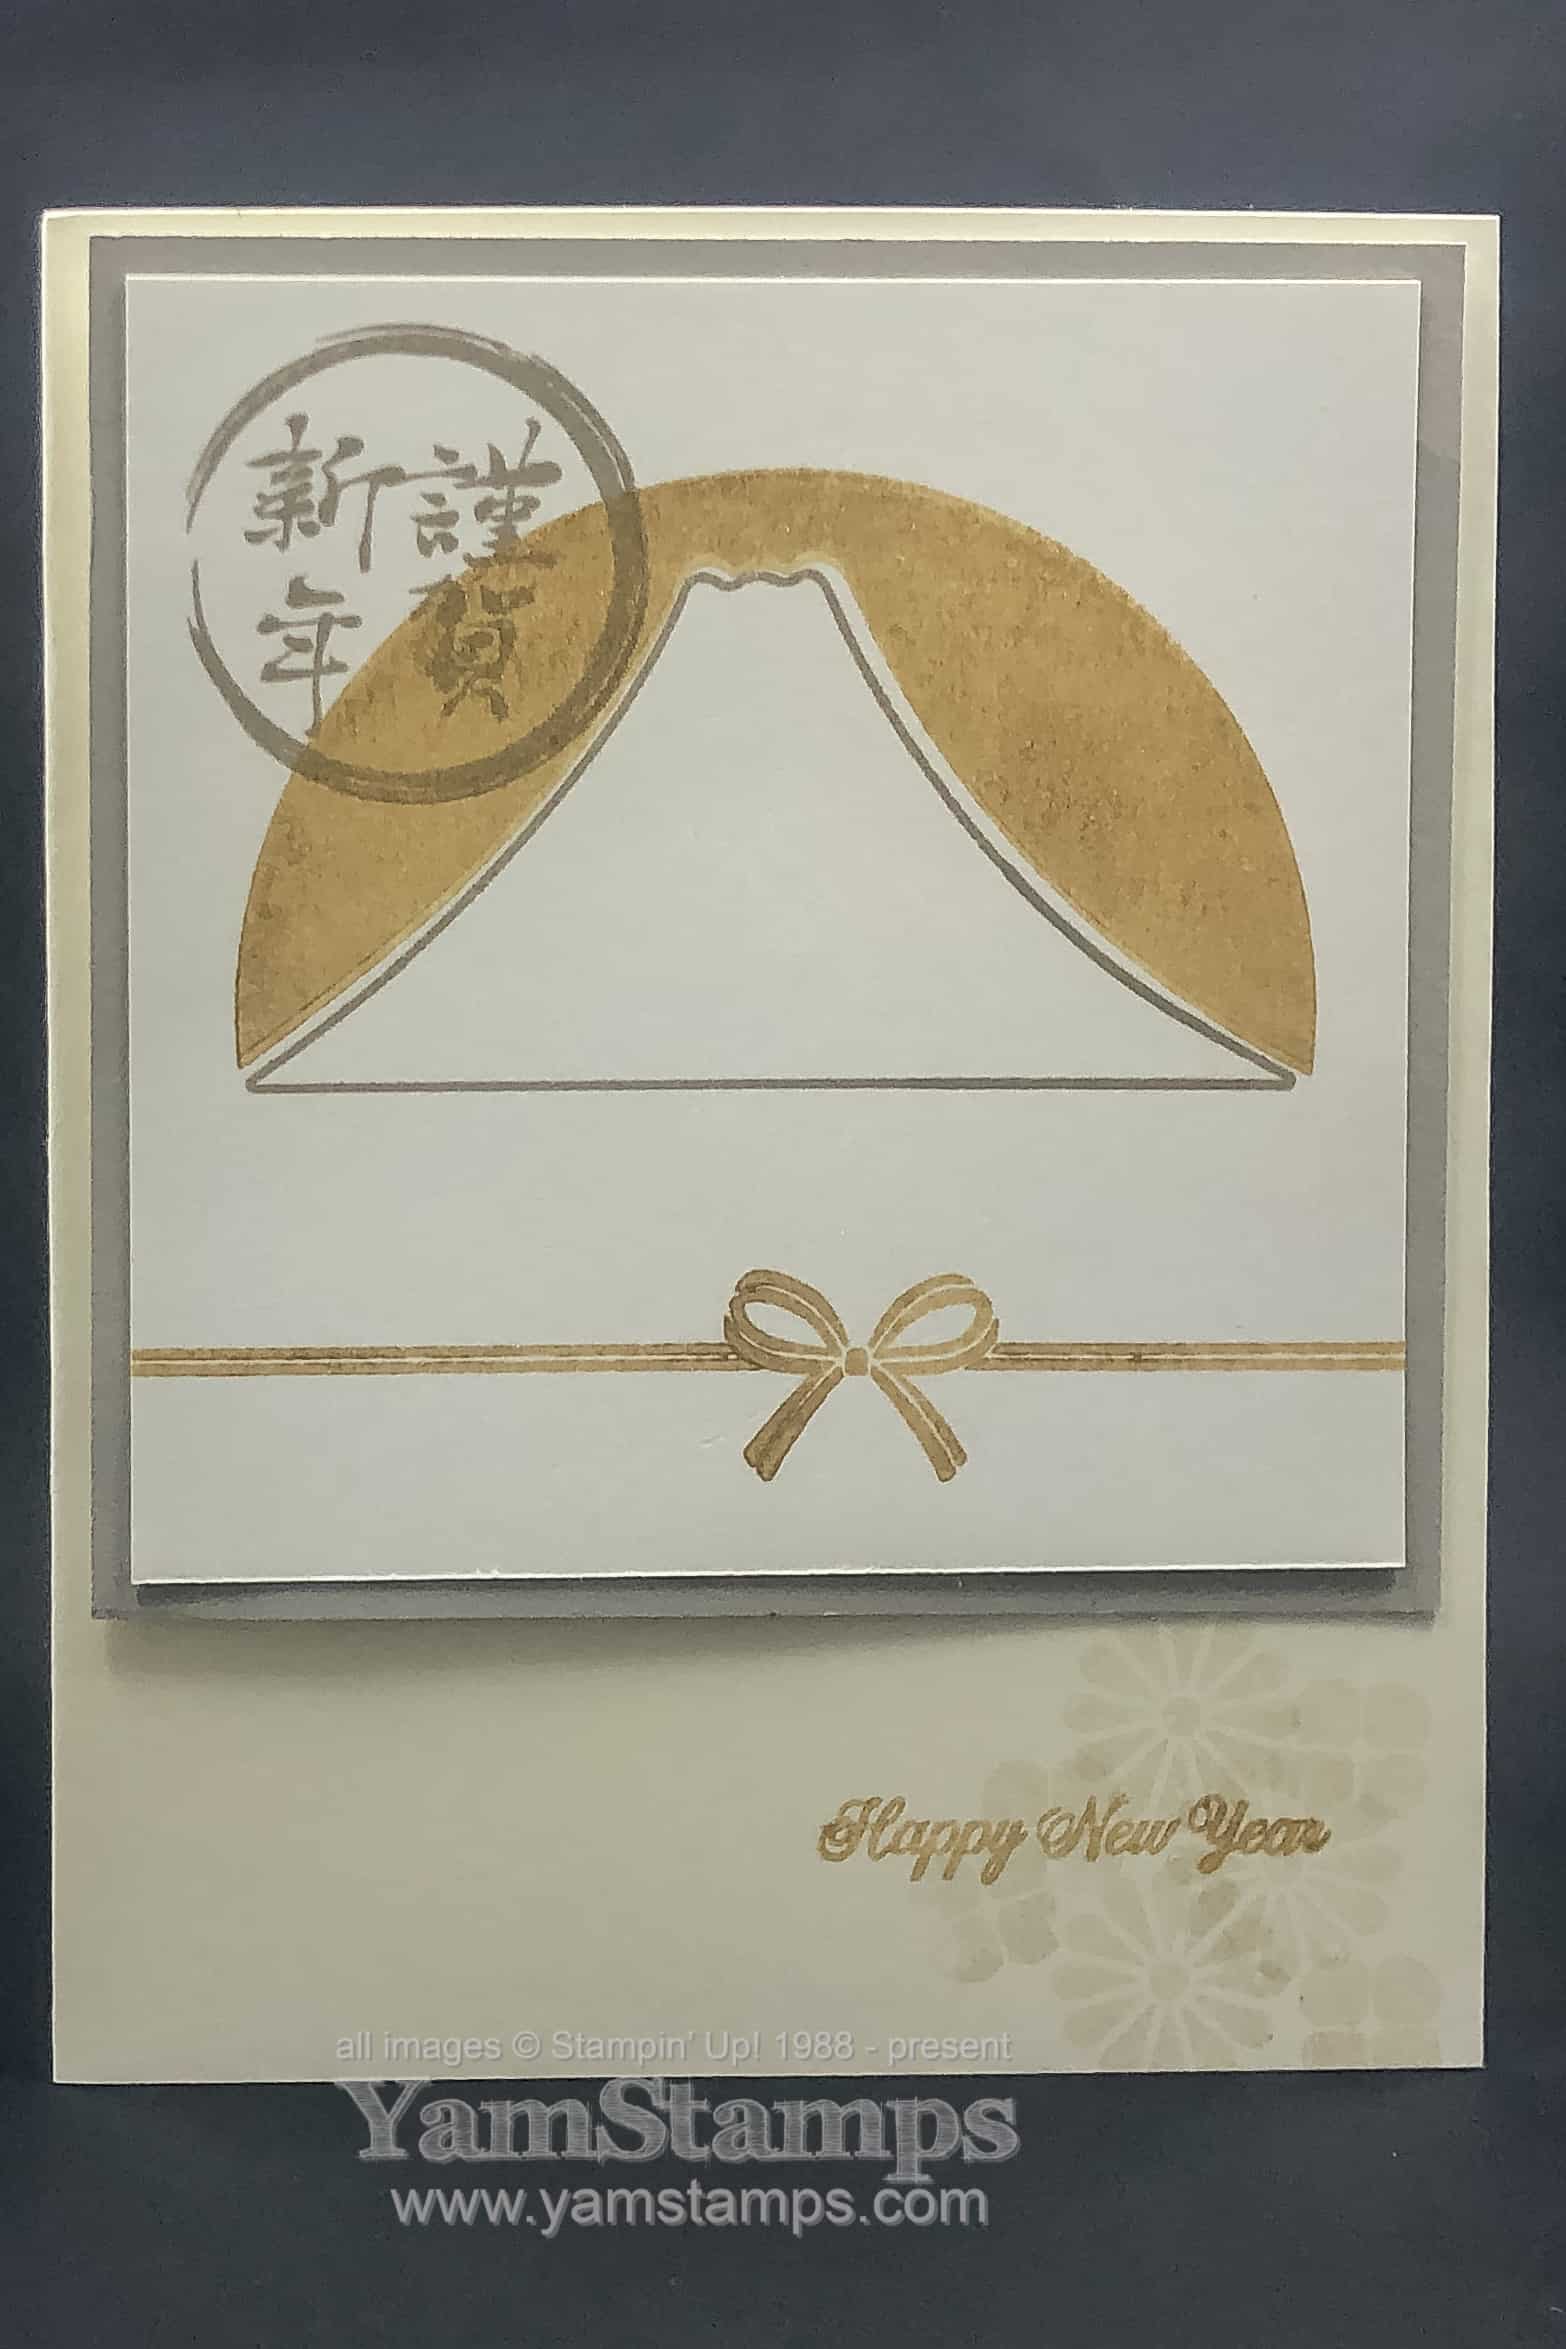
Stampin’ Up! is an international company, with divisions outside North America in Europe and the South Pacific. Stampin’ Up! is also in Japan – and that’s where this stamp set started! The New Year Celebration stamp set is now available in North America for a limited time – until January 31, 2020.
I love the images and the calligraphy in this one, and being of Japanese heritage, wanted to get this stamp set for sure! Sadly, my fluency in Japanese is almost non-existent…though my son is taking it as his university elective!! (I think that it’s a crazy amount of work, but he’s enjoying it).
Even though it’s a new year set, the images can be used at other times of the year, and quite honestly, unless the recipient can read the Japanese characters, you could use those as well!
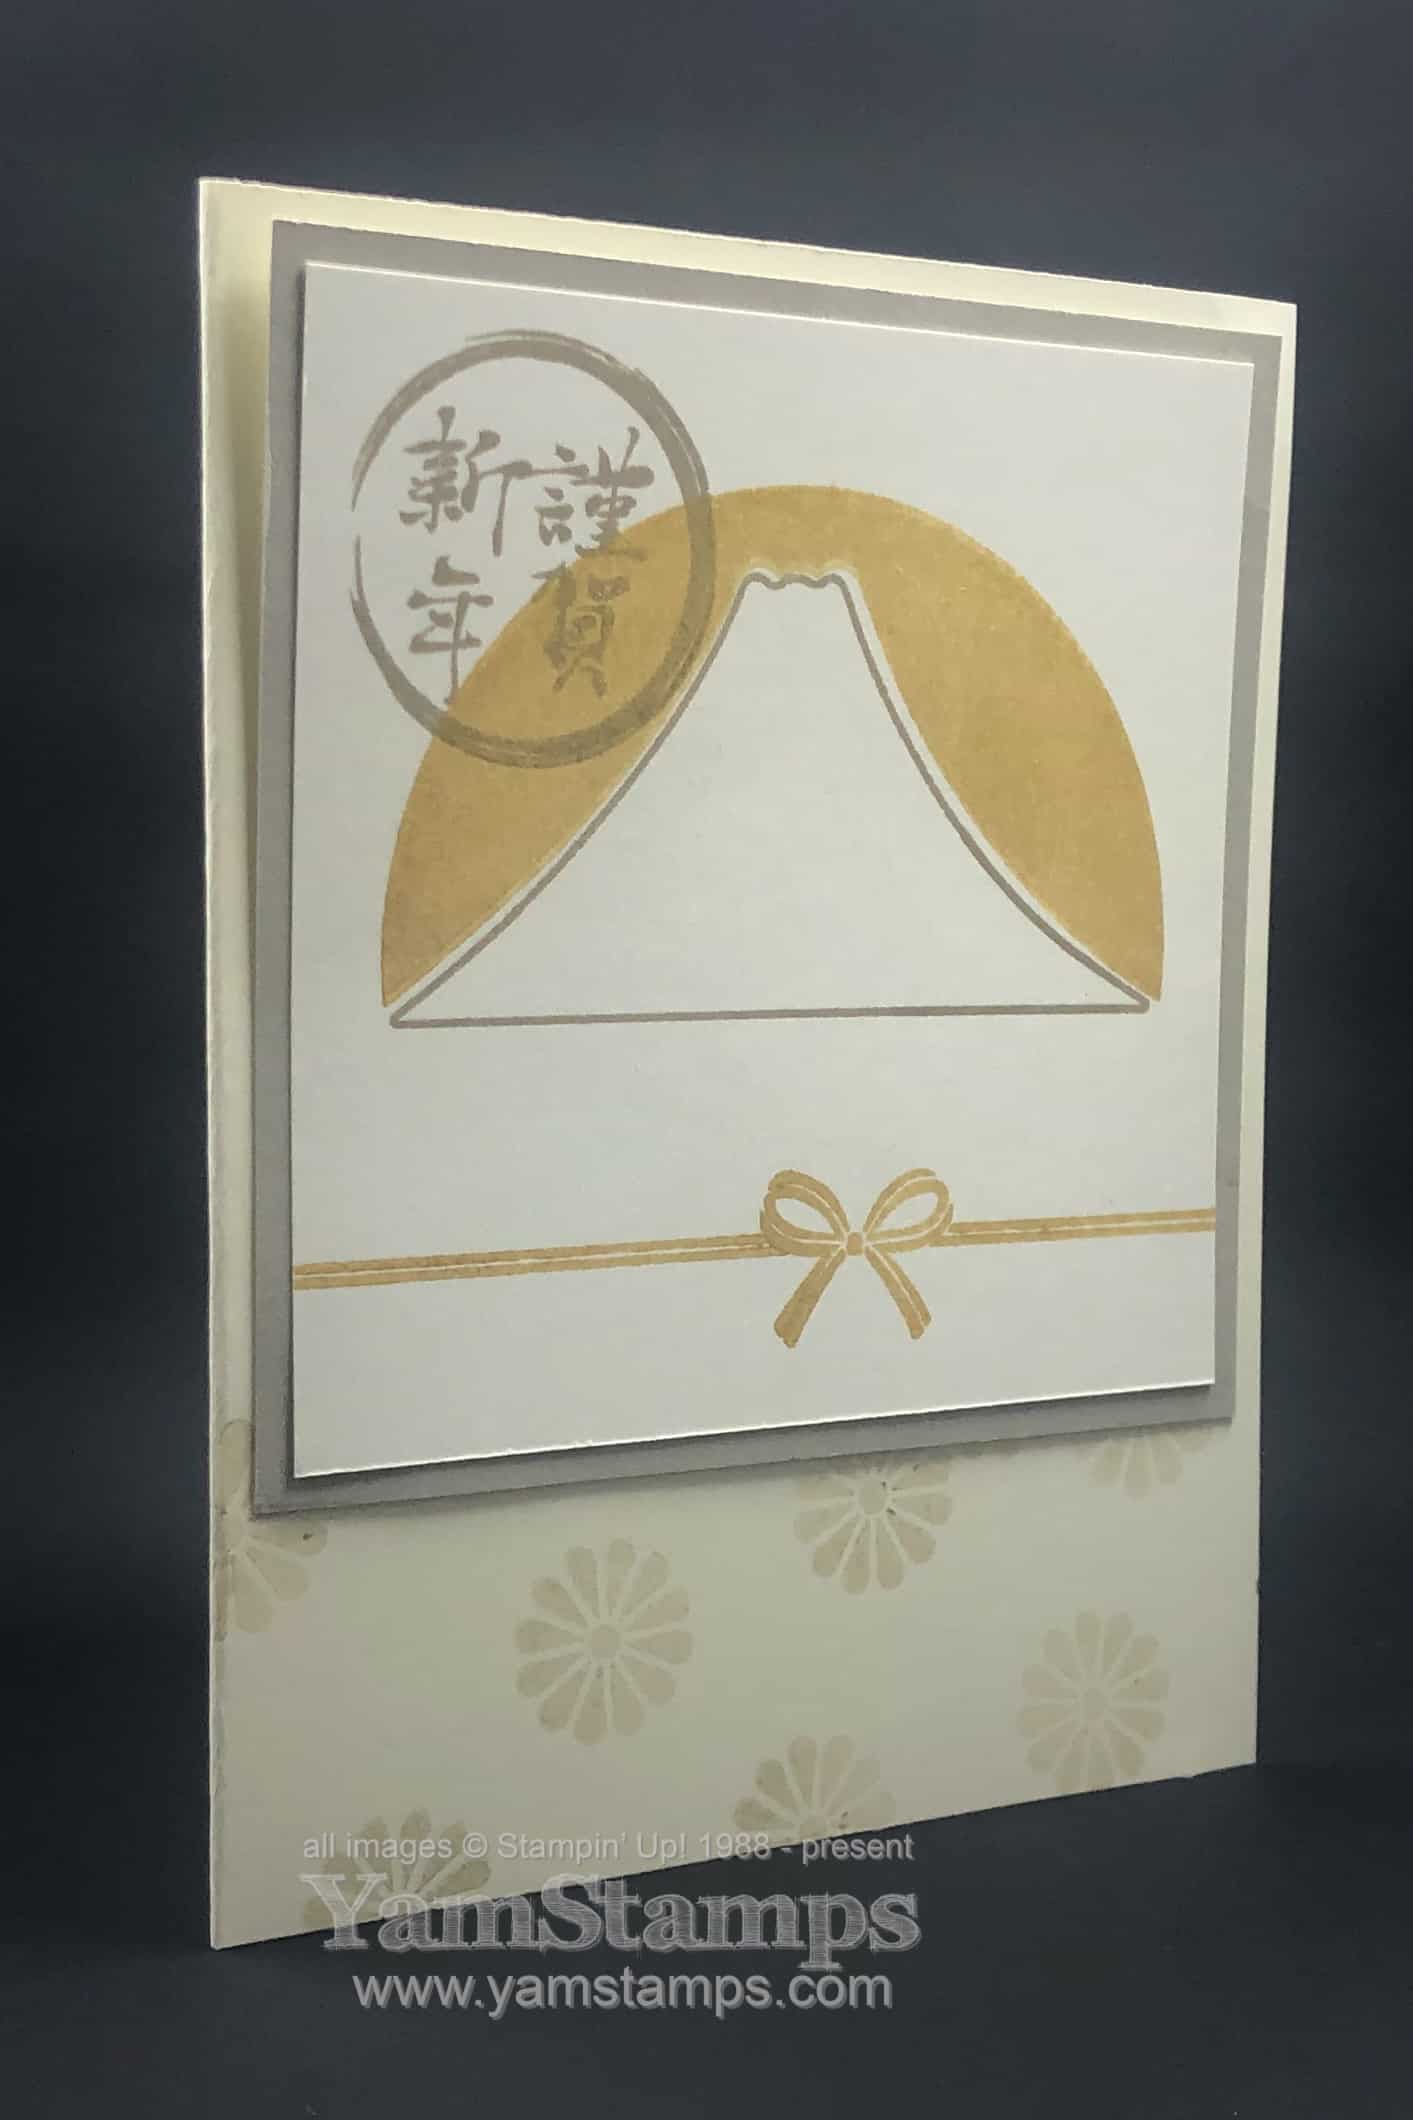
Here’s the image only/non-new year card. I used the Golden Glitz Delicata Metallic Ink Pad for the background and bow – but the photo doesn’t show how glitzy it actually is!
Here’s the new year version (well, for those who only read English….LOL). I used Sahara Sand as the colour for the other images on the card, including the faint flower images on the cardbase itself.
New Year used to be the bigger celebration (as opposed to Christmas) during the holiday season in Japan – not sure if that’s still the case, but it’s also a good reason to still send holiday cards….especially if you miss the Christmas mailing deadline! (…um….that’s typically me….)
HINT if you’re stamping these two images together. I stamped the mountain outline first – because the background “sun” image is a bit more flexible. If you stamp the mountain first, you can adjust the sun so it (roughly) fits around the mountain outline. My first attempt had the sun overlapping the mountain and that wasn’t quite the look I was going for. Also – the Stamparatus is great for 2 step stamping, and also made it easy for me to stamp the sun a couple of times with the Golden Glitz ink to make it really glitzy.
My next HINT – if you’re not sure which way the characters are supposed to go, look at the stamp case LOL. Even though I can’t read kanji, I can often tell which way they are supposed to go because of the brush strokes, so it bothers me if I can see that it’s upside down. True confession, I actually stamped it upside down the first time and had to check because I thought it looked weird.
If you’re interested in getting this stamp set, remember it’s only available until January 31, 2020. You can grab it through the YamStamps Online Store (shortcut: yamstamps.com/shop) or contact me for assistance placing an order.