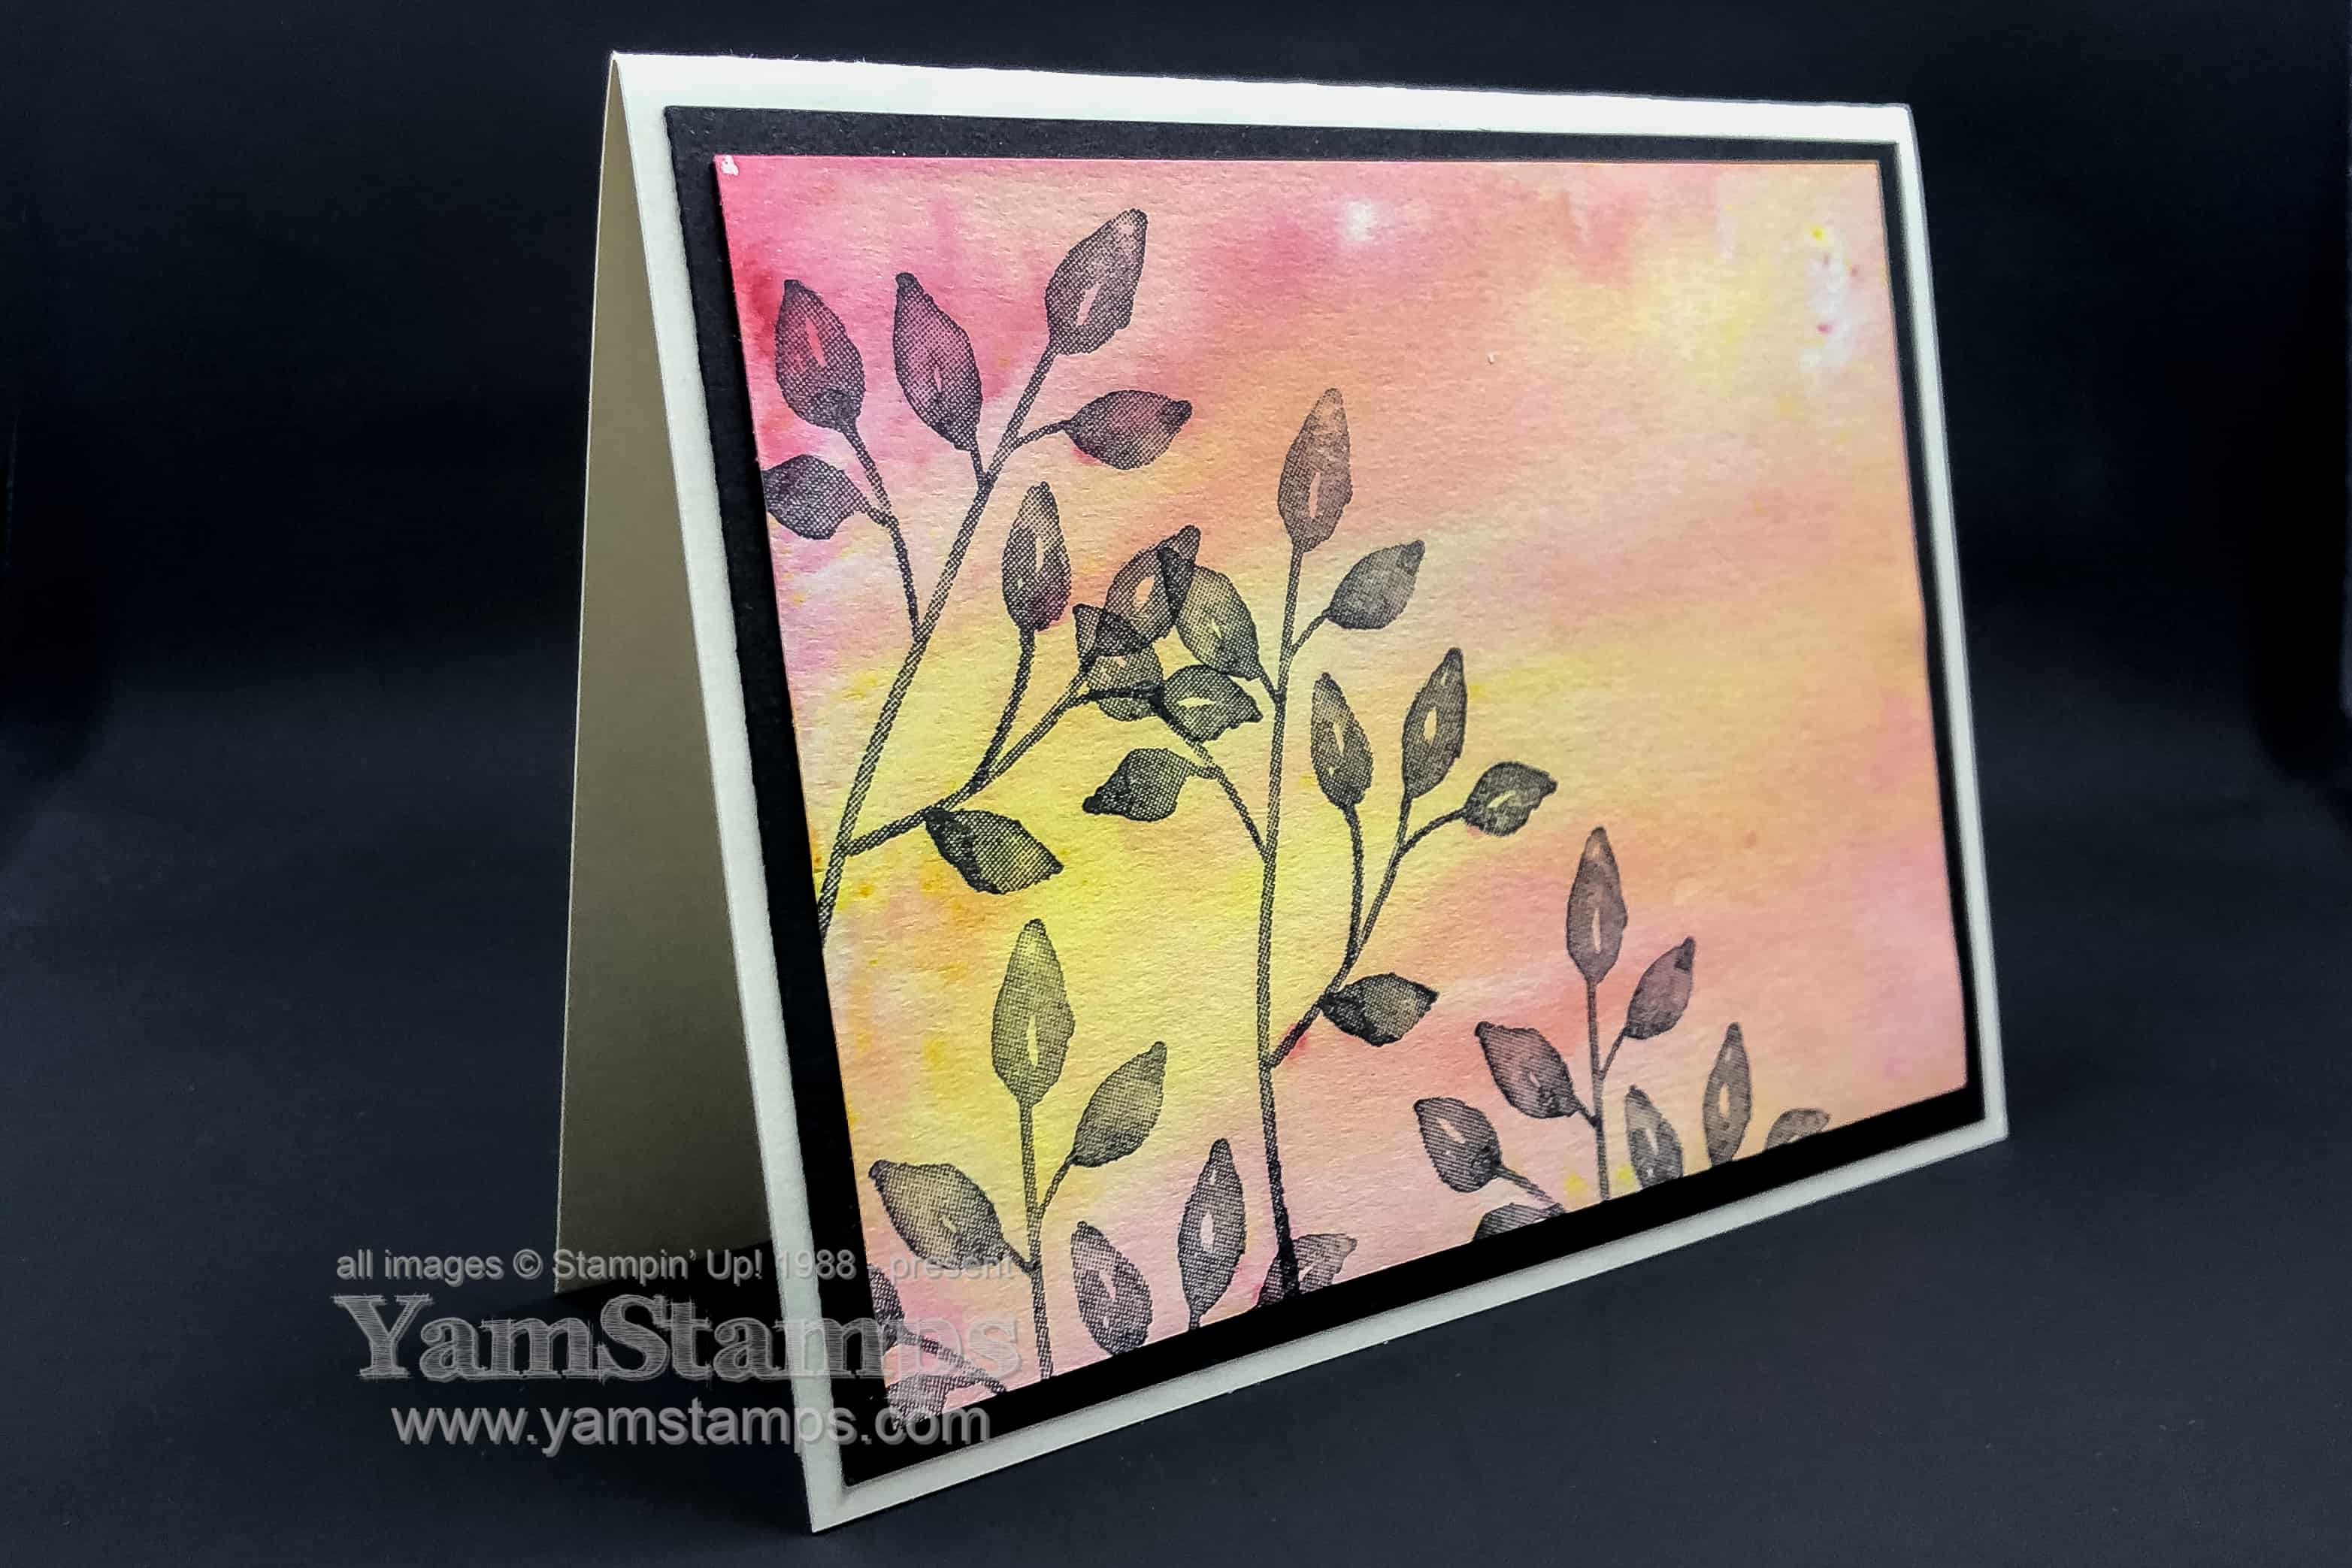
This sparkly sunset card wasn’t intended to look like a sunset…but it ended up that way and I’m okay with it!
The beautiful sunset effect was created using Brusho Crystal Colour and water. I admit I’ve been a bit hesitant to play a lot with these because I thought they were a bit on the messy side and required a bit of commitment! However – now that I’ve played with them, I think I’ll pull them out a bit more!
The image is from Petal Palette – one of my favourite stamps in that set – I think I’ve used that more than any of the others. It’s currently available in red rubber wood mount and red rubber clear mount. Don’t forget if you really want some of these wood mount stamp sets, you’ll want to order them in the next month or two – because as of June 2019 all Stampin’ Up! stamps will either be red rubber clear mount or photopolymer.
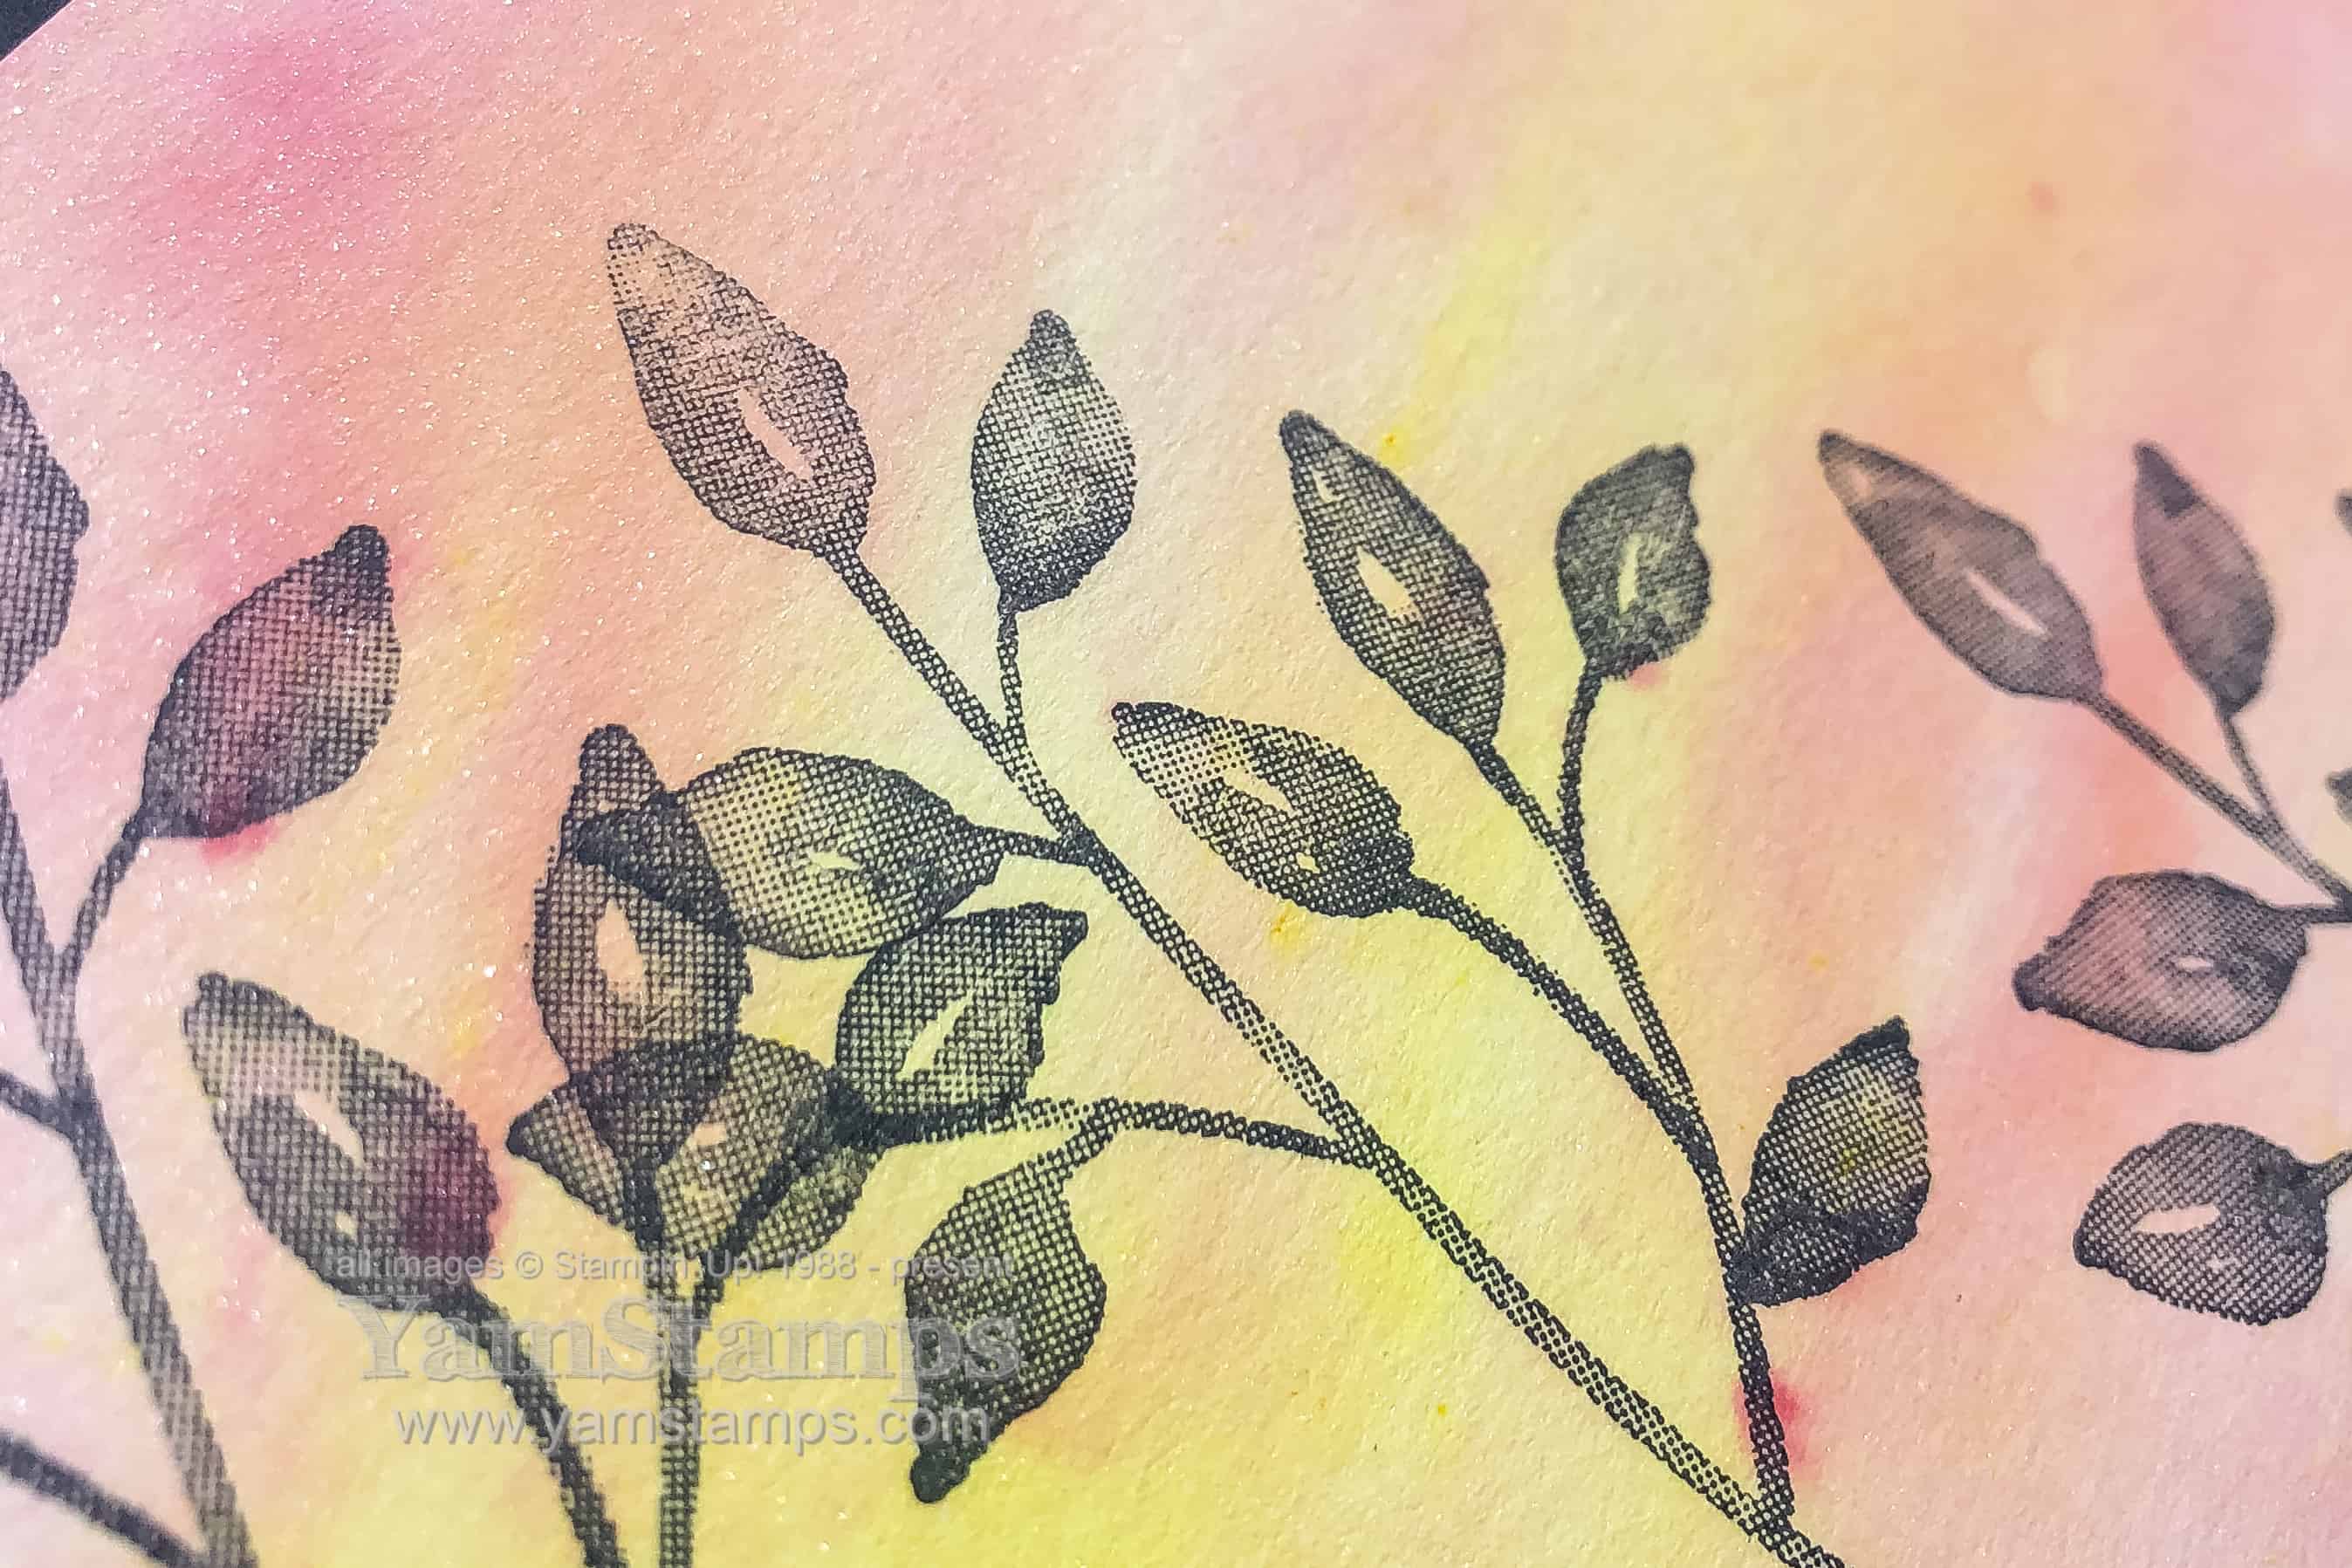
You can “kind of” see the sparkle here I think? It’s subtle, but it’s there. Shimmery White Cardstock is great and will stand up to getting a soaker.
I was a little enthusiastic with soaking my cardstock so I actually was able to tip it and get the wet colour to run towards the side, which resulted in the streak effect. Definitely a bit of a happy accident.
A couple of things to know with Brusho – a little goes a LONG way, and some of the darker colours are quite strong and can overwhelm your piece. I worked on a few layers of older grid paper (“reuse recycle!”), and used my heat tool to speed up the process because I’m a little impatient. You don’t need to open up the Brusho containers – just pierce the lid with a pushpin, and then you can leave the pushpin in place to seal the hole when not in use.
I’ll try to do a Facebook Live over on the YamStamps Facebook Page showing this sparkly sunset card construction in the next few days so you can see the Brushos in action. Please like and follow the page, you should get notification when I’m going live! If you miss it live, there’s always the replay which will remain available indefinitely.
In the meantime, I’m trying to get ready to go to the Kitchener Scrapfest! I’m happy to have a vendor booth there once again this year. Friday April 12 and Saturday April 13 – please stop by to say hi, do a bit of shopping and do a free make and take…and fill out a door prize draw form! Hope to see you there!
This is not an April Fool’s Trick! Stampin’ Up! has released their storage solutions and you can get them starting today! Storage by Stampin’ Up! is perfectly sized for your Stampin’ Up! ink pads, refils and markers!
This modular system is totally customizable – and can expand as your collection expands! You can select which trays and which toppers you get, and then combine them in a way that suits your crafting area!
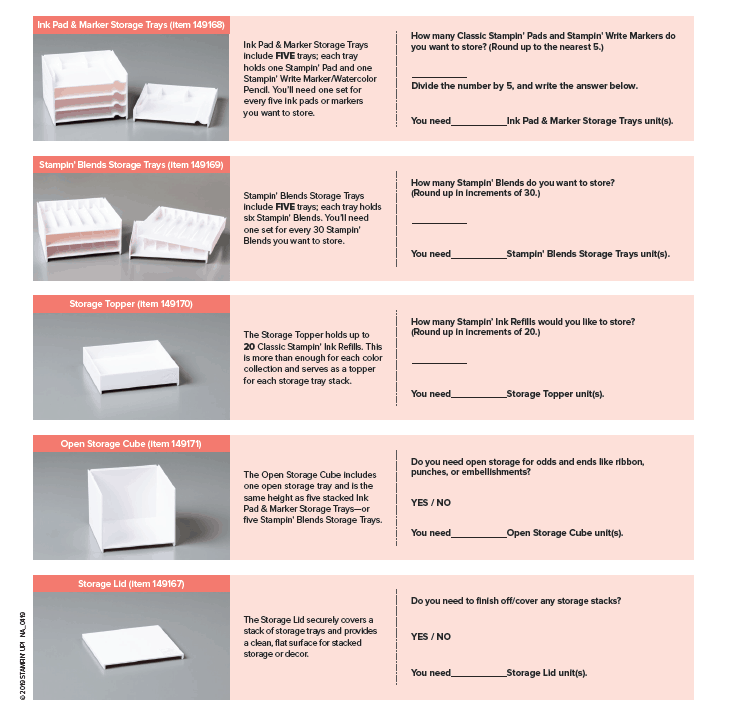
Check out this flyer to see all the options – and a handy way to calculate how many of each type of storage block you’ll need! (or check out the quick reference image below)
As another cheat sheet helper:
There are 4 colour families, each with 10 ink pads/refills/Stampin’ Write Markers, there are 2 In Colour Families, each with 5 ink pads/refills/Stampin’ Write Markers. By my count there are currently 30 pairs of Stampin’ Blends Markers available (so 60 markers) plus 3 single Blends (colour lifter, Ivory, Bronze) but this number could be slightly off….obviously you’re best to count how many YOU have and order accordingly?!
I can’t wait to get my storage system set up – because I’m sure that will mean I will be totally organized in the next year, right?! *cough*
If you have any questions or need assistance ordering your Storage by Stampin’ Up, please feel free to contact me!
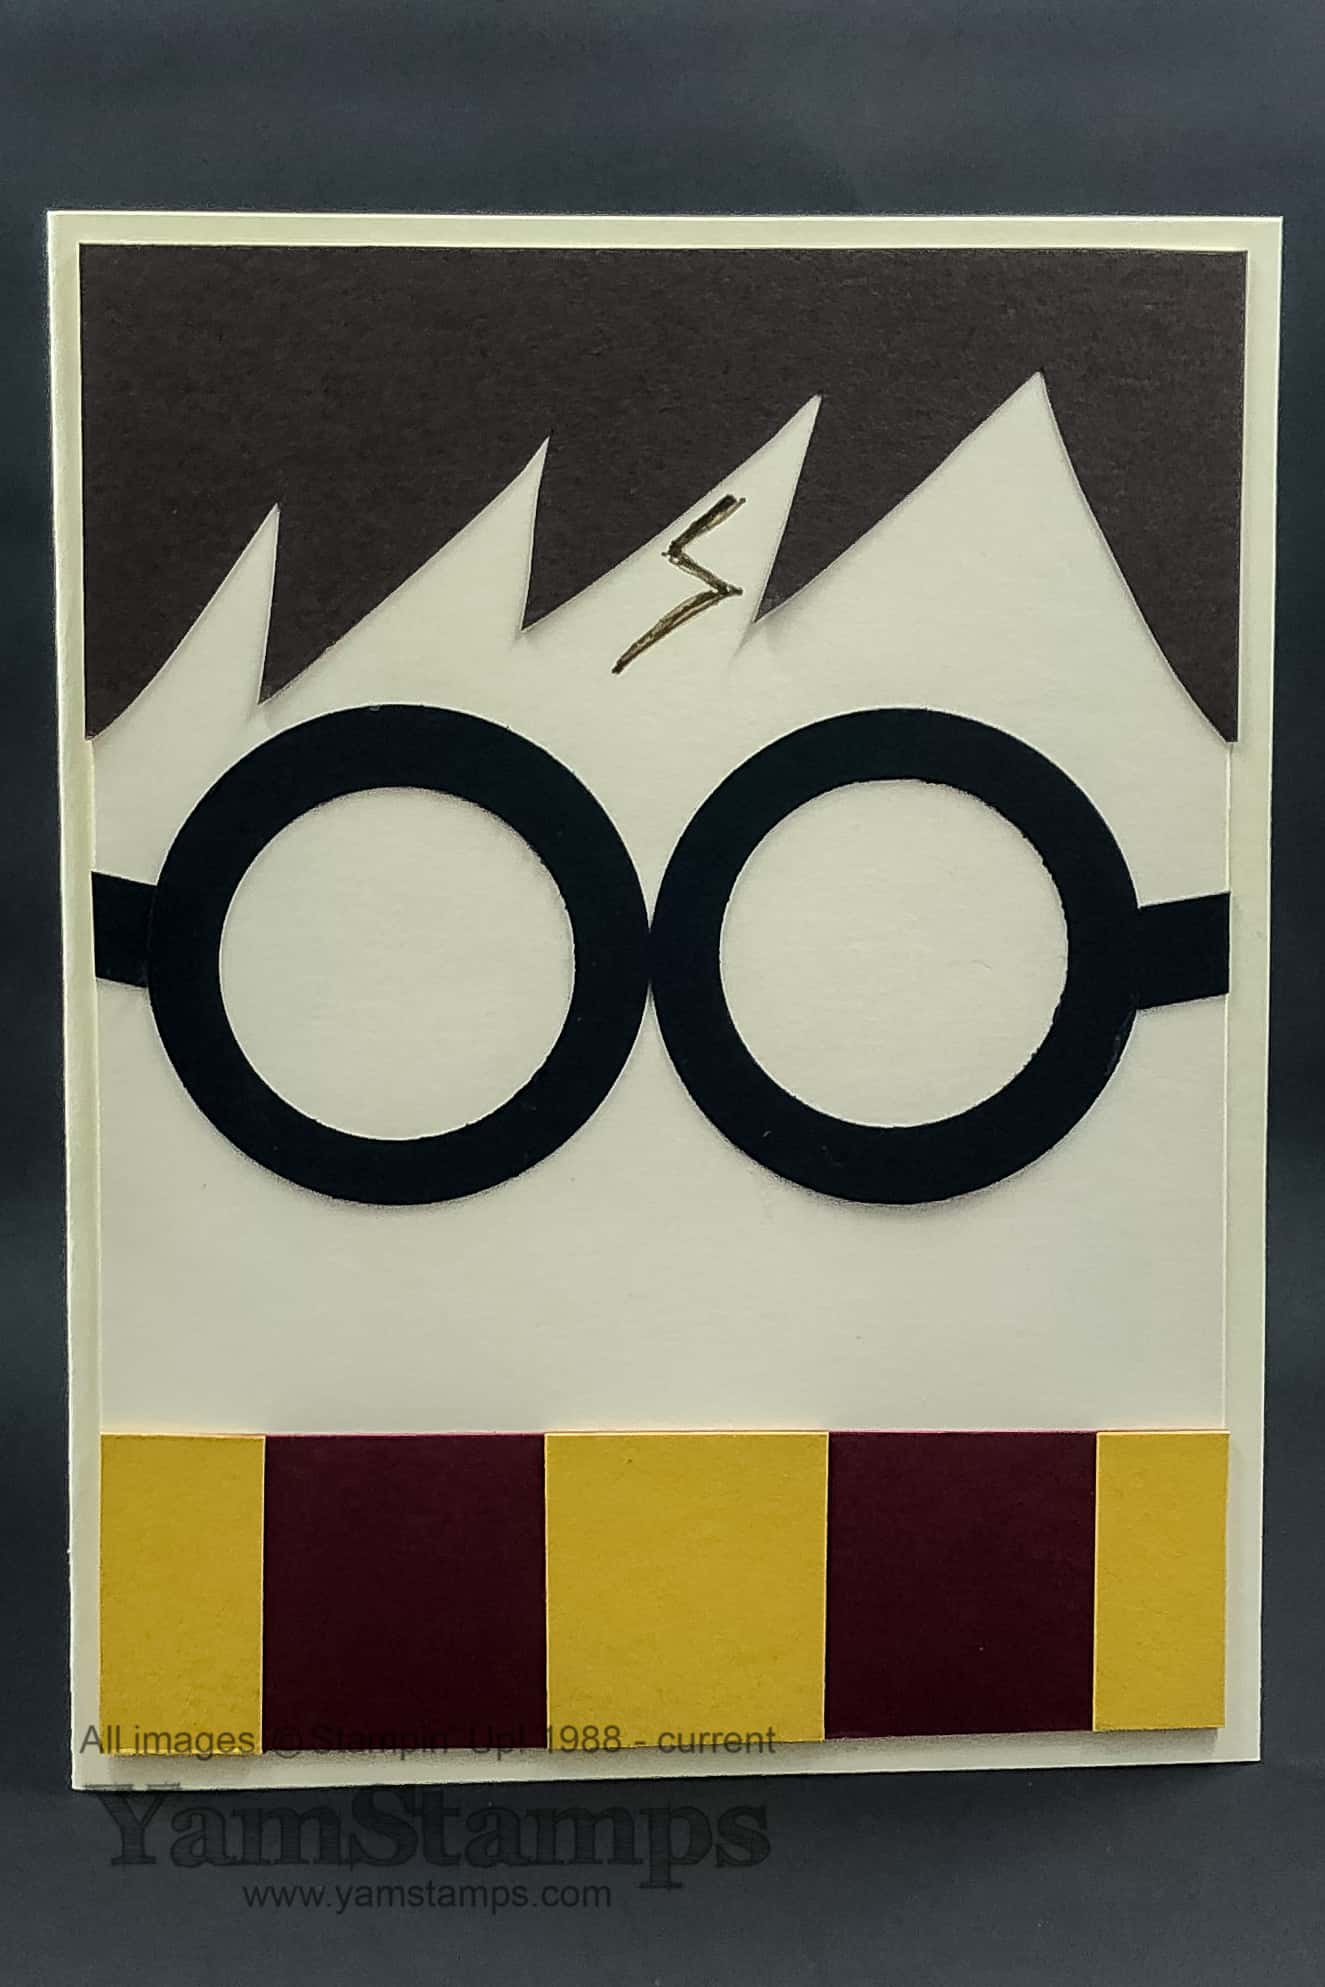
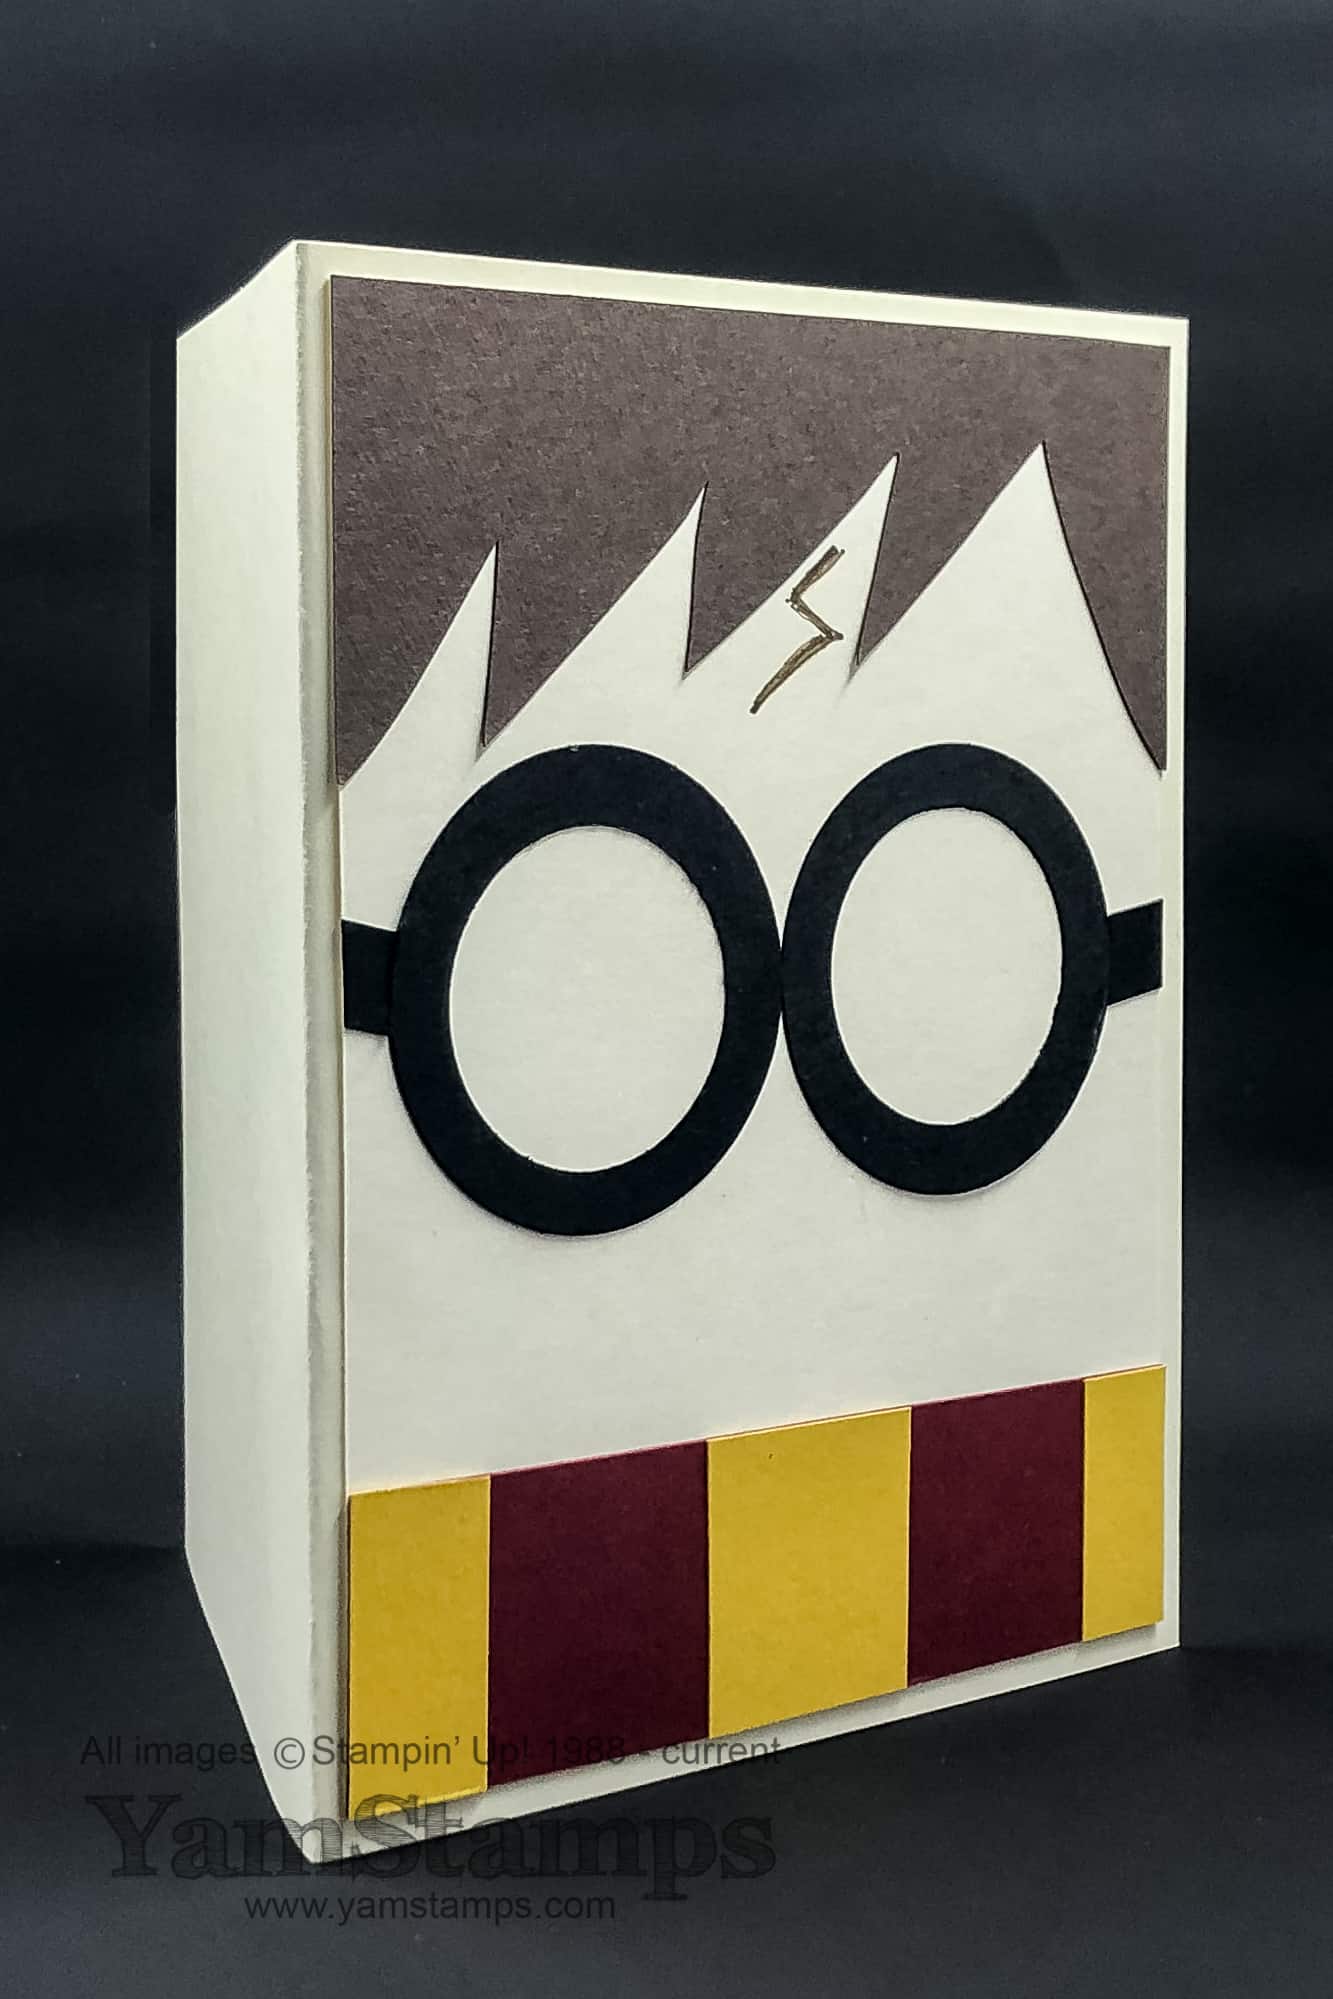
OK I had to save this post because the card recipient wasn’t at band practice last week….and I didn’t want to spoil the surprise! So here it is now – my EASY handmade Harry Potter Greeting Card. So easy, muggles can make it!
I have to admit, I squealed a bit when this card came together like it did! And true confession….not sure if I would do the scar next time…but I know it’s integral to Harry Potter…maybe I’ll just learn to draw it a bit better. (There’s a REASON, well, many, that I am a stamper and not a painter/illustrator etc).
This handmade Harry Potter greeting card is actually VERY easy to recreate, just a swish and a flick and you’re done…
The glasses are created using circle punches – in this case, the 2″ Circle Punch and the 1-1/4″ Circle Punch. Punch the smaller inner circle FIRST, then centre and punch the outer circle. If you wanted, you could also easily do this with coordinating sizes of Layering Circles Framelits and the Big Shot. I just used two scraps of Basic Black cardstock for the arms of the glasses.
For the hair, I had a strip of Early Espresso cardstock that I snipped in jagged points with my Paper Snips. For the scarf, I had a strip of Merry Merlot and I added pieces of Crushed Curry to recreate the Griffyndor colours.
Or…you could give this information to another card maker and then say “Accio, handmade Harry Potter Greeting Card“?!
If you are looking to get into cardmaking, or know someone that is starting out, I’m finalizing details for my Beginners Card Making Class – it’s a 101 class on creating your own greeting cards – from choosing cardstock to cutting and layering, and all the “basic” information you need to build a foundation upon for more intricate cards. I’ll be opening preregistration soon and looking to launch in April. Like my most recent card classes, class registrants will receive an invitation to a private group which will house class information and host the live videos. Stay tuned for more information!
In the meantime, I leave you with this thought….even wizards like to stamp…
Questions? Send me an owl…or just email me. (or leave a comment below!). Don’t forget that my birthday week celebrations are ongoing until Saturday at midnight!
If you are in Canada: place an order with me through to midnight eastern time on Saturday, March 30th, and I’ll send you a pdf download with 10 different paper crafting projects!
Place an order of $50 or more, and I will cover the shipping charges ($9.95 or 10% after $99.50 product order).
To qualify – either contact me with your order and your payment method (I can accept Mastercard/Visa or etransfer), or place the order yourself online in the YamStamps Stampin’ Up! Canada online store (click on the link or type in yamstamps.com/shop). Please use the host code 2DDGZPHG
Due to Stampin’ Up! Regulations, I can only sell product to those in Canada. However, if you are located outside of Canada, purchase access to the Scrapbook in a Box Online Class before March 31st at midnight eastern, and receive the tutorial bundle download as well!
This offer is valid only through me, and only until midnight eastern time on March 31, 2019.
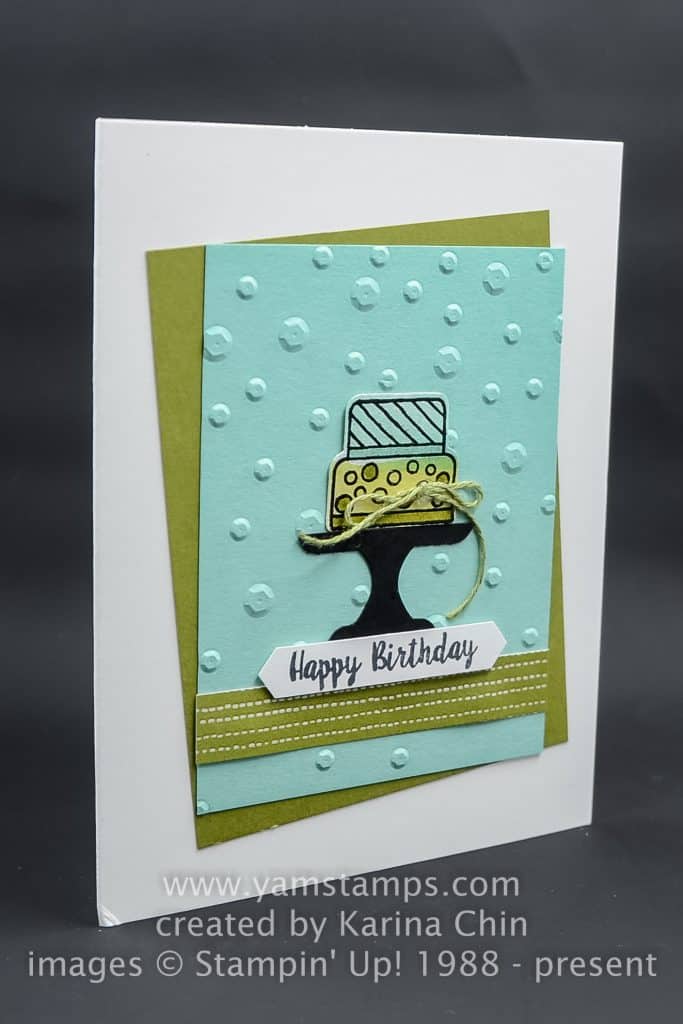
Let Them Eat Cake! OK so I know I’m not using that quote in the correct context, but it talks about cake so that’s good enough for me. Check out this Birthday Cake Card, made with Stampin’ Up!’s Cake Builder Punch which is available for ordering once again!
Today’s Sunday Swap Share is this Birthday Cake Card from Karina Chin – who used the Piece of Cake Bundle on her card. The discounted bundle includes the Piece of Cake Photopolymer (clear/see through) stamp set and the Cake Builder Punch, which is once again in stock and available to order….though I notice it says “Low Inventory” which means it may go on backorder – so if you’d like it and need it now, please don’t hesitate to order it! In the background, the Scattered Sequins Embossing Folder was used to add texture. This folder is available for purchase, or as a Level 1 Sale-a-Bration reward choice with a $60 product order. (please note that there are different item numbers, depending on if you’re purchasing or getting as a Sale-a-Bration item).
There is more good news – Stampin’ Up! has let us know that the Cake Builder Punch (AND the Butterfly Duet Punch – hopefully available to order again in the next couple of weeks) will be available beyond the Occasions Catalogue! I don’t know if the BUNDLES will be carried over, though, so if you’d like to get the stamp set and punch together at a discounted price, you’ll want to be sure to grab the bundle before June 3/while supplies last/once orderable. You can contact me if you have any questions or need assistance placing your order.
One week today I’ll be completing my leg of the Around the Bay Relay Race! This is the second time I’m doing the 2 person relay (15km each) – which I told myself would be so much easier than the bunch of times I did the full race….but at this point in time, I’m not so sure about that! It’s been a tough winter for training for sure – but I’m glad to be able to get out there. Wish me luck… (and I will definitely be saying “Let ME Eat Cake!” afterwards!!!)
Inspired by this Sunday Swap share, I took elements of the design and created this quick and simple positivity card. I’m not sure there’s actually a category called simple positivity cards, but there should be….so I’m starting it!
Remember to grab your Sale-a-Bration rewards soon! Sale-a-Bration ends on March 31, but supplies are not guaranteed (we’ve already seen a number of items sell out) – so don’t hesitate! You can always contact me if you need assistance placing an order.
I am getting prepared for the upcoming Kitchener Scrapfest – April 12 & 13. I’m going to have a vendor booth there, so I hope that you will be able to stop by and say hello! I’ll have a free make and take, displays and some product for sale – retired Stampin’ Up! product plus some brand new in package adhesive supplies. One thing that I really like about Stampin’ Up! is that as a demonstrator, I place orders for customers rather than having to carry full stock of all the products (can you imagine the cost!). This can be a bit of a drawback when I have a vendor booth, but I usually have enough retired product and adhesive products that I can sell, and of course, I can take orders as well.
You are going to want to check back in to the YamStamps blog next week, as I’ll be sharing a fun project that I had to delay posting about….because I want the recipient to be surprised! Plus it’s my birthday week, so I will want to celebrate….and you may benefit as well (hint hint LOL).
In the meantime, I hope that you will come up with a simple positivity card, like this one, and send it out to someone! If you do – please share it with us! You can post it in the Paper Crafting with YamStamps Facebook Group! I slacked off on the creative challenge in the group this month…but I will be posting a new creative challenge for April for sure. I’ve had the YamStamps Facebook Page for a while, but just started a group as well, so that hopefully there can be more conversation and sharing. Please click on the group link and request to join us – see you there!
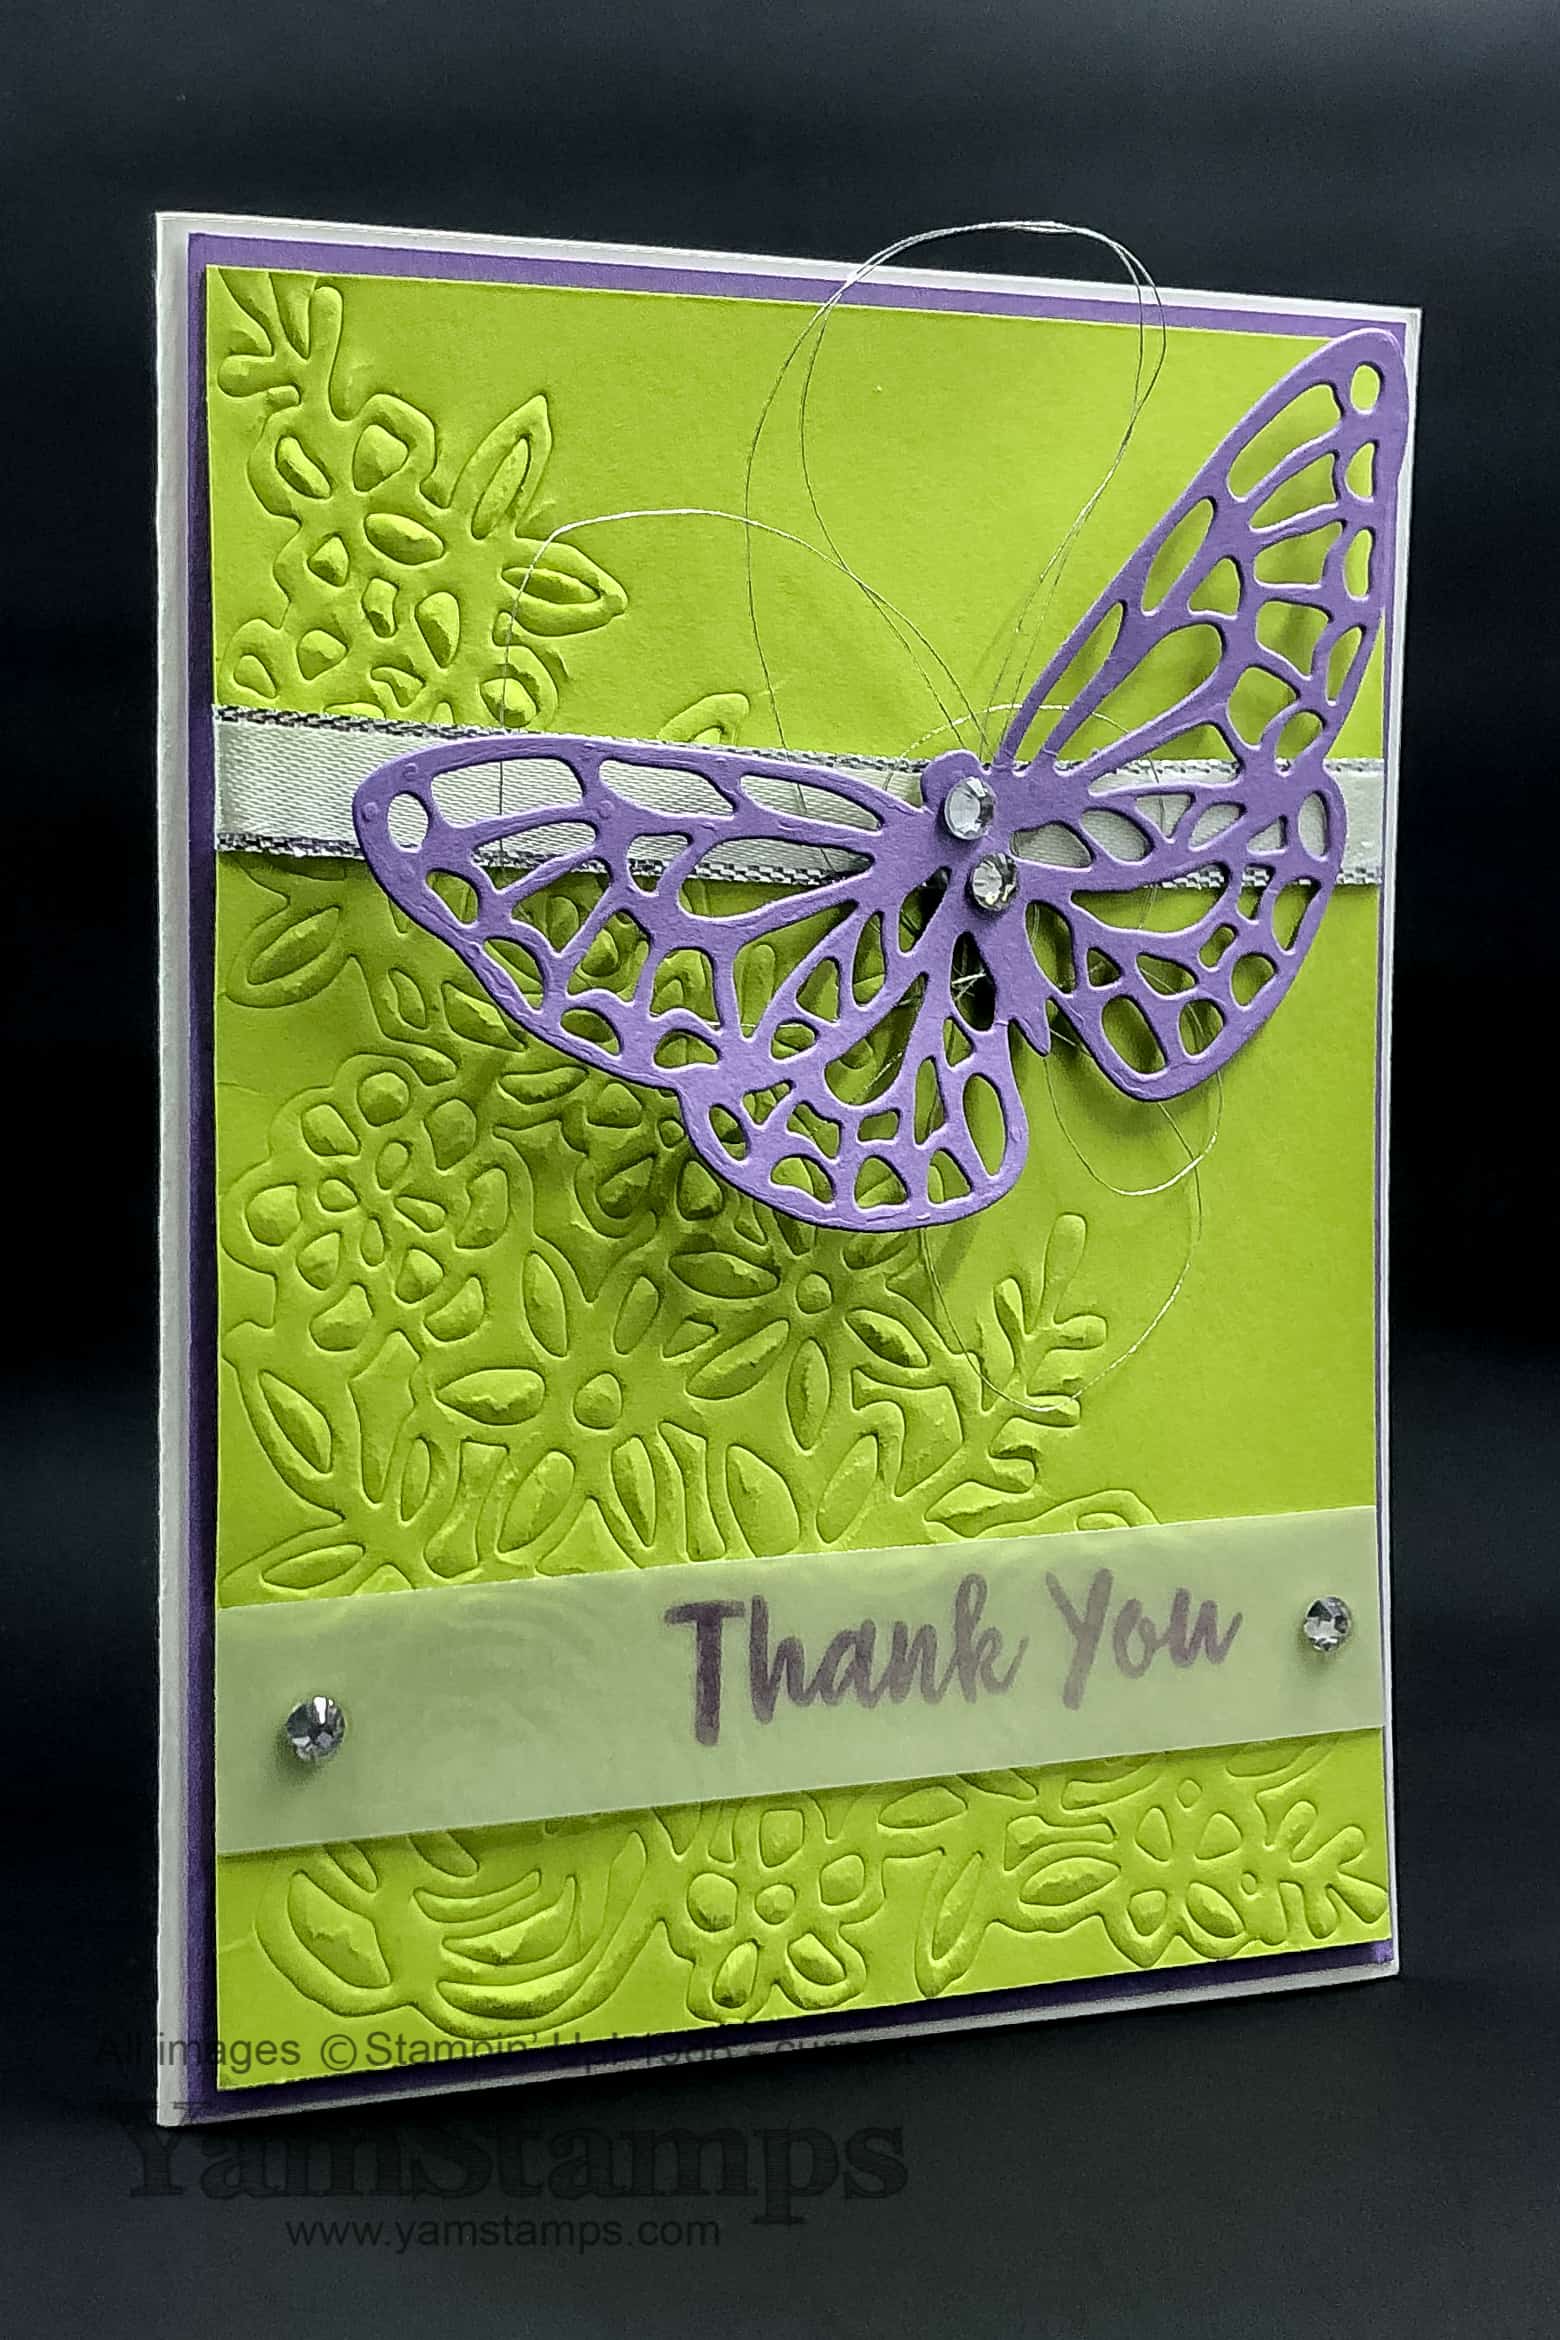
Spring has sprung! Thank goodness – and fingers crossed that the weather stays spring-like. This is a card we did this month in class – a spring thank you card!
This card features the Abstract Impressions discounted bundle – which includes the Abstract Impressions Photopolymer Stamp Set (the clear stamps) and the Springtime Impressions Thinlits Dies. While we wait to see what will be carried over into the next Stampin’ Up! Annual Catalogue (coming out in June 2019), one thing that usually happens is that current bundles are discontinued. The individual products may appear in the next catalogue, but the discounted bundle option is no longer available. So – if you like these products, you may want to consider grabbing this bundle soon!
For this card, we played with the Big Shot Embossing Mat – which allows you to emboss with the metal dies, rather than cut. This means you can use these tools in more ways and get more value! (Maybe I should have saved this card for a Frugal Friday feature?!). For this card, the corner flower die was used to emboss the Lemon Lime Twist Cardstock. I love the texture it gives without drawing too much attention away from the die cut butterfly. These colours and images were just perfect for a spring thank you card, in my opinion!
Happy Sunday Swap Share! Today’s card features the Sale-a-Bration set, So Hoppy Together. These fun frogs are great for so many different types of cards – so let’s hop to it and check it out!
This fun card of encouragement was created by Alison Solven. This is an example of two step stamping – the frog is on one stamp, and the crown was added separately. The background is embossed with the Dot to Dot Embossing Folder, which has a kind of reptilian feel when used in this context, don’t you agree? She’s also used the Stitched Shapes Framelits (the circles) to die cut her image and the Gingham Gala Designer Series Paper.
So why did I entitle this entry “Hop To It“? It’s a reminder that Sale-a-Bration is coming to a close! If you want to grab this stamp set, you’ll need to make a $60 product order before the end of March and select this as your Sale-a-Bration Level 1 Reward item. As well, it’s a reminder that all products are either to a certain date OR while supplies last. As we’ve seen over the last little while, there are a number of products that have been so popular that the demand has outstripped the supply. Stamp sets are usually a safer bet, because Stampin’ Up! produces them in house so there’s a bit more (a BIT more) ability to compensate for unanticipated or unusual spikes in demand.
For the Sale-a-Bration Coordination products, we are down to just one set of framelits remaining – the Four Seasons framelits. All other framelits are now out of stock and unavailable. You can tell we have gotten used to using framelits and don’t want to fussy cut if we don’t have to! The More Than Words stamp set and the Story Label Punch are still available at the time of the writing of this post…(like how I covered myself there?! LOL)
So – please make sure you hop to it if you’re planning on getting in on the Sale-a-Bration! This also goes if you’d like to get a Demonstrator Starter Kit. We won’t sell out of the kits themselves (since you pick the product that you want in it) – BUT – historically, there’s a spike on the website during the last day and especially the last hours of Sale-a-Bration, making it difficult to get through the process efficiently! SO – ask me any questions you have, and sign up NOW! You can see more information and a sign up link here. (or the shortcut to remember is yamstamps.com/join). I’d love to have you become part of my group of demonstrators, the “Eh” Team!
I have been working on getting happy mail out into the world! I just finished a few customer thank you cards, and I’ve got my cards for my “Eh” Team (that’s the name of my Stampin’ Up! demonstrator group) rewards mailings all packaged up as well. If you know me, that’s a big feat, because often as much as I like to make cards (and I do make a fair number…LOL)…actually getting them into an envelope and then into a post box can be another thing entirely…..
This is the card I made for February rewards mailings…
The stamped image is from a Demonstrator Exclusive Stamp set called Stamping Your Way to the Top which has a number of sentiments that can be mixed and matched and that are great for use in my stamping business. If you want to get your hands on this set, why not become a member of my demonstrator group?! Sale-a-Bration is a great time to get a starter kit – you’ll get more product included and the opportunity to purchase a demonstrator exclusive tote bag! My FAQ page is here, or you can always contact me if you have specific questions or concerns….or RSVP for the next Information Night – April 4th. (see other events and upcoming dates on the YamStamps Events Page)
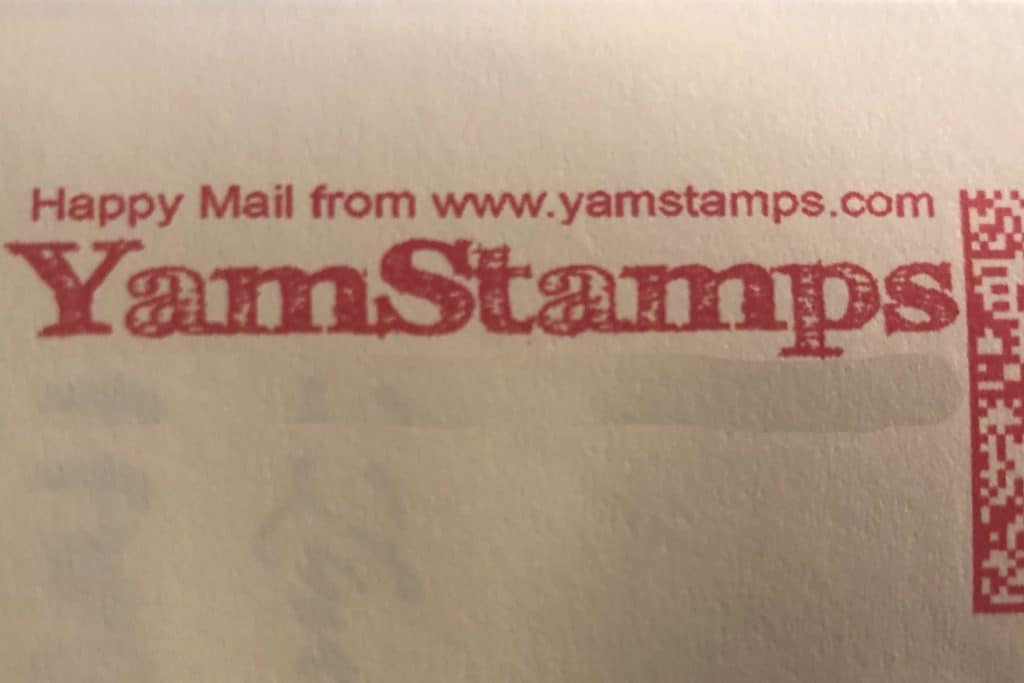
Oh – and I was serious about Happy Mail – I’ve even got it on my postal mark!!
If Instagram is cooperating at the time you read this, you may be able to check out the YamStamps Instagram feed – I uploaded a picture of this card, but also shared a quick tip video in my Instagram Story. It’s a fun way to hit the highlights of a video!
Given the way that Facebook and Instagram were so wonky today, it might be worthwhile to spread joy with actual cards that are sent through the postal system – who’s with me? Send Happy Mail! Need cards to send? Come to class or club! Class is usually the first Wednesday of each month, and Stampers Club is the third Monday – join in at any time! BRAND NEW – INTRODUCTION TO CARD MAKING CLASS – if you’ve never made cards or stamped before, join this new intro class! See the details for these recurring events on the YamStamps Events Page – I updated it earlier today – so don’t miss out! Hope to see you soon!
I love this effect! For this card, we tapped the Balmy Blue ink pad onto the inner surface of the Country Floral Dynamic Embossing Folder. (A Sale-a-Bration Level 1 reward – you can select it for free with a $60CAD product order!). Tap onto the side with the Stampin’ Up! logo. Once there’s an even coating of ink, place your cardstock inside and run it through the Big Shot – don’t forget the special sandwich for these extra thick folders – Regular Platform, folder with cardstock inside, top Plastic Cutting Plate only.
Clean up for this inked embossing folder technique is also super easy – I just run the folder under the tap and pat dry with a paper towel. Stampin’ Up!’s inks are dye based so they’re water soluble.
The sentiment is from Flourishing Phrases (available in red rubber clear mount or red rubber wood mount), and it’s punched out with the new Story Label punch which is available for purchase during March as part of the Sale-a-Bration Coordination product suite. We used a sponge dauber to add a bit of Balmy Blue ink around the edges of the label. I am using up some of the Organdy Ribbon I had from my earlier Sale-a-Bration order – because if you blinked….it’s gone again! I think everybody who had been waiting on it jumped in to order and it’s unavailable once again in North America (this time gone for good).
However – there are LOTS of new regular catalogue items available to select for free as well as the original offerings (other than the ribbons, obviously…). You can go to the YamStamps Online Stampin’ Up! Canada store and check out the Sale-a-Bration options currently available. Remember that we are now into the “March 31 or while supplies last” phase of Sale-a-Bration. I shared a strategy for planning out your Sale-a-Bration redemptions on the YamStamps Facebook page a while back. Stampin’ Up! manufactures their own stamps in the US, so they are better able to quickly deal with varying levels of demand for stamp sets, but the accessories and tools tend to be sourced from outside the US and so are often affected by shipping times.
In the meantime, we will continue to Sale-a-Brate until the end of March! Please feel free to contact me if you have any questions, or need assistance placing your order. Comments are working again, too, so feel free to leave a comment for me!