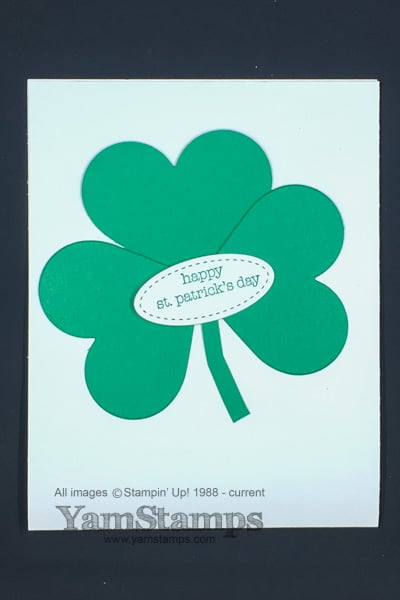
Do you have the luck of the Irish?? One lucky commenter will win a package of cardstock! To enter, comment below and answer this question: What colour cardstock was used for the shamrock? (HINT: it’s a Stampin’ Up! colour….and like Stampin’ Up! colours coordinate, this colour’s name coordinates with today). Answer by midnight eastern time March 17, 2017 to be included in the draw! Good luck!
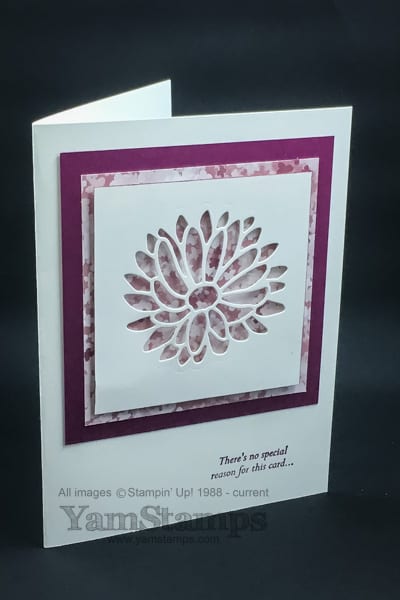
This quick negative die cut card features Stampin’ Up! Canada’s Special Reason Bundle (available with wood mount or clear mount stamps) – available in the Occasions Catalogue. When you use a negative image, you can highlight some of the patterned paper you may have in your stash! In this case, it’s the Blooms & Bliss Designer Series Paper. The tough part is picking which side of the paper to show! Keeping the paper and image as the focal points, there’s just a touch of colour on the edge of the Whisper White cardstock – you can achieve this look by running the side of the brush tip of a Stampin’ Write marker along the edge of the cardstock, or a sponge dauber with the coordinating ink. In this case, the colour is Rich Razzleberry.
One tip I can share is that as my plastic cutting pads get older, they tend to curl or bow a bit more – so sometimes running the die and cardstock through the Big Shot a few times ensures that all the little pieces are completely cut through – and the Big Shot Die Brush helps ensure they all come out easily. Another option is to use the Precision Base Plate, which has no “give” and will ensure good contact the entire time. That will ensure that your quick die cut card is truly that!
If you’re interested in learning other techniques, you can attend a card making class in person or online! We created this card during classes in the past week, but I love this quick die cut cardeffect, so it may make another appearance in the future, in some incarnation! Do you have a favourite set of dies that you like to use for a negative image effect? (future class attendees will appreciate if you share your faves, so they don’t keep seeing a version of this card repeatedly – haha just kidding – but just about the card – I do want to hear if you have a fave!). Feel free to leave a comment below – and don’t panic if it doesn’t show up right away – comments are moderated to avoid spam! In the meantime – be positive about negative die cuts (sorry, couldn’t resist), and contact me if you have any questions.
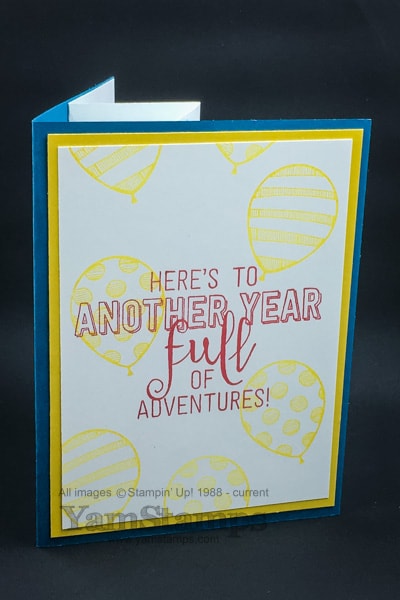
Sometimes you need an extra special or “WOW” card, and you don’t feel like making it from scratch. (If you do feel like making it from scratch, may I suggest the Clever Cards Online Class ?! You’ll get five different WOW card designs!) Here’s an easy pop up birthday card made using Stampin’ Up!’s Balloon Adventures set and Balloon Pop-Up Thinlits Dies. They’re available together in a discounted bundle…which I recommend because I love easy coordination (and who doesn’t like saving a bit of money?!). Real Red, Island Indigo and Crushed Curry combine to make a bright, fun card that’s sure to impress.
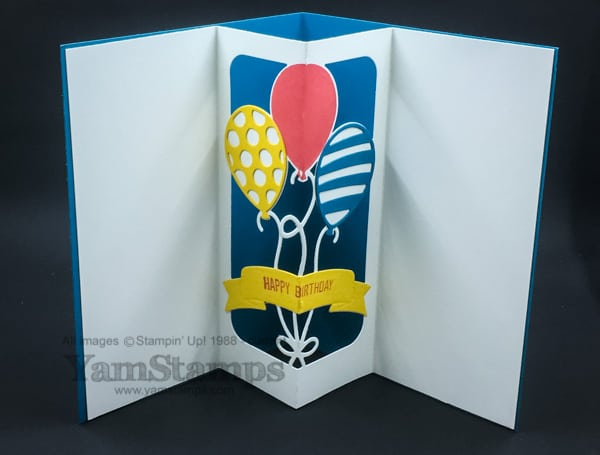
The interior pop up portion is made using a die! You score your cardstock, align the die along the score line and run it through your Big Shot. Fold along the score lines and you’re ready to complete your card! (I told you it was an easy pop up birthday card!) I like to use Tear & Tape to adhere the pop up insert securely in place (just don’t adhere the middle, otherwise the pop up won’t work!). Originally, I had stamped “Happy Birthday” directly onto the banner, but truth be told, I messed it up….so I cut another banner from a scrap of Crushed Curry Cardstock, restamped the sentiment and adhered it over top of the messed up one. It looks good either way. Well, maybe not with a messed up sentiment, but with a white banner rather than a yellow one. I added two additional die cut balloons that were adhered in place on the pop up portion, and the middle balloon is simply stamped in Real Red. The set is photopolymer, so you can re-stamp the balloon image on top again if you need more ink coverage – sometimes the score line doesn’t take the ink very well. (ask me how I know this…).
This card does take a little longer than a non-3D or non-moving part card might take to construct, but it’s just more steps, not that much more difficulty, really! A bit more time to construct a still quite easy pop up birthday card, thanks to coordinating stamps and dies, but the smile on the recipient’s face is sure to be worth it in the end! This is the kind of card that can be a gift in itself. We actually tackled this card in Stampers Club and the March Card Class! I liked this card so much I included it in both classes! If you’re needing an outing during the day or evening, consider joining us next time! See the YamStamps Events Page for upcoming events, or contact me to register for the April Card Class or to find out more about Stampers Club. Hope to see you in class soon!
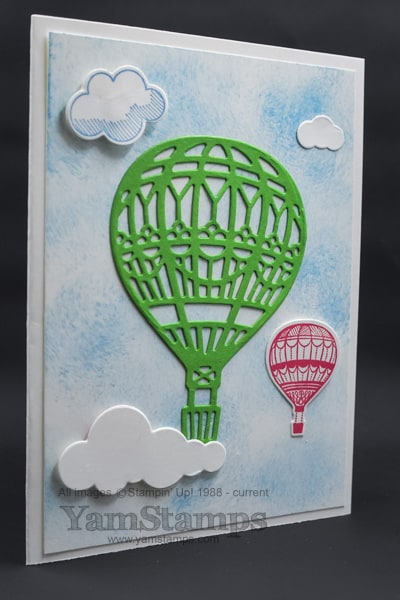
I love Stampin’ Up! Canada’s Lift Me Up stamp set & the coordinating Up & Away Thinlits Dies for easy handmade cards! The set is available in clear mount or wood mount, as well as a clear mount bundle or wood mount bundle with the dies at a discounted price. Hot air balloons are great images for all purpose cards, masculine cards, and all age ranges. The coordination of the stamp set and die always makes it easy to produce great images for the cardfront. I particularly love the irregular long cloud and the intricate hot air balloon dies in this set. For this card, the background is simply sponged with Marina Mist ink, and then the die cut balloons and clouds are adhered in place. During Sale-a-Bration (until March 31) there’s a coordinating Designer Series Paper availble for free with each $60 merchandise order as well – lots of coordinating images to go with the hot air balloon theme! (talk about making handmade cards even easier!). I did use this bundle and the Carried Away free Designer Series Paper (item 143608) for one of the projects in the Clever Cards Online Class. I couldn’t resist! When you spend a bit more time on the construction of the card itself, anything you can do to make the rest faster is always good, in my books.
It’s Family Day weekend in Ontario, so I hope that you are able to enjoy some time with your family – whether they be relations by genetics or by choice! I have a teenaged boy at home, so here’s hoping we get a few moments together at some point or another….LOL. It’s unusually warm out there too, which was a nice change when I was out for my early morning run today – not quite as many layer required (and not as much mental convincing to get out the door, to be truthful too!).
In any case, I’m also going to take advantage of a little extra down time to get caught up on some handmade cards! I’m owing a few thank you for your order cards….so if you’ve placed an order with me in the last while, you can definitely count on some “happy mail” in the next while. If you are needing to build up your stash of cards on hand, and are close to Burlington ON, join the Monthly Card Class – next one is Wednesday, March 1 at 1pm or 7pm. Cost is $20 and includes all supplies required to create 4 different cards using a variety of supplies and techniques Registration and payment required in advance. Can’t make that time? Get a group of friends together, and I’ll come to you! (well, within driving distance of Burlington…LOL). Not local to Burlington? Grab an Online Class and do some crafting when you have the time! No excuses not to get a little crafty soon!
Happy Valentine’s Day! I hope that you are able to spend time with those you love, and/or spend time doing something you love! My gift to you is a video of Valentine’s Day crafts! I thought I’d share one of the videos from my appearance on Halton Insider last week. I was fortunate to be invited to TV Cogeco to film some segments to air! I managed to load a few of the appearances on the YamStamps YouTube channel, so you can catch them there, but I thought I’d share one here on the YamStamps blog as well. (If you can’t see the video below, click on the link to go to YouTube to see them).
In this segment, I show a couple of really quick and easy paper crafting decorations you can make – fun for adults or children! You don’t need fancy equipment to make these decorations (though it does make it more fun…haha). You could whip up a few of these right now and still have lots of time to enjoy them!
So you’ll need something to cut the paper with, something to attach the paper with (tape, stapler) and something to hang the decoration – ribbon, string, twine….. You could make them fancier by using different papers, by decorating the papers – stamp on them, colour them, draw on them, emboss them…. I love that you can totally customise these Valentine’s Day crafts to your taste!
(Warning, shameless plug coming up) The same concept goes for the projects in the Clever Cards Online Class! You will learn the concepts of how to make some tricky looking cards (which actually aren’t all that tricky to make once you know how!) and then you can decorate them to your personal taste (or the taste of the recipient) once you have the basics. You may be able to pick up that I tend to go for the more clean and simple look, but you can definitely make more complex and complicated looks if that’s what you’re going for!
Thanks again for reading the YamStamps blog. I feel quite lucky that I am able to spend time doing something I love, and being able to share it with others! Happy Valentine’s Day! Now go make some “love”ly cards and decorations!
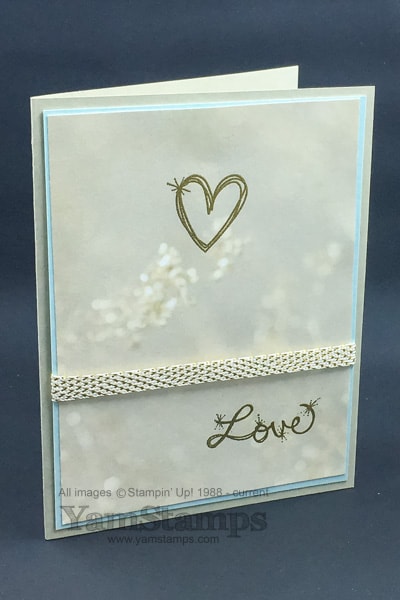
Have you seen Stampin’ Up!’s Falling In Love Designer Series Paper? This is a gorgeous set of papers, double sided, with lots of bokeh effects and images. It’s hard to pick which side to use! (Good thing there’s duplicates!). They make a great background for a simple card.
This is a version of the card that I showed on Cogeco’s Halton Insider the other day. I realize that you have to be within the Cogeco Halton viewing area to catch the show (6pm, repeated the next day at 630). I am working on a way to get the recordings into a format I can share! The other night I actually did a facebook live video on the YamStamps page where I showed my TV screen!! (The recording is posted if you wanted to check it out). Much like at Christmas time, we recorded 5 segments in a row, featuring different projects, that will be aired during the shows this week.
Essentially, you heat emboss the graphic and word of your choice from the Love Sparkles set (available in clear or wood mount) with Gold Embossing Powder. I did an extra thin border for the matting piece in Soft Sky (rather than using a traditional 1/4″ larger piece of cardstock, I did 1/8″ larger), and then wrapped it with some of the gorgeous Metallic Woven Ribbon in Gold. You can get the ribbon for free with a $60 product order until the end of March for Sale-a-Bration! (Download the Sale-a-Bration catalogue here and the upcoming new releases here!). This makes a clean, simple and elegant card – perfect for Valentine’s Day, wedding, anniversary or “just because” kind of card!
I am putting the finishing touches on the Clever Cards Online Class and it will be open for registration in the next couple of days. It’s a great class (if I say so myself LOL) that will break down the construction of a few “fancy folds” type cards that you will be able to decorate for the occasions when you want to give a card that will really WOW the recipient! I’ll post the official release here on the YamStamps Blog so please be sure to come back to the site!