Oct 10, 2013 | Announcements, scrapbooking, specials
Once you’ve finished the sob-fest that I’m sure tonight’s Glee episode will be (shhh don’t tell me yet, I’ve got it PVR’d), you might want to grab these deals while they’re still in effect… Today’s one day special is on these Designer Series Papers – you’ve got a few hours left before the discounted price disappears!
Sep 2, 2013 | Announcements, Events, scrapbooking
Stampin’ Up!’s latest “best of” set is Best of Autumn – featuring some seasonal images (and one saying) that will evoke that fall feeling….like the back to school rush isn’t enough to do that?! Anyway – a variety of styles is sure to suit your autumnal crafting needs! See the flyer here. Remember that each “Best of” set comes with a sticker, and once you’ve got six of them, you get to pick a free stamp set worth up to $17.95!
I personally always loved back to school time. I always loved (still do) shopping for back to school supplies! I think that’s part of my fascination with crafting – all those blank pieces of paper and tools waiting to be used….*sigh* If you’re also ready to get back to classes, come to one of my upcoming card making classes! This Wednesday is the monthly card class featuring 4 designs, and this Friday is the first of my Christmas Card Classes – featuring four different holiday cards each time. This way, you’ll have a number of unique cards to give to those special people, or discover a design that you like and get supplies to create a number of them, for your bulk card needs! Please contact me to register or use the paypal links on the events page for ease. Don’t forget if you register and pay for your Christmas classes before the first class, you’ll be able to make an extra card at each of the upcoming monthly classes!!
Also – I’m adding a few different classes to my slate of offerings – Wednesday, October 2nd I’m offering a Thankful mini-scrapbook using the Thankful Tablescape Simply Created Kit. Class fee will be $35 and you MUST register and pay by September 16th as I need to pre-order all the supplies. This class runs the same time as the monthly card class, and you CAN register for both classes (and you WILL NOT be here all evening! LOL) Friday, October 4th, I’m offering a Hallowe’en banner class. We’ll create a fun banner to decorate your door or mantel for Hallowe’en. Cost for the banner class will be $40, again, registration and payment required by September 16th. So – LOTS of different opportunities for you to get crafty in the upcoming while! As always – if you aren’t able to make it on the class date, get a group of friends together and I can bring the class to you! Visit the events page or contact me if you have questions or prefer to register via email!
Jul 29, 2013 | Information, MDS, scrapbooking
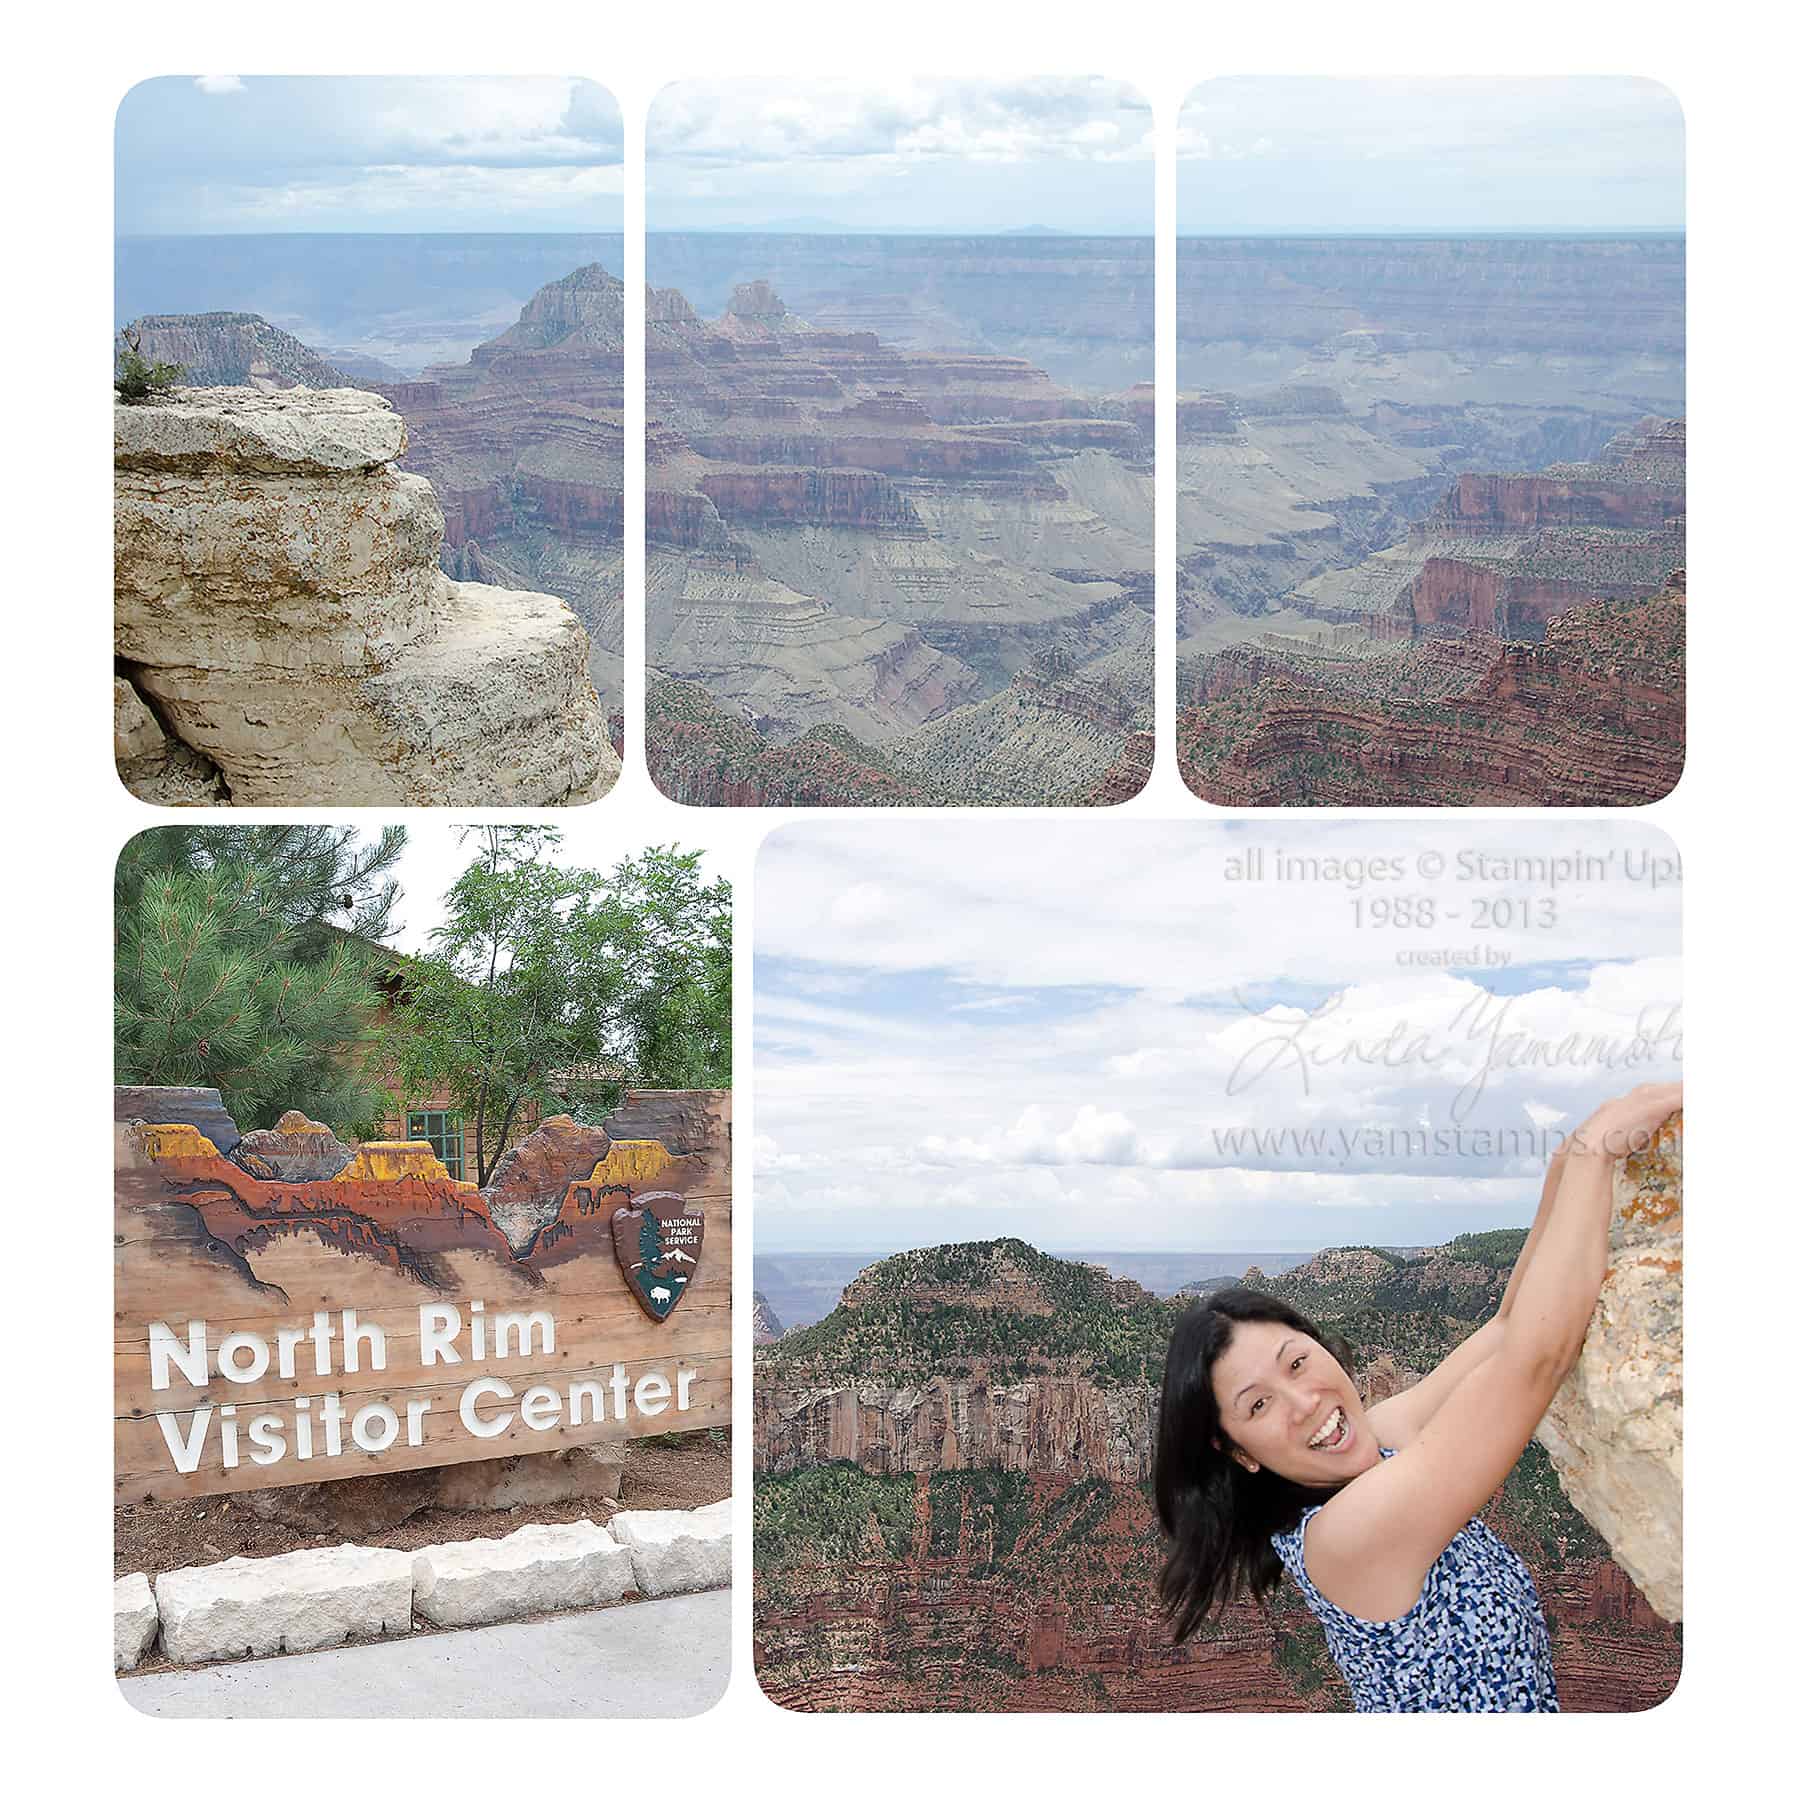
 OK here’s the second page that I created in MDS from my recent girls trip to Utah/Arizona and Stampin’ Up!’s 25th Anniversary Convention. Melanie organized a stay in Kanab, where we stayed in a gorgeous huge house that actually belongs to Shelli Gardner (the co-founder & CEO of Stampin’ Up!)’s family. We toured the factory there and saw the sights, including a day trip to the North Rim of the Grand Canyon. This was my first trip to the Grand Canyon and it was fantastic – and my photos don’t do it justice.
So once again, I used a 12 x 12 photo page template in MDS and added my photos into it. I’ll do a quick video tutorial on how to create the image at the top (so stay tuned!). It’s actually three photo blocks that you “group” together, and then drag & drop your photo into place. It’s a great way to incorporate a larger photo to a pre-set layout. The bottom right photo is a fun set up that I have taken to doing whenever there’s an opportunity… A friend introduced me to this concept a few years back (OK a LOT of years back) when we were at Ayer’s Rock or Uluru in Australia. You find a spot where there’s an outcropping or a downhill slope area, then set yourself up so it looks like you’re hanging off the edge! Again, note that I say it LOOKS like you’re hanging off the edge. You are TOTALLY safe. This being said, we did see some crazy people climbing out to the edge for photo ops, and I couldn’t even look at them – too stressful for me. I have enough stress in my life without adding to it.
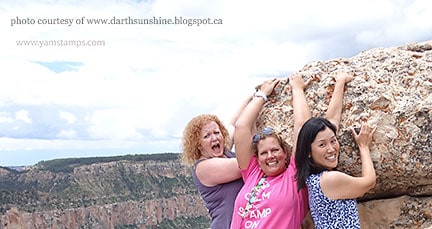
Here’s me, Dana and Sue (Sue being the only one who looks convincing in this shot…..) cropped photo ready to go…
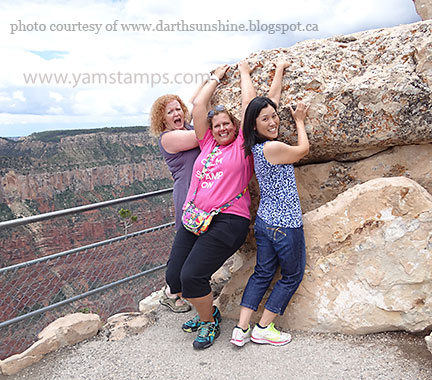
and here’s the uncropped photo showing how we did it (not that you couldn’t figure it out yourself, I’m sure…LOL). This was taken by an innocent passerby that we convinced to take the shot for us (and who didn’t get the instruction to take us from waist up). I’m sure she wondered what the heck we were doing….
We had so many laughs during our time together – I’m so fortunate to have found such good friends through crafting!
Jul 27, 2013 | Events, MDS, scrapbooking
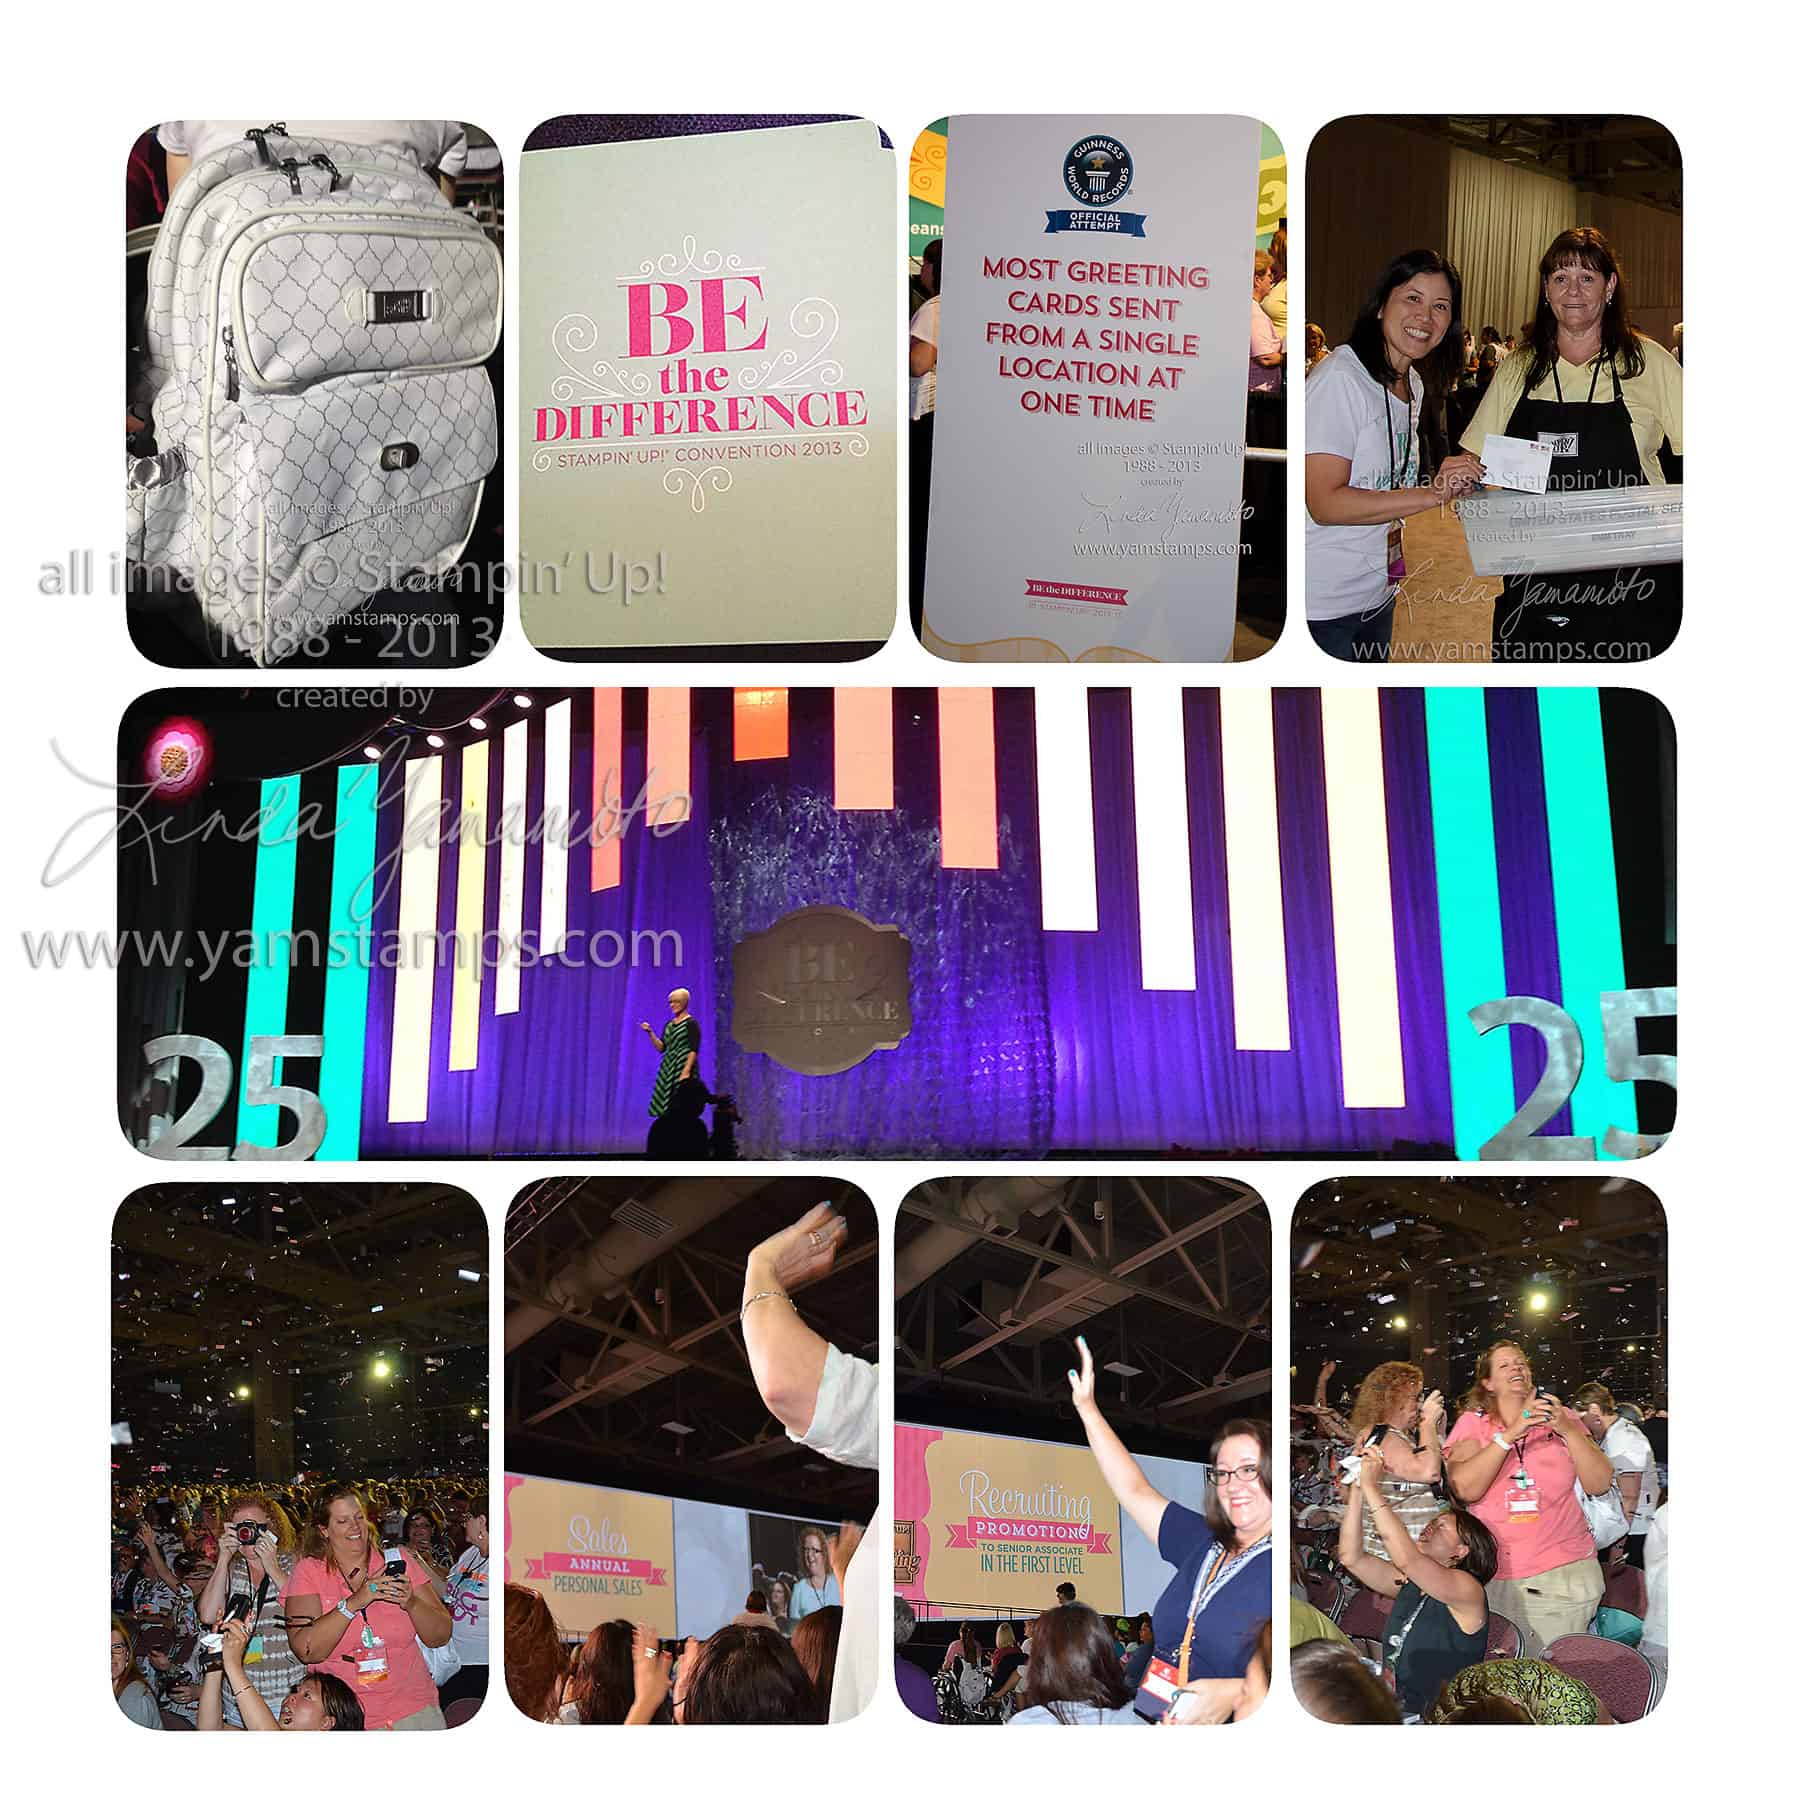
 I think I’ve now recovered from the excitement of Stampin’ Up!’s 25th Anniversary Convention! It was quite the gathering this year, with over 5000 demonstrators from North America and around the world descending upon Salt Lake City to celebrate. A few friends and I arrived in Utah a few days before the start to socialize and tour the area. Our friend Mel was kind enough to organize us for our road trip (and that was quite the job in itself…)
Here’s a page that I did featuring some images from convention – the centre shot is a picture of the stage – the “banners” could be different colours and have different background images on them – very cool. The top photos show the bag we received this year – we demonstrators always look forward to these! It’s a different design each time and comes loaded with supplies that we need to create our “Make & Take” projects (or in my case, “Take & Make”, since I usually just bring everything home and try to complete them then!). I really liked this year’s design, done in a classy white & silver motif. The only downfall….have you ever tried to negotiate through a crowd where everyone has a backpack??!! LOL At the right is me putting my card into the bin as part of the Guinness World Book of Records effort (a successful bid, too!).
The bottom row shows two of my friends getting recognition for their efforts this year in sales and downline promotions, and also enjoying the glitter shower at the end of convention. And…like true scrapbookers, taking photos of the event!!! We always have a fun time at these events, and I look forward to seeing my friends from year to year. Our circle of friends grows with new friends and group members that attend with us too! I’m hopeful that next year more of my demonstrator group will be able to attend with me. (Maybe YOU?!)
I made this page up quickly using a page template in MDS. It’s a 12 x 12 layout on a white background (which in hindsight, I probably should have changed to a different colour so you could actually see the borders of the page…DOH) I simply dragged & dropped the photos I wanted into the appropriate photo slots and was done! Instead of printing this page, I chose “share” and was able to save the page as a jpeg so I could upload here. I love digital scrapbooking because my photos are digital….and this way I can share them in a fun format rather than have them live on my hard drive where nobody gets to see them…
Come back tomorrow & I will share another quick page with you featuring a fun trick that you can do in MDS!
Feb 3, 2013 | Big Shot, scrapbooking, Seasonal Catalogue, TV/Video/Web/Tech
 First of all, a big thanks to all the crew and cast of CHCH TV's Morning Live Show. I have been so fortunate to have been asked to appear on this show many times, and it's always so much fun. On Friday, I was on to share some ideas for Valentine's cards and gifts. This is one of the projects that you may not have been able to catch a glimpse of on the day.
I think scrapbook pages can make great gifts – you can include them in a larger scrapbook that can be added to over time, or do as I've done here and put it into a frame to display. Since I don't do a huge volume of scrapbooking, I like the frame option. When I create a new one, it can go into the frame, and the previous page can go into my scrapbook. As with my cards, I prefer designs that aren't overly fussy, and quite honestly, for me, I need to get it done, or I'll dither away over it for hours (and probably end up stripping it back to what I started with…).
I created this layout to commemorate our family time at the DisneyWorld Marathon Weekend in January of this year. My son & I ran in the Family Fun Run 5km around Epcot, and later that weekend, I ran my third (!) marathon – the 20th Anniversary Disney Marathon. I wanted to create this page to remember the fun time we had. I love how the Real Red and Whisper White of the Polka Dot Parade Designer Series Paper reminds me of Minnie Mouse's dress. Oh, and of course, my Team Sparkle running skirt that I got for the occasion. I added the scallop edge using the Tasteful Trim Die in my Big Shot and added pennants with words that reflected the theme from the set Loving Thoughts. I used the new Oval Collection Framelits to create a journaling spot as well.
If you are looking to get some creative time in, please consider attending one of my monthly card making classes – or if you're looking to commit to some "me" time, consider joining the Stampers Club for 6 months of classes and a turn at spending some hostess dollars! Contact me for more information, or see the YamStamps Event Page.
Aug 29, 2012 | 3D samples, scrapbooking
 Fun thing about creating scrapbook pages – you can frame them to display like the work of art that they are! This is one of the displays from Stampin' Up!'s convention – I still have so many photos to go through…I loved the effect of the butterflies going through the frame – and so easy to recreate using the Beautiful Wings embosslit and your Big Shot.
The Lattice Bigz die creates a layer on the background of DSP; and hey – look, there's a notched edge on that strip of paper behind the photo? Wonder how they might have done that??!! ROFLOL.
If you're interested in getting a whole whack of pages done at once, consider attending my scrapbook in a day class, technically scrapbook in an afternoon…but you get the idea…more information and a sign up link can be found on the yamstamps class & events page, or you can contact me directly.