Return of the super simple card! Here’s a variation on a simple card….
I’m not sure if it’s because summer is winding up (sorrrrryyyyy to mention that) or things are gearing up for back to school/back to routine but life seems to be a bit busier than usual right now – or is it just me??
I’ve been busy putting the final touches on the Shake It Up! Class, and truth be told, I have had the Taylor Switft song that I used for the Tik Tok video stuck in my head since I uploaded it! (haha video linked so you can share my ear worm…). In any case, here’s a variation on a simple card that stays still, which is a nice break for me after editing shaker card videos! *sigh of relief*.
I call this a variation on a simple card because of my previous post about the World’s Most Simple Card…it’s similar but different….
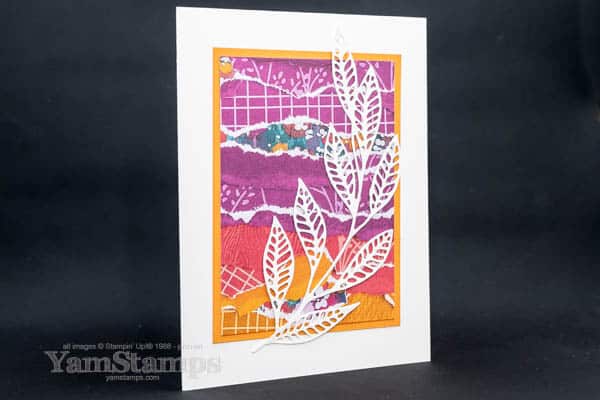
Have I mentioned that Masterfully Made is one of my current favourite Designer Series Papers?! Perhaps you’ve guessed that since it shows up on a semi-regular basis in my shared projects of late. In any case, a simple card that still looks impressive thanks to the patterned paper. I coordinated the backing cardstock (Pumpkin Pie) with the orange shade in the paper, and then added the die cut in Basic White to highlight the torn edges on the DSP and also to make it stand out on its own. I added Adhesive Sheet to the back of the Basic White Cardstock before running it through the Stampin’ Cut & Emboss Machine with the leaf die from the Artistic Dies. I love that die for adding a large decorative element to my cards! The Adhesive Sheet makes it super easy to apply this detailed die cut to the card. As a bonus, often when removing the backing adhesive liner, it pulls out any little offcut bits that might remain in the die cut!
If you’re looking for a fun way to start the back to class season, you have until 7pm EDT tomorrow (Thursday 24 August) to grab Early Bird pricing on the Shake It Up! Online class. Don’t miss out on the extra savings! Even if life is a little hectic for you – you can purchase the class at a discount now, and access it later (well, after tomorrow evening when it launches) when you have a bit of time! Lifetime access means you have plenty of time to get through all the content, and re-watch it as necessary. If you have any questions, please feel free to contact me!
Shaker Cards Made Easy with the Shake It Up! Online Class!
My next online class is Shake It Up! – and it’s in pre-launch right now. If you register for class now, you’ll save $10 and be ready to jump in once the class site is open on Thursday, 24 August at 7pm EDT. This has been a lot of fun to prepare…and of course I’ll be sharing tips and tricks to making shaker cards that are sure to impress!
Check out this fun video giving a peek at some of the sample projects! (You can see it on TikTok or Instagram as well).
I’ve really been enjoying creating online class content, and always love to hear the success stories of students!
Merle mentioned how she has repeatedly gone back to watch class videos to re-create class projects that really WOW her friends and family!
Sheila mentioned how she can’t wait to do more cards!
Shake It Up! will be available until 24 August at 7pm for just $20CAD – after that, the regular price of $30CAD will apply. Even if you can’t get around to watching the class right away, you have lifetime access to get there – so why not purchase it now and save?!Message me if you have any questions. Looking forward to welcoming you to class!
(NOT QUITE your) Last Chance to get the Exclusive Tutorial featuring the Everyday Thanks stamp set!
This month’s Product Focus featured the Everyday Thanks stamp set. For the product focus, when you purchase the featured item with the host code by the end date, I’ll send you the exclusive project tutorial! This time around, if you order the Everyday Thanks stamp set with the host code EJKBHBFX by Thursday 10 AugustThursday 17 August you’ll qualify! (if you click on the link above, it should automatically take you to the stamp set in the YamStamps.com online Stampin’ Up! Canada store). Keep reading to see a sneak peek of the project. **EDITED** I’m extending the date of this offer since my email didn’t go out as originally planned. My tech issue = your gain!
It’s fun to be able to focus on one particular item or stamp set and bring it to your attention, plus giving you a little incentive to add it to your craft room stash! If you have any questions, feel free to message me, otherwise you can place your order at https://yamstamps.com/shop. You can also message me if you would like to pay by etransfer or want assistance placing your order – I’m happy to help!
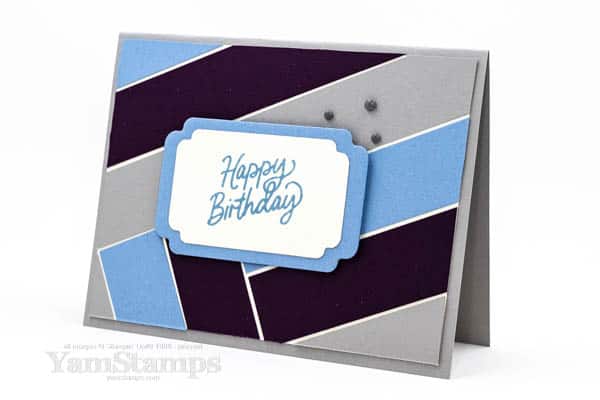
Create an eye catching Paper Strips Card – it’s easier than you might think!
There is nothing better than an eye catching design that is easy to create – and usually once you have the design, you can just swap out the supplies and get a whole new look! That’s the case with this fun paper strips card that only uses 3 long strips of cardstock for the striped design!
To create a paper strips card like this one, you have a backing piece of cardstock cut to the size you want your focal area. After that, you add the strips one by one and just trim to fit that cardstock. For me, it was easiest if I placed the longest strip first (so in this card, it’s the long Smoky Slate cardstock piece that has the Matte Dots on it in the picture). From there, I just lined up the other pieces accordingly, alternating the colours (Blackberry Bliss and Balmy Blue). The second section I placed was the one with the vertical(ish) strips, starting with the longest one and lining everything up accordingly. I didn’t worry too much about exact positioning, because it’s a “structured free form” kind of design, if there’s such a term. You could definitely play with this design and come up with countless variations.
I just eyeballed the spacing on this paper strips card, and then added some Classic Matte Dots and die cut labels from the Something Fancy dies for the sentiment from the Beautiful Balloons stamp set. SECRET TIP: (well, not so secret anymore, I guess) – stamp your sentiment on an angle so you don’t have to worry about it being perfectly straight
Potential Paper Strips Card Variations – change the pattern, use Designer Series Papers, emboss your cardstocks (some/all of them), use different colours….so many possibilities without having to work too hard!!
If you like being given patterns and ideas that you can take and make your own, you should subscribe to the YamStamps Sketch System! Each month brings you a sketch (card blueprint) with measurements, and a total of four weekly samples (with supply lists) based on that month’s sketch – directly to your email inbox. After four weeks, a new sketch and four new samples will be on their way! This monthly subscription to help your creative flow costs only $9.99CAD (billed every 4 weeks). It’s a month by month subscription, and you can stop your subscription at any point in time (though you’ll get the full set of samples for whatever sketch you’re on before you’re removed from the mailing list). I posted a bit more about the Sketch System in this previous post on YamStamps.com.
Check out this video on prepping & storing your stamps (CC should be available as an option if that helps you). If you would rather, you can watch it on the YamStamps YouTube channel. I’ll also be posting a quick short version on labelling your stamps if you like bite sized information!
Hope the video helps you with some options for prepping & storing your stamps – because it’s always easier to create when your materials are easily identified and located!
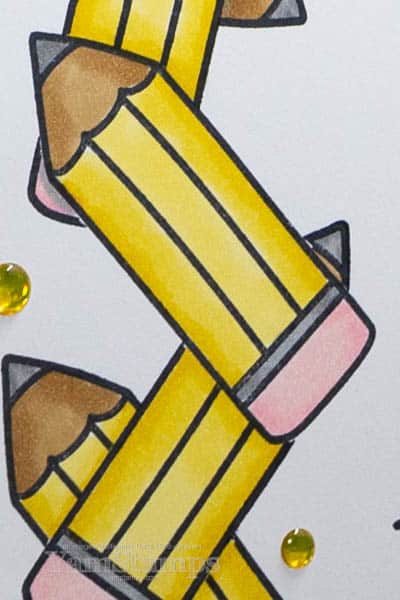
The featured stamp set is Everyday Thanks (seen in the video) – it’s a cute line art stamp that you can use for simple black and white or colour with your choice of colouring media. If you purchase this stamp set before 10 August 2023 using the host code EJKBHBFX, I’ll send you a tutorial for a project featuring this stamp set. (Hint: Click on the link and it should apply everything for you).
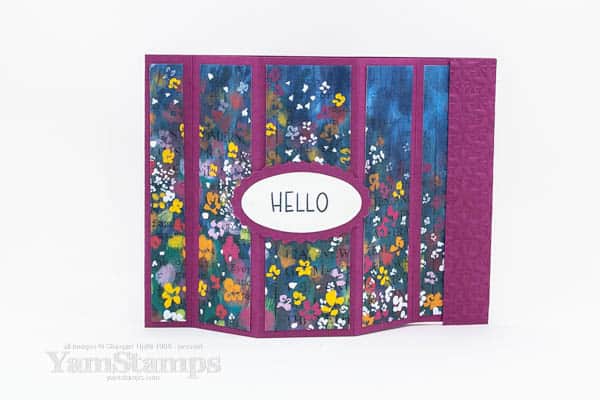
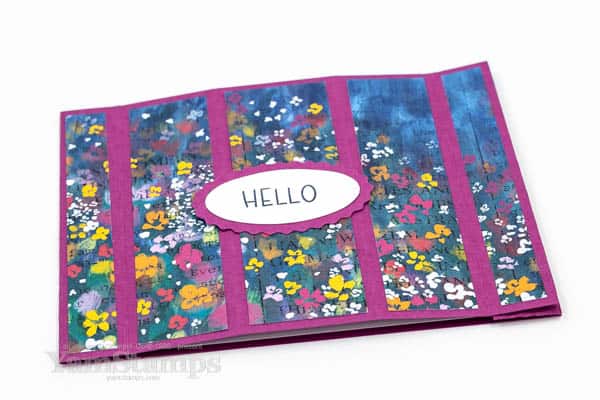
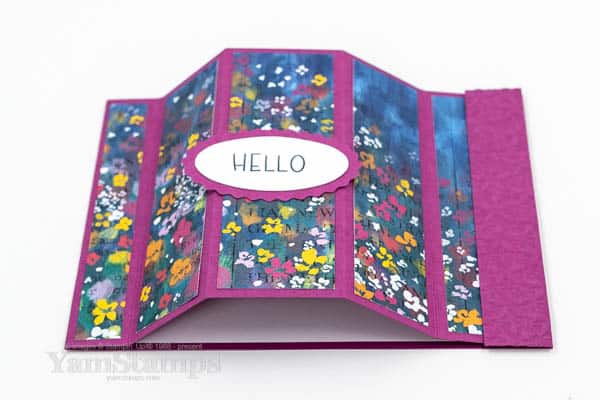
Check out this floral print fancy fold card – sure to impress!
I like fancy fold cards, but I love fancy fold cards that aren’t super difficult or time consuming to make!! This floral print fancy fold card fits that category for sure. It’s a Bay Window type fancy fold card, and Stampin’ Up! Canada’s Masterfully Made Designer Series Paper makes it even more eye catching. I love the colours in this paper!
If you’ve been following the YamStamps blog here, or YamStamps social media (Facebook, Instagram, TikTok, YouTube), you may know that I really like it when I can carry a pattern continuously across multiple cuts, so I was sure to continue that trend with this floral print fancy fold card. I cut the strips of Designer Series Paper in order from one side to the other, so that when they were adhered to the card front, the pattern would be carried through. This isn’t mandatory (the card will still look good even if you don’t carry the pattern through) but I love the end result, so I will take the time (and the brain work as need be) to cut accordingly. I just like the flow of the pattern. Plus if I do this, the card works with any patterned paper, including directional or larger image papers.
I sent out a detailed tutorial for this type of card in a previous YamStamps email newsletter (so if you’re a subscriber, check back a few weeks, if you’re not a subscriber, sign up so you don’t miss out on more ideas!), but essentially, you score a piece of 4-1/4″ x 11″ cardstock at 3/4″, 2″, 3-1/2″, 4-3/4″ and 5-1/2″. The DSP is cut to 4″ tall, and if you want the continuous pattern effect, you cut in strips from one side to the other: 1/2″, 1″, 1-1/4″, 1″, 1/2″. You can go left to right or right to left, doesn’t matter since the pattern is symmetrical – widest piece in the middle, narrowest pieces on the outside. I embossed another piece of cardstock that was 4-1/4″ x 3/4″ and that is adhered on the inside of the card at the edge, and acts like a “stopper”. The cardfront section closest to the fold is adhered in place to anchor the Bay window effect, and then the edge of the cardfront gets tucked under the stopper to hold the cardfront in place.
So no fancy tools required for the basic construction of this floral print fancy fold card, but you can pull them out to help decorating the finished piece! Be sure to be signed up for the YamStamps Email Newsletter to get lots of information, inspiration and ideas (and offers)! When you first sign up you get a free video tutorial for a fancy fold card too! You can sign up by using the box on the YamStamps website, or click here.