I am not going to dwell on the fact that summer is halfway through….even though I no longer have anyone school aged, August always seems like the wrapping up of summer and vacations, and getting ready to get back at everything in earnest. However, there’s a few things in the Stampin’ Up! world to soften that blow….
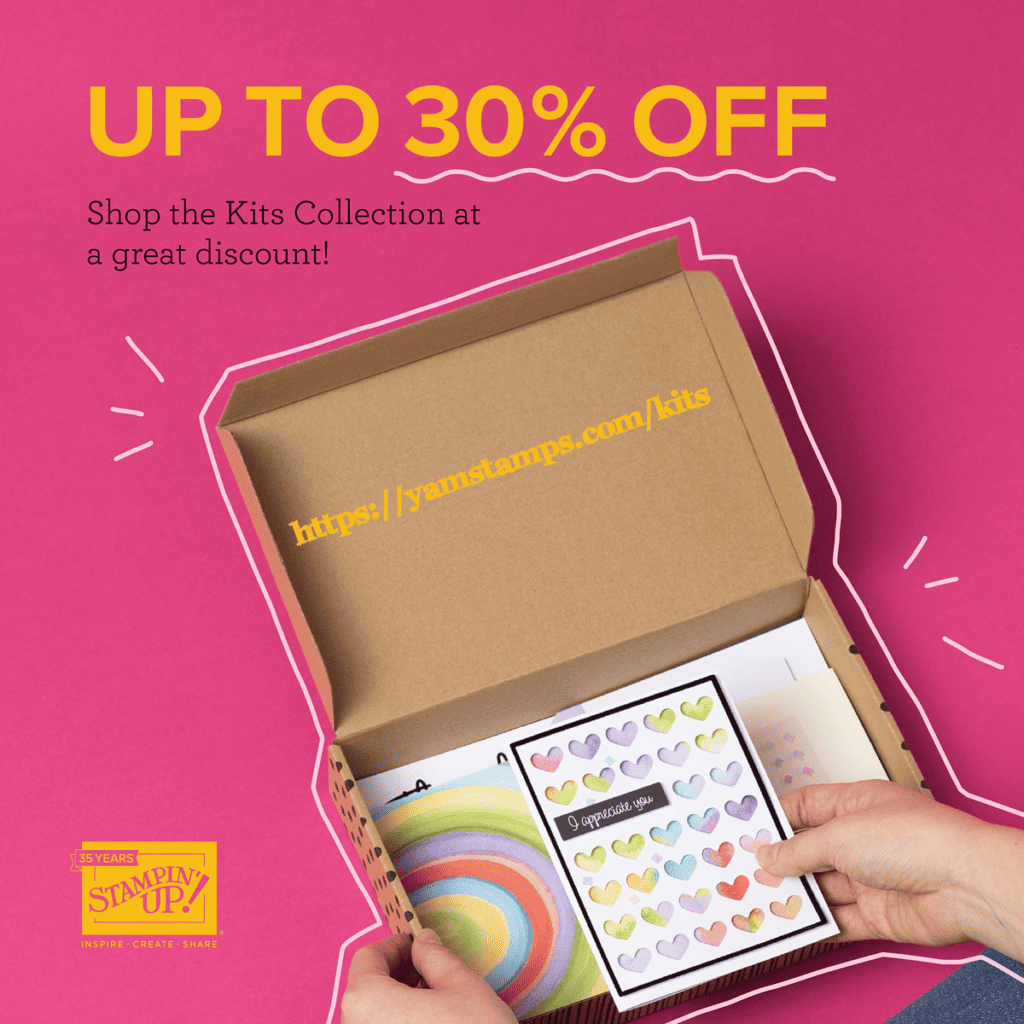
First up – the KIT SALE that Stampin’ Up! is having this month. Up to 30% off pre-packaged kits (not including Paper Pumpkin). Stampin’ Up!’s kits contain supplies and instructions to create various projects – including cards, tags, 3D home decor type items – and some require no stamping at all! These kits are great to have on hand for crafting on the go (rainy days at the cottage or trailer) or for those times when you want to craft, but don’t know what you want to make or the designs are just not flowing.
These kits would also be great to have on hand for gifts! Shortcut to shop the kits is https://yamstamps.com/kits, or as always, you can message me if you’d like to pay by etransfer or would like assistance placing your order.
Use your Bonus Days Coupon Codes now!
Don’t forget that you can spend your BONUS DAYS coupon codes now! You could save even more on one of these kits. Shortcut to shop is https://yamstamps.com/shop. I know Demonstrators in my team are looking forward to using their codes to purchase items from the upcoming Mini Catalogue this month! The next Mini Catalogue will be available from September to December, but Demonstrators have already got access to digital copies of the catalogue and get to place orders starting tomorrow! So exciting! If you can’t wait, you could sign up as a Demonstrator now and get early access too! (You could even get these items in your Starter Kit!). Message me for more information or check out my Demonstrator Info Page at https://yamstamps.com/join
In the meantime, I’m going to hope that August has a few less rainy days than there were in July, so we can still get out there and enjoy the summer season!
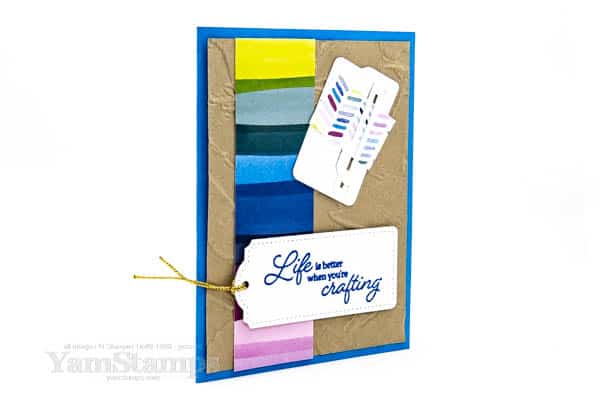
Like the card says, life is better when you’re crafting! Truth!
This is such a fun and bright card – and I love the little paper trimmer die cut! That is what tipped me over the edge when I was deciding on my recent purchases – well that, and theLife is better when you’re crafting sentiment!
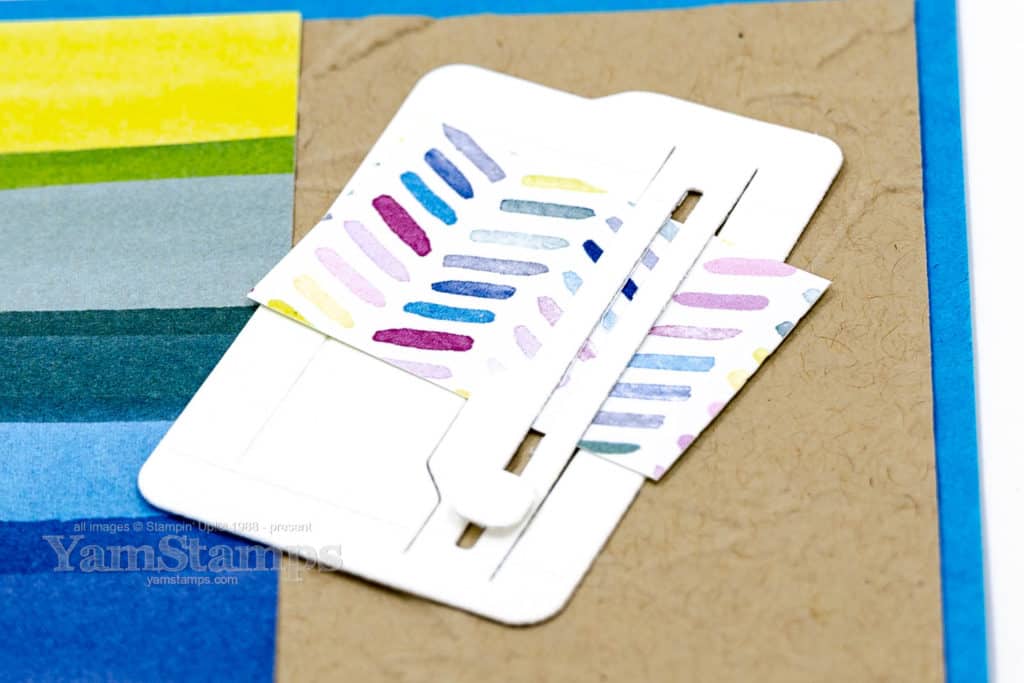
I love this cute die cut! Word of warning – that “cutting blade” die cut portion is small and easily misplaced on a messy crafting table….ask me how I know this…LOL. I used a portion of a Mini Stampin’ Dimensional to attach it in place on the paper cutter die cut before I adhered it to the front of the card. Because…Life is better when you’re crafting…and when you can find your die cuts on your work surface.
If you’re looking to budget out your crafting purchases, one factor you may want to consider right now – Stampin’ Up!’s Bonus Days are in effect until Monday 31 July. For each $60CAD of product ordered in a single order (before shipping/taxes, after any discounts), you’ll receive a $6CAD coupon code to spend in August. Shortcut to shop is YamStamps.com/shop, or you can message me if you’d like to pay by etransfer or want assistance placing your order. (The Crafting with You Bundle would qualify you for a coupon code!). Because…Life is better when you’re crafting….and when you can earn coupon codes!
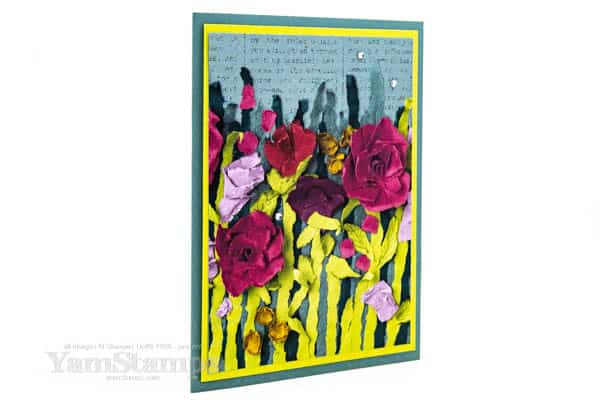
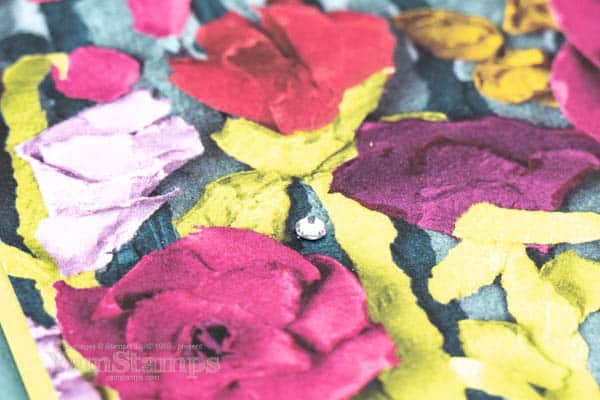
Presenting to you – possibly the world’s most simple card!
Because it’s a Monday, and sometimes Mondays can be a bit rough….so here’s a simple and still impressive card that you can send to someone for a little pick me up – for both of you! The World’s Most Simple Card!
You may ask – what makes the world’s most simple card so simple? The design on the cardfront is quite impressive…and it’s all in the paper. This is Stampin’ Up!’s Masterfully Made Designer Series Paper – so while SOMEONE spent a lot of time creating that 3D paper floral collage, it was NOT me! One of the talented artists at the company created this collage, which was then photographed and printed onto the Designer Series Paper. Isn’t it amazing? There are other eye catching and non-labour intensive patterns for the lazy crafter (aka ME) on the other sheets as well.
You might get a better idea from this close up angle view. All I did was cut the paper to size, stick it on coordinating cardstock and add some Rhinestone Basic Jewels. Tada!
The “usual” card size that paper crafters in North America create is a half sheet of 8-1/2″ x 11″ cardstock. This card is 5-1/2″ x 8-1/2″ of Lost Lagoon Cardstock, folded in half. For me, easy layers means stepping everything down by 1/4″. So – 5-1/2″ x 8-1/2″ folds down to a 5-1/2″ x 4-1/4″ size. My cardstock background layer of Lemon-Lime Twist Cardstock is then 5-1/4″ x 4″, and the patterned paper is 5″ x 3-3/4″.
Simple, straightforward, and still impressive! The World’s Most Simple Card! Use this card design to show off your most eye catching patterned paper.
ONE DAY ONLY – Wednesday 19 July – get 15% off Annual Catalogue stamp sets!
You can get 15% off Annual Catalogue stamp sets (excluding host stamp sets) on Wednesday 19 July 2023! It’s a great time to grab that stamp set you’ve had your eye on…why wait? PLUS for each $60CAD of product (after discounts, before shipping/taxes) in your order, you’ll receive a $6CAD coupon code to use in August!
Shortcut to shop 24/7 in Canada is YamStamps.com/shop – or if you’d like to pay by etransfer or have me place the order for you, you can message me! If you are able to do porch pickup in Burlington ON, I will have a group order going in on Wednesday – if you have an order that’s under $100, you can save a bit on shipping that way (minimum shipping cost is usually $10.95 or 11%, whichever is higher).
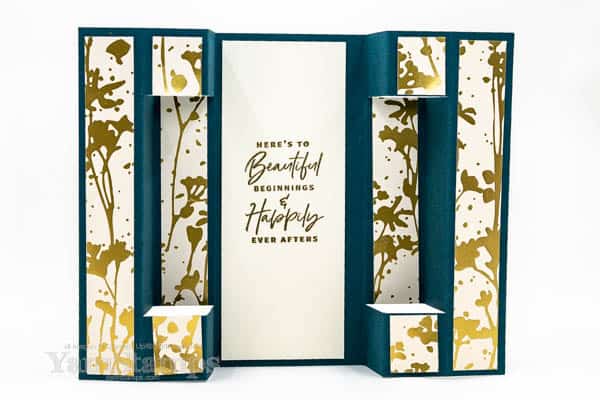
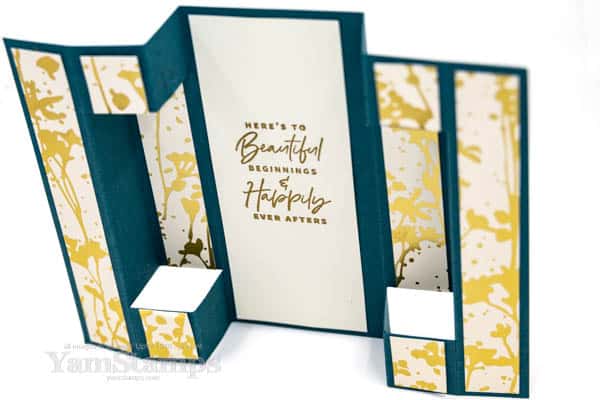
This is a fun stand up fancy fold card that is easier than you might think!
As a Stampin’ Up! Demonstrator, I often get inspiration from other Demonstrators – like the inspiring swap cards I share every Sunday on the YamStamps Facebook Page and YamStamps Sunday Swap Page . My card was inspired by a design I saw from Connie Stewart, and I tweaked the decorating a little bit to suit my style. We made this in June’s Club get together.
The basic design is to take a 5-1/2″ x 8-1/4″ piece of cardstock, and score at 1″, 2″ and 3″ from either side. Add your DSP strips, and then for this version (which Connie called a “wow” version), you cut a slit at 1″ from the top and bottom across the inner two 1″ panels. My variation has DSP strips on the outer and inner panels, with the cut portion from the inner panel moved to the middle panel, so that when the card is standing up, the pattern flows continuously from top to bottom. The hack way of doing it is to only apply adhesive mostly in the middle of the inner panel’s DSP strip with only a bit towards the ends, so after you cut your slits, the cut portions of DSP are easy to peel up and move one section over! Trust me. I tried doing a measurement version, and I could never get everything accurate enough to fit. I think the hack way is the only way for this version of the stand up fancy fold card.
For the final version, the 3″ score line ends up as a valley fold. The 2″ score line end sections are mountain folds, while the middle, longer section is a valley fold. This card fits into a regular Medium Stampin’ Up! envelope, which is a typical requirement for any card I make. I know I could make my own envelopes, but I already made the card….and I usually need another cup of tea at that point.
My Club Members get access to recordings of our Zoom classes afterwards which is great for those who either can’t make it to the live get together or prefer to make their cards with the recorded version so that they can start and stop as they need. That’s one of the things that people have told me they like about my YamStampsMore Online Classes as well – the pre-recorded, edited videos mean that they can start/stop the video and re-watch as many times as they need! Check out my current collection of Online Classes – and watch for the next one which is launching next week! Pre-launch registration and Early Bird pricing start on Wednesday – so come back to YamStamps.com to find out more then!
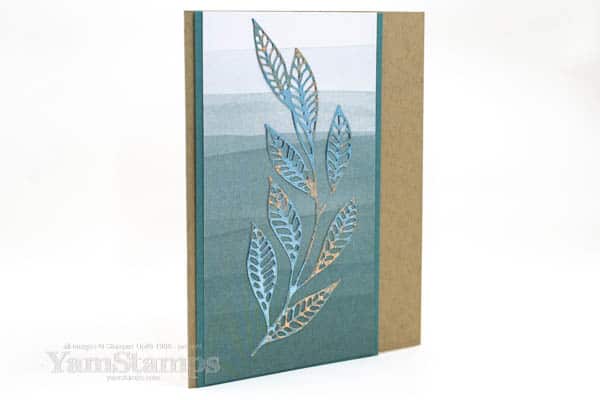
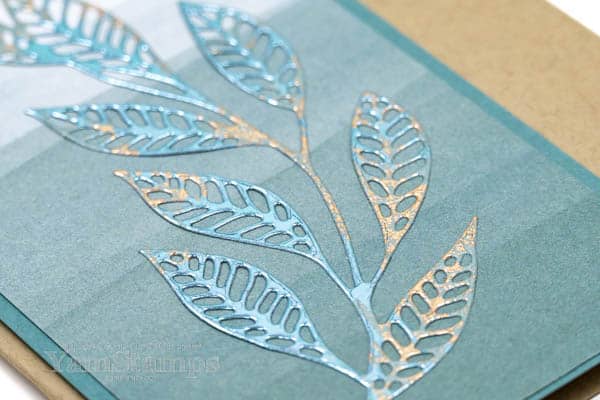
Sharing this Leafy Die Cut Card using one of my favourite die sets.
Similar but different….here’s another leafy die cut card for you today! The Artistic Dies are still one of my favourite sets of dies – and this leaf spray is a big reason. I love how this spray is big enough to be the main feature if you’d like it to be…and can be used for cards for anyone and any occasion.
For this card, I die cut the leaf spray from a sheet of the Dry Brushed Metallic Specialty Designer Series Paper. Before I die cut it though, I did add some Adhesive Sheet to the back – so it was super easy to add to the cardfront. I used the sheet that had Soft Succulent shades in it, so I stuck to blue-green tones for the background. The ombre patterned Lost Lagoon paper is from the Bright & Beautiful Designer Series Paper. I placed it onto a piece of Lost Lagoon Cardstock before adhering to the front of a Crumb Cake card, which I think echoes to gold tones in the Specialty DSP. So matchy matchy, but not perfectly so for this Leafy Die Cut Card.
I have confessed how I tend to automatically reach for Basic White as my go-to neutral background for a card, but this was a good reminder of how nice Crumb Cake can be! Light enough that you don’t have to add any extra cardstock inside to be able to write a message but a deeper, more calming shade than a bright white. It also feels a little more “artsy” to me. Or maybe “kraftsy” – because it’s the shade we used to call “kraft” cardstock… (Sorry, I’m a little punchy as I’m writing this post…)
So – the crafty challenge for the next week or so (for all of us who are willing to take it on…) – create a card and use a different neutral shade than you usually use for your cardbase! If you post it on social media – tag me – @yamstamps across all platforms – including Threads which I have joined and am still trying to figure it out!
Don’t forget that if you are stocking up on Stampin’ Up! supplies – you’ll want to do so in multiples of $60! Each $60CAD product order (before shipping/taxes, after any discounts) for the rest of July will earn you a $6CAD coupon code that you can redeem in August! You can shop online at https://yamstamps.com/shop or message me if you’d like to pay by etransfer or need assistance placing your order.