Sign up for the YamStamps Newsletter to get paper crafting tutorials, ideas and information – free! New subscribers get a video tutorial for a fun fancy fold card (existing subscribers – link was sent in the 14 February newsletter – since it may not be the same new subscriber tutorial since you joined me and I don’t want you to miss out!).
The project tutorials that are shared in the emails are exclusively for subscribers – you won’t see them anywhere else in the YamStamps online world!
The next edition goes out TOMORROW (Tuesday 7 March) so don’t miss out!
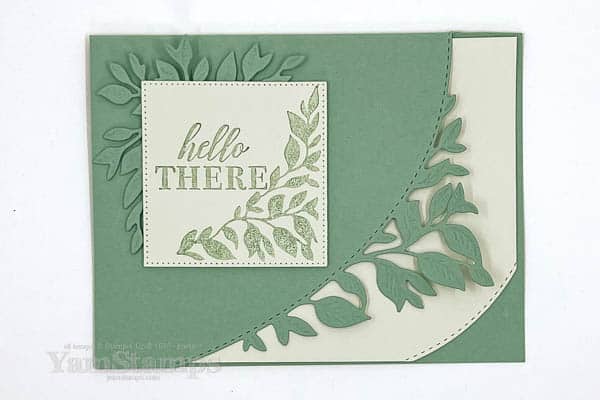
A monochromatic clean and simple Hello Around the Bend Card
I like clean and simple cards and I like elements that tie together – so this Hello Around the Bend card features both of those design elements!
I used the Around the Bend stamp set (available in red rubber cling mount or clear photopolymer verisions) and Around the Bend dies. There are also discounted bundles available with the dies and stamps – you can choose from the cling bundle or the photopolymer bundle to create this monochromatic card in Soft Succulent. I have been using a lot of that colour lately, since it’s a 2021-2023 In Color, so it’s slated to retire at the end of the Annual Catalogue sales period (30 April 2023). I like it and I want to use it while I can!!!
That being said….Stampin’ Up! has told us that there is a Colour Refresh going to be happening, which means we will see some new / returning colours in the new Annual Catalogue, and some colours will be retiring…so if you have some favourites, you may want to consider stocking up just in case…
Back to the Hello Around the Bend card!
I really liked the curved, leafy border die, so used that on the Soft Succulent cardstock on the front of the card, and then echoed that angle using the stitched curve die for the Very Vanilla cardstock on the inside of the card. I used a stitched square from the Stylish Shapes Dies for the sentiment stamped in Soft Succulent ink – figuring that the stitched edge tied in to the border dies. I aded the leafy die cuts behind the sentiment to give a little texture and balance to the cardfront.
Another reminder that discounted bundles are often only available for the first catalogue in which they appear – for example, the Around the Bend bundle is available right now from the January-April Mini Catalogue. We will know better which products are retiring and which may be re-appearing in future publications near the end of the month, but often, even if the individual items carry over, the discounted bundle does not. You may want to keep that in mind as you plan out your crafty spending over the next few months.
Budgeting your Crafting Dollars?
If you are interested in maximizing your crafting budget, consider joining my Stampers Club! It’s an online monthly craft class that you can attend “live” via Zoom or watch the recordings at your leisure. Each month, members get a packet of card supplies and we go through the construction of the cards together online. Crafters join club for a 6 month membership period (and can start in any month). During that membership period, each crafter places a $33CAD monthly product order, and once during their membership cycle, will receive Stampin’ Rewards (aka free money to spend on product) for that month’s club orders. A lot of members find it helps them keep crafting on a regular basis, and helps to budget out their spending – plus who doesn’t like free stuff?! We usually meet the third Monday of each month, though in March, we are meeting on the fourth Monday due to my trip with the Burlington Teen Tour Band!
If you’re interested in joining Club, please message me for more details – we’d love to have you join us!
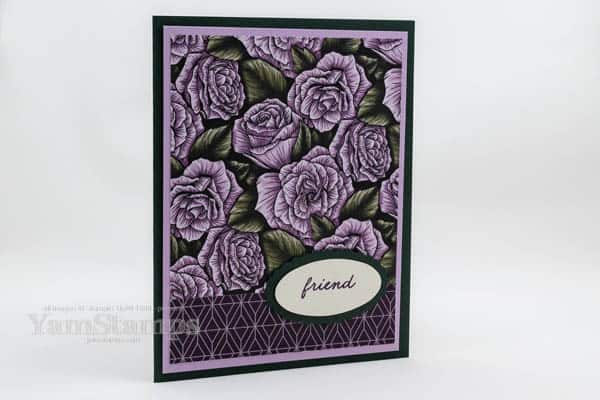
Patterned paper makes creating this flowery friend card quick and easy!
This flowery friend card is created using the Favo(u)red Flowers Designer Series Paper is a freebie that you can select when you place a $60CAD product order during Sale-a-Bration. All Sale-a-Bration items are available until 28 February (TUESDAY) or while supplies last – whichever comes first (we’re down to the wire, in any case!).
I love using patterned paper to make cards quickly and easily. This was inspired by a swap card I received, but I can’t credit the original maker because I’ve managed to separate the card and the paper that identified the card maker. (If you’re reading this and it’s you, let me know!!).
Perhaps this is why I need quick and easy cards….because my life is somewhat chaotic otherwise…
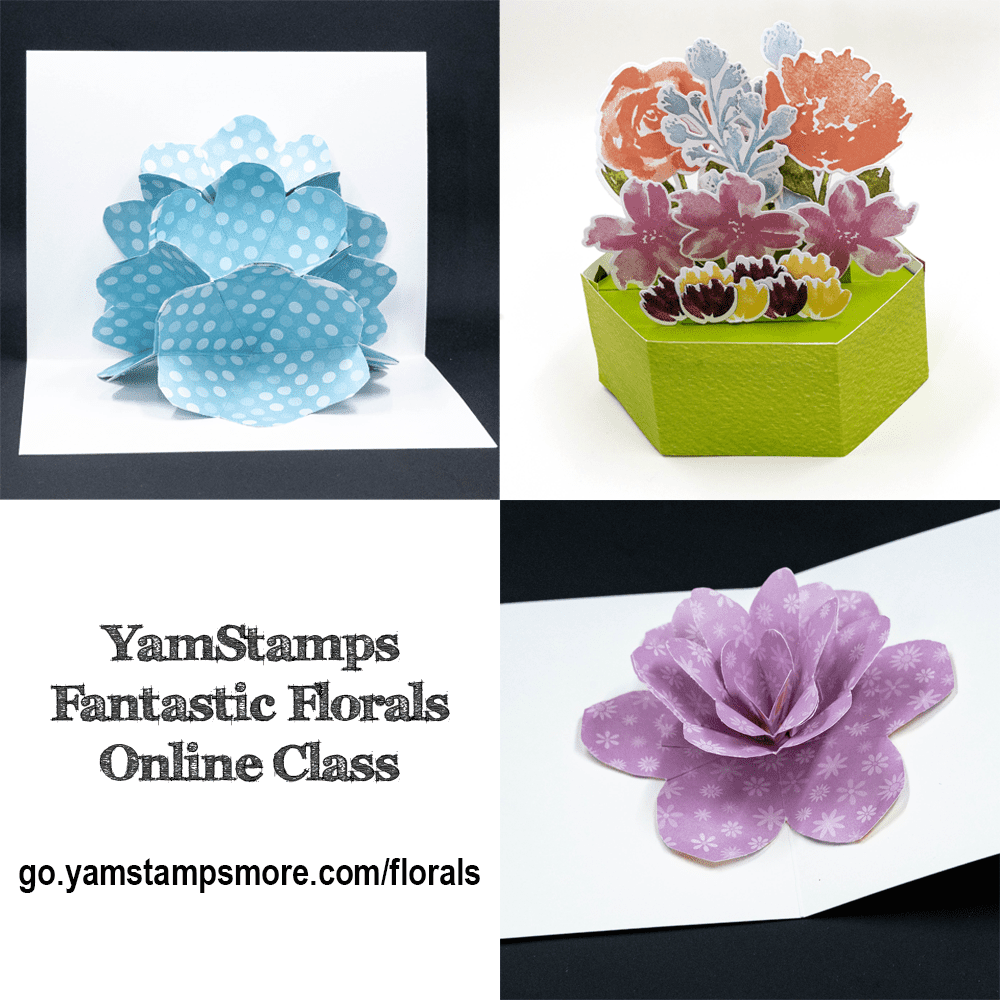
Fantastic Florals Online Card Class – dimensional and interactive flower cards!
It’s time for another new Online Class – Fantastic Florals! I’m finalizing the class videos and instructions but the registrations are open now – and you can save $10CAD during the pre-launch period! Pay just $20CAD for lifetime access and you’ll be first in line when the class officially launches Thursday 2 March.
In the Fantastic Florals class, I’ll show you how to make these three dynamic, interactive fantastic floral cards! You’ll be able to customize them with the papers and supplies that you have on hand. In terms of the basic card construction, though, you won’t need any fancy tools. If you have a Paper Trimmer/Scorer, Bone Folder and Scissors, you’ll be able to re-create these cards. Dies and punches will help to customize the decoration (like the tiered hexagon card shown), but aren’t required to create the basic mechanics of the card.
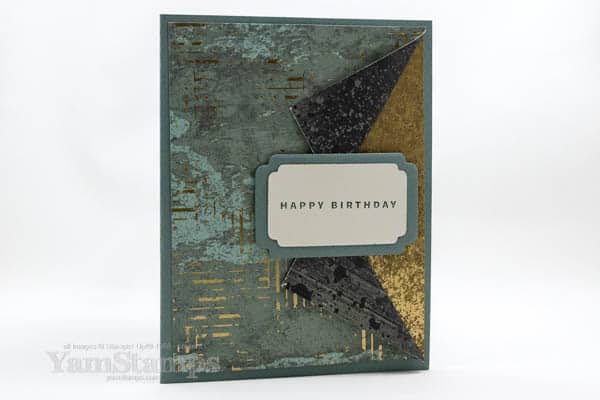
This double sided paper card shows off both sides of the paper and makes for a quick and easy card!
This card layout is perfect with Stampin’ Up!’s two sided papers – this double sided paper card design is easy and impressive!
double sided paper card design
Most of Stampin’ Up!’s patterned papers are double sided – and this card design is perfect for them! I often have a hard time deciding which side of the paper to showcase, so this lets me feature both of them (OK one more so than the other, but at least I don’t have to bury one side totally). For this particular card, I used the Texture Chic Specialty Designer Series Paper and then added a small strip of the Distressed Gold Specialty Paper in behind to pull out the gold features in the paper and to make everything a little more special! I gave detailed instructions on this card design in a previous YamStamps Newsletter (subscribe so you don’t miss out on future tutorials), but the quick version – make a slit in your DSP and then fold back on a diagonal, and adhere the flaps in place.
For this double sided paper card design, I added the sentiment and dies from the Something Fancy Discounted Bundle (which includes the Something Fancy stamp set and coordinating Something Fancy dies). I like that the bundle is “gender neutral” which means I can get more bang for my crafting buck – it can be used for anyone on my card list, and there’s a number of different card-giving occasions covered, too!
If you purchase the Something Fancy Discounted Bundle by 28 February, you’ll also qualify to pick a free Sale-a-Bration item! That’s definitely a way to get more bang for your crafting buck! A reminder that Sale-a-Bration items are available until the end of the month OR until supply is exhausted. The Dainty Flowers Designer Series Paper was definitely the most popular pick amongst my customers, and obviously others liked it too, because it’s no longer available. So if there’s something remaining on your Sale-a-Bration wish list, you’ll want to grab it sooner rather than later! You can shop online 24/7 and have your item delivered directly to your (Canadian) door from the YamStamps Online Stampin’ Up! Canada store – shortcut is yamstamps.com/shop. Grab the supplies to make your own version of this double sided paper card design! If you need assistance placing your order, or would like to pay by etransfer, you can email me and I’m happy to help (though I may not be as 24/7 as the online store links LOL!!!).
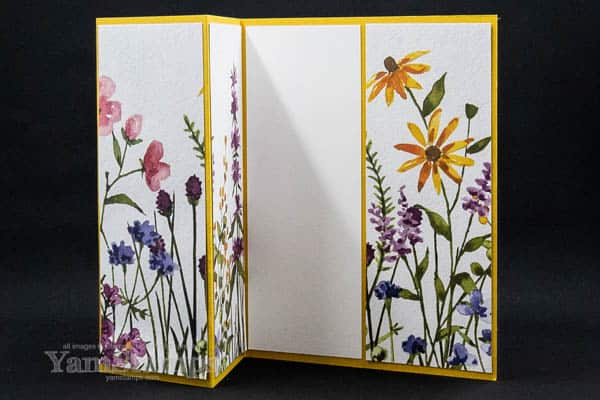
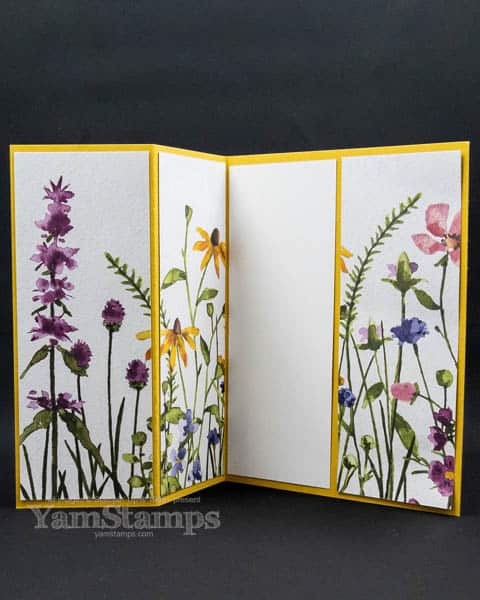
A few cuts and folds, and you’ll have an easy continuous pattern card that’s sure to impress!
Here I am with another quick and easy card – a continous pattern card that is one of my favourite layouts of the last little while. It works especially well with border print papers, like one of the pages from the Dainty Flowers Designer Series Paper that you can get for free with a qualifying purchase of $60CAD product during Sale-a-Bration/while supplies last!
Continuous Pattern Card
For this card, it’s a standard sized cardbase – so in North America, that’s cardstock cut to 5-1/2″ x 8-1/2″. It’s folded in half, and then the cardfront is folded in half again. It’s an easy fancy fold style. I used Crushed Curry Cardstock, since that’s one of the colours used in the paper patterns.
I cut a piece of Designer Series Paper that was 5-1/4″ tall, and 6″ wide – which is great, because you can get 4 cards from one sheet of the paper! The paper was further cut down into 2″ wide strips and then I added a 2″ x 5-1/4″ piece of Basic White, closest to the inside fold. You’ll want to keep the strips of DSP in order while you decide how to adhere them onto your card. There’s a couple of ways to make a continuous pattern card!
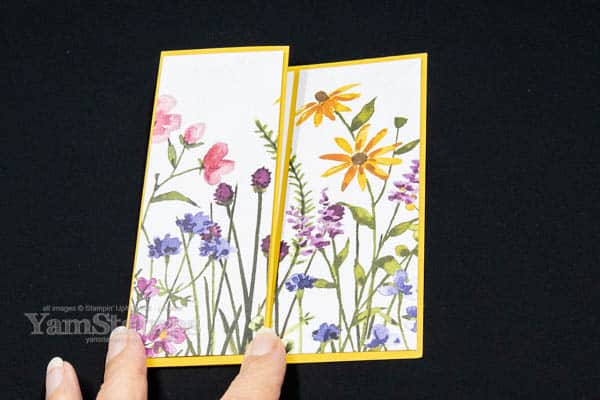
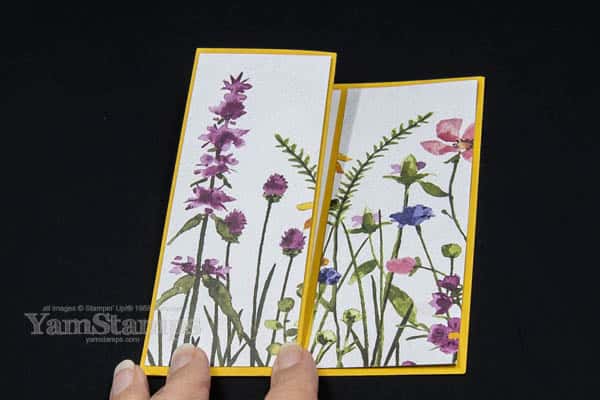
Closed version of the continuous pattern card version above
The fun thing about this continuous pattern card is that you can decide what order to adhere the strips onto the card – if you want a continuous image when the card is closed, or if you’d rather have the entire continuous image flow from from left to right.
continuous pattern card – left to right version – closedcontinuous pattern card – left to right version
Which version do you prefer? A continuous pattern from left to right, or a continuous pattern when the card is closed?Either way, it’s a great card, I think!!
If looking at cards is a source of inspiration for your own crafting, a reminder that my Lovely Cards Inspiration Book is available for purchase until the end of next week (18 Feb 2023). I’ve rounded up one hundred photos of cards celebrating love and friendship using Stampin’ Up! Canada products that have been created over my twenty years as a demonstrator. It’s a digital photo gallery that will give you ideas for your own card making! Available as an instant download when you complete your purchase. Check it out!