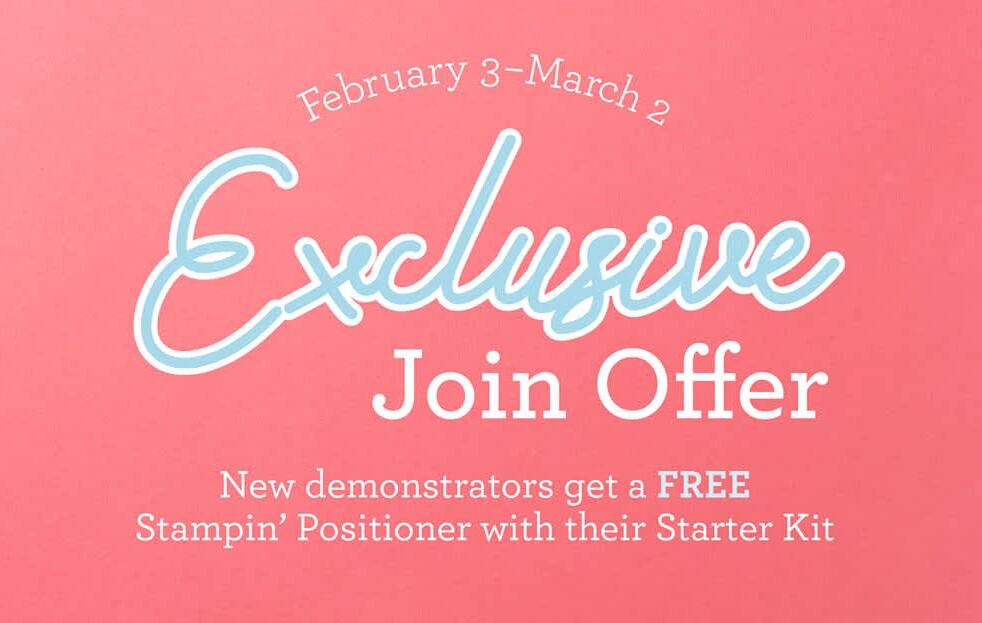
A New Stampin’ Positioner—Only for New Demonstrators (Feb 3–March 2)
This Stampin’ Up! Canada starter kit special runs from February 3 – March 2. Luckily, they let existing Demonstrators pre-order this positioner — otherwise we’d all be trying to join again…
During this limited time special, anyone who joins Stampin’ Up! as a new demonstrator will receive an exclusive Stampin’ Positioner in their starter kit—at no additional cost. Though it will be available for purchase in a future catalogue, until then, the only way to get your hands on one of these is by getting a Starter Kit. The Stampin’ Positioner will make your stamping more accurate and less stressful (because who needs stress when you’re crafting?!).
Just say “no more crooked sentiments” (unless you purposefully want it that way).
What Is the Stampin’ Positioner—and Why Does It Matter?
A stamp positioner is one of those tools you don’t need to make cards… but once you use one, you wonder how you crafted without it.
The Stampin’ Positioner helps you:
Line up sentiments precisely (no more crooked sentiments)
Re-stamp lighter images for deeper ink coverage — or if it doesn’t stamp perfectly the first time
Place images exactly where you want them, especially on layered designs or die cuts
Feel more confident when stamping directly on finished card fronts (a real game changer!)
This tool removes a huge mental hurdle: the fear of messing it up at the last step. For experienced crafters, it can also speed things up — especially if you’re doing mass production (Christmas cards, anyone?).
In short: fewer do-overs, less cardstock waste, more fun crafting!
Who This Stampin’ Up! Canada Starter Kit Special Is For
This promotion is ideal if you:
Are newer to cardmaking and want tools that reduce frustration
Love technique-based crafting and clean results
Want to stretch your supplies further with fewer mistakes
Are curious about teaching, sharing, or crafting more intentionally
Already buy Stampin’ Up! products and want the demonstrator discount
And yes—some people join purely for personal crafting savings and access. Others enjoy community, classes, or eventually sharing tutorials. There’s room for all of that, at your own pace.
A Quick Note
I always like to say this clearly: there is flexibility as a Stampin’ Up! Canada Demonstrator. Some join to earn some extra pocket money. Some join to get their own crafting supplies at a discount.
Everyone enjoys getting early access to products, and the chance to be part of a creative community and learn from other Demonstrators and Demonstrator Events.
Stampin’ Positioner Starter Kit Special – February 3 – March 2 – Exclusive Stampin’ Positioner included – Available only to new demonstrators
Thinking About It? Here’s Your Next Step
If this promotion has you curious—even just a little—I recommend taking a look at what you’d put in your starter kit if there were no pressure attached. What tools would make crafting easier? What stamps or papers would you reach for first? You get $165 CAD worth of product of your choice for just $135 CAD — with no shipping charges and no harmonized tax.
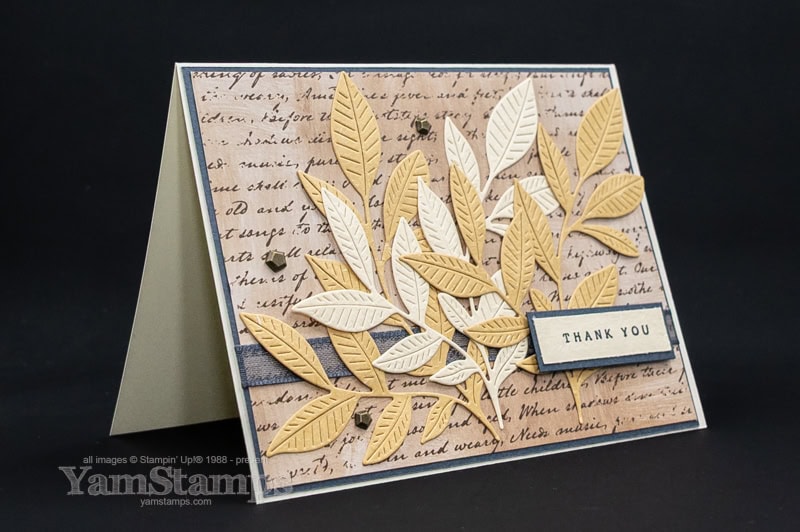
A Nature-Inspired Handmade Card with Stampin’ Up! Canada’s Nature’s Symphony
Today I’m sharing this nature-inspired handmade card that I created for a recent Stampin’ Up! Canada Demonstrator only card swap. I love the Nature Walk Suite and how calming the colour palette is! I’m double dipping and using this card for a blog post as well as for the Sunday Swap Share, so I’ll let you know now that the fully linked supply list will be on the YamStamps.com Sunday Swaps Page on Sunday!
Nature-Inspired Handmade Card – Nature’s Symphony and Nature Walk
I was happy to be able to present this Suite at a Demonstrator-only event late last year – these products are definitely my style! For this botanical card, I die cut multiples of the leaves from the Natural Hues Textured Specialty Paper, and then laid them out on the card front. Layered card designs are always eye catching and I think added depth makes it more professional looking. The background layer is from the Nature Walk Designer Series Paper and coordinated with the calming tones in the die cuts. This is another one of those cards that could be used for many different occasions – just change out the sentiment!
I was really happy with how this one turned out – I think it’s a good example of elegant cardmaking – nothing too over the top and not too “in your face”…I hope it can act as some cardmaking inspiration for you! Full supply list with links will be on the Sunday Swaps Page…on Sunday. If you’re looking for more handmade card project ideas and inspiration, be sure to be signed up for the weekly YamStamps newsletters, and check out theYamStamps Facebook and Instagram Pages as well!
Bonus Days are back! From now until February 2, with each increment of $60CAD in product order (before shipping/taxes, after any discounts), you’ll earn a $6CAD coupon code to use Feb 3-28! There is no limit to how many coupons you can accumulate! Click here or on the image to start shopping – or message me if you’d like assistance placing your order.
New Product of the Month!
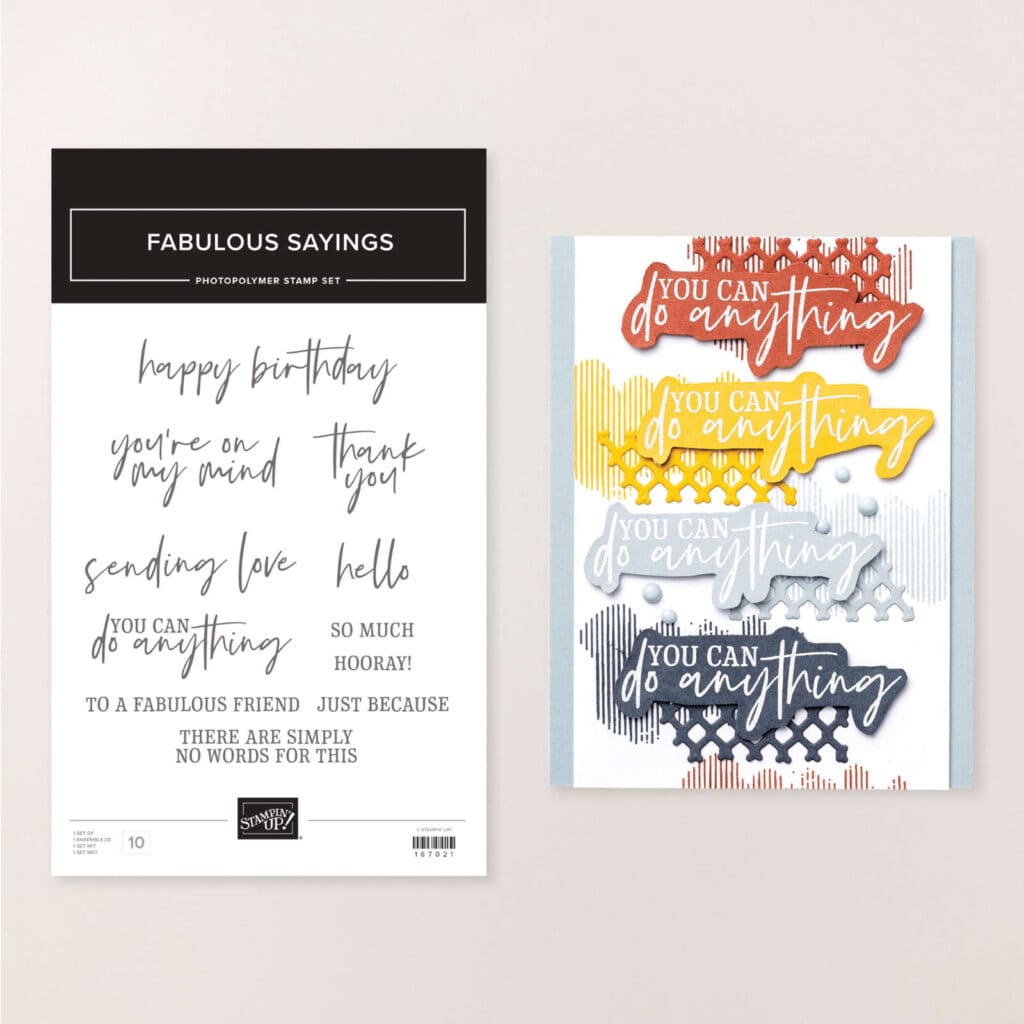
When you order $100CAD worth of product (really, make it $120 to get an extra Bonus Days coupon….), you’ll have the opportunity to purchase the Product of the Month for just $5CAD! January’s product is the Fabulous Sayings Stamp Set – a great collection of sentiments for all your paper crafting!
Please note that if you make a qualifying purchase in January but did not purchase the December Product of the Month (the True Blue Designer Series Paper) – you will have the opportunity to choose which Product you’d like to purchase (while supplies last). If you did not purchase the December Product of the Month and supplies are still available, if you make TWO separate qualifying orders (so two orders with $100CAD product) during January, you will have the opportunity to purchase one of each Product of the Month (December and January), if supplies are still available. You can only ever purchase ONE of a particular Product of the Month (so only one of December’s, and only one of January’s). Questions? Contact me.
Last but not least….
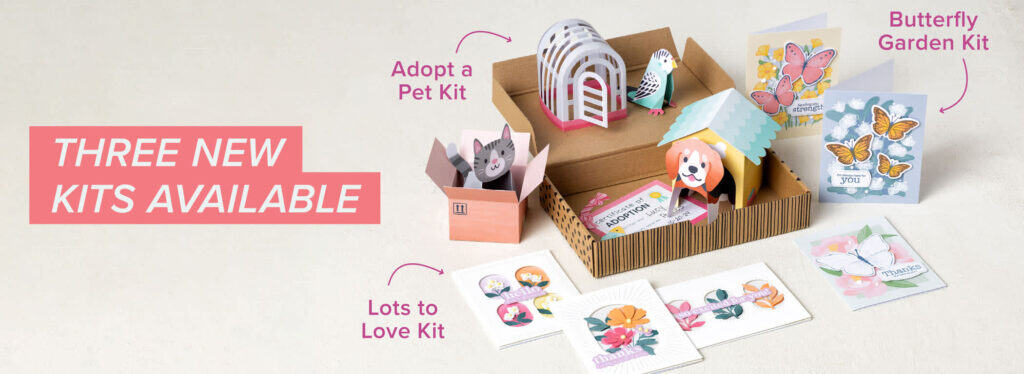
New Kits available!
Three new paper crafting kits are available! Two for creating cards, and a cute 3D kit featuring easy to care for pets! Click here or on the image above to check out all the currently available kits.
Thursday, September 18 ONLY – save 15% on Stampin’ Up! Canada stamps and stamp tools!
Time to shop and SAVE! Grab stamps and stamp tools at 15% off for 24 hours Thursday September 18 while supplies last! Offer excludes Last Chance items and bundles (already discounted),
Sale starts at midnight Mountain Time (which is 2am Eastern) Sept 18th and runs until 1159 pm Mountain time (which is 159AM September 19 Eastern). Shop online at yamstamps.com/shop or message me if you need assistance placing your order!
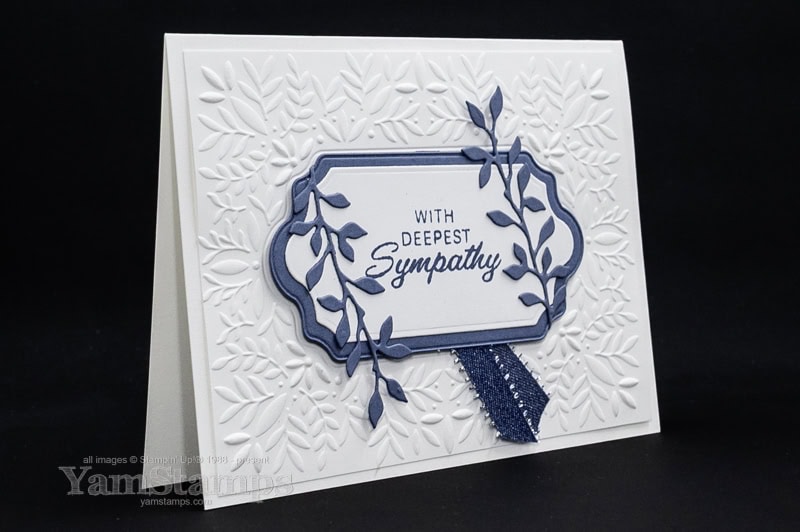
First of all, it’s the sense of loss and grief that’s felt – you, as well as the person who has suffered the loss. I often feel more anxious and pressured to “get it just right” – wanting to make a sympathy card that is beautiful, thoughtful and appropriate, which is particularly difficult at a time when I’m not feeling very creative or crafty.
It’s often said that cards are a hug with a fold in the middle, and I think that sympathy cards are definitely an example of this. Those who receive handmade cards feel cared for and seen. Your time, your creativity, your words—especially when shared during difficult times—can carry deep comfort and meaning. If I can, I often like to include a favourite memory of the loved one – because that was one of the things that would bring a smile to my face in the past when I’ve received sympathy cards.
I’ve found it helpful to create sympathy cards to have in my stash – because I often don’t feel like making a sympathy card when I actually need one to send. This sympathy card was the second design that I created for the recent Stampin’ Up! Canada September-December 2025 Mini Catalogue card swap. For a linked supply list for this card, please see the YamStamps.com Sunday Swaps Page – where I share linked supply lists for swap cards that I receive (and make)!
Sympathy Card Making Tips
I love monochromatic colour schemes, and I think they are particularly good for sympathy cards – very calming and peaceful, especially if you choose more muted tones. To keep one colour cards from being too boring, texture from Embossing Folders or simple die cuts add interest without being too distracting. Nature themes, not necessarily florals – leaves/greenery, nature scenes (lakes/trees), birds are all good options (as well as florals). I also prefer simple embellishments if any, and nothing too “blingy” – but that’s me, and the person that you are making the card for may like bling and appreciate that more! That’s the joy of making your own cards – you can customize it for the person receiving it.
Sympathy cards can be difficult ones to make, but they are always appreciated.
Ready to Stay Inspired?
If the thought of beautiful, easy card projects lights you up, I’d love to share more with you! Sign up for my weekly newsletter to get exclusive tutorials, time-saving Stampin’ Up! tips, and creative inspiration delivered right to your inbox—just for amazing people like you who deserve a little crafting me time.
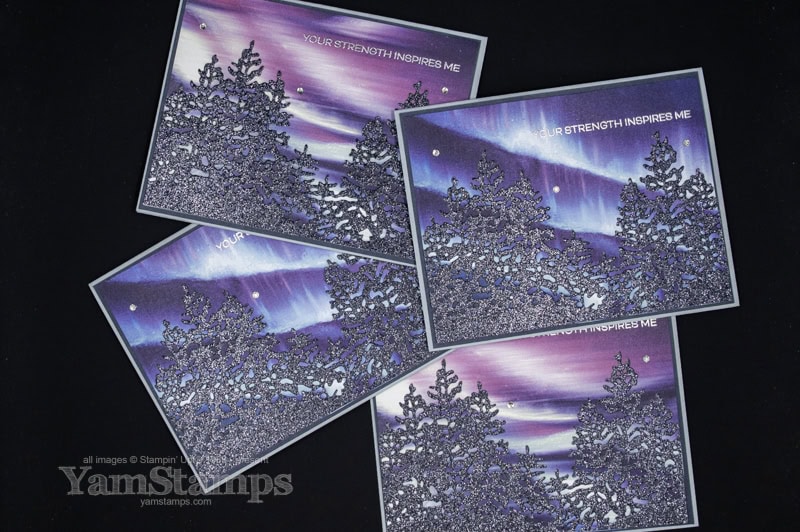
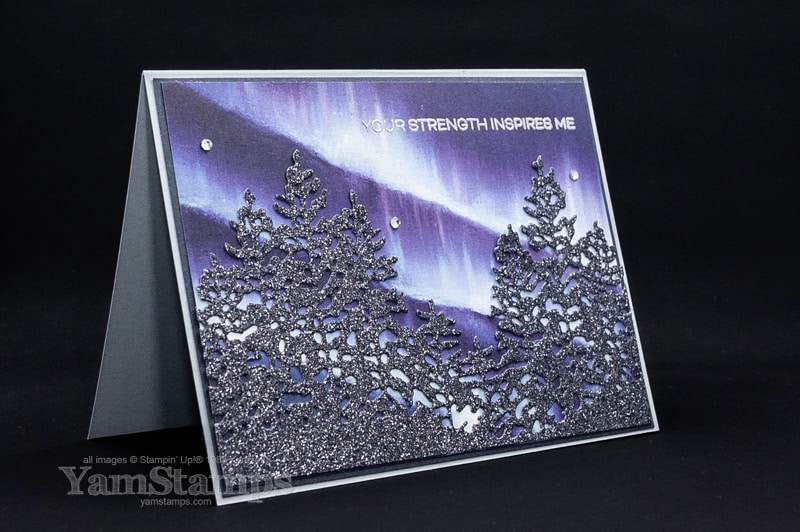
One guaranteed way to see the Northern Lights? Make a Northern Lights Card using Stampin’ Up! Canada products!
I have been fortunate to see the Northern Lights, but they weren’t extremely strong where I was, so it’s still on my bucket list….Stampin’ Up! Canada’s September-December 2025 Mini Catalogue features the Lights of Aurora Suite, and I used that to create a Northern Lights card for a recent Demonstrator card swap! Make your own and be guaranteed to have a great view of this beautiful phenomenon!
I’ve always enjoyed participating in card swaps, because they’re a great way to get ideas for products that I own – or have yet to purchase! They’re inspiration as well for my future card designs – by taking the basic design and then using what supplies I have on hand, I can come up with a new look without too much effort (or frustration!). My nothern lights card design had two different versions, as I used two different sheets of Designer Series Paper. The Lights of Aurora Designer Series Paper is a 6×6 package, with 8 sheets of 6 different double sided designs. By using two different papers, I had enough for 16 cards which was enough for what I needed for the swap. I can’t decide which was my favourite version!
I used a fairly simple layout for this card because I really wanted the paper to be shown off – it is a northern lights card, after all! Honestly, the most finicky thing about this card was making sure I got all the little bits out of the die cut trees! Thankfully, I had my Take Your Pick tool with the die brush tip, so I just ran that over the die cuts a few times, an easy task to do while binge watching shows. The streaming shows of choice during the card swap making sessions – Wednesday, and Only Murders in the Building. I typically watch foreign language shows, but I can’t do that when I’m multitasking because I can’t read subtitles at the same time! I do have subtitles on all the time, but at least with English language shows I can listen and follow along for the most part…
Anyway! If you want to get the full supply list (with links) for this northern lights card, I shared this card as part of the YamStamps Sunday Swap Series Page – yamstamps.com/sunday-swaps. If you’re a Stampin’ Up! Canada Demonstrator and are interested in participating in our next Demonstrator only swap, message me! If you’re not yet a Stampin’ Up! Canada Demonstrator and want to find out more about being one (and maybe participating in a card swap, too), message me! Happy Sunday! Hope the upcoming week treats you kindly.