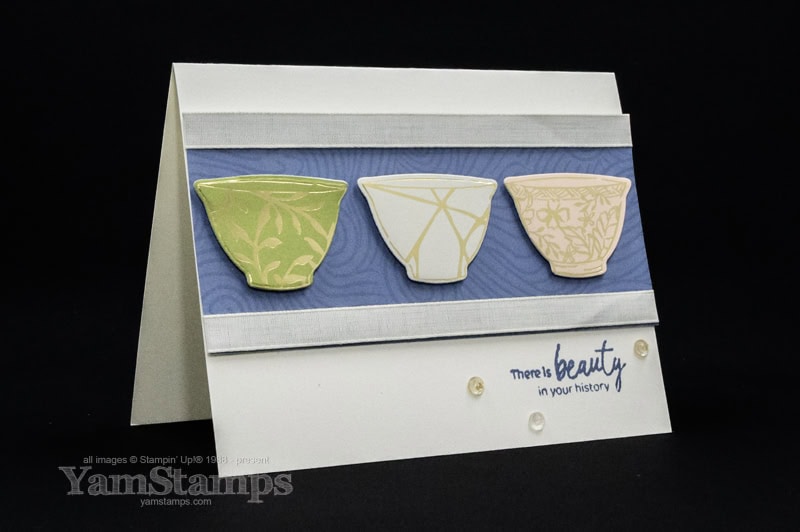
I love that Stampin’ Up! Canada has a Kintsugi Inspirations Suite!
Kintsugi is a Japanese art/craft where broken pottery is repaired with laquer that is dusted with gold or another precious metal. It celebrates imperfection and that there is still beauty in things that may not be “perfect”. Kintsugi Inspirations is a suite of products from Stampin’ Up! that brings that elegant beauty to your craft room!
I love the whole concept of celebrating the history of an item and imperfections, and I love that there is an easy way to craft with this suite! For this Kintsugi Inspirations card, I used the Kintsugi Inspirations Specialty Designer Series Paper, and the coordinating Inspiring Imperfections Dies. The Dies coordinate with the Inspiring Imperfections stamp set (and you can get them together in a discounted bundle), but they also coordinate with the Designer Series Paper!! I roughly trimmed around the images I wanted to use (because the paper is 12″ x 12″ and won’t fit through the Stampin’ Cut & Emboss Machine!), and then I die cut the images with the tea cup shaped die. I made sure to pick one of the images that had the kintsugi-look to it – the centre one, with the gold lines. If you prefer, there’s also a couple of stamps that have those “crack lines” – so you could use that on any image!
The concept behind Kintsugi also suits my paper crafting…because my crafting is often not totally perfect, and I’m learning to roll with that (though it’s a difficult concept sometimes!!). So I’m going to look to Kintsugi and how imperfection can be inspiring and still beautiful in its own right!
Don’t forget that free shipping offer is only available July 23-25, so don’t miss out!! You can message me if you would like to pay by etransfer, or need assistance setting up your account or order!
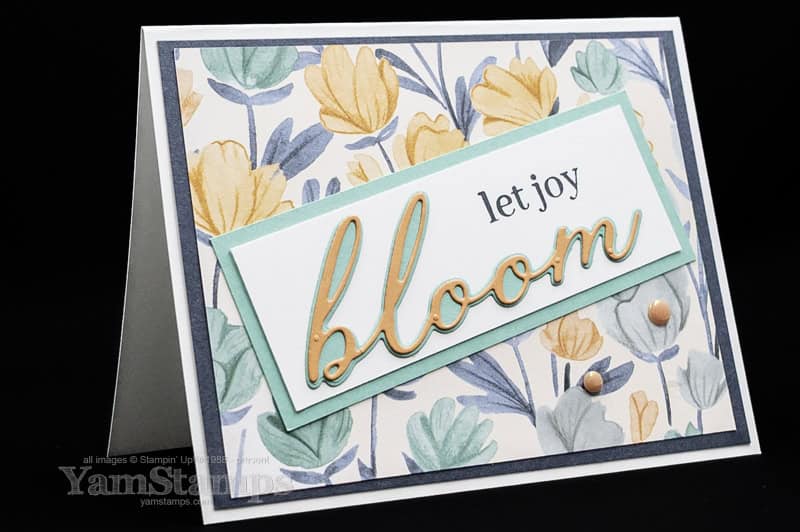
Have an occasion to celebrate? Let Joy Bloom with this card!
I realized that I hadn’t yet shared this card…..and it’s been a hot minute since I posted something on the main blog page – so here’s a card to Let Joy Bloom!
I created this card for a 2025-2026 Annual Catalogue Canadian Demonstrator swap. I like these swaps to see samples created by others featuring stamps and dies that I may not (yet) own! It also forces me to sit down and be creative – and that can sometimes be a good thing, because I’m easily distracted….nothing like a deadline and guidelines to keep me focused!
For this Let Joy Bloom card, I used the Sweet Blooms Bundle, which includes the Sweet Blooms stamp set and Sweet Blooms dies. They’re part of the Florals in Bloom Suite – so if you’re seeing this before the end of June, they can be included in the Sweet Suites Sale! Unfortunately, the Florals in Bloom Suite itself is currently unavailable – the Pretty Florals Dies that are also part of the Suite are unavailable (though everything else in the suite IS available – at time of writing). SO – if you purchase ANOTHER suite that IS available, you could get the Sweet Blooms bundle for 50% off! The Sweet Suite Sale means if you purchase one suite, then you can get a second suite or ANY product that is part of ANY suite for 50% off – but only until the end of June (so don’t miss out!).
I combined the Sweet Blooms Bundle with the Florals in Bloom Designer Series Paper, and then pulled my ink and cardstock colours from that – Secret Sea, Summer Splash and Timid Tiger (all 2025-2027 In Colors). I was going to try to be tricky and die cut the backing “bloom” from the Basic White Cardstock to let the backing layer show through….but it got too complicated and definitely did not Let Joy Bloom! Simple option (but still thrifty) – die cut the backing “bloom” from the backing piece of Summer Splash cardstock; the Basic White Cardstock piece hid the hole, and then I adhered the backing bloom and script word on top. Also easy – putting an Adhesive Sheet on the back of the Timid Tiger Cardstock before die cutting!
Easy but effective crafting – my favourite approach!! Let Joy Bloom! If you’d like to see more samples from the swap, check out the YamStamps.com Sunday Swaps Page!
Here’s a cute project to celebrate someone who’s going places! Plus more of my Japan trip photos!
Know someone who is going places? Could be a trip somewhere, or could be a new life adventure….here’s a cute project to celebrate! It uses the On the Go Suite products – which I LOVE!
Speaking of going places, I did promise more pictures of my trip, which now feels like a lifetime ago….but here’s some photos from our time in Tokyo!
I called this the Ghibli clock, but more accurately, it’s the NTV clock designed by Hayao Miyazaki. At different times during the day, there’s a show where the clock comes to life! This was on my list of “things I want to try to see in Japan” and it was actually quite close to our hotel, so my mother and I wandered over one day to see it! (I think Dylan & Denisse were shopping at Uniqlo at the time LOL).
We visited Sensoji Temple – definitely one of the more crowded areas! Once we made it to the main hall, it was a little less congested.
A few sights from around the grounds of the temple – koi fish and yes, flowers on the trees, in JANUARY. Just at the very top, but still – January!!
So exciting to attend one day of the Tokyo Sumo Tournament!!! Nothing says “I am in Japan” like watching sumo wrestlers! We grabbed a bento box and sat and ate (in the cheap seats way up high), and watched the tournament. We were very excited that there was a wrestler called “Ichiyamamoto” so of course we had to cheer for him (he’s not in this picture though).
Last but not least, one of my stationery purchases from Tokyo – so cute! If you have watched the Ghibli films My Neighbour Totoro or Spirited Away, you’ll recognize these soot sprites or kurosuke. These are little erasers!!
If you are going places, like travelling to Japan, I got these erasers at the NTV store on the ground floor of where the clock is located.
I plan on using some of the On the Go Suite for scrapbooking some photos from our trip! Stay tuned for those pages (but don’t hold your breath, because you can see how long it’s taking me to go through and pick out/edit photos!!).
Here’s a tale of some of my latest adventures in stamping…
Once a stamper, always a stamper….no matter where you are! I recently went on a “trip of a lifetime” and thought I’d update you on some of my global adventures in stamping!
I went on a 3.5 week trip to Japan – well, technically we also had a few days in Seoul, South Korea. It was more or less planned as a “see as much as we possibly can” kind of trip, keeping in mind the distance we had to travel to get there and the makeup of our group – which was myself, my mother (aka “Grandma”), my son Dylan and his girlfriend Denisse. January was picked as the month to go because it worked best for Denisse’s school schedule.
We made a list of sights and places we wanted to try to see…(well, except for Grandma, the only one of us who had actually been on a trip to Japan before, and was “just along for the journey” in her words). One of the places, though not in Japan – was Seoul – for the food, the sights and the culture – both historical and current. (OK for me – mostly current culture – I love k-pop and k-dramas LOL). Since the main portion of our trip was Japan, we thought we’d start in Seoul and try to ease into the time zone and get used to traveling in a place where English is not the first language.
Gyeongbokgung PalaceChanging of Guard Ceremony at Gyeongbokgung Palace
These shots are from Gyeongbokgung Palace, one of the palaces we visited in Seoul. What you can’t see is how COLD it was that day! Minus 15 C plus a wind….cold weather warnings but we had places to see! Also I found it funny that I travelled around the world to still be taking pictures of instrumentalists in red outfits. (I am a volunteer photographer with our city marching band, the Burlington Teen Tour Band, who wear red tunics).
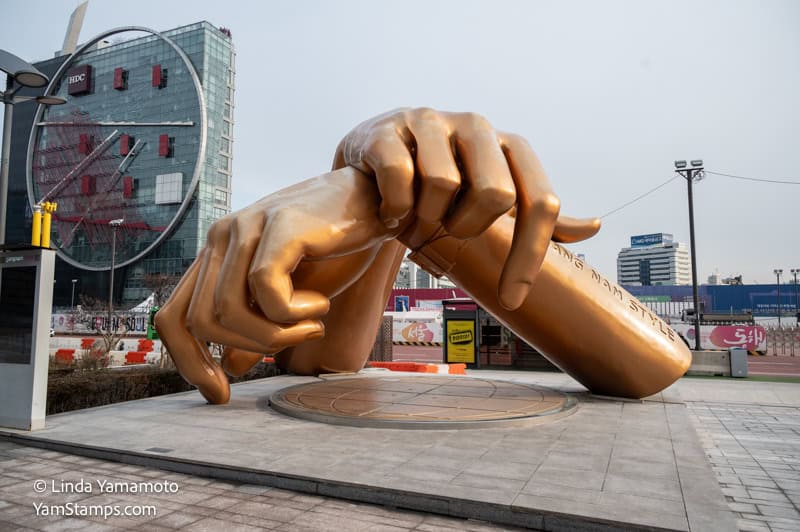
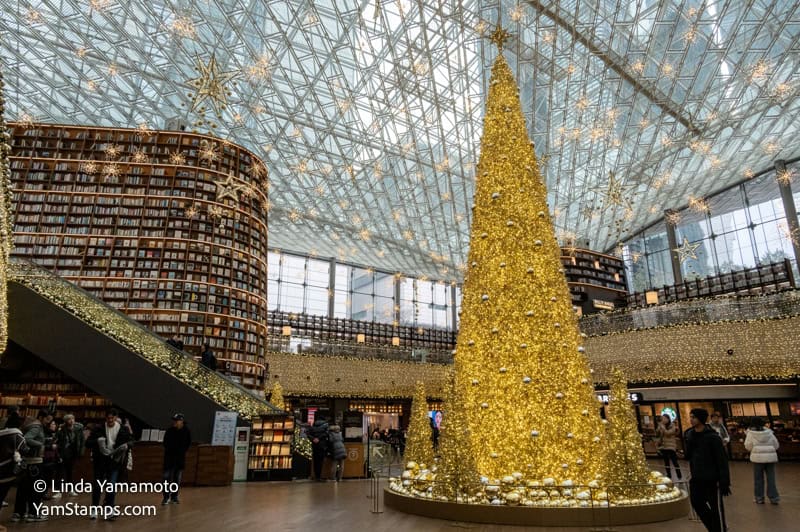
We also managed to get some modern day cultural sights in…
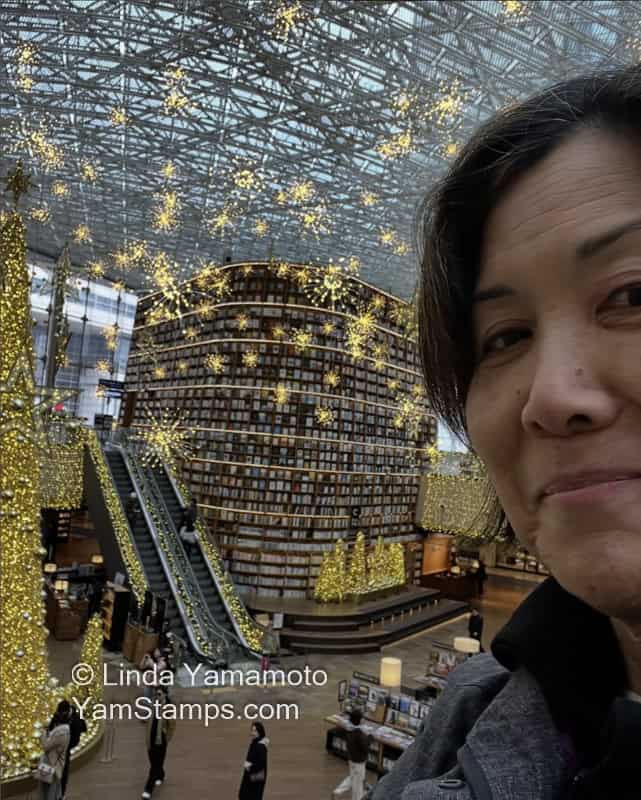
Gangnam Style statue (are you singing and doing the dance?!)Starfield Coex Mall / Library
The Starfield Coex Library was still set up with holiday decorations! It was beautiful – and because we were there early, it was also not too crowded. One of the advantages to travelling in January is the relative lack of crowds. We wandered around the Mall for a while and were weirded out initially by how empty it was…but it was early on a weekday. It definitely got busier at lunchtime, when the locals were on lunchbreak from work!
(I took this selfie so I could get a free holographic sticker from the library!!)
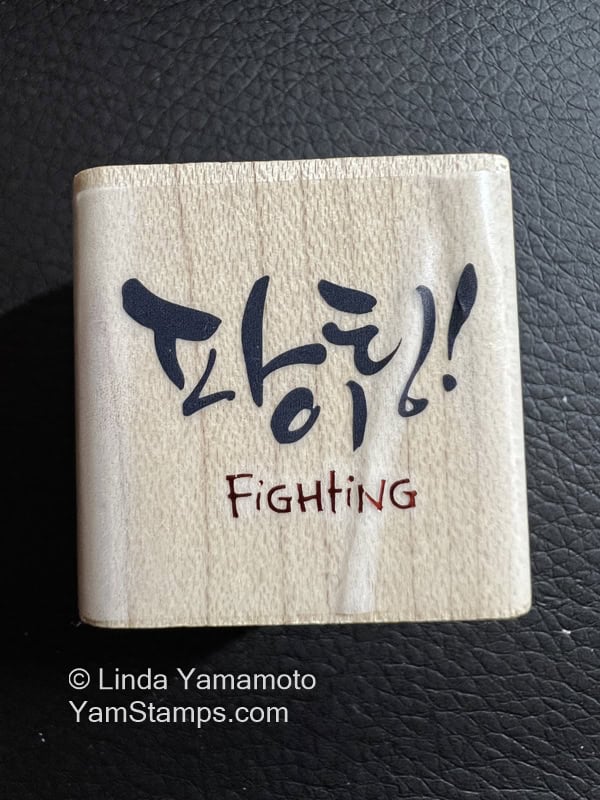
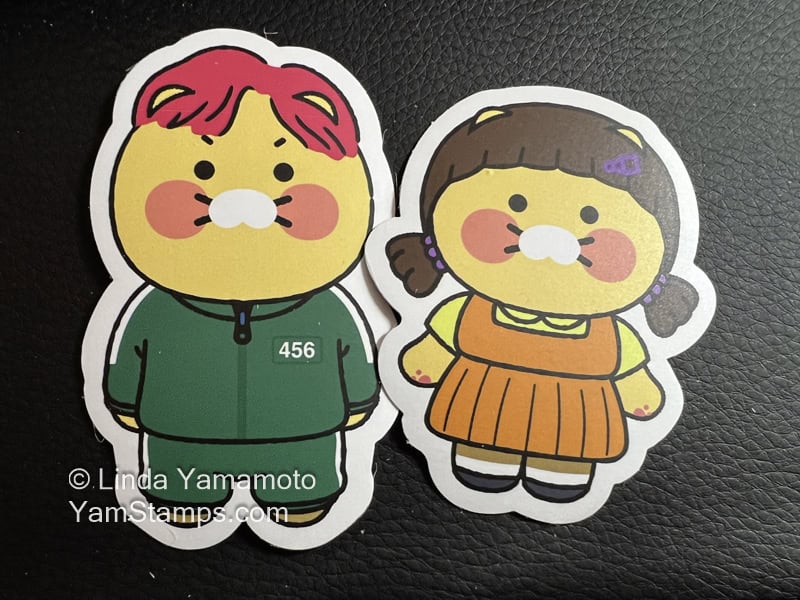
And of course, I did promise adventures in stamping. I have always loved paper crafting and stationery, so I had to really watch myself while we were away – because I wanted to BUY ALL THE THINGS. I did manage to restrain myself, though I picked up a Korean stamp and some fun stickers that were Korean pop culture themed….
“Fighting” is a word of encouragement, and the stickers are cartoon caricatures from Squid Games. I’ve had a couple of people ask me how I can watch Squid Games because it’s a rather gory and dark show, and I am more of a bright happy type of viewer….and my answer is “multi tasking”. Just like I would do back when my high school friends would get together and watch horror movies, I just don’t look at the screen if something gory is happening!! Typically, since I stream things at my desk, I’ll be tidying my desk/office (a never ending task), or catching up on my journaling. I’ve put a few stickers into my journal already, and figure I can use some others when I get around to scrapbooking the trip!!
Also thinking the Documenting the Day stamp set is perfect for journaling / scrapbooking / commemorating your own adventures in stamping! Only available until February 28th/while supplies last (whichever comes first), it’s a Level 1 Sale-a-Bration freebie – you can select it for free with a $75CAD product order!
Is there anything you look to buy when you’re traveling? I have a few things that I try to pick up….Christmas ornaments (or things that could be used as a Christmas ornament), Pandora exclusive country charms and Starbucks location mugs. The mugs are great but they get heavy……so small rubber stamps and stickers are definitely easier to transport!
Stay tuned for more of my adventures in stamping!!
This So Thankful Beautiful Butterflies Card is a great way to show your gratitude!
I am loving the Beautiful Butterflies Bundle – a hybrid embossing folder (embossing folder and dies) and stamp set – so three tools for one great price! This So Thankful Beauitiful Butterflies card is a great way to show your gratitude – or change out the sentiment to suit the occasion!
I love how easy it is when you can emboss and die cut at one time – and by using a patterned paper it’s even easier and prettier! For this So Thankful Beautiful Butterflies Card, I used the Beautiful Bokeh Designer Series Paper for the large die cut butterfly, and place it onto an embossed piece of Lemon Lolly Cardstock, It’s mounted on a Balmy Blue cardstock base, and that’s also the ink I used for the sentiment. One of the easiest tricks in the book to give your project a coordinated look – pick out colours from the Designer Series Paper you’re using! (they are listed on the back of the packaging…or if you’re like me and sometimes end up with things separated…it’s also listed on the website – shortcut to the Online Stampin’ Up! Canada YamStamps shop is YamStamps.com/shop). Technically, I did cheat a little bit – the colour used in the patterned paper is actually Daffodil Delight, but Lemon Lolly is a coordinating, lighter shade, plus there’s only a bit of yellow that ended up showing on the butterfly die cut.
To finish it off and add a bit more bling, I randomly stuck on sequins from the Itty Bitty Bokeh mix. I found it really handy to pick up the sequin with my Take Your Pick tool putty end, and then dip it into some Liquid Glue that I had squeezed out onto my Silicone Craft Sheet before sticking it to the cardfront. If you’re looking for the “easy” button for this So Thankful Beautiful Butterflies Card, the Beautiful Bokeh Suite Collection includes the stamp set, embossing folder, dies and embellishments that I used for this card. It’s another way to take a shortcut to a project that looks totally put together and coordinated.
If you purchase the suite, you will be able to select one Level 1 Sale-a-Bration item of your choice for free! When you place a product order until February 28th, each increment of $75CAD in a single order will earn you free Sale-a-Bration product! Plus- I’ll send you a tutorial for this So Thankful Beautiful Butterflies card! Shortcut to shop is YamStamps.com/shop or message me if you have any questions or would like to pay by etransfer. If you decide to become part of my demonstrator group, the “Eh” Team during Sale-a-Bration, you’ll be able to select TWO Stampin’ Write Marker families in addition to the “regular” $165CAD worth of product for $135CAD. More information about becoming part of my group of demonstrators here, or reach out if you have any questions. I’d love to have you as part of the “Eh” Team!!
It’s Sunday! Time for a Sale-a-Bration 2025 Share!
Every Sunday (well, pretty much every Sunday), I share a swap card that I’ve either made or received from recent swaps with other Demonstrators on the YamStamps Facebook Page (and the YamStamps Sunday Swaps Page). I was first introduced to swaps when I became a Stampin’ Up! Demonstrator over 20 years ago – it’s an event where you create a card or cardfront, and then make multiples of it. When you meet up with other Demonstrators (typically it was at conventions or other in person events), you would trade one of your card fronts/cards for one that another Demonstrator made. It’s a great way to get new ideas and samples with products that you may not personally have in your own stash.
I honestly can’t remember when this particular swap group started, it might have been around the time of COVID, or before, but this is a mail in swap. We create multiples of the same card, and then send them to the other Demonstrators. This year was a bit tricky due to the Canada Post strike….but in the end it all worked out! In any case, this is my Sale-a-Bration 2025 share!
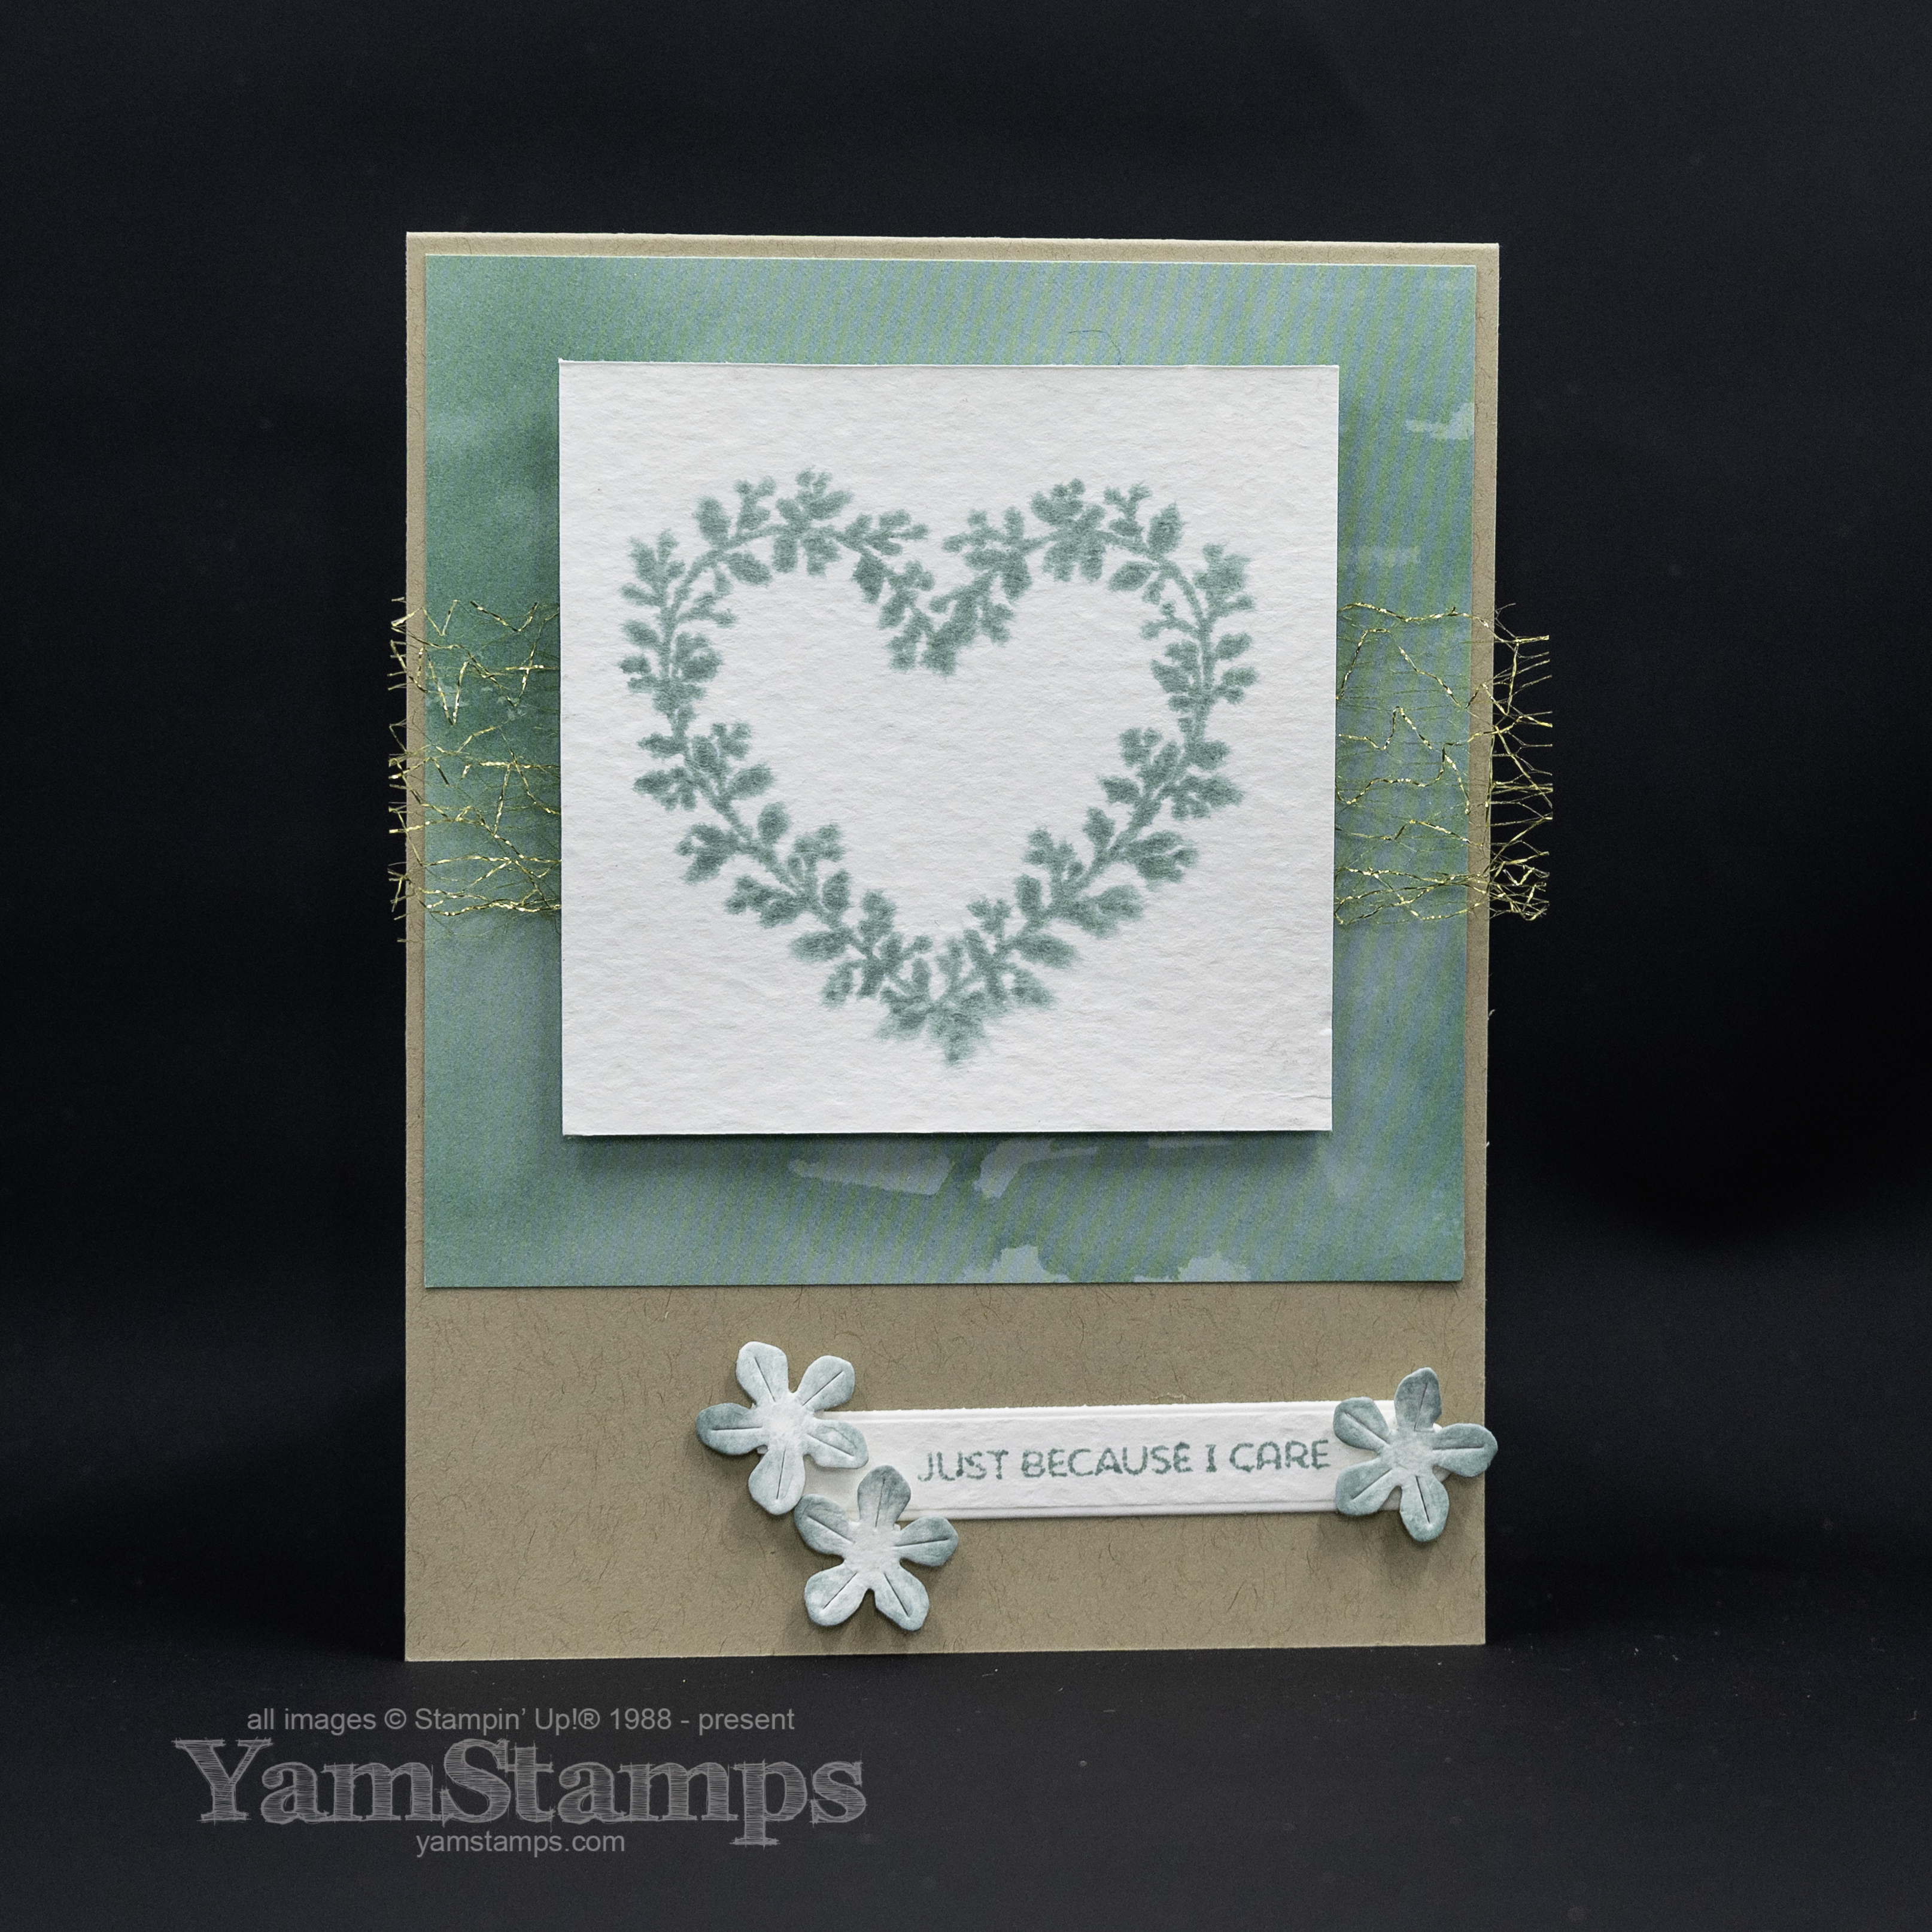
You can find a full linked supply list on the YamStamps Sunday Swap Share Page. For this card, I used the Heart Shaped Bundle (also available in French) which is a Level 2 Sale-a-Bration item – you can select it as a Sale-a-Bration freebie with a $150CAD product order (single order total, before shipping/taxes, after any applicable discounts). I used a couple of design techniques that always work well for me – monochromatic colour schemes and clean layouts. For this card, the main image (and sentiment) are stamped on watercolour paper. I like using that paper because of its weight and because of the techniques you can use. I spritzed the paper before stamping it to get a soft, watercolour-like image. I used the same paper for the sentiment strip because I wanted it to match. The flowers were die cut from scraps of the watercolour paper (must use every inch possible!!) and then I used a Water Painter to add some ink to the flowers.
What do you think about single colour approaches? Are you one of the “the more colour the better” types or the “keep it simple, stamper” types? (We know which category I fall into haha).
You can shop 24/7 in Canada with delivery to your door (especially now that Canada Post is fully operational again) – shortcut to shopping is YamStamps.com/shop. You’ll be prompted to enter your choice of Sale-a-Bration item once you hit the applicable total product order as well, so you don’t have to worry about doing math!! Thanks for stopping by the page today, and happy shopping!