Oct 19, 2018 | cards, Stampin' Up!, TV/Video/Web/Tech
Why, hello there! I’m happy to report that I survived Scrapfest and have more or less recovered…LOL. All that lugging stuff around and standing on a hard concrete floor…and I’m not as young as I used to be… Sharing this hello card that you may recognize if you were at Scrapfest and stopped by the YamStamps booth! The make and take we did using the Stamparatus created the main feature of this fun card.

The main element on this hello card uses the Ready to Layer stamp set. I absolutely love this four stamp set that combines to create the above image. For the colour palette, I copied the one in the Stampin’ Up! Catalogue! (why work too hard, I say…). So – Bermuda Bay, Pool Party, Granny Apple Green and Lemon Lime Twist. The Detailed Trio punch adds some interest to the corners. To turn this make and take tag from scrapfest into a card, I simply mounted it onto a piece of Bermuda Bay cardstock, and then onto a piece of Lemon Lime Twist Cardstock that had been embossed with the Seaside Textured Impressions Embossing Folder. I thought the wavy lines in the embossing folder went well with the line art of the image.
I’ll share a Facebook Live this weekend on the YamStamps Facebook page showing how the tag portion was created with the Stamparatus. It’s a fantastic tool for this set! I love this hello card so much you may see it show up in a few upcoming classes…
On a completely different note….

…if you’re in Canada, please tune in to the CBC tonight (Friday, October 19th) at 9pm to watch “Band Geeks”. You can also stream it online at the CBC website. This documentary film follows the Burlington Teen Tour Band in preparation for their Rose Parade appearance. I was a member of this band, and my son just finished his time with the band as well. I’m lucky enough to volunteer as a photographer and chaperone with the band, so was with them during the filming of this show. I think that Suddenly SeeMore Productions did a great job of capturing the incredible work ethic of these teens (and staff) but also the fun and camaraderie that is had when you’re a “band geek”. So take a bit of time out of your crafting (or colour a few images while you watch?!). It’s nice to see a positive story about youth! (End of plug…hahaha). In the meantime, I’m looking forward to getting back into routine around here and sharing some more crafting inspiration. See you online!
Oct 11, 2018 | cards, Seasonal Catalogue, Stampin' Up!
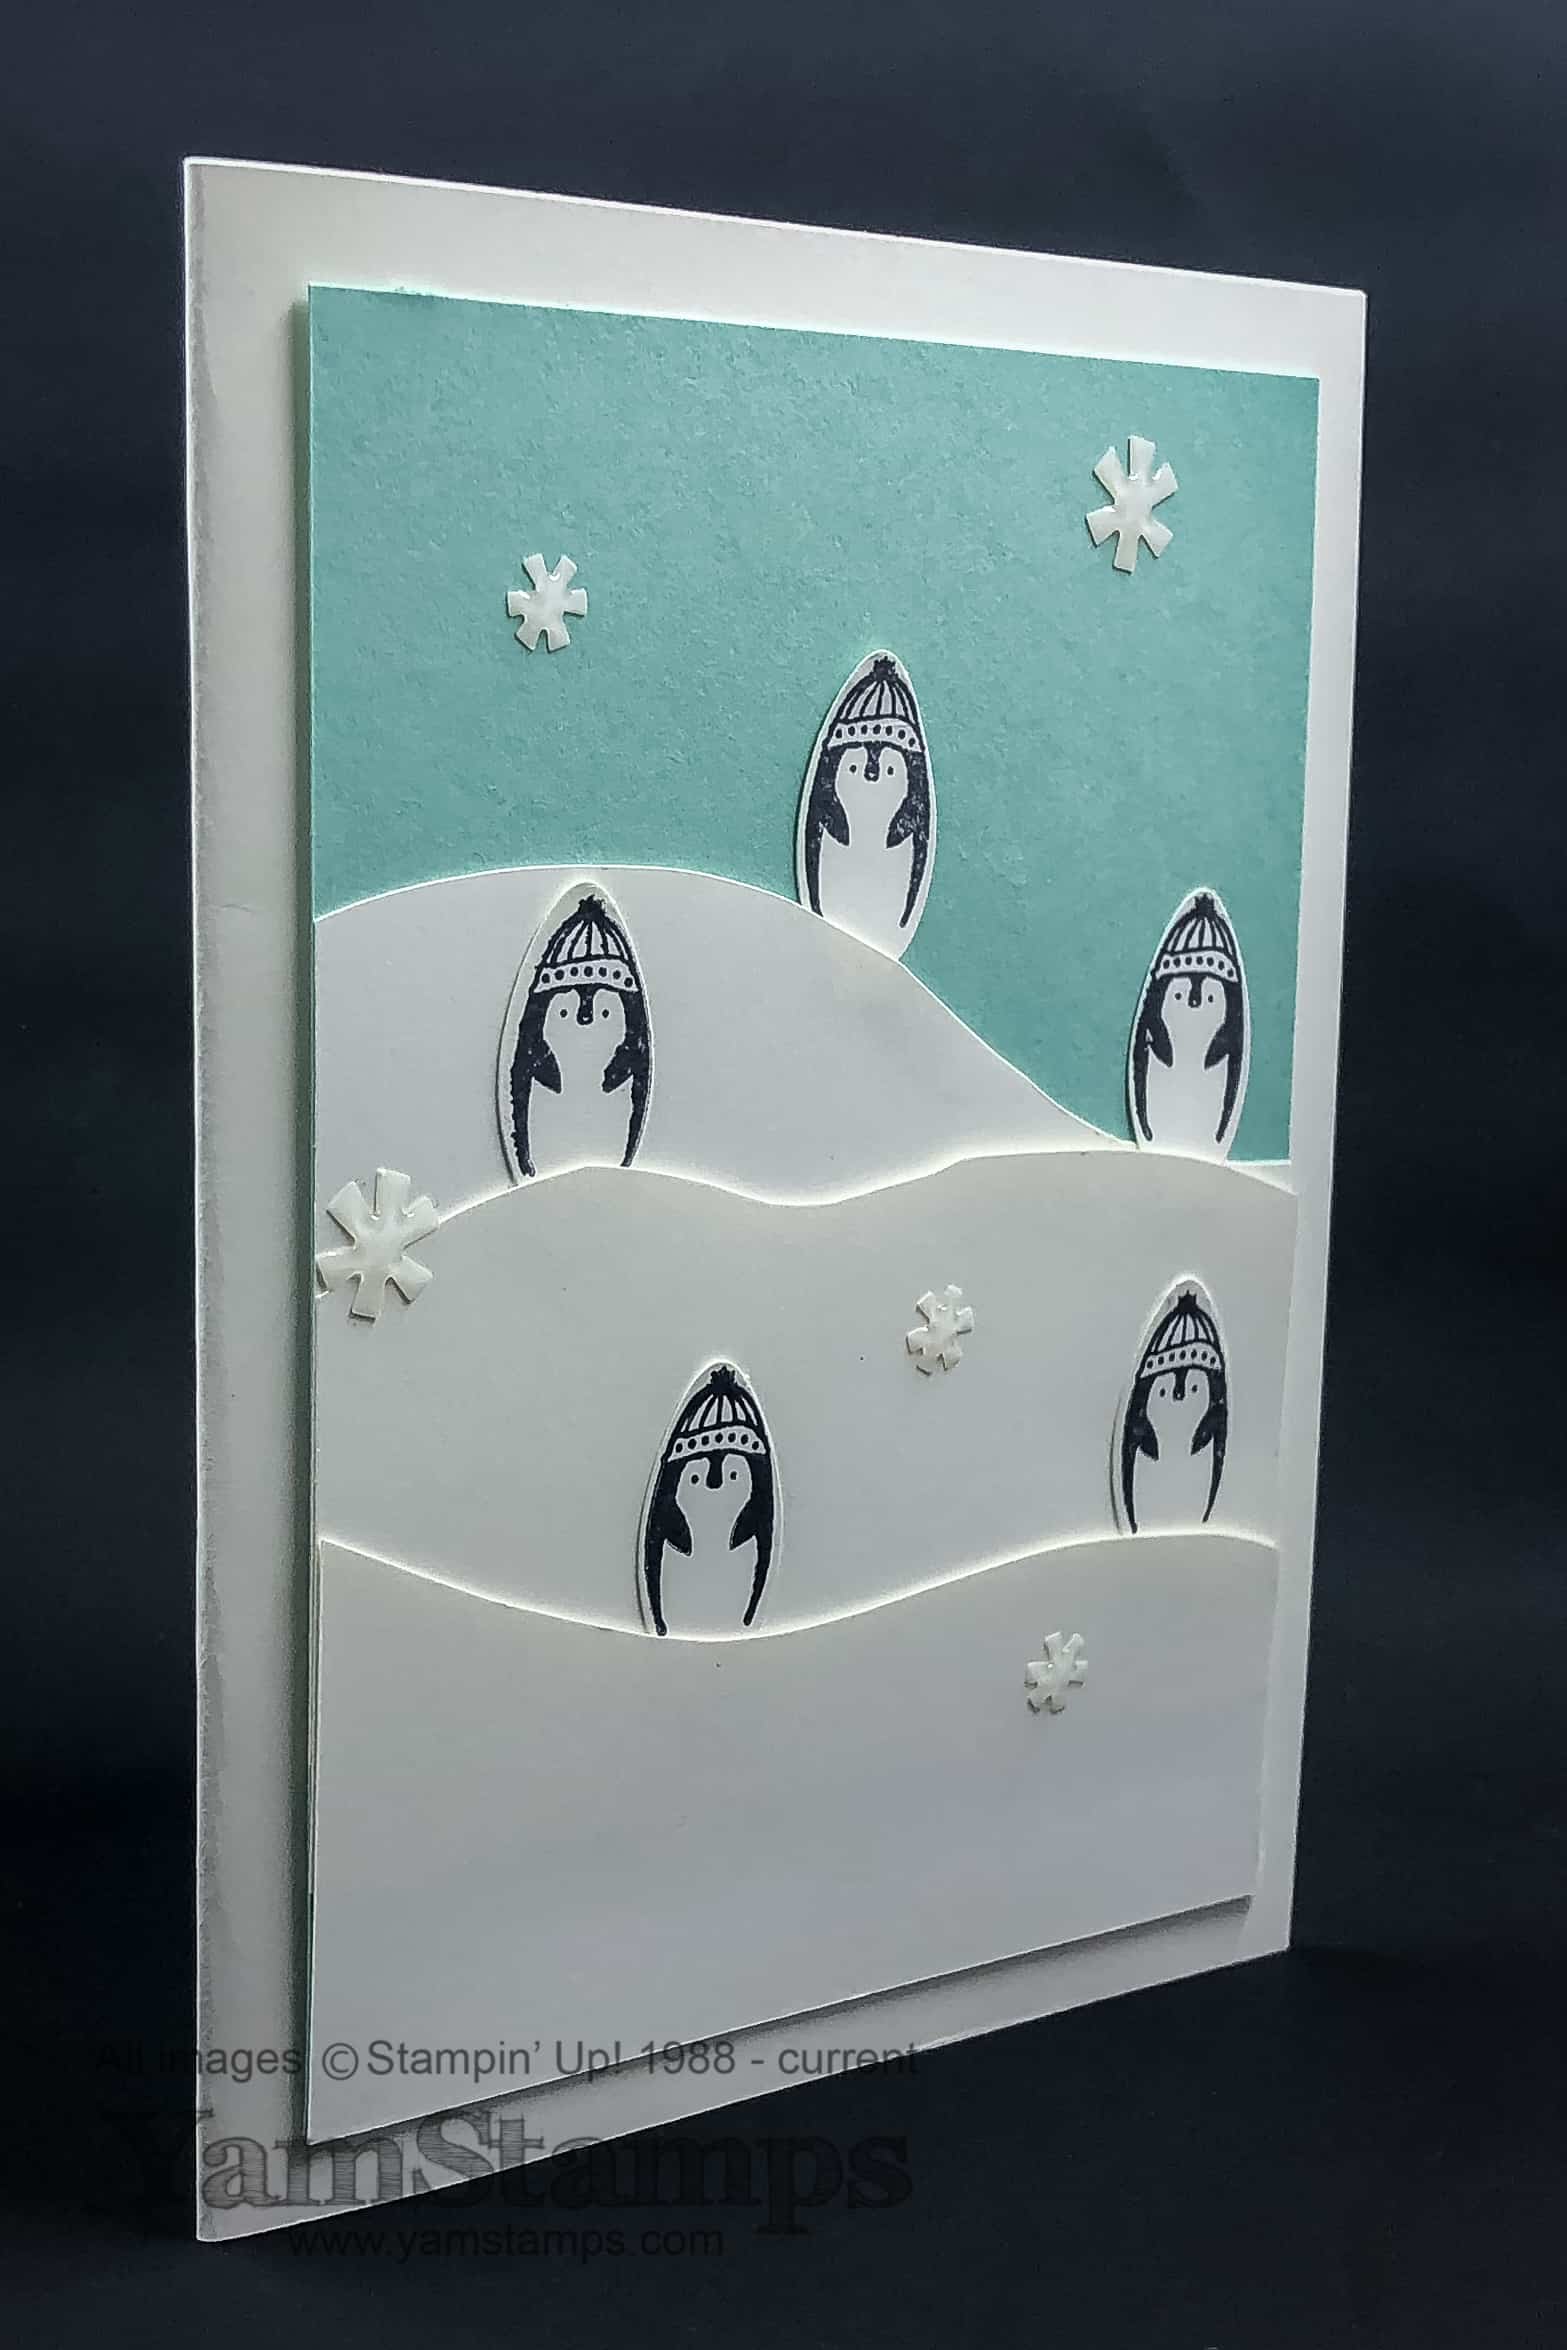
If you are following the YamStamps Instagram or Facebook Page feeds, you’ll know that I have a booth at Scrapfest/CreativFestival right now! I survived day one….and realized I hadn’t shared a post on here in a little while – so I am apologizing with this fun penguin card. I will also amaze you with some fun penguin facts, courtesy of web searches. *ahem* While you may know that a group of penguins is commonly called a colony, it can also be called a rookery, huddle, or a waddle. (Guess which one is my favourite?!). These terms, however, only apply if the group of penguins is on land. If they’re in the water, they’re called a raft of penguins. Who says you can only learn some paper crafting tricks here. Look at me, helping you to increase your vocabulary and trivia. (Let’s see if that shows up as a question on HQ, maybe I’ll win more than $0.30?!)
So with that knowledge in your hands now, I present to you a card featuring a waddle of penguins!!

How cute is this penguin card?! And of course, how easy! The penguins are from the Making Every Day Bright photopolymer stamp set. This set features a number of images that can be punched out with the Christmas Bulb Builder Punch, and i love that there’s some non-winter/non-Christmas images that you can use with the punch! The punch itself can also be bought in a discounted bundle with the Making Christmas Bright photopolymer set (which is definitely all about the holidays). For this card, the penguins were stamped in Memento Tuxedo Black ink, and then punched out. The snow slopes were cut by hand (that’s about as close as I try to get to “fussy cutting”). The penguins were tucked in behind the slopes and then some snowflakes from the Santa’s Workshop Enamel Shapes were added for a little extra interest.
I’m not sure what a group of Stampin’ Up! Demonstrators is called, though. A gaggle? A hoard? hmmm. Well, I know that _my_ group of Stampin’ Up! demonstrators is called the “Eh” Team! I invite you to join us, in any case! On Thursday, October 25, I’m hosting my next Information Evening here in Burlington, where you can find out more about having your own home based business, and how you can work on your own terms and schedule. The only commitment I ask that you make for that evening is that you RSVP to attend! If you can’t attend that evening, or don’t live close enough to Burlington, please contact me anyway, and you can either join us “virtually” online or at a different time, either online or in person. The more the merrier!
Oct 7, 2018 | cards, Stampin' Up!
Happy Canadian Thanksgiving! I add the “Canadian” in there because I know some of my American friends are thinking I’m a little early….and in all honesty, I feel like our Thanksgiving is a little earlier in the month than usual! However, I’m happy for a long weekend, happy to see friends and family and thankful for all the blessings that surround me. This year will be different too, since my son will be home for a week – the longest stretch (and first time home) since he left to go to university back in September.
In the theme of the day, I thought I’d share a Thank You card that I received as a swap. You may recognize the Country Home stamp set – since it was the main set used in the Sunday Swap post that I shared last week! However, you can see that the sentiment is different, and the flowers in the pitcher are different too! I love that you can swap out bits and pieces and come up with a brand new image. I love one of the sentiments in this set – Simply thankful for all the good things. Words to live by, especially today!
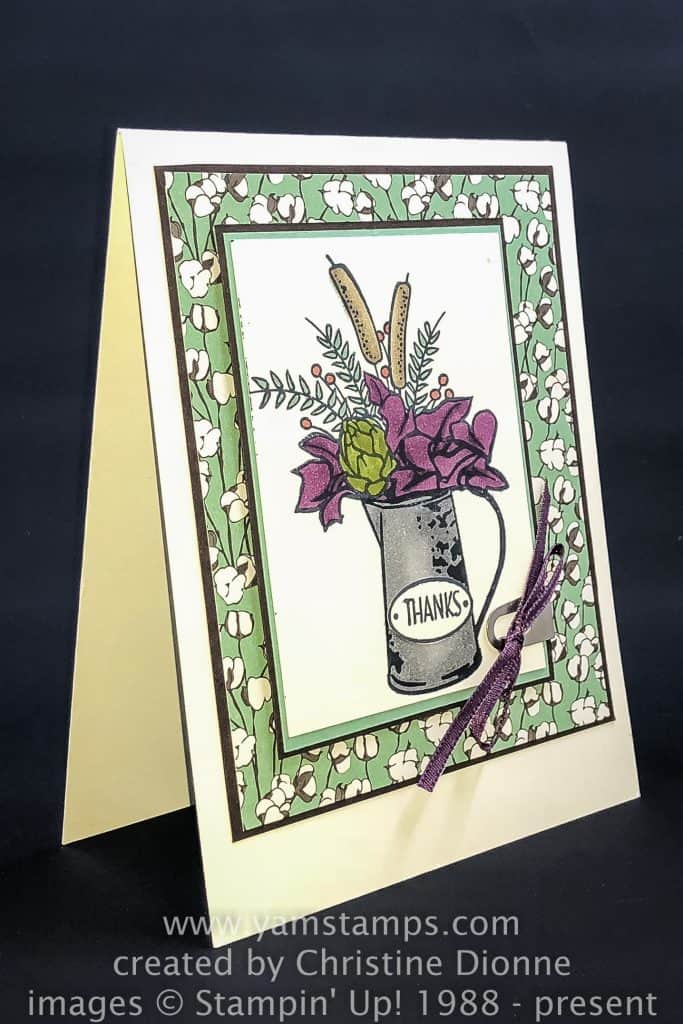
This card was created by Christine Dionne. Another great example of colouring with Stampin’ Blends on this image as well! She’s used the coordinating Country Lane Designer Series Paper in the background, and then pulled colours from the paper for the cardstock choices as well. The fun galvanized clip and I think that’s the Fresh Fig Ribbon are the accents.
I love participating in these Demonstrator only swaps – it’s a great way to get inspiration and ideas! If you’re interested in turning your hobby into a Side Hustle to earn a little extra income, consider joining my team of demonstrators – we are known as the “Eh” Team! I invite you to come to my Information Evening on Thursday, October 25th at 7pm. Find out more about the business opportunity and the flexibility and fun it can provide at the same time! RSVP for directions. I hope to see you there! In the meantime, THANK YOU for reading my blog and social media, THANK YOU for supporting my business, and from me and my family to you and yours – HAPPY THANKSGIVING!!
Oct 5, 2018 | Big Shot, birthday, cards, Stampin' Up!
Stampin’ Up! has so many great Designer Series Paper packages. These coordinating patterned papers make paper crafting a snap – and here’s an easy birthday card to share! The main feature is the die cut sentiment, and then you can change up the background paper to suit your need.
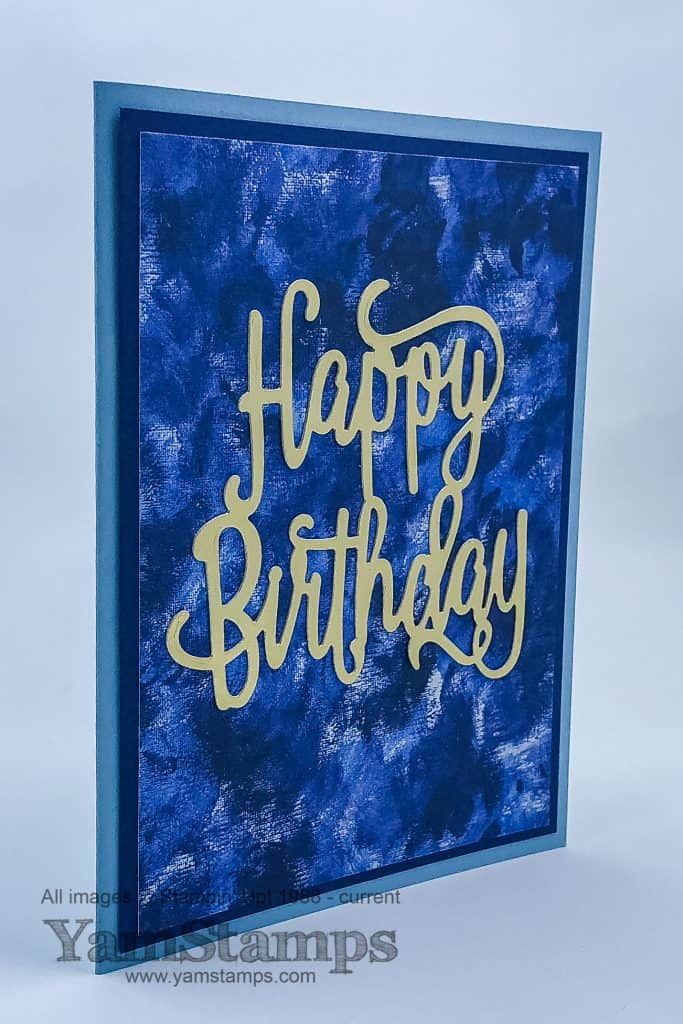
The sentiment on this card is created with the Happy Birthday Thinlits Die and Gold Foil Sheets. There’s a couple of tips to share with you with this thinlit and the gold foil to be sure this easy birthday card is…easy. First – when you die cut the Gold Foil sheet and remove it from the die, you may notice some “bumps” on the foil from the thinlit die. You can remove these or smooth them out by running the die cut shape through your Big Shot a second time on its own – just be sure that the Plastic Cutting Plate next to the Foil side/good side is fairly blemish free. I tend to try to use one Plate as the bottom one all the time, and the other Plate as the top one all the time, so that only one gets really scuffed up. A non-scarred Plate will not transfer any marks to the foil sheet. To adhere the die cut shape to your card, there’s two methods I prefer. One is to use the Multipurpose LIquid Glue – use the pointy tip end and just apply dots to the thicker areas on the back of the die cut. The other way I like is to use a Multipurpose Adhesive Sheet. If you want to use an adhesive sheet, adhere the non-cut cardstock or foil sheet to the adhesive sheet BEFORE die cutting. Then after it’s cut, you just peel off the remaining liner paper and adhere it in place.
I like the abstract pattern of this Designer Series Paper – it’s from the Garden Impressions package. If you want a more floral look, you could simply change out the paper – or in this case, flip the paper over! The flipside of this pattern is a random floral design. See? It really is an easy birthday card! You could make a whole bunch of these in advance using different papers and then have them on hand when you need a birthday card. If you are looking to build your stash of cards and want a regular outing, consider joining the Stampers Club! Each month, on the third Monday, the Stampers Club members get together for their class – at 1pm or 7pm (you can see dates on the YamStamps Events Page). Each member commits to 6 months of membership, during which time they place a minimum order at each class. Then, once during their 6 month membership, they’ll also receive a minimum of $20 free product of their choice (or $20 towards a Demonstrator Starter Kit, their choice). It’s a great way to get to know other people who are interested in crafting, and a fun afternoon or evening out! Contact me for more information or to sign up. New members are welcome to start at any time. See you in club soon?!
Oct 3, 2018 | Announcements, cards, Christmas, Seasonal Catalogue, specials, Stampin' Up!
It’s that time of year again! Pumpkin spice! Just kidding (well, I guess not really….) but I was actually referring to the YamStamps Twelve Weeks of Christmas Mailings! Christmas Project Inspiration directly to your inbox! This special “Thank You” goes out to all subscribers on the YamStamps List – and it starts today – around 1pm Eastern. You can sign up at yamstamps.com/signup or enter your information at the top right of the blog.
Subscribers receive a weekly email with various projects, ideas, information and tips – and at this time of year, it’s double the fun. On Tuesdays, the “regular” YamStamps emails go out, and then on Wednesdays, the Twelve Weeks Christmas Project mailings are delivered. We start with cards, move to gifts and then to packaging and tag ideas. I hope you can join in the fun! These mailings will not be resent so if you want to start at the beginning, you’ll need to be on the list TODAY (like, NOW…).
Here’s a holiday card that I can share. It’s one that I created for a demonstrator swap – and I loved this design. However, I messed up when I created this particular card (and I’m really hoping it was only this card…) – but you can’t see the mistake in this photo.
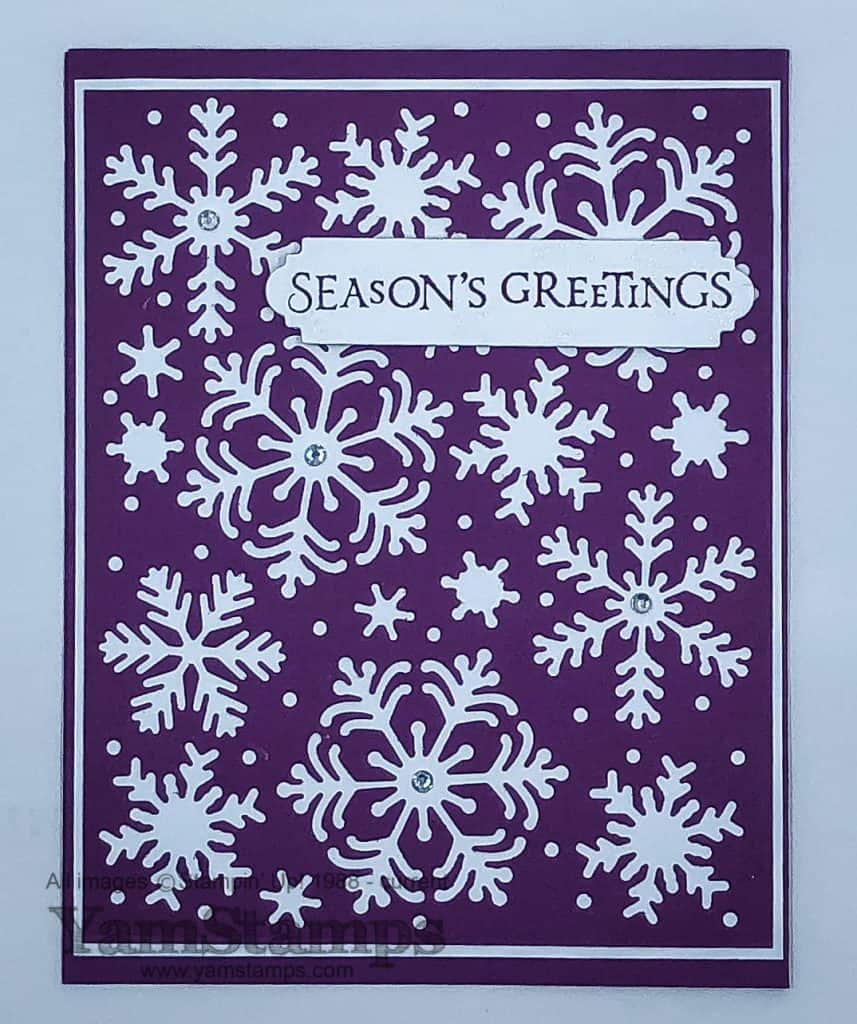
I discovered my mistake when I went to open the card to take a photo (which is why the card is flat in this picture!)….I stuck the front of the card elements on upside down!!! To see how I easily fixed this – check out the Facebook Live I did on Monday. I have to admit, I wasn’t sure how well it would work, but thought I’d wing it…and thankfully it did work beautifully, especially since it was a live video so no re-dos! I can guarantee that the Christmas Project ideas you’ll receive in your email inbox will not feature such errors…or if they do, you won’t be able to see them?! hahaha.
One last thing – World Cardmaking Day is coming up on Saturday, October 6th – and to celebrate, Stampin’ Up! is offering selected product at a discount until October 7th! You can check out the products in the YamStamps Online Stampin’ Up! Canada store, or click here to see the flyer. In the meantime, I hope that you are able to join the YamStamps mailing list for the extra Christmas Project mailings starting today!
Sep 30, 2018 | Big Shot, birthday, cards, Seasonal Catalogue, Stampin' Up!
Happy Sunday to you! Can you believe it’s the end of September already?! Today’s Sunday Swap Share is a gorgeous fall birthday card – but you could easily switch out the sentiment to suit your purposes for any card you’d like to send out this autumn. Today was a bit of a rude awakening for me – I spent the last few days in New Orleans at a business retreat/mastermind. It was great to see my fellow stamping business owners, mahy who have become such good friends. The weather was very humid and warm, and the food was great….and now I’m back to reality in Ontario where it’s autumn weather and I have to cook for myself LOL!!!


A couple of touristy shots from the trip including the NOLA equivalent of stopping at the doughnut shop?! You can see some other photos from my trip on the YamStamps Instagram account and Facebook page.
So back to that Sunday Swap Share…being at the retreat/mastermind these past few days have reinforced to me that stampers really are some great people! Lots of ideas, inspiration and sharing occurred as we focused on running and growing our businesses. Another aspect of this line of work is of course the creative side. I often will participate in smaller, organized card swaps to get creative inspiration for myself (and thus for my cusomters!) – and I love seeing samples with sets that I might not own myself (yet?!).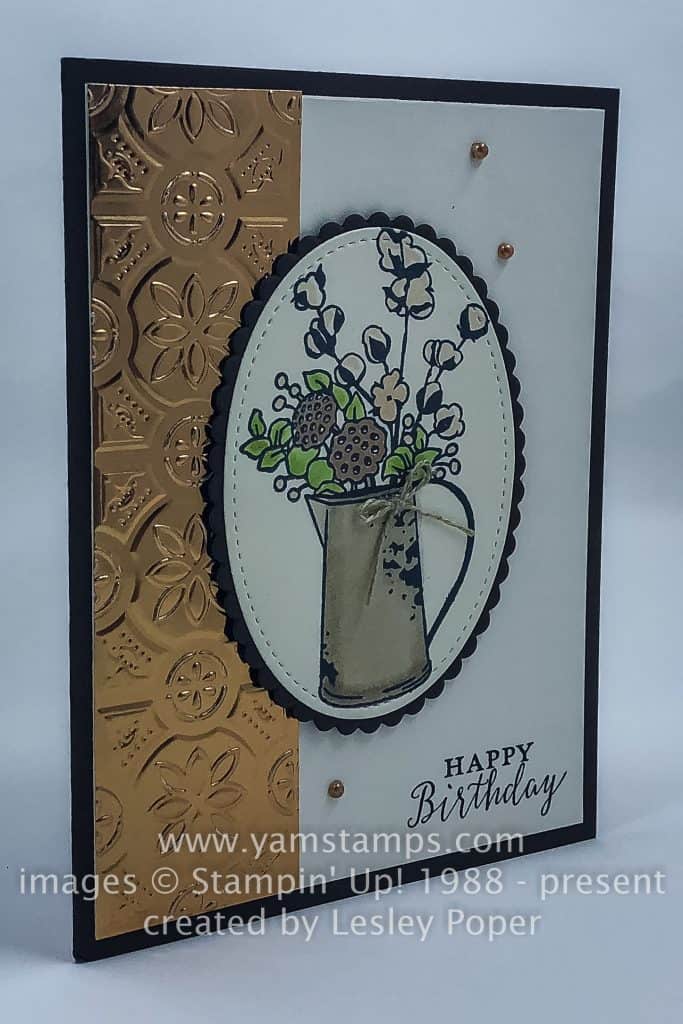
This card was created by Lesley Poper. I love the effect of the Tin Tile Dynamic Textured Impressions Embossing Folder on the Copper Foil Sheet.The depth from the dynamic folders really is quite stunning! The main image on this card is from the Country Home stamp set. I believe that she used Stampin’ Blends to add colour to the image. The sentiment is from the set Detailed With Love, which is available in red rubber clear mount or red rubber wood mount. The colours and sentiment make this a fall birthday card, but as I mentioned, you could change out the sentiment and even the bouquet )the stamp set has options) and/or colours to suit whatever card giving occasion you have!
If you are looking for seasonal cards, the October Christmas Class is scheduled for Wednesday, October 24. The 1pm class is already full! There are still some spots in the 7pm class though! Please contact me to register by October 9th – there are some options for this class – $20 version for card supplies only – $30 includes 1/2 package of Joyous Noel Designer Series Paper and $40 includes a full package of Joyous Noel Designer Series Paper. For the paper included options I will cut your card supplies from your portion of the paper, and you will have the remainder to take with you, which will be more than enough to recreate those designs or use them for other projects. If you register after October 9th please note there will be an additional fee to ensure that your class supplies will arrive in time for your class. Again – please contact me to register or if you have any questions. Upcoming events can be seen on the YamStamps Events Page. Hope to see you at a class or event soon!