Click on the picture to go to my business website and watch the video on watercolouring! If the link doesn't work, just type in www.yamstamps.stampinup.net. Once there, If you click on the little square underneath the preview picture, you can watch the video in full screen mode. Enjoy!
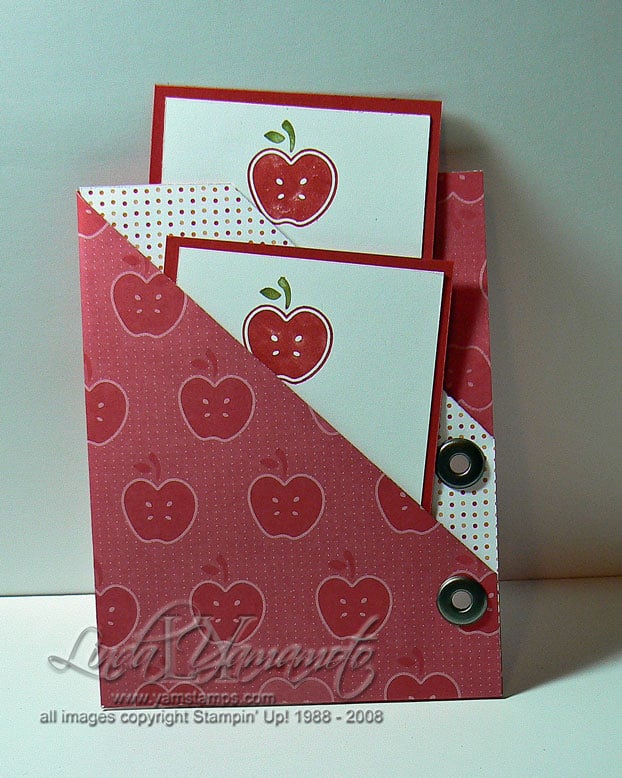
The May video tutorial is here (just under the wire!). This one features my version of a double pocket card. I had promised the video so that club members (OK and anyone who watches!) could get a handle on how we did this. I think that the sound and lighting are better on this month, and I've learned how to do the "speed up" effect… feel free to leave feedback or ask questions! Photo is of the version that I think will become the "Thank you teacher" gift at the end of the school year! One tag can easily be converted to a gift card holder by using the slot punch, and the thank you note can be written on the other tag!
Even with my editing, the video is almost 5 minutes long, so grab a cuppa while you watch (or better yet, grab some designer series paper, jumbo eyelets and your crop-a-dile and play along!!) Enjoy 🙂
TADA! The promised video is here….this is as good as it gets at this point in time… I’m going to have to work on the lighting and the audio for future videos, though – because the camera is behind me, my voice didn’t pick up very well. (hard to believe, I know); I tried brightening the video and think perhaps I overdid it…ah well, it’s a learning curve. Hopefully this will inspire you to try this project – just in time for Mother’s Day!
This coordinates with the Wonderful You watercolour card from my last post… Ingredients are all Stampin’ Up – Very Vanilla cardstock (8.5 x 11), Stems & Silhouettes jumbo wheel with Pretty in Pink jumbo cartridge, rose wide grosgrain ribbon, pewter hodgepodge; for tag – Wonderful You stamp set, Mellow Moss ink, Going Grey ink; small & large tag punches; vanilla & regal rose cardstock.
Here’s the photo of the project, because it doesn’t get shown off as well as it should… (click if you need to see a larger version)
And…here’s the video. Feel free to leave (gentle!) feedback here on the blog.
We did a diorama card at the punch class (Punch your art out!) and I had promised to post the instructions for the attendees so they could remember everything!!
This was taught to me by my friend & fellow SU demonstrator, Karen Motz, at another demo’s (Mo Dickie) demo meeting.
I used the In Full Bloom simply scrappin’ kit (as did Karen) because it makes life a little easier (and who couldn’t use that?!). I have a sneaking suspicion that we may lose this simply scrappin’ kit because the coordinating stamp set In Full Bloom is retiring at the end of June (*sob*). (No insider information here, but just hazarding a guess…..really).
Anyway…..
2 pieces of coordinating solid cardstock, 3" x 8.5" 1 piece coordinating patterned cardstock 3" x 6.5" (or randomly stamped cardstock). 1-3/8" circle punch (for the holes on the front of the card) 1-1/4" circle punch (for the holes on the middle section of the card) paper trimmer with scoring blade adhesive
Score both solid cardstocks widthwise 2" from both ends.
Score patterned cardstock widthwise 1" from both ends.
Choose cardstock to be the back of the card. Stamp sentiment of choice on centre of this cardstock & set aside.
The front of the card You may wish to stamp on the cardstock to decorate – you can do this either before or after punching holes. Punch first hole: Line up the right edge of the 1-3/8" circle punch with the right score line, and insert the cardstock all the way into the punch.
(the physical edge of the punch lines up with the score line, not the shape to be punched
Punch 2nd hole lining up left edge of punch with left score line, again, inserting cardstock all the way into punch.
This is what you have so far. Use as a mask for Hallowe’en….or continue on to make the diorama card.
Using the punch upside down so you can see what you’re doing, punch a third circle in the middle of the two circles already punched out.
(truth be told, I usually punch upside down, perhaps I spent too much time "down under" in the South Pacific on my travels).
The end result
Repeat above process using the 1-1/4" circle punch on the decorative cardstock which will be the middle portion of the card.
Start construction: Adhere middle & back section of card first:
Apply adhesive to the outside edge of the decorative cardstock. Align ends of cardstock & adhere.
Repeat with other side so you end up with something like this:
Apply adhesive to front section edges & align & adhere to card body.
The finished project. I stamped images from the In Full Bloom stamp set & applied some adhesive die cuts from the Simply Scrappin’ kit.
I’m baaaack….and a couple of tutorials here!
First up is the Stamp-a-ma-jig – one of my favourite stamping tools. Trust me, I’ve tried other stamp positioners and this is the best one! I’m still using my original samj from Stampin’ Up! – it’s purple. The current version is the same but is in black.
This tool is great for precise placement of stamped images or quick fixes. You know, when you stamp and some of the image doesn’t turn out….the samj will help you restamp exactly over top of your original image & saving that piece of cardstock from the recycle bin.
The samj consists of the positioner and the acrylic sheet. To use; position the sheet snugly in the corner of the positioner. The set up here is great for right handed stampers. Lefties could position the acrylic sheet on the other side. You can also put the positioner at the “top” corner of the sheet. It’s your preference, just be consistent.
(OK try not to notice that the sheet is not in perfect position, it’s very hard to position & photograph with only 2 hands!! LOL)
Next step – ink up the stamp, and place it snugly in the upper corner of the positioner – and slide it straight down….
until it makes contact with the acrylic sheet.
Normally, I’d use one hand to hold the positioner in place, and the other hand to slide the stamp, but again, I only have 2 hands, and one of them was holding the camera!!
Here’s the image on the acrylic sheet.
Next step is to take the acrylic sheet & position it so the image is exactly where you want it to be on your cardstock.
Holding the acrylic sheet in place, slide the positioner up to the corner of the acrylic. (again, more easily accomplished with two hands!! LOL)
Remove the acrylic sheet, leaving the positioner in place.
Ink up your stamp
Line up the stamp in the upper corner & slide down until you make contact with the cardstock.
AKA the bow on my wedding invite swap. (Did you notice it was for Jessica Simpson & John Mayer?! LOL. What can I say, it was easier than making up 2 names). First of all, I used the double rectangle punch to create the 2 holes. Much easier than trying to line up a single punch twice. The vellum paper is thin, so I could punch through that and the cardstock without issue.
Next, I took a length of wide organdy ribbon, and put an end through either hole, front to back.
Next, criss cross the ribbon in back. I’m holding one end out of the way.
The end of the ribbon feeds to the front of the card, through the opposite hole. (I’m still holding the one end of ribbon out of the way).
(Don’t my nails look nice? didn’t even have to "edit" them with photo software!! LOL).
Pull the end through snugly….
Then repeat with the other end of ribbon.
Finish the ends. Fold ribbon in half lengthwise, then snip on a downwards angle towards the fold. I call this "Martha"-ing the ribbon – it gives a notched edge to the ribbon, looks nice & helps prevent fraying. I originally saw it on Martha Stewart Living!

 Click on the picture to go to my business website and watch the video on watercolouring! If the link doesn't work, just type in www.yamstamps.stampinup.net. Once there, If you click on the little square underneath the preview picture, you can watch the video in full screen mode. Enjoy!