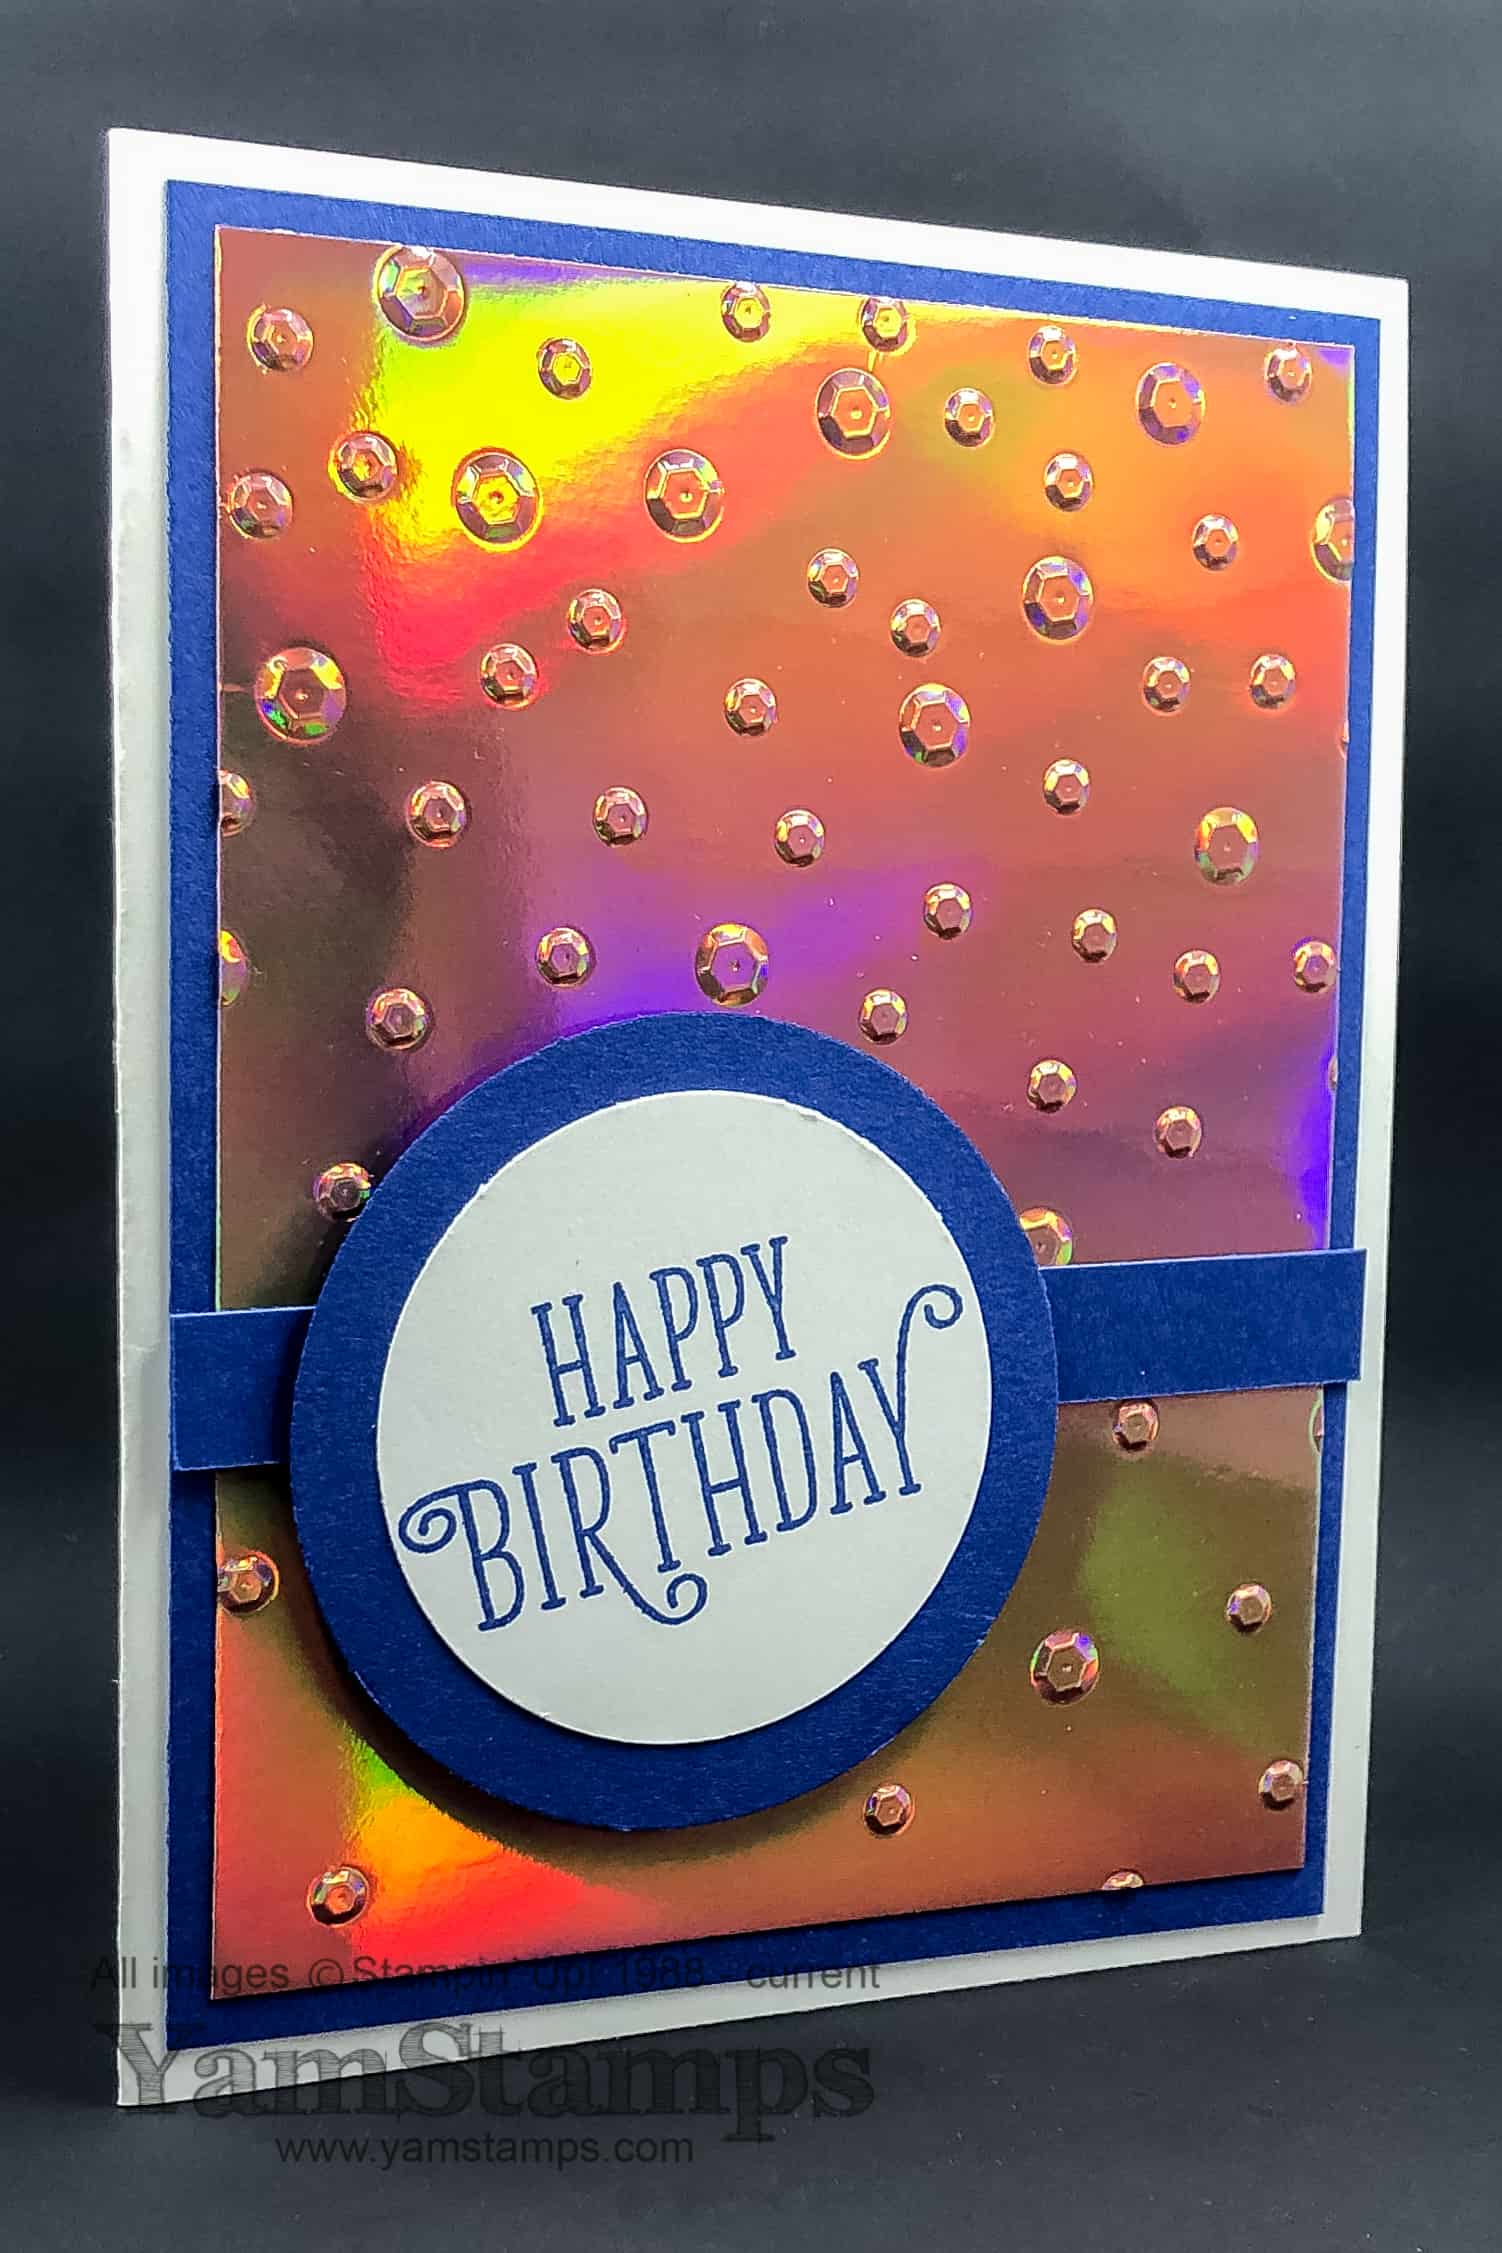
This is a perfect card for a Manic Monday – easy but impressive (though that’s the goal for most of my crafting any day of the week….). This Metallic Foil Birthday Card features one of the Grapefruit Grove Foil Sheets which comes paired with Lovely Lipstick Foil Sheets as a Sale-a-Bration Level 1 package! You get four sheets of each, so eight sheets total for plenty of crafting opportunities!
For this Metallic Foil Birthday Card, I used the Grapefruit Grove Foil which has an iridescent sheen to it – so it’s good for a gender neutral kind of card! Here it’s embossed with the Scattered Sequins Dynamic Embossing Folder, and the sentiment is from the Happy Birthday Gorgeous stamp set. I usually like to use circles for sentiments or images if I can because they’re very forgiving – you don’t have to worry about whether the image is totally straight – and in this case, I wanted to mount the sentiment on an angle to make it a bit more interesting, so it’s easy to do if there aren’t any straight lines or corners I need to worry about! Just a few steps and this card is done. Of course, I used my thrifty trick of cutting the backing circle from the backing layer of cardstock for the foil sheet – since noone will see the hole there anyway!
Just a reminder that for each $60 CAD in product that you order, you earn a Level 1 Sale-a-Bration reward (like the foil sheet package used to make the Metallic Foil Birthday Card) – and $120 CAD product order means you can pick either a Level 2 reward or TWO Level 1 rewards! Coming on Friday, February 15 – more options! A new set of rewards to tempt you through to the end of Sale-a-Bration, March 31st. I’ll be sure to post a link to the catalogue here on the YamStamps site on Friday.
Of course, the Demonstrator Starter Kit special is still going strong – $225 worth of product of your choice for just $135 – or you could add in an exclusive Craft & Carry Tote Bag for a total kit price of $175. Provincial sales tax ONLY applies – so if you’re in a province with a blended tax, there is NO tax, and FREE shipping. You can check out this page of FAQ (shortcut is yamstamps.com/join) or contact me if you want more information about joining my “Eh” Team of stampers! I’d love to have you join our group!
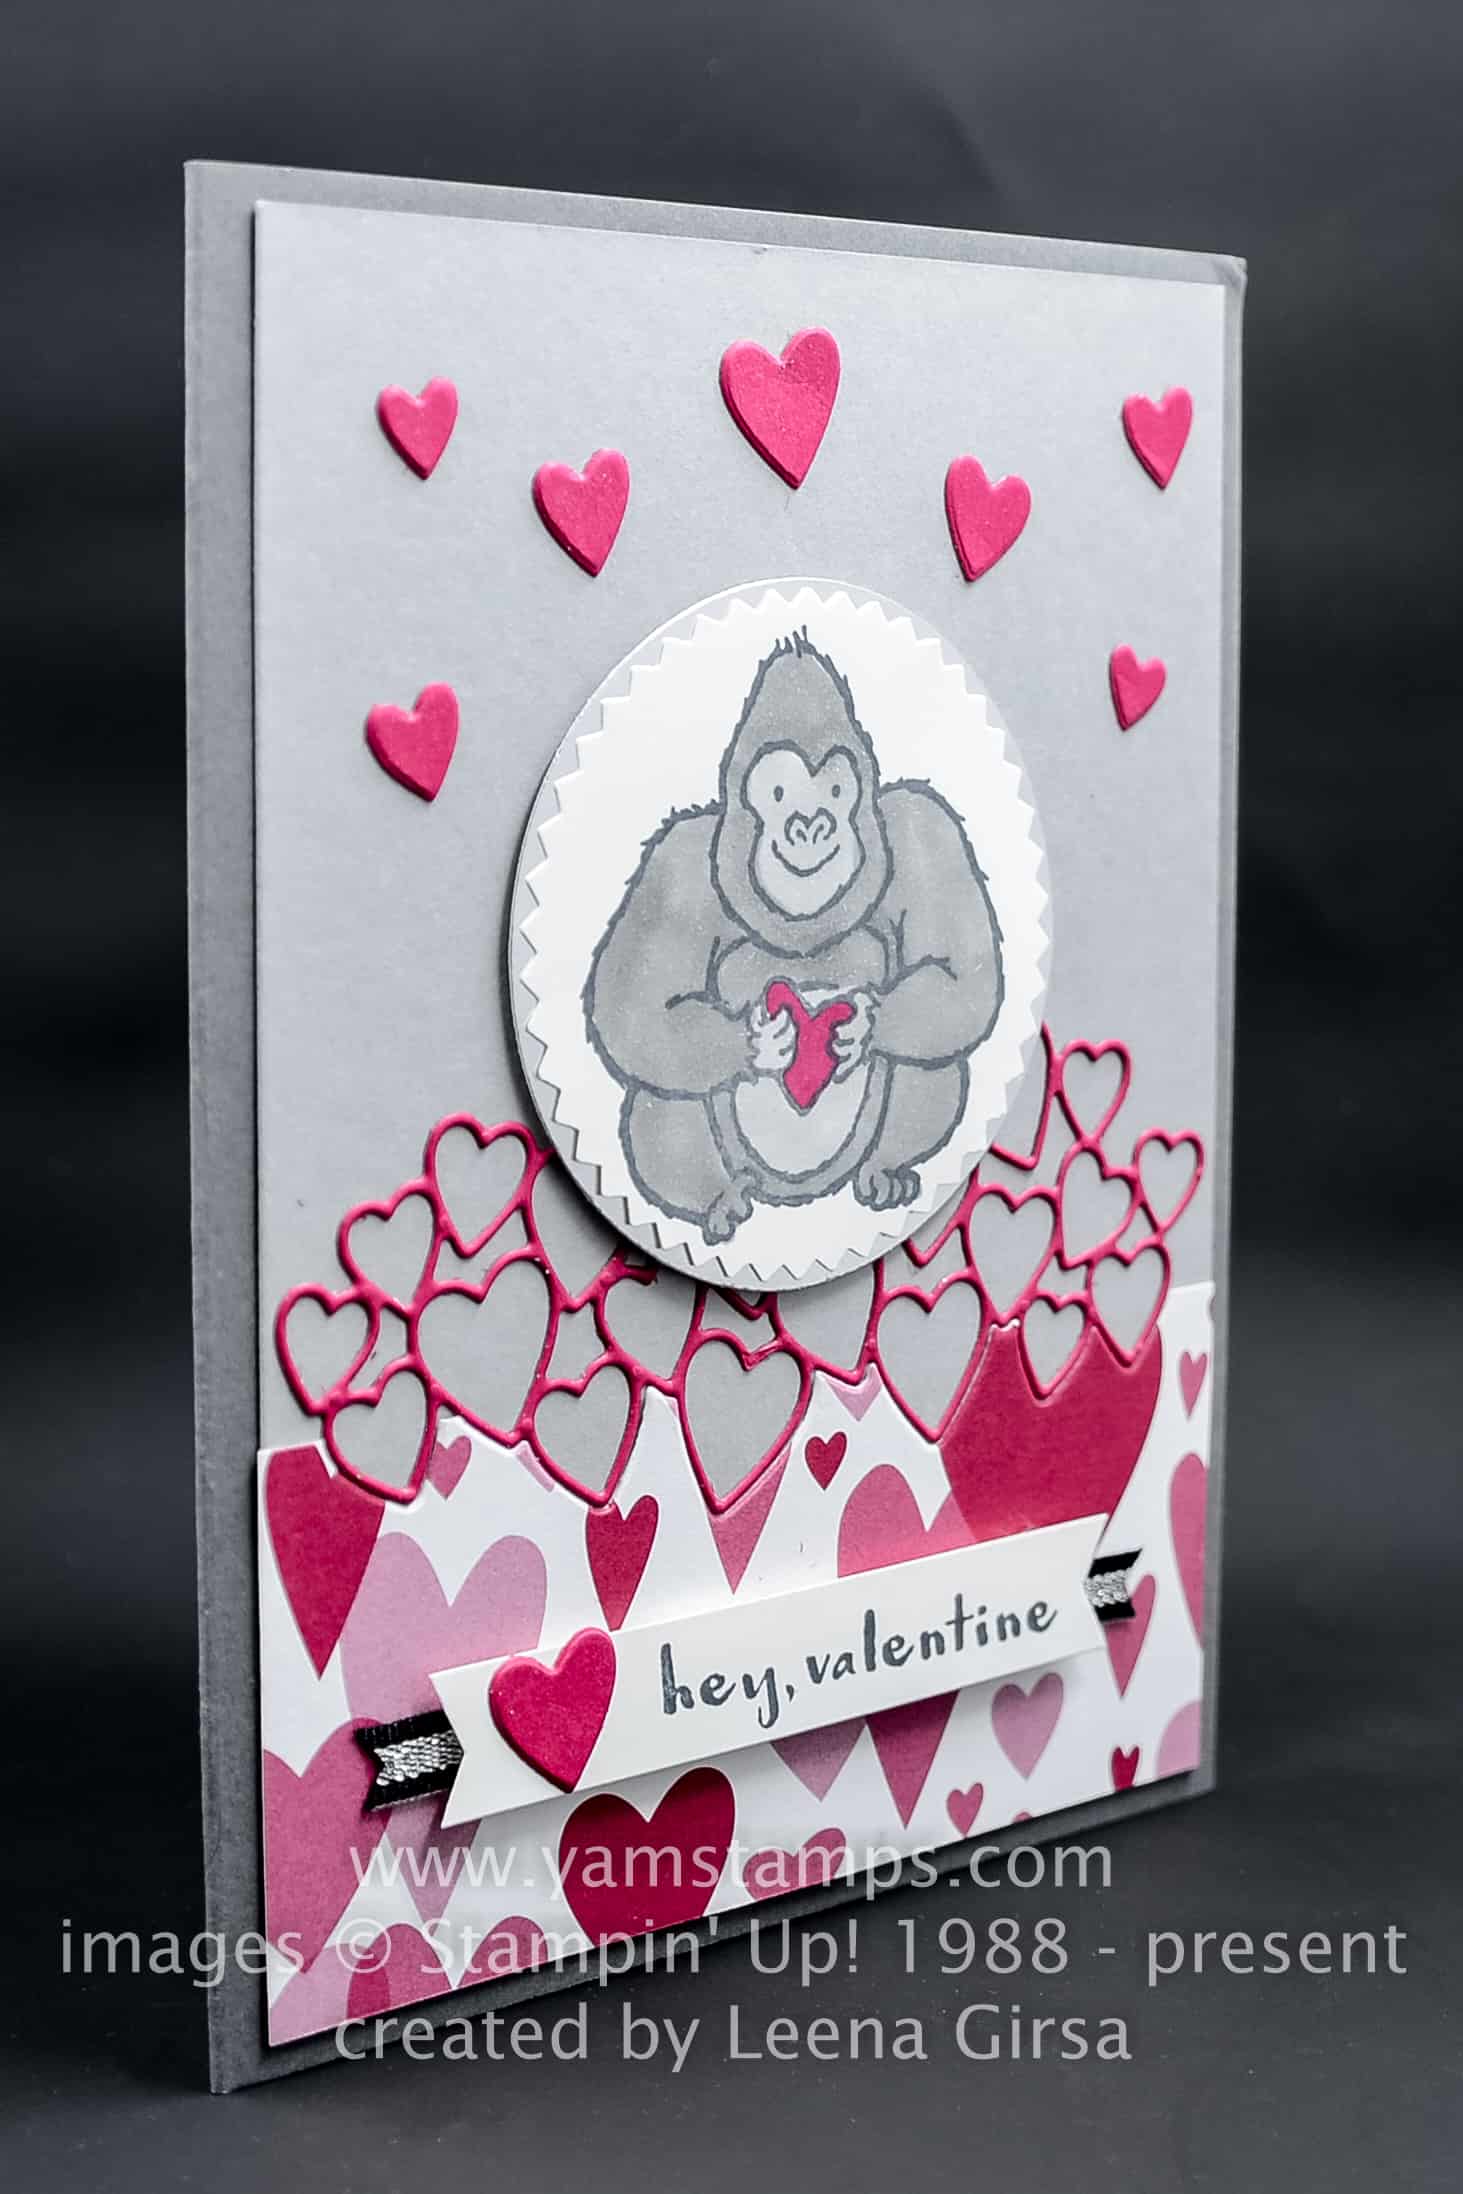
Isn’t this fun? Created by Leena Girsa, it features a few love themed Stampin’ Up! products. The image is from the Occasions Catalogue Hey Love stamp set and is punched out with the Starburst Punch. The paper along the bottom of the card is from the All My Love Designer Series Paper package, and the die cut is from the Be Mine Stitched Framelits Dies. I love how you end up with the outline of the small hearts plus all the solid small hearts to use on projects! I also love how Leena inlaid the diecut by cutting the top edge of the Designer Series Paper as well. The sentiment strip is accented with a piece of the Black and Silver Striped Ribbon. I think this would be a great card for a young man. Hey Valentine!No frilly stuff here!
You still have a few days to make your own Valentine’s Day cards – Stampers Club members will actually have the opportunity to make one on Monday – just in time for February 14th. We welcome new members at any time! If you’re local to Burlington, Ontario, why not come and join us? Check out the YamStamps Events page for more information, or contact me! Stampers Club is a great way to meet some fellow crafters and get a monthly creative fix – plus once during your 6 month membership you’ll get FREE product! Afraid of commitment? Well then, theMonthly Card Class is for you – sign up for the dates that work for you! The First Wednesday of the Month is Card Class (usually….check the Events page just in case…) and the third Monday of the Month is Stampers Club (usually…depending on stat holidays). Due to the crazy weather we’re having in Southern Ontario, we had to cancel February’s Card Class – and I noticed when I was posting on the YamStamps Facebook Page, that LAST February’s Card Class was also affected by weather! Hmmmmm…..
Anyway – hope you can join us in person at some point – or if not, there’s always the Online Club option. Hey Valentine – there’s no excuse not to get some crafty “Me” time in! Happy creating.
Happy Year of the Pig! It’s the Lunar New Year (Chinese New Year) and the year of the pig, to be precise, Earth Pig. (At least that’s what it said when I looked it up online). In any case, it was enough encouragement for me to revisit a previous favourite Stampin’ Up! stamp set, This Little Piggy.
The perils of being a demonstrator – sometimes I get so distracted by the latest releases and upcoming products that some older items get a little neglected at times. This Little Piggy is available in red rubber clear mount and red rubber wood mount. I stamped the image in Staz On Jet Black ink onto watercolour paper (see the YamStamps Facebook Page post from yesterday to see how I excluded the sentiment on the image). I then did a quick colouring job with my Aquapainter and drops of ink refills. The whole idea behind this card was to get it done and not be tooooo fussy (that’s my reasoning for colouring outside the lines LOL). I used Blushing Bride for the body of the pig, with a bit of Balmy Blue for the sky and Pear Pizzazz for the grass. The flower is So Saffron, and I scribbled onto a clear block with my Neutrals Basic Gray Stampin’ Write marker before picking up the colour to add to the pig’s hooves. I die cut the image and mounted it onto a scallop square using the Layering Squares Framelits for both. Since it was a square image, I placed it on a square card, and now I’m ready to send it to someone in honour of the Year of the Pig! (Want it? Let me know!)
Part of the reason I’ve been distracted by new, shiny objects…Stampin’ Up! will be releasing a second set of Sale-a-Bration products on February 15th, so be sure to come back here to see the new options! Plus, on March 1, there will be more product available to purchase that was designed to coordinate with existing Sale-a-Bration products, so your crafting will be even easier. Demonstrators are able to preorder all these items NOW, so I have been figuring out what I “need”….
January 31 is Inspire Your Heart With Art Day! Who knew that there was an “official” day for this?! I think that technically this is any day when I get to craft, but it’s nice to mark it this way.
Here’s a card I created to commemorate Inspire Your Heart With Art Day. I was a little literal….so it has a heart on it…
I hope that you are able to take a moment or two today to Inspire Your Heart With Art. Crafting is a great creative outlet for me. I also find inspiration in other art forms, especially music. I often listen to music while I craft – usually something I can sing along to. Are you a “craft in silence” or “craft with distractions” kind of person? For me it often depends on if I’m working to a deadline or not…and how close that deadline is looming!
If you are looking for a creative outlet, don’t forget the YamStamps Monthly Card Classes! Next class is this upcoming Wednesday, February 6th at 1pm or 7pm in Burlington, ON. Please contact me to register (or use the link on the YamStamps Events Page). If you aren’t able to make it on a class date, consider getting a group of friends together and booking a private class!
In the meantime, I’m looking to Theatre Night tonight – a group of friends and I have a subscription to attend shows in Toronto. It’s always fun to get together and enjoy a night out. I am definitely taking the “Inspire Your Heart With Art” theme seriously!
A simple handmade sympathy card is what is called for at a time that you may not feel very creative, and there’s often more of a time pressure element involved. This monochromatic card is perfect in that situation, though the sentiment could easily be changed out for another occasion, since this graphic is not occasion specific. It’s also good for a “Manic Monday” share – a quick card to make when life is hectic.
This card features the Flourishing Phrases Stampin’ Up! stamp set (red rubber clear mount or red rubber wood mount), which also has coordinating framelits. The only framelit used on this card, though, is from the Stitched Labels Framelits dies – for the sentiment. I think it adds something to this otherwise simple sympathy handmade card, but it’s also added with a purpose. A slightly crooked image for this card is not going to be noticeable (and could be an artistic choice), but a crooked sentiment will likely be more noticeable (especially by the person making the card LOL)….so by adding it with a die cut afterwards, you avoid that grief! I stamped the sentiment on a scrap piece of Very Vanilla cardstock, then used the framelit with the Magnetic Platformon the Big Shotto cut out the sentiment, saving myself a bit of stress in the meantime. Simply position the framelit around the sentiment so the sentiment is straight and you’re good to go.
Stampin’ Up! has announced that they’re going to be moving to all photopolymer (the see-through stamps) or red rubber cling mount stamps. The only stamps that will still be available in red rubber wood mount will be the large background stamps. (Check out this quick comparison of the types of stamps). I personally have always loved the wood mount option, primarily because I am a bit of a lazy crafter, and the less steps involved in crafting the better for me. I liked being able to grab a stamp set and be ready to stamp right away – no looking for blocks etc. I do have to admit, though, that with the arrival of the new cling mount labels and the Stamparatus, I’m not missing the wood mount option so much! Who’d a thunk it? The new cling mount labels are super sticky and there’s no shifting of the rubber stamp when I clean it, and the Stamparatus is my favourite tool for multi-step stamping. A little work to get the images positioned correctly initially and I’m ready to go, and encouraged to make multiples of cards at the same time – good for my card stash, and for my card sending efforts for sure! My set for this simple handmade sympathy card is a wood mount set, but I am starting to choose the non-wood mount option more often. Plus, Sale-a-Bration is a great time to pick up a Stamparatus, or Stamparatii (if you are getting more than one…isn’t that the proper plural form?). One Stamparatus will get you a Level 1 Sale-a-Bration reward, two Stamparatii will get you a Level 2 Sale-a-Bration reward (or two Level 1 Sale-a-Bration rewards!), and so on…and so on…
I’m planning on doing a quick Facebook Live today on the YamStamps Facebook Page (once all my technology is properly charged up), so be sure to like and follow the page to get notified when I go live! In the meantime, if you need assistance placing your order or have any questions, please contact me! See you online.
This week’s Sunday Swap Share is this calming thank you card. It was created by Dana Hancock, using the Level One Sale-a-Bration stamp set,By the Bay. You could choose this for free when you place a $60 Stampin’ Up! product order until March 31st.
For this thank you card, Dana also used some of the Wood Textures Designer Series Paper Stack, plus the Balmy Blue ribbon from the Sale-a-Bration Organdy Ribbon Combo Pack, which of course, coordinates with the Balmy Blue Cardstock. When you have a line art image like this one, it may feel like you need to add colour to the whole thing – but you can spotlight just one area of the image, as is done here – a bit of blue and brown added to the building only. You can recreate this by adding colour with either an Aquapainter or Blender pen, and picking up some colour from either a reinker or the inside cover of an ink pad. If you look closely, you’ll also see the detail added by using the Rectangle Stitched Framelits Dies, one of my new favourite products in the Occasions Catalogue.
When you book a private card class through me, you can request the themes of the four cards we will create – so if you are in need of a thank you card, birthday cards, or thinking of you cards, be sure to contact meto book a date! Sale-a-Bration runs until March 31st, so if you want to take advantage of the freebies, you’ll want to get a date in before then. Hope to speak to you soon!