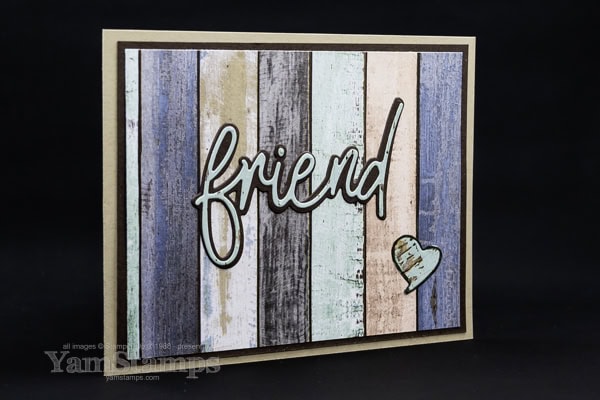
I think Stampin’ Up! Canada’s Friends for Life bundle is one of my favourites right now. I used it along with the Country Woods Designer Series Paper to create this Friends For Life Card – and it’s easy to re-create! I’ll share a couple of tips that might make this card a bit easier as well.
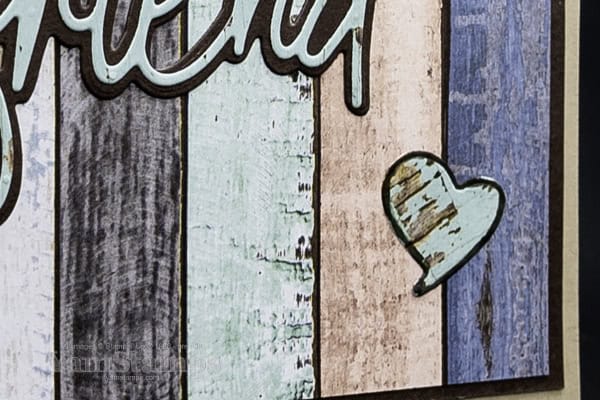
First off, the Country Woods Paper has some gorgeous wood grain / painted wood grain images including this multicoloured/striped one. That makes for an easy background for my Friends For Life Card! I used Early Espresso Cardstock for the backdrop, but before I stuck everything down, I cut the backing die for the word “friend” from the centre of that cardstock. I love that thrifty trick. The hole was then covered by the patterned paper and noone’s the wiser. I chose to die cut the detailed text and the heart from another sheet of the paper that had the lighter blue toned “paint”.
The trickiest part about this Friends for Life card is not losing the dot for the “i” when you pop everything out of the die!! If I am sending out die cut pieces like this to my Card Club Members, I fold some Press ‘n Seal in half around the pieces to encase everything safely. The other thing that the Press ‘n Seal can do is to hold the die cut in the original shape. Sometimes when I pull a thinner die cut word out of the die, it will stretch/spread, so I have to smush it back into the original orientation to fit onto the background. I hold the die horizontally, close to my work surface (covered in a bit of Press n’ Seal), use the brush tip for my Take Your Pick tool, and run it over the die to push out the die cut shape and drop it directly onto the Press ‘n Seal (or with as little handling as possible) to keep it in the original ratio/shape.
One other thing to make it easier with thinner or more detailed die cuts – I often will use an Adhesive Sheet on the backside of the paper – so that I just have to peel off the liner and it’s ready to attach. The other option is to use Multipurpose Liquid Glue – small dots, and it’s good to let it dry just a bit so that it doesn’t “smoosh” out everywhere.
To tie everything together and add a finishing touch to my Friends for Life Card, I took the brush end of my Early Espresso Stampin’ Write Marker (part of the Neutrals Stampin’ Write Markers set) and ran it around the edge of the heart so that it matched the word “friend” and the general design of the card. Put everything onto a Crumb Cake Card and it’s done!
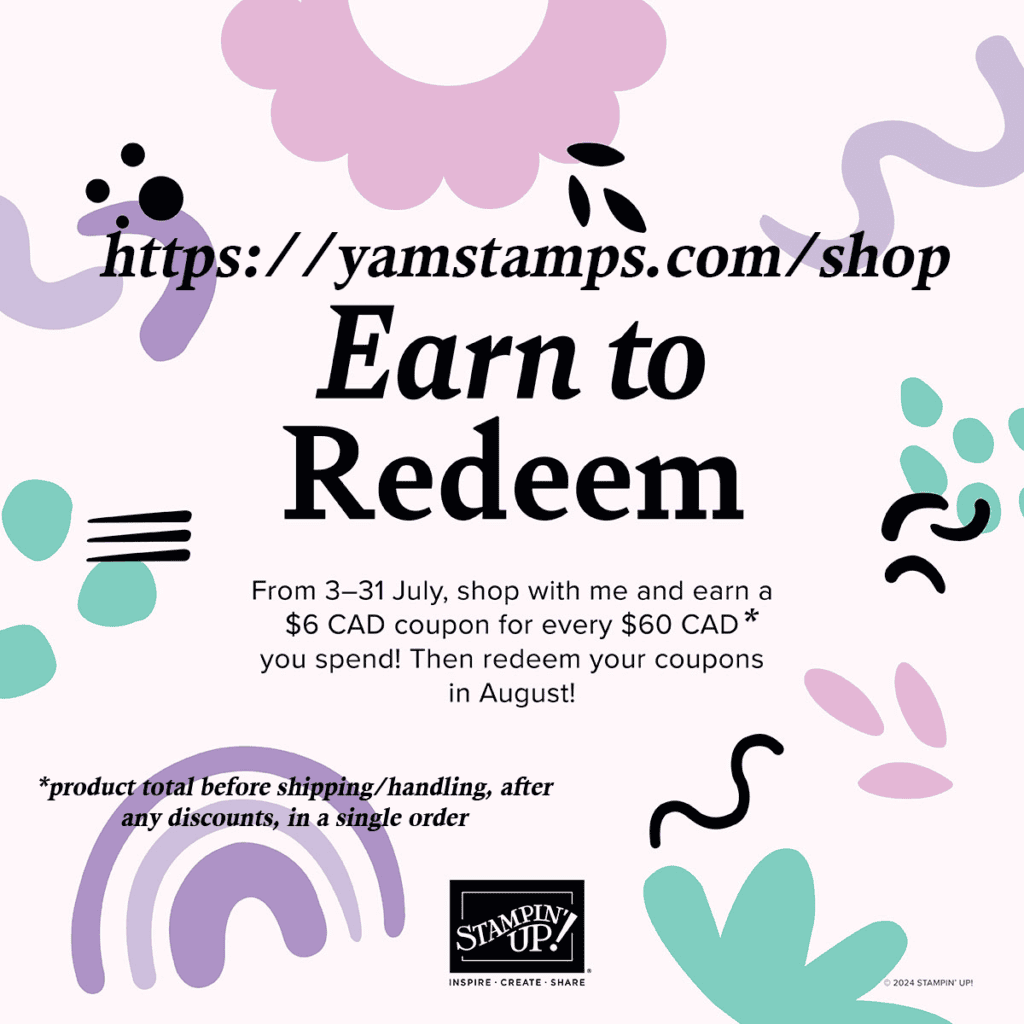
Starting today and running until the end of July, it’s Stampin’ Up!’s BONUS DAYS! For each $60CAD in product that you order, you’ll earn a $6CAD coupon that you can spend in August! Product total must be before shipping/taxes and after any discounts or codes are applied. It’s a great way to get an extra reward for making sure you’ve got crafty supplies on hand! Shortcut to shop in Canada is YamStamps.com/shop or you can message me with your order if you’d like to pay by etransfer or if you need assistance placing your order. Happy Shopping, and Happy Bonus Days!!
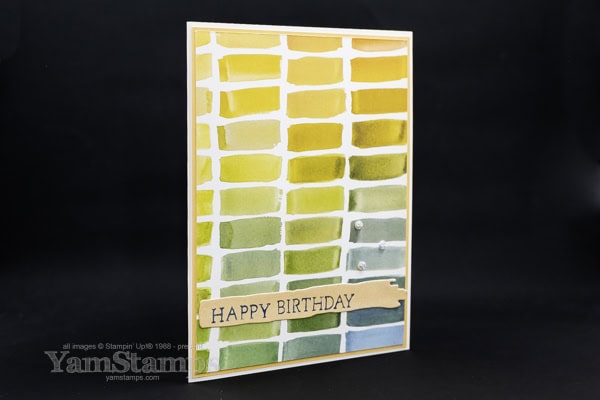
Recreate this simple colourful card quickly and easily!
I am all about the quick and easy crafting – I love when something looks more difficult than it actually is – so this simple colourful card fits the bill!
Use your patterned paper as the main focus and you can create so many cards – add a bit of stamping for customization, and it’s ready to pop into the mail! For this card, the main focus is the Full of Life Designer Series Paper. This is a 6″ x 6″ set of papers, and you get four of each double sided design (there’s 12 different designs, so 48 sheets all together). Depending on how you cut your paper, you can have a majority of one colour tone over another. In this case, I chose the yellow/orange tones and used the blue/greens as a bit of an accent colour.
So you could call this a simple colourful watercolour card – since the original designs for the paper were hand painted by one of SU’s artists! (So yes, watercoloured, though not by me…!) For the sentiment, I used the Friends for Life bundle which includes a stamp set and dies. (It’s an extra 10% off the already discounted price if you purchase it before the end of June!). I added the die cut brush stroke strip, and managed to fit the greeting onto it. If you look at the Friends for Life stamp set, you’ll notice that the Happy Birthday Greeting is actually stacked, so the word “birthday” is below the word “happy”.
I used the Blueberry Bushel Stampin’ Write Marker (from the Regals Collection) to colour directly onto the stamp, one word at a time. I inked up “happy” and stamped it onto the strip, then I cleaned my stamp (to fully remove any remaining ink), inked the word “birthday” and stamped it onto the strip, so I could have the words horizontally aligned. I think that was the most difficult part of this simple colourful card, and it’s not THAT difficult!
You can grab these products in the YamStamps Stampin’ Up! Canada Online Store by clicking on the links, or going to YamStamps.com/shop. Stamp and die bundles are an additional 10% off during June! If you’d like assistance placing your order, or would like to pay by etransfer, you can contact me. Create your own simple colourful card that doesn’t look so simple! Like I say – paper crafting doesn’t have to be difficult to be impressive!
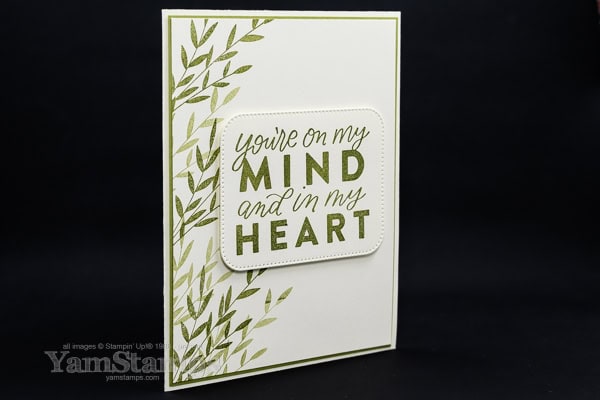
If you want an easy but effective design, try this one colour clean and simple card!
Of late, I’ve been doing primarily online classes and clubs, but last month I actually did an in person event! I was invited to do a fundraising/cardmaking event for Grace United Church here in Burlington ON. W4 (Women who Work and Worship) had an event to help replenish the card stash for their Care Network – who send out cards to those in their congregation in need of a pick me up. It’s a lovely concept, and I’ve done this in the past (pre-covid) so I agreed to dust off my wheelie bags and take the show on the road again!
This is one of the cards we made at the event – a one colour clean and simple card that’s easy for crafters of all experience!
The stamp set I used for the main sentiment has now retired, but you could use something from Kindest Expression or any other sentiment set you might have on hand. I do think a larger sentiment looks good on this kind of card design – it doesn’t get lost on the card front. We used the Nested Essentials Dies for the sentiment piece. The leaves along the side of the card are from the Painted Lavender stamp set. The only colour used on this card is Old Olive, and the cardbase is Very Vanilla which I think goes with some of the colours that are a bit more yellow based in tone.
For a one colour clean and simple card, I like to add interest with angles and asymmetrical designs, so I added the leaves along the left side of the cardfront. For the leaves, I inked up the stamp in Old Olive ink and then stamped on an angle, going off the edge of the card, and re-stamped without re-inking the stamp to get variations in the colour of the card. The very bottom set of leaves has a bit of a colour variation within the image – because I stamped off the top edge of the cardstock initially, then re-stamped at the bottom, but because there was extra ink left on the top of the leaves, it’s a little darker on the re-stamped image – so you may want to keep this in mind when creating your own version. It’s not a fatal flaw, but it may be something that annoys you, so be aware! (Or hide it with some bling or with your sentiment!!).
When creating a less intricate design like this one colour clean and simple card, I like to also use dimension for a bit more interest – so the sentiment is popped up with some Stampin’ Dimensionals. I think a small border for backing cardstock on a clean and simple design is eye catching, though it can be a little trickier because your cutting (and pasting!) have to be a bit more accurate, but it only takes a few more seconds to make sure it’s lined up well.
This one colour clean and simple card is a perfect way to let someone know you’re thinking about them – and it won’t take you forever to create!
I’m working on new designs featuring some of the new 2024-2026 In Colors and of course, 2024-2025 Annual Catalogue new product, so be sure to come back to YamStamps.com to check out what I’ll be sharing!!
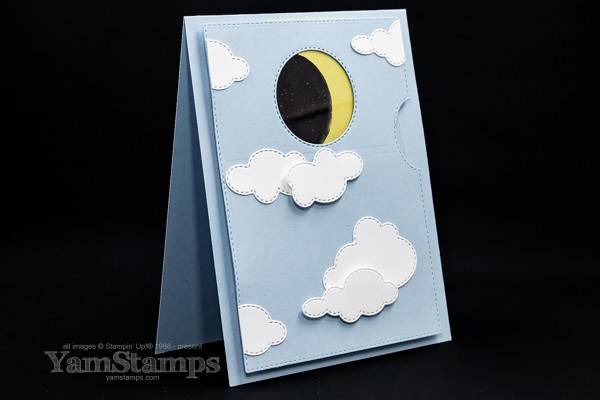
I am challenging myself to use the term “PATH OF TOTALITY” as many times as possible while I can. Also because every time I see it, I am saying it in my head in a loud booming announcer voice with an echo.
Burlington Ontario was in the path of totality for the solar eclipse that happened on Monday so I was outside around 230pm to watch the event, along with my family and many others from our neighbourhood. I live across from a park so we decided to go to the park and sit on the hill to watch it….though we could have easily just sat on our porch! It was overcast early in the day, so we were worried we wouldn’t be able to see much, but luckily, the skies cleared enough so that we could see the sun! It was still pretty cloudy, and when we were close to the total eclipse, we had a couple of “false starts” because a cloud would pass over the sliver of sun. (“Is that the full eclipse or is that a cloud? I’m worried about taking off my glasses to check!”).
Here’s a fantastic photo that my son took (and gave me permission to share). I didn’t know that what he captured is called a diamond ring…but it makes sense.
Since I am a paper crafter, I had to be crafty with the solar eclipse theme! I am happy that this card turned out the way I had envisioned (because trust me, that is not always the case)….so here’s a version of the solar eclipse that you can watch whenever you want, without the need for special vision protection! I first posted this on TikTok and Instagram – and just uploaded this to YouTube so that I could share it here as well.
I used Stampin’ Up!’s retiring Give It a Whirl Dies to create this solar eclipse card – so if you’d like to make a card like this one, you may want to grab them before they’re gone at the end of the month – BONUS – they’re on sale for half price!!
I used a window sheet as the spinning portion, and used my Basic Black Stampin’ Blends on both sides of the acetate to get really good coverage. I imagine you could also use a Staz-On Jet Black Ink Pad or even Sharpie Markers – basically anything that is alcohol based colour.
Also, if you make a version of this card, please make sure that you say “PATH OF TOTALITY” every time you spin the card (at least in your head, if not out loud).
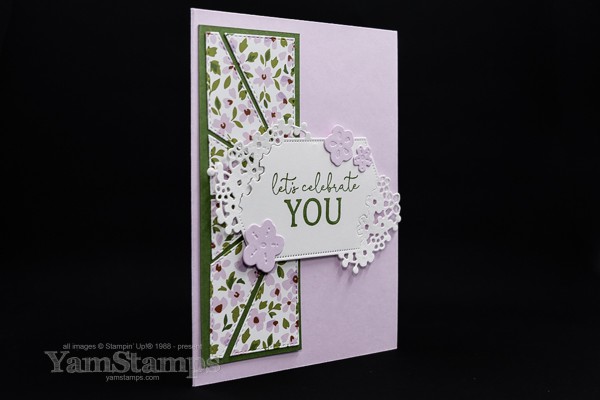
An eye catching element for this celebrate you card!
A “celebrate you card” is a perfect one to have in your card stash – because it can cover so many occasions – or non-occasions! This one has an eye catching design element that is easy – and an efficient way to use your patterned papers!
It’s apparently spring here (*cough*)….so I thought this was a good floral-spring themed celebrate you card to share! The patterned paper is from the Delightfully Eclectic Designer Series Paper which has four times the sheets that are in the typical DSP packages. I die cut the paper with one of the Patchwork Pieces Dies, and then used half of the die cut on this card – meaning I can use the other half on another card! The sentiment is from the Sentimental Park Stamp Set and the label and flowers from the coordinating Sentimental Park Dies.
This is the time of year when we start getting ready to say goodbye to products from the 2023-2024 Annual Catalogue and the January-April 2024 Mini Catalogue. Happily, the Sentimental Park stamp set and dies will be around for another year….but the Patchwork Pieces Dies and Delightfully Eclectic Designer Series Paper will be retiring at the end of the month, so are available only while supplies last/end of April – whichever comes first. Starting 9 April (next Tuesday), the Last Chance Sale starts – and the Delightfully Eclectic Designer Series Paper will be half price! So you may want to take your chances and wait until 9 April to get all that paper for less…. HOWEVER…
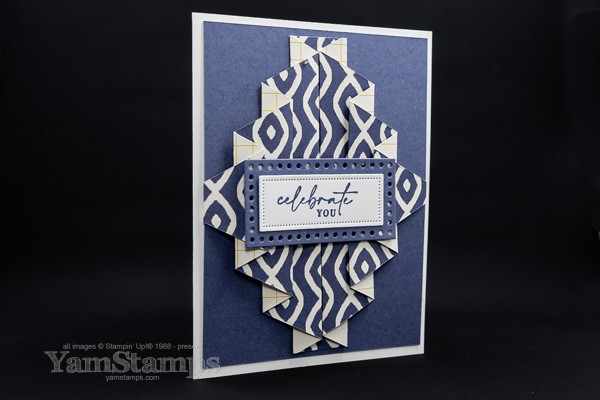
This fancy folding technique isn’t too difficult and can be used with any of your patterned paper for any occasion!
I used some of the Delightfully Eclectic Designer Series Paper for this card. This fancy folding is perfect for Stampin’ Up!’s two sided patterned papers because you get a peek at the pattern on the other side too! The Delightfully Eclectic Designer Series Paper is going to be retiring at the end of April. It’s one of the best deals in the catalogue especially if you like to have a “set” of cards or scrapbook pages with the same patterns, because this package has 48 sheets – 4 each of 12 different double sided patterns – that’s FOUR times as many sheets as a regular package of Designer Series Paper!
I added a sentiment from the Dainty Delight stamp set (also retiring at the end of April) in Misty Moonlight, and die cut the labels with the Everyday Details Dies (which will continue to be available as an Online Exclusive Product – available to order, but not appearing in the printed catalogue).
I shared a sped up video that I actually took during our last Online Card Club session, as we made this card during March’s club. Key Measurements: Designer Series Paper is 5″ x 11″, scored in a pattern – 1/2″ then 1″, starting at 1-1/2″ – so 1-1/2″, 2″, 3″, 3-1/2″, 4-1/2″, 5″, 6″, 6-1/2″, 7-1/2″, 8″, 9″, 9-1/2″. In portrait orientation, marked at 2-1/2″ at the top & bottom. Fold the centre score lines (they will be on either side of the wide section), and cut from the closer score line to the mark to create a point at each end, then accordian fold! It’s a fun backdrop for your sentiment or image. You can find the video on the YamStamps Instagram Account or YamStamps Tik Tok Account.
If you’re interested in joining my Online Card Club, you can message me for more details on the 6 month program. At this point time time, I’ll only be allowing new members to join in the next couple of months, as the way it runs will be changing in the future. Open to Canadian residents only due to Stampin’ Up! regulations.
Now that the tech glitches I was having with the YamStamps.com site are sorted, I should be able to post more regularly again!