Dec 18, 2018 | cards, Stampin' Up!
I think I say this every year….and still it doesn’t change…it’s ONE WEEK until Christmas?! So not ready. I know that I do the 12 Weeks of Christmas mailings, and really I should be more aware…but it seems that I get so wrapped up in the busy-ness of the season that I all of a sudden come up for air and realize the date. (How about you?!). I think in part it’s also because my son isn’t yet home from school – he’s finishing up exams at university, and won’t be home until the end of this week….and then it’s the weekend…and then it’s Christmas!!
By the way, YamStamps Mailing LIst subscribers will receive the last (*sniff*) 12 Weeks of Christmas email tomorrow, so watch for that around 1pm Eastern. The emails are my version of a Thank You Card for being a subscriber.
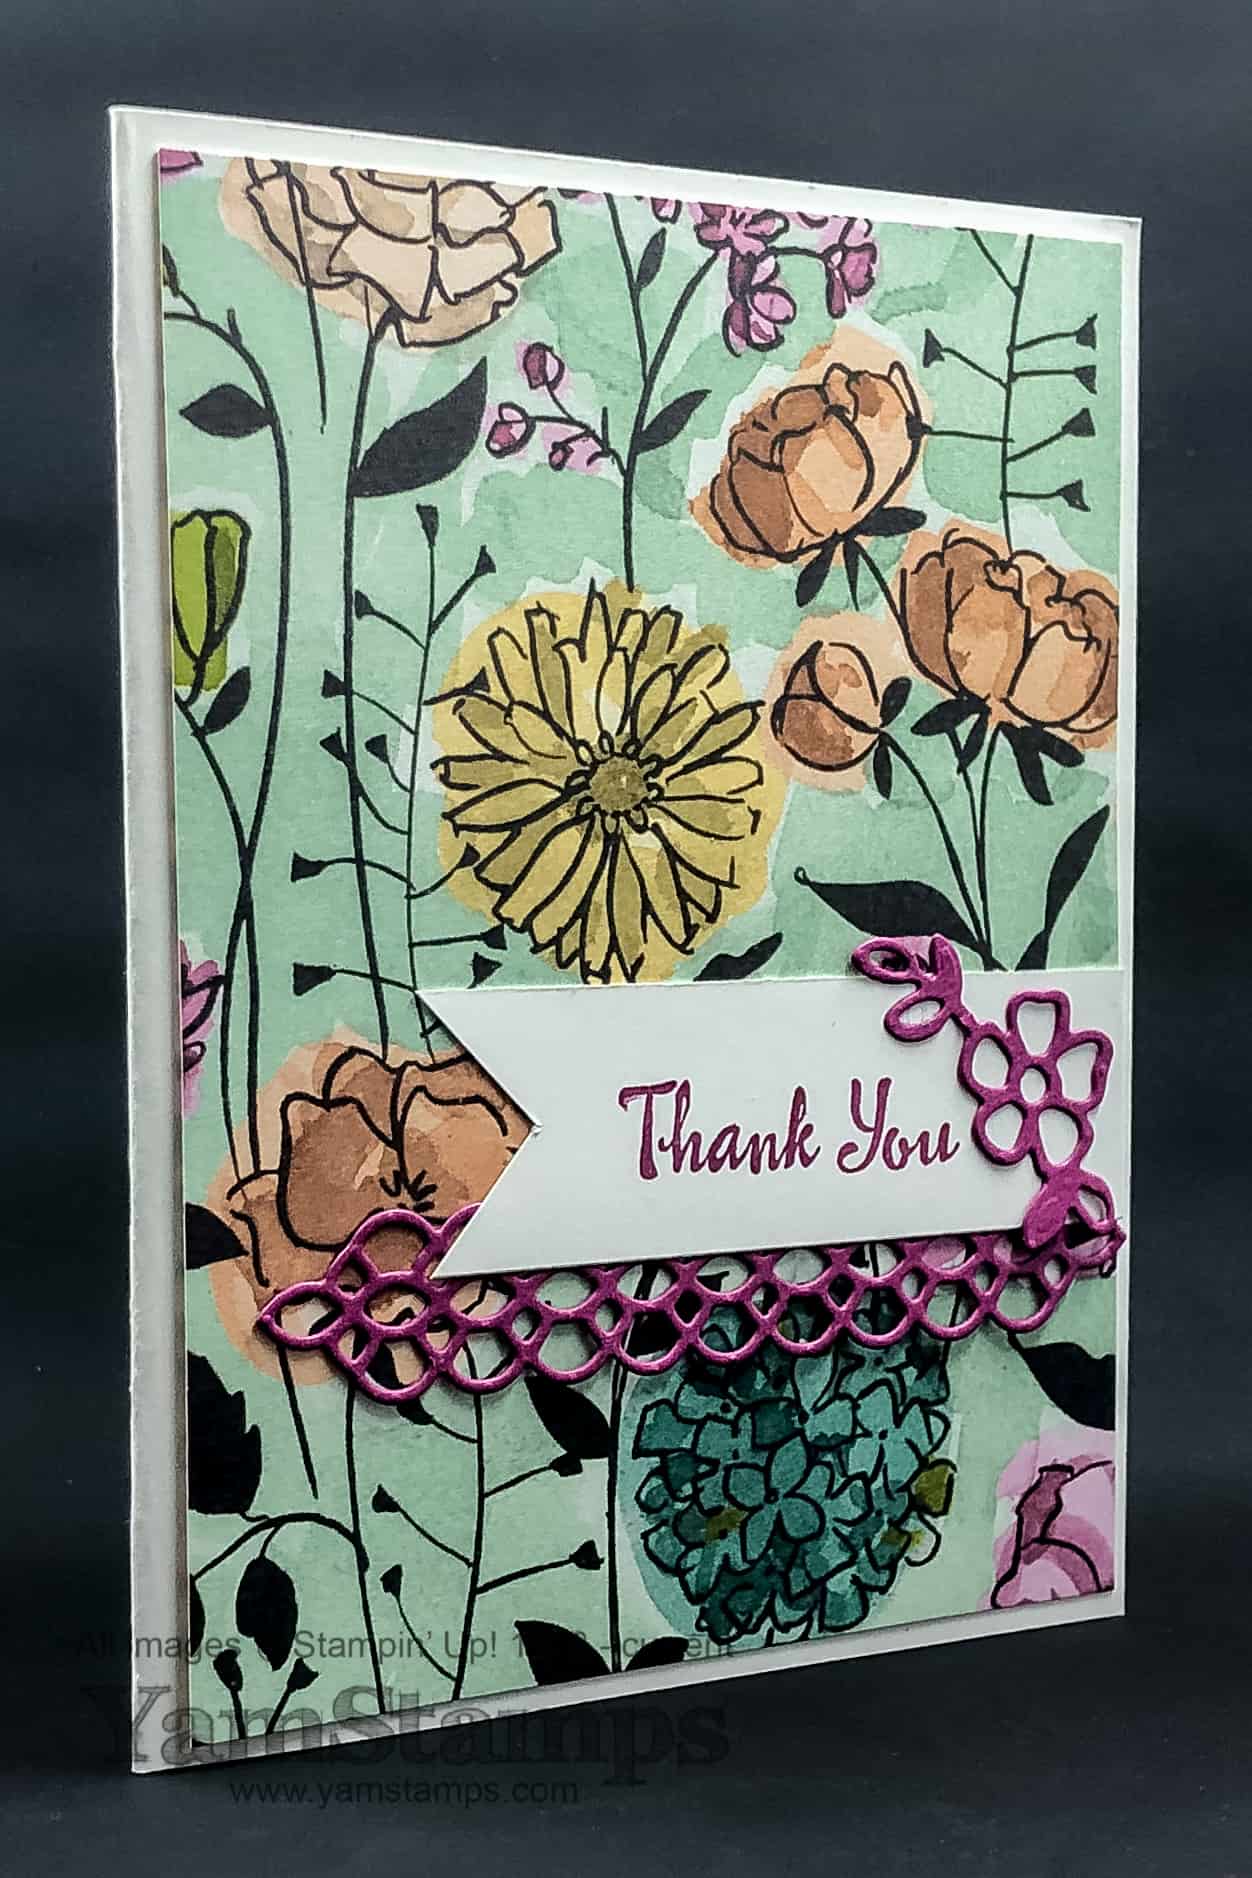
This is a real life thank you card that we did in Stampers Club a little while ago. We moved up the December Stampers Club date so that people didn’t feel too pushed with the timing of the club class and the holidays. One of my friends mentioned that some of the nicest cards to receive are thank you cards – because it’s not expected (in most cases). Using Designer Series Papers, you can add a dimension to your cards quicklly and easily! In this case, it’s the Specialy Designer Series Paper, Share What You Love. The sentiment is from the Petal Palette stamp set (available in red rubber wood mount or red rubber clear mount), and the accents are die cut with the Petals & More Thinlits Dies.

I figure I will create cards with a spring theme since that’s probably when they’ll get mailed/delivered – between me and Canada Post!! I am, however, crossing my fingers that the Occasions and Sale-a-Bration Catalogues will make their way safely to a mailbox near you by the time they are in effect! The current Holiday Catalogue (and the Year End Clearance Sale) runs to January 2nd, and then the Occasions and Sale-a-Bration catalogues are open for business as of January 3rd (I think at noon Mountain Time, in order to give the system time to get switched over). Do not fear, though, because I will be sure to post links to the online versions at least…and if you are able to attend a class in person, you can grab a copy from me at that! Please note that the January Card Class date is Wednesday, January 9th at 1pm or 7pm. So that’s the SECOND Wednesday of the month, not the first. I figured that I wouldn’t be ready for a class on January 2nd…plus this way we can focus on some of the new product that will be available!!
One last note for now – I will be offering a paper share for the Occasions Catalogue! Each person will receive a 6″ x 12″ piece of each of the patterns of Designer Series Paper, or a complete 6″ x 6″ sheet of each pattern in a Designer Series Paper stack, plus a 6″ x 12″ piece of each of the patterns of the Sale-a-Bration Designer Series Paper that will be available. Please note that this Paper Share does NOT include the Specialty Designer Series Papers. Cost per person is $30 CAD, plus postage/shipping. (I will be in touch with each participant to confirm method of delivery). I will post images in the new year (in case you want to be surprised when you open your catalogue). You can contact me to reserve a spot or if you have any questions about the Paper Share. Please note that due to Stampin’ Up! regulations, only Canadians may participate in this Paper Share.
In the meantime, I’m off to do a bit more last minute holiday prep, and off to my choir Christmas party tonight – snacking together is something we do almost as well as singing together!! THANK YOU for stopping by the YamStamps blog!
Dec 7, 2018 | birthday, cards, specials, Stampin' Up!
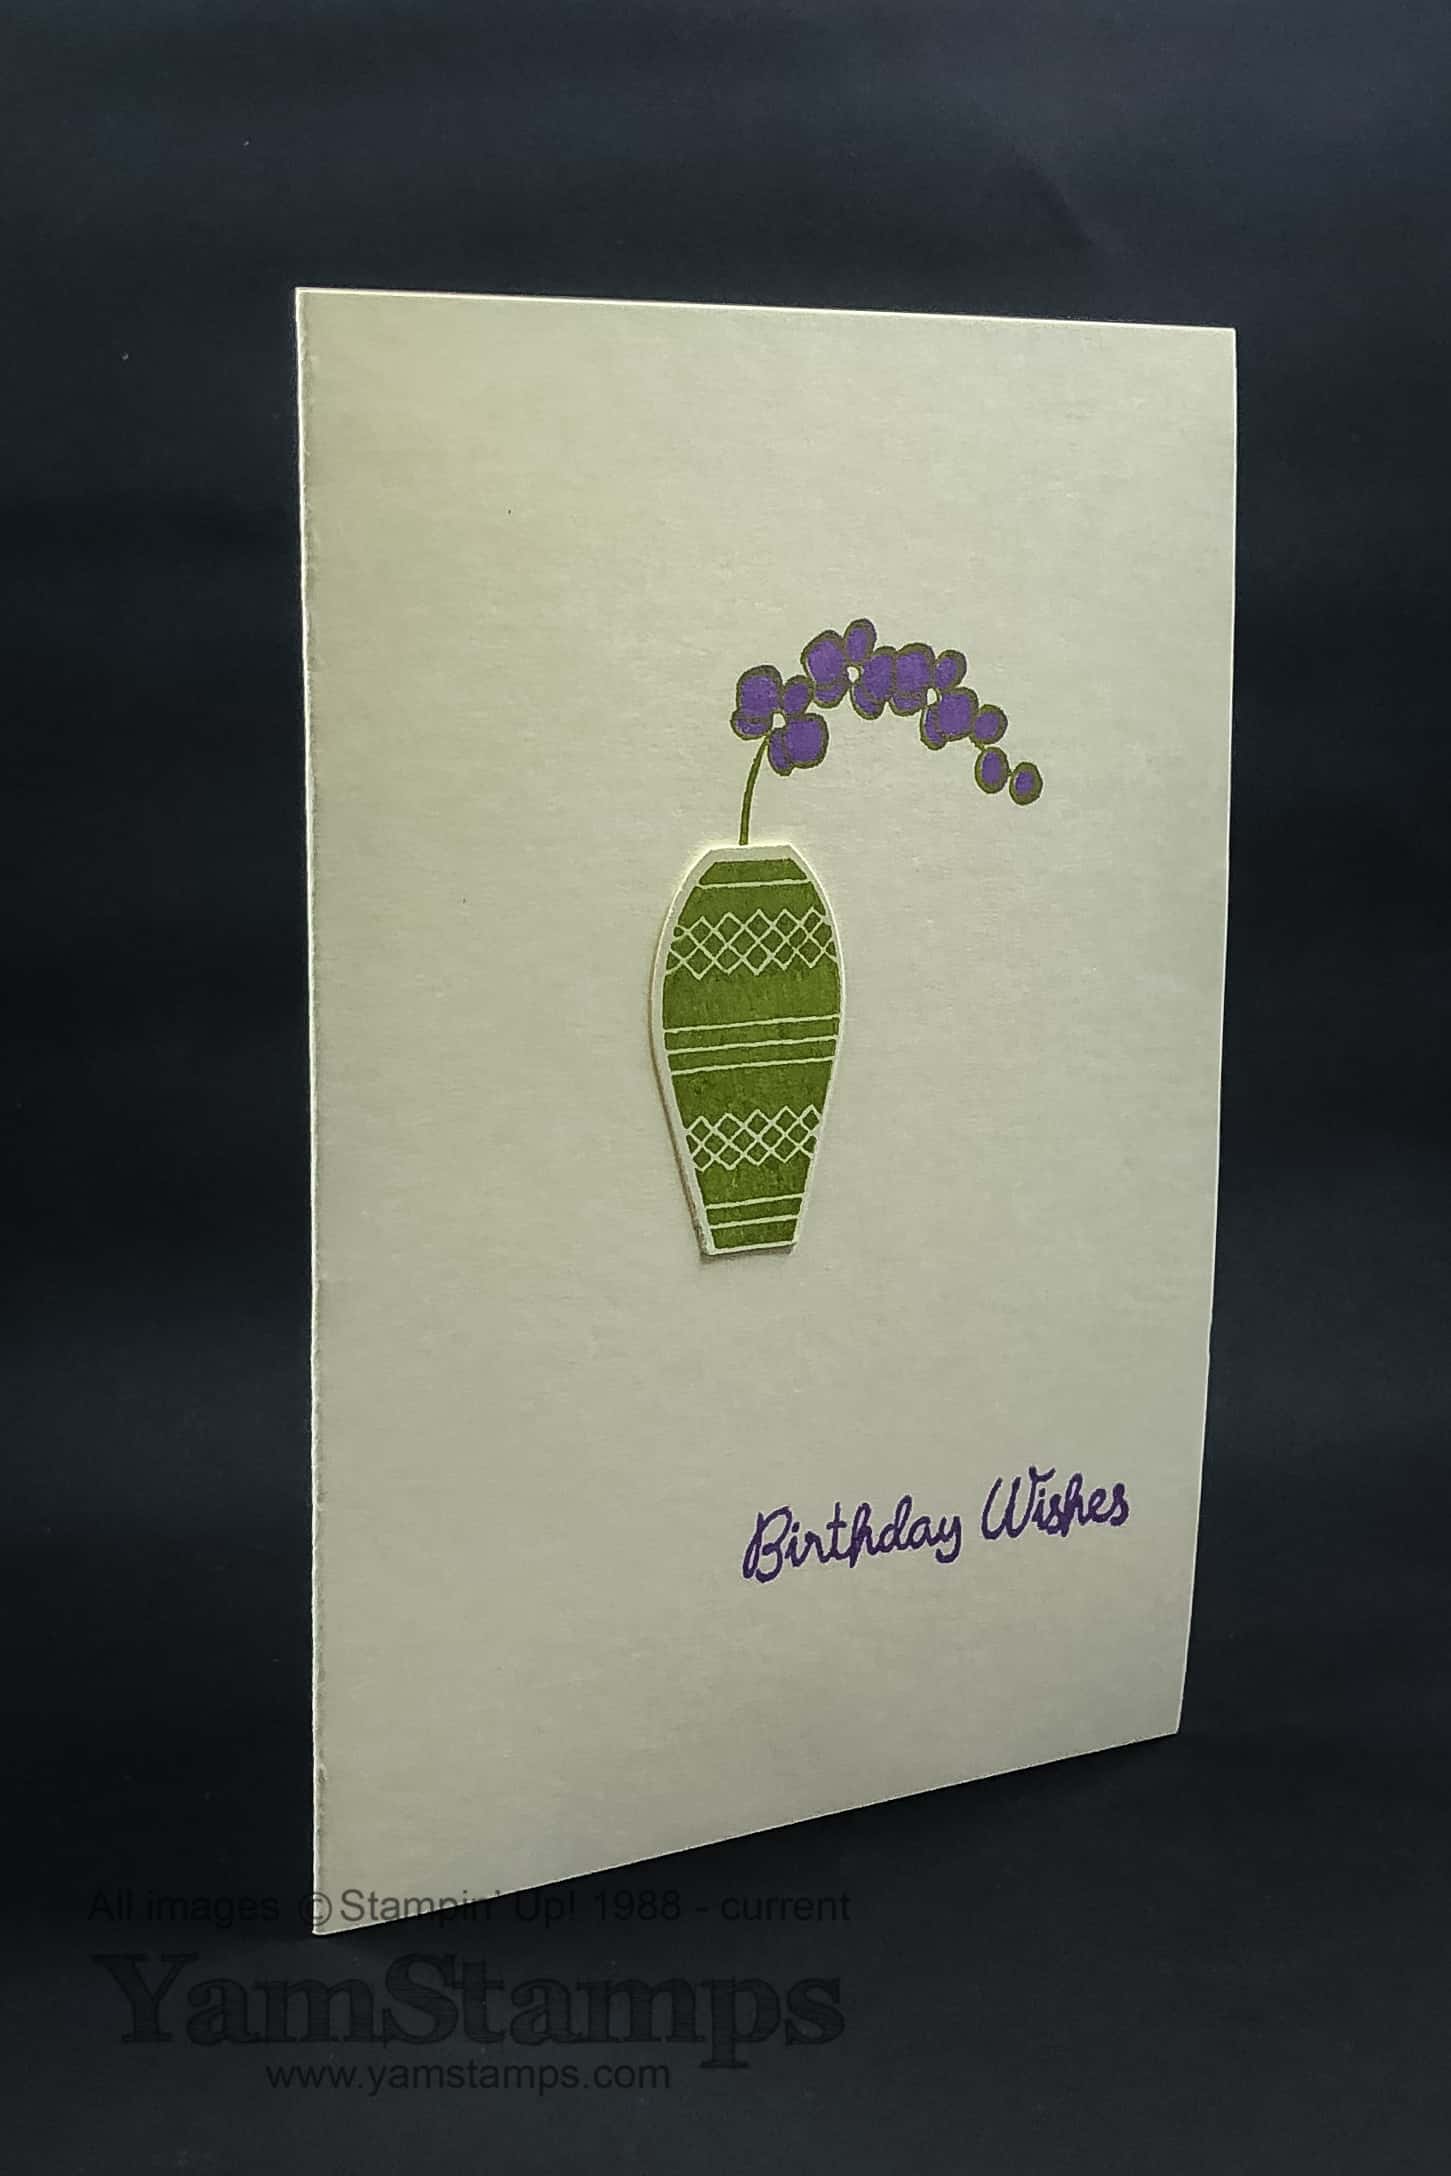
So…if you haven’t figured it out, I really like clean and simple designs. Here’s another one! A clean and simple birthday card. This is a two step stamp set, meaning that there are two (or more) stamps that combine to make a complete image. By using Stampin’ Up!’s stamp positioning tool Stamparatus, this is made even more easy!
This card uses the Varied Vases stamp set, which has a coordinating Vases Builder Punch – and you can get them together in a discounted bundle. Since it’s a photopolymer set, it can be used with clear blocks or the Stamparatus. For a class situation (like the Monthly Card Class or Stampers Club), it’s great to use the Stamparatus. I just set it up, and align the stamps, and it will be perfect each time. In this case, the stem and flower outline is one stamp, and the flower colour is another. Since the sentiment and flowers are the same colour, I put those stamps together on one side of the plate, and put the outline on the other side. Not seen – the inside sentiment, which was on the other plate. Subscribe to the YamStamps Facebook Page and you’ll get a notification of when I go live next – I’ll show how quickly this clean and simple birthday card comes together!
Stampin’ Up! challenged us to share some #simplestamping ideas – and this qualifies as that! Though…I may have cheated slightly by adding a layer. I think Stampin’ Up! wants to define Simple Stamping as a notecard, ink and stamps only….so maybe I pushed those boundaries a bit haha! I used a scrap of Very Vanilla to stamp the vase and punch it out, and then simply adhered it in place on the front of the card. So maybe it’s just a clean and simple birthday card because of that?! Ah well. I still like it.
The Stamparatus is great if you’re doing multiples of the same card since you’re guaranteed to get the same placement each time. Perhaps I should be using it to help me crank out some more Christmas cards to send?! I may convert them into Holiday/New Year cards…since between me still fiddling with them and Canada Post dealing with a backlog of mail to sort through…
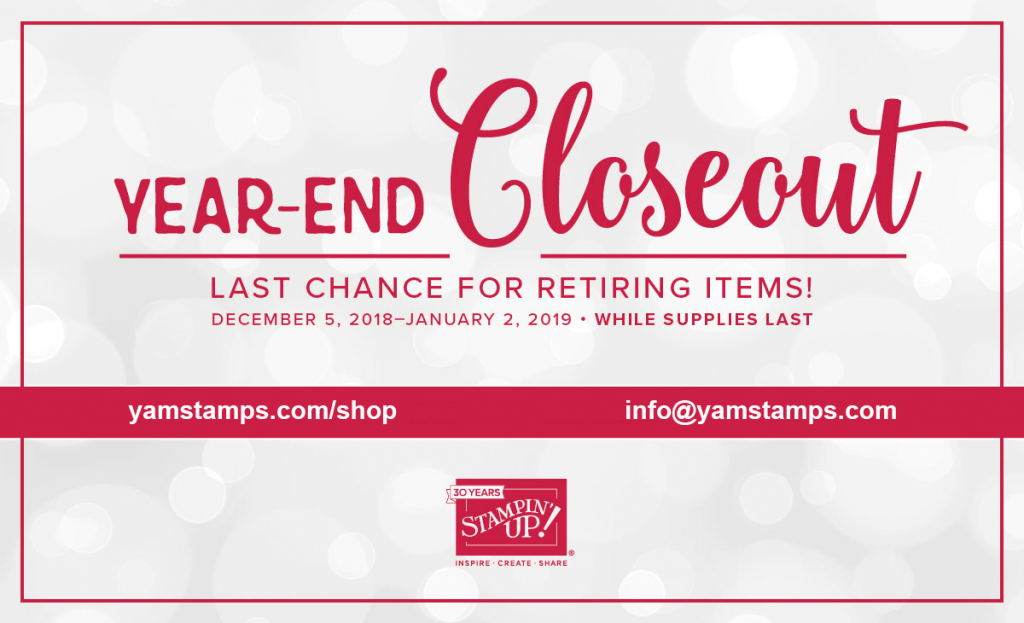
Stampin’ Up! is offering some discounts on selected product as part of the Year End Closeout! Check out the Year End Closeout in the YamStamps Online Stampin’ Up! Canada store. (or download the list here) You’ll see which items are retiring from the Holiday Catalogue, and which items are being offered at a discount – while supplies last. You can shop 24/7 in the online store, or you can contact me if you have any questions or need assistance placing your order. Happy Shopping!
Nov 28, 2018 | Big Shot, cards, Christmas, Limited Time, specials, Stampin' Up!
I have a thing for snowflakes, if you couldn’t tell. Mostly the paper ones, not so much the ones that have to be shovelled…so this Silver Snowflake Card is right up my alley. It was made during my November Christmas Card Class – which also used the Festive Farmhouse Elements. Thankfully, I’d purchased the class supplies before they became unorderable – but you can recreate this card using a stamped sentiment or die cutting words/letters.
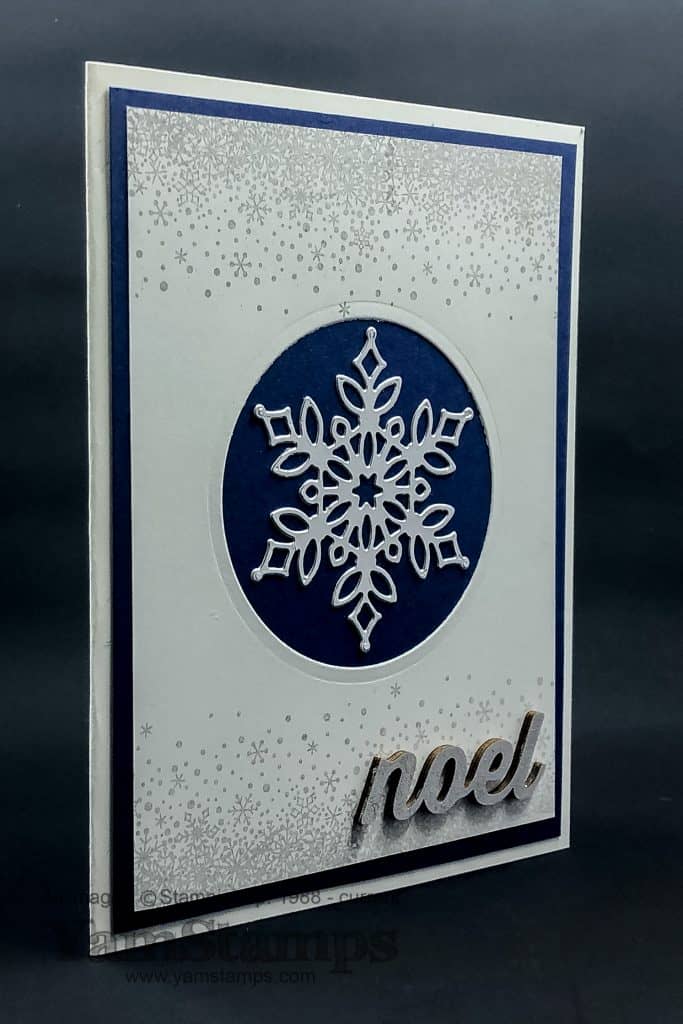
The wooden elements had a grey/silver colour on one side, and we added some Clear Wink of Stella Glitter to it (though I think it’s a little hard to see in this photo) to give it extra bling. The central snowflake is cut from a Silver Foil Sheet using one of the snowflakes from the Snowfall Thinlits Dies. The border is from the Snow Is Glistening set stamped in Smoky Slate and the Stamparatus using the “hinge technique”. We stamped the image once, then moved the Stamparatus plate a couple of hinges over and restamped to create a continuous line of snowflakes along the edge of the cardstock. So easy!
A reminder that we are in the last few hours of the last online sale from Stampin’ Up! – selected tools and ink pads are 10% off until 1150pm Mountain Time today. We are also in the last few days of the Snowflake Showcase items (some of which are featured on today’s Silver Snowflake card). Those products will not be available after November 30th…so please don’t hesitate and miss out!! You can shop online in the YamStamps Online Stampin’ Up! Canada store, or you can contact me if you need assistance placing an order or have any questions. Stampin’ Up! will ship to Quebec though the online shopping portal will NOT work – but you can contact me and I can enter the order for you and have it shipped directly to you. Happy shopping!
Nov 20, 2018 | Announcements, cards, Christmas, Information, Limited Time, specials, Stampin' Up!
I don’t think I shared this card here! I made this one a while back – here’s some Christmas Card Inspiration. It takes a little more time than my usual quick cards, but I think it’s worth it in the end! True to my usual style, though, it looks like it’s more work than it actually is….
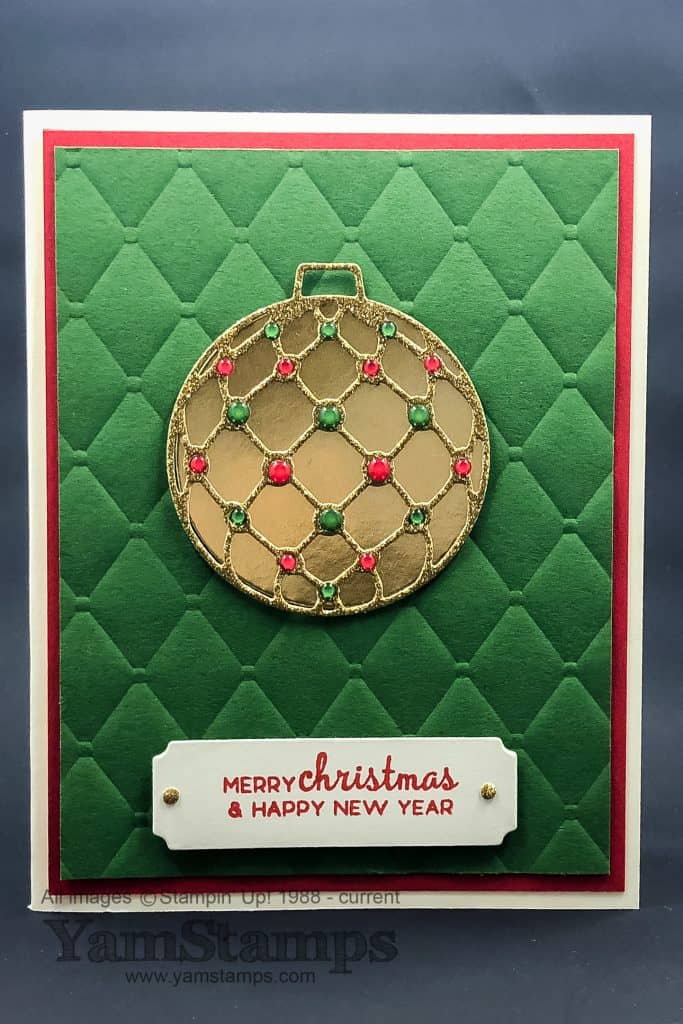
I used a lot of different framelits on this card…the Detailed Baubles Thinlits Dies, the Layering Circle Framelits Dies, and the Merry Christmas Thinlits Dies. The background is textured with the Tufted Embossing Folder (so elegant!). The lacy bauble portion is from the first set of dies, cut from Gold Glimmer Paper. The layering circle cut the background (from a Gold Foil Sheet) and the label is from the last set of dies. The sentiment on the label is from the Beautiful Baubles stamp set, and you can get it in a discounted bundle with the coordinating Detailed Baubles Thinlits.The jewels were an extra level of bling I added…they’re from the now unavailable Santa’s Workshop Enamel Elements. You could easily substitute any other bling you like – red rhinestone basic jewels, rhinestone basic jewels or metallic pearls are just some of your options! The other secret to making this easier – use the Multipurpose Adhesive Sheets. I placed some on the back of the Gold Glimmer Paper and then ran that through the Big Shot with the Detailed Bauble framelit. Run the Big Shot Die Brush over it, then peeled off the liner and stuck it onto the Gold Foil Circle!
Unfortunately, a number of Holiday Catalogue Items are now unavailable to order – they’ve been overwhelmingly popular! Currently unavailable to order: Santa’s Workshop Enamel Elements, Festive Farmhouse Elements, Joyous Noel Specialty Designer Series Paper; Framelits: Alpine Sports, Santa’s Signpost; Santa’s Workshop Memories & More Card Pack – and anything that uses that card pack (like the kit). A few items are running low, but the good news is that Stampin’ Up! has let us know that they are going to be carried over: these items include the framelits In the Woods, Detailed Deer and Merry Christmas. The Swirls and Curls Embossing Folder will also be available to order after the Holiday Catalogue Sales Period. You’ll notice that there are NO stamp sets included in this list – mostly accessories/tools – since these are items that are not directly manufactured at Stampin’ Up!’s facilities in Utah. Their stamps are produced in Utah, so they have more direct control over production numbers.

Coming soon – Online Extravaganza. Download the flyer here. Three consecutive 48 hour sales featuring different selected items from the Annual Catalogue. November 23-24 is Paper & Embellishments, November 25-26 is Stamps & Kits, November 27-28 is Tools & Ink. Each sale runs until 1150pm Mountain time and then the next set of products will be available at special pricing. Please note that there are a set number of selected products available at the Online Extravaganza price, and once that allottment is gone, the product will not be available to order until after the sales period. Excluded from this sale – Paper Pumpkin Kits, bundles (which are already discounted anyway), the Big Shot and the Stamparatus. There are a few other items that are not included in the sales pricing, but you’ll be able to tell once you’re shopping online during the sale! If you need assistance placing your order, you are always welcome to contact me for assistance or to place the order for you. Please note, though, that I can’t guarantee availability, so if you’re really anxious to get your hands on some sale product, your best option is always to place the order yourself online at the YamStamps Online Stampin’ Up! Canada store. Shortcut is yamstamps.com/shop .
Last but not least – there’s still some space in the Festive Farmhouse Elements Christmas Card Class happening on Wednesday, November 28 at 1pm or 7pm. Yes, you read that correctly. I do have a supply of the sold out wooden elements that each class attendee will receive with their $30 class fee. Contact me ASAP to reserve a spot, and one of the sold out packages of elements! You can check out upcoming events on the YamStamps Events Page. Hope to see you in class or club soon!
Nov 16, 2018 | birthday, cards, Stampin' Up!
Simple Stamping (#simplestamping)
While at Stampin’ Up!’s On Stage event last week, one of the things they talked about was #SimpleStamping. The idea was about getting back to the basics, and they showcased a lot of clean and simple cards. Essentially…..like most of my cards!! LOL. Truly, while I appreciate some intricate and over the top designs, if it’s not easy to make, I don’t want to deal with it…but I still want it to look good.
So with that in mind, I present a recent class card that truly is simple stamping. One colour ink, and a couple of accent colours of cardstock. That’s it. It uses the Big Wishes stamp set which is available in wood mount or red rubber clear mount. The ink is Bermuda Bay and the other accent colour cardstock in the background is Lemon Lime Twist.
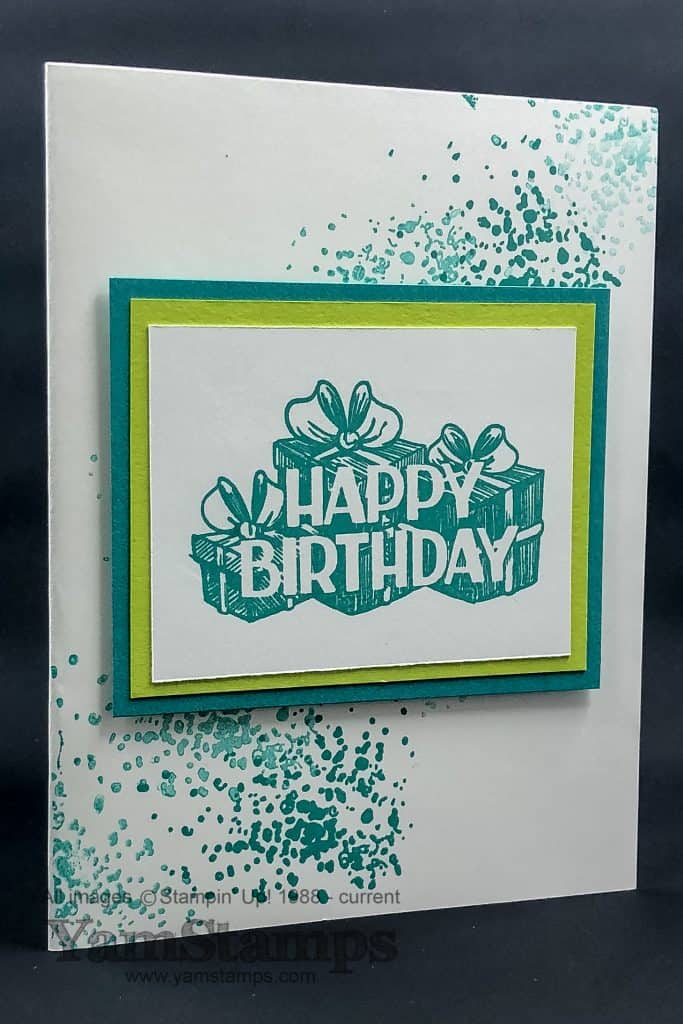
To add more interest and depth to this simple stamping card, the splatters from Artisan Textures (available in red rubber wood mount or red rubber clear mount) were stamped in Bermuda Bay in a combination of first, second and third generation images. (First generation = ink the stamp, then stamp on the cardstock; second generation = second stamping onto cardstock without re-inking…etc). The one caution I will give if using a combination of these images is that you need to be aware that if your first generation stamping goes off the edge of your cardstock, you will NOT want to do a second generation image at that time – because the ink will not have been removed from the rubber of the stamp evenly, so you’ll likely end up with an image with a definite demarcation between a lighter and darker image. Ask me how I know… Perhaps that’s a good topic for a future Monday Mistakes Facebook Live on the YamStamps Page?!
If you’re looking to add to your card stash or your card making supplies stash, consider joining my Monthly Stampers Club! We meet in north Burlington on the third Monday of each month, and new members can start at any time! Commitment is a 6 month period, and during that period, at each club class you’ll make 4 different cards and place a $33 order. Once during your 6 month cycle, you’ll also receive a minimum of $20 free product! Contact me to join or if you have any questions. The next club date is this Monday, November 19th, and we meet at 1pm or 7pm. Simple Stamping in this case is being able to have some regular crafting time set aside!
Nov 14, 2018 | Business Opportunity, cards, event, Stampin' Up!
Why I love being a Stampin’ Up! Demonstrator…
Reason 1 why I love being a Stampin’ Up! Demonstrator: An excuse to travel! I spent last week in Orlando, Florida at Stampin’ Up!’s On Stage Event. I know, you’re feeling sorry for me already. And OK, not the whole week was actually the event. I spent a couple of days preparing for the event by visiting with fellow demonstrators, visiting the parks of Florida (that would be theme parks…), and taking a bit of down time. (if you follow the YamStamps Instagram or Facebook Page you may have seen proof of that). I have noticed lately that my travel tends to be woven in and around Stampin’ Up! or training opportunities, so it’s a nice way to mix business and pleasure. Also, I need to work on my selfie skills….LOL. Visited Universal (the Harry Potter areas!), The Magic Kingdom (Mickey’s Very Merry Christmas with fellow Canadians (front to back: Gaile, me, Mary Louise, Jasmine, Carrie, Laurie and Debbie – crowded on Main Street but easy to get onto the rides), and Disney Springs (or Downtown Disney if you’ve been there in the past) with my American friends Debbi and Rebecca .


Reason 2 why I love being a Stampin’ Up! Demonstrator: Sharing Creativity: One of the things that tends to occur when demonstrators get together – SWAPS. Demonstrators will create multiples of a paper crafting project and then trade with other demonstrators. It’s a great way to get ideas and inspiration (no, we don’t think our designs up on our own all the time!). Sometimes these are organized events – where a specific number and theme are mandated. Other times, “general swaps” occur – demonstrators literally walk around trading their creations. It’s a great way to meet people as well! Here’s a lovely swap that was gifted to me by Mary Louise – even though I didn’t have anything to swap with her (and I cut her off in the photo too LOL)! So I’ll share the wealth here.
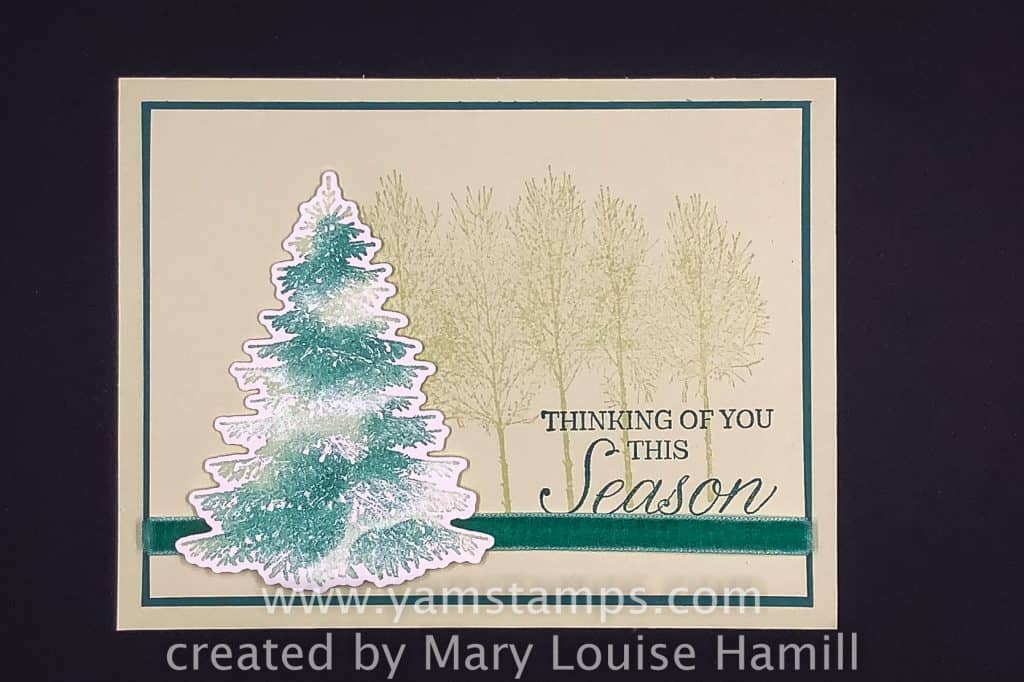
She used Winter Woods Bundle (available in a red rubber clear mount stamp bundle or red rubber wood mount stamp bundle) to create this beautiful card. The paler areas on the evergreen tree are actually areas she’s added some Frost White Shimmer Paint (sorry, my photo is not really doing it justice!).
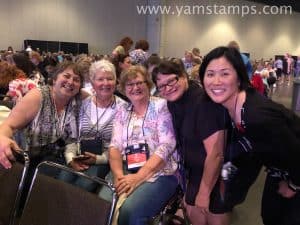
Reason 3 why I love being a Stampin’ Up! Demonstrator: friends – old and new! Another thing that happens at Stampin’ Up! Events? Getting together with demonstrator friends! My group of demonstrators is called the “Eh” Team, and there were five of us in total this time that were able to make the big journey south. Amazing that we were able to find each other in a sea of 7000 demonstrators! So here we are as a group (from left to right in the photo: Karen, Arlene, Pamela, Mary and myself). Karen and I also were able to attend Centre Stage, which is an event for demonstrators at a certain level of leadership in their business. We were treated to passes to Epcot (it was the Food & Wine Festival as well!), and a dessert reception.(I still haven’t figured out how to take the selfie and look at the right spot on the phone…). Last photo is a reunion of the 2017-2018 Events Council – we are from all over North America and the last time we all saw each other was a year ago so it was great to meet up again, albeit briefly. Not pictured – SO many other friends that I got to see and hug. It truly was so heartwarming to be able to see so many friends that I often only “see” online.


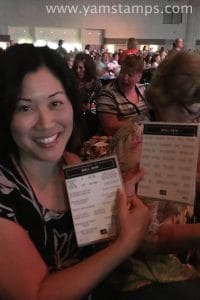
Reason 4 why I love being a Stampin’ Up! Demonstrator: Last (for now) but not least – new product! We get so many goodies at Stampin’ Up! events and one of the fun ways to receive something is Prize Patrol. I hit the jackpot! I won a huge sentiment set that I can’t wait to use in upcoming classes. All the prizes were from the upcoming Occasions and Sale-a-Bration catalogues, which will be in effect as of January 3, 2019.
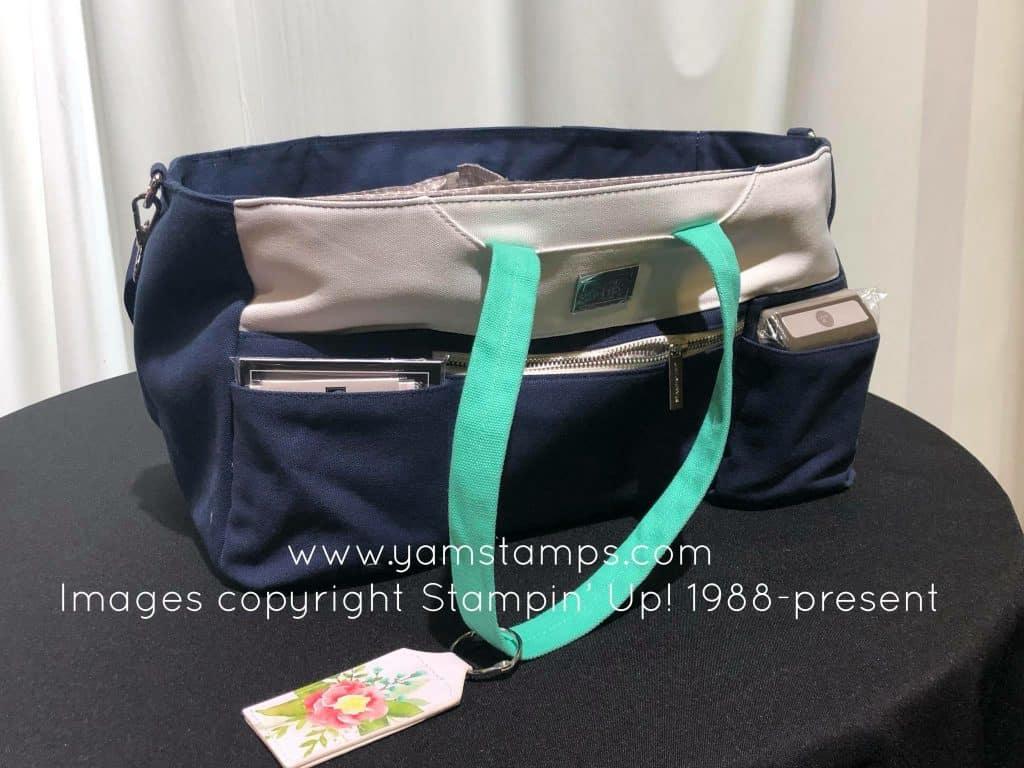
We also got a look at the Craft & Carry Tote which is a demonstrator only item. Current demonstrators are able to order this bag until the end of the year only. Not a demonstrator (yet)? Not a problem! You can select this as part of your starter kit right now! Valued at $68, you can select it right now as part of your $165 worth of product for $135 – OR you could select other product in your starter kit and then purchase the bag (before January 2) once you have your demonstrator number! Your other option is to pick one up with your starter kit during Sale-a-Bration in January. There are two starter kit options – the “regular” kit for $135, and the tote kit for $175. During Sale-a-Bration you’ll also get $60 more product of your choice in your kit. Check out my FAQs about joining my team here (or if you like to type, www.yamstamps.com/join).
The next big On Stage event is happening in April in Auckland, New Zealand. While I would LOVE to be able to attend that one…I think I’m going to have to stay a bit closer to home. In Canada, the two local event locations (we get a local event when the main event happens either in the South Pacific or Europe), will be Quebec City and Vancouver. If you would like more information, please contact me, or consider attending my next Information Evening (Thursday December 6, or check the Events Page to see upcoming dates) to find out more about being a demonstrator with my group and find your own reasons why you love being a Stampin’ Up! demonstrator!