Dec 19, 2014 | cards, Christmas, Tutorial
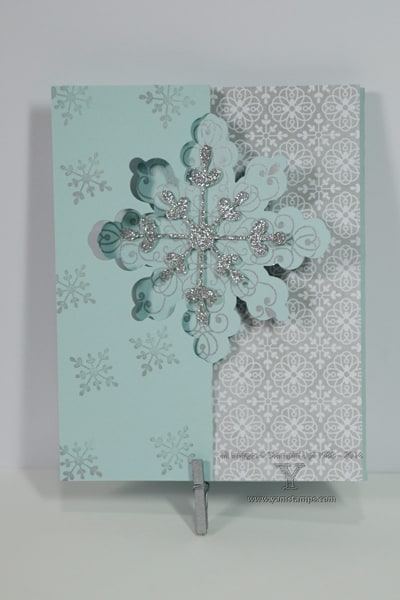 The Twelve Weeks of Christmas mailings are finished now – but why is it that I’m still surprised by how quickly time has passed? (Note – this would be the heads up that I have not really finished my own cards…LOL). Stampin’ Up!’s Snowflake Card Thinlits die does make for a fairly quick and impressive card, though! Of course, everything also looks more impressive when you add some bling – in this case, a snowflake from the Silver Glimmer Paper. The All Is Calm Designer Series Paper covers the back flap of the card, and the small snowflake from the Letterpress Winter Photopolymer set is on the front of the card, with the large snowflake taking centre stage.
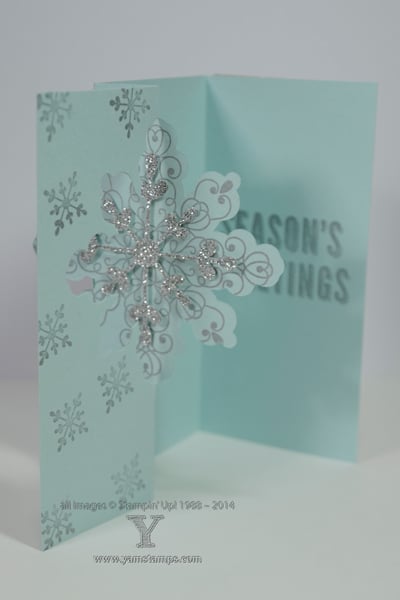
The next shot shows the open card. You can make your card long like this one by cutting your cardstock to 5-3/8″ x 8.5″ and having the one end of the cardstock on top of the die (at the end farthest from the snowflake), rather than underneath it. This allows the snowflake end to be die cut/embossed, while not chopping off the other end of the cardstock. Then you simply fold the long end inwards and you have an extra area that will let you write on the inside of the card without having it exposed when the card is closed. (The last photo shows how to position the cardstock.
 I hope you have the chance to try this out! In the meantime…off to finish preparing for the big family party this weekend…
Dec 12, 2014 | cards, Christmas, Stampin' Up!
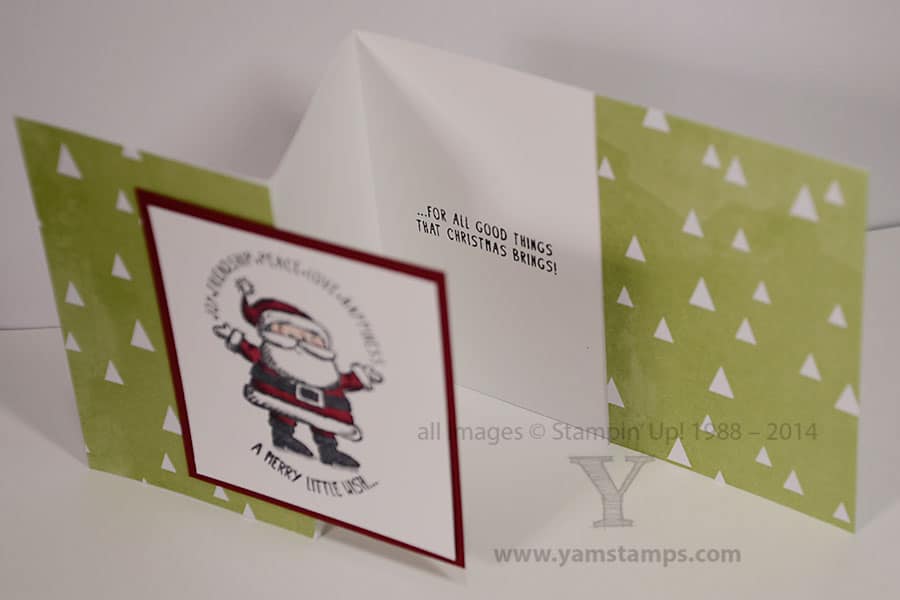
A fun way to make your cards stand out is to vary the fold a little bit. This “Z” fold card adds interest without adding a lot of time to your crafting! (Handy when you’re mass producing). Cut your cardstock to 4.25″ x 11″, score and fold in half, then fold back one side so the edge of the cardstock meets your fold. (You may want to score it again, or just use your bone folder to ensure a neat fold. I did a quick video tutorial on cutting and basic card folds in this blog post: http://yamstamps.com/2013/10/cardmaking-basics-tutorial
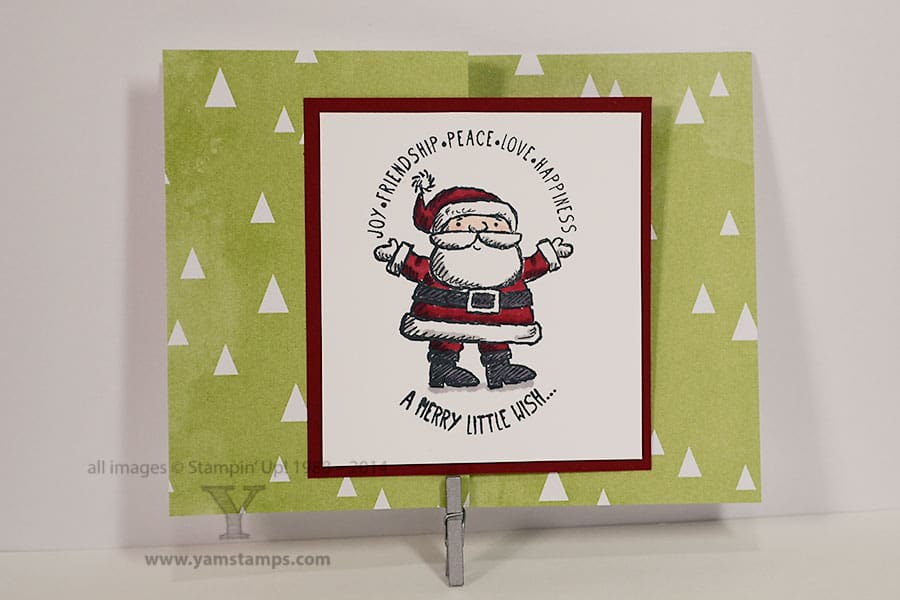
For this Santa card, there’s a piece of the All Is Calm Designer Series Paper on the front flap and back edge so the closed card reads like a more unified front. The Santa is from Get Your Santa On and was coloured with Blendabilities. Love those alcohol based markers (and if you do as well, just wait until the new Occasions and Sale-a-Bration catalogues – hint hint!). The other fun thing about this card is because the stamp set is photopolymer, I could curve the “A Merry Little Wish” stamp on the block (granted it may need to be reapplied a few times, because it’s really a straight line) – but it ties in with the curved greeting above Santa.
This weekend my choir (OK not MY choir, but the choir with which I sing…) has two concerts so it’s going to be a busy one! If you’re looking to hear some holiday music, please join us! We’re in Ancaster on Saturday evening and Guelph on Sunday afternoon and tickets are available at the door.
Dec 8, 2014 | cards, Seasonal Catalogue, Stampin' Up!
 And now for something completely different….how about a card idea?! I realize the last few posts have been a lot of information about the great deals you could grab, but it’s always nice to review creative efforts, isn’t it?!
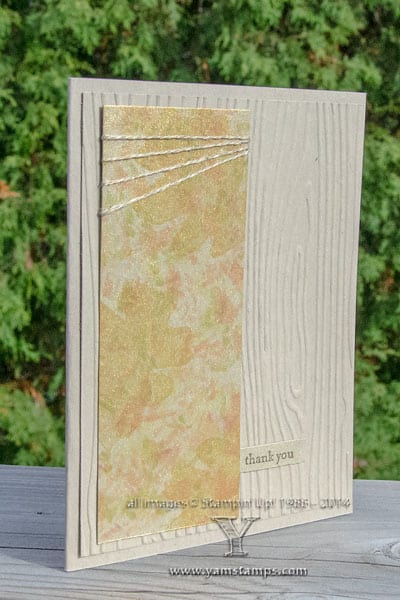
I realize that this card got “missed” during the autumn season – so thought I’d share it now – we can always use Thank You cards, can’t we? It’s a nice effort to make to show someone that they are appreciated. I need to send more of these! This is a card I created for the demonstrator swap I participate in. If you’ve been visiting my blog here, you know that I don’t do too much “over the top” super layered and embellished stuff and this is holding to form. I used a fun technique to create a mottled effect on the Brushed Gold cardstock, then stamped the leaves (the leaf is from the Stampin’ Up! set For All Things) over top (you can just make them out in this image), and added texture with the Woodgrain Embossing Folder on the background piece. The technique used for the Brushed Gold cardstock is called “Polished Stone” and you basically wet a cotton ball or pad with Rubbing Alcohol, then drop on some reinkers of various shades, and dab it onto the cardstock. It’s one of those techniques that during the process you kind of wonder if it’s really going to turn out well initially…but as you continue to dab and once it dries, you know your fears were ungrounded! It’s a bit of a stinky technique but effective.
A reminder that my end of year “Thank You” to email subscribers continues this week. We are into the final weeks of the Twelve Weeks of Christmas! Look for it in your inbox on Wednesday.
Nov 21, 2014 | cards, Christmas, specials, Stampin' Up!
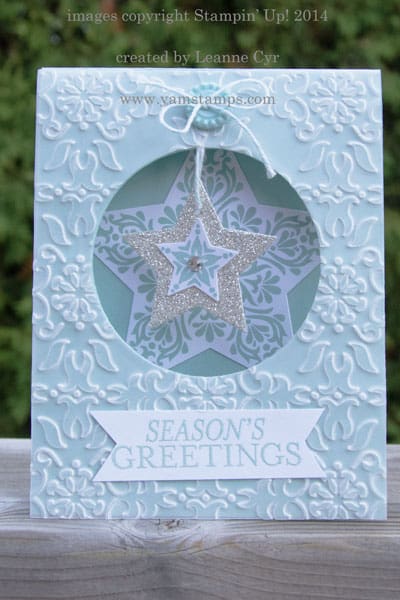 and not just “of the season”! Though I thought that was a nice tie in to feature this card created by Leanne Cyr (a member of my demonstrator group the “Eh” Team and part of the swap I participate in). I love the soft colours and how the embossed vellum on the front of the card adds texture but also ties in with the pattern on the stars. It’s gorgeous.
So other things to anticipate – Stampin’ Up! will be having some special sales starting MONDAY. Click to download the list HERE – or if you’re on my email list, you’ll receive a full copy in your inbox of the different items on sale on different days…plus I will have my own offering on Friday. “Black” Friday which was a totally American phenomenon (being that it occurs the day after US Thanksgiving) seems to have spread into Canada as well – so might as well jump in!
Plus – if you’ve been looking for a way to supplement your income or pay for your hobby (*cough*), there is a Starter Kit special as well! The kit (which is comprised of items that YOU select), will be 25% off, and you’ll earn an additional 5% income on commissionable sales in December! (*5% income will be paid in January) Check out great reasons to become a demonstrator with my group, and be ready to take the plunge on Monday – because this special is on for ONE WEEK only. If you have any questions, please contact me.
Nov 13, 2014 | cards, Stampin' Up!
www.yamstamps.com
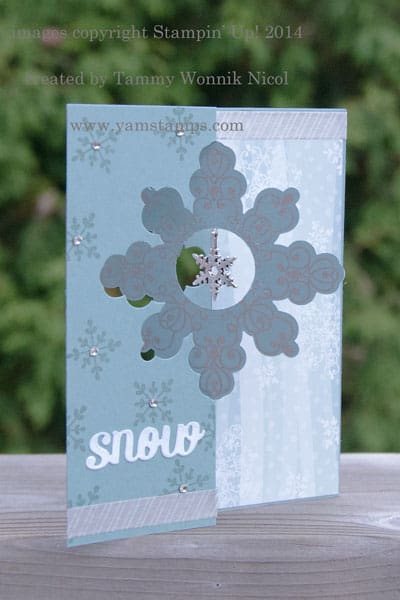
Saw a few flakes swirling down this morning…short lived but I’m sure that will change in the next while….so I thought I’d share this card from Tammy Wonnik Nicol that makes me smile and forget that snow also means cold. This is a fun card using the Snowflake Card Thinlit Die and Letterpress Winter stamp set – flip flop cards have never been so easy! It also uses the gorgeous All Is Calm Specialty Designer Series Paper and coordinating Washi Tape and Snowflake Embellishments. Stampin’ Up! really does make it easy to create – all these items coordinate with one another!
There is still time to create holiday cards – my Christmas Card Clinic is happening on Sunday, November 23rd – come make ten cards for those special recipients on your list! Cost is $40 and payment is due at time of registration. Contact me to reserve your spot – space is limited.
Nov 6, 2014 | cards, Stampin' Up!
 Some of the latest Stampin’ Up! sets have some wonderful phrases and sentiments that really resonate with me (or SHOULD!). This is one of them. It can often feel like I’m so busy slogging through the day and just trying to survive it – so for me, this is an energizing statement, reminding me to appreciate the moment and put something into it so I can get more out of it.
Don’t fall over – there’s some elements that I cut by hand. I know. It’s shocking. However, those who like “fussy cutting” will scoff, since this cutting is basically straight lines… It’s hard to see in the image, but the “Today” is actually in a lighter colour. I like the fun, energizing colours in this card, and it’s a great “all purpose” kind of card, even if the set it comes from is called “Amazing Birthday“. The Designer Series Paper in the background is from the Sweet Taffy collection.
This weekend, I’ll be at the Cambridge Cropfest on Saturday morning, doing a Make & Take with the croppers in attendance. I’m looking forward to checking out what everyone’s working on! (oh, and I’ll have some items for sale, like adhesives and kits in case you “need” anything to fuel your creativity as well).
**Please note that the date of the December Monthly Card Class has changed – it will be on THURSDAY, December 4th at 7pm.**


