Nov 1, 2014 | cards, Christmas, Seasonal Catalogue, Stampin' Up!, Tutorial, TV/Video/Web/Tech
One of the fun opportunities I’ve had of late is the chance to be creative for Stampin’ Up! Saturday on the Scrapbook and Cards Today Blog. This is the blog for the Canadian produced magazine that also features contributions by Ali Edwards and Cathy Zielske, two of my scrapbooking idols, so I’m thrilled to be able to say that we’re published in the same space… well, kind of… (as close as I’m going to get at this point anyway LOL!). I had a lot of fun with the latest set of projects featuring the Watercolour Winter Simply Created Kit (ok, I know it’s actually Watercolor Winter in the catalogue, but I can’t help including the “u” – it looks like a spelling error to me otherwise). I’m so grateful for the opportunity.
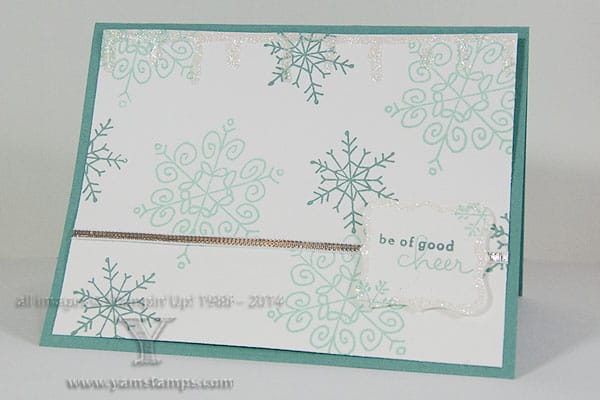
I managed to do a new video for you all! I know it’s been a while since I’ve done one – I apologize – between decluttering/selling/packing/moving a household, it’s been one of those things that fell by the wayside a bit. However, time to get back at it, and no time like the present! Today’s video shows you how to create the fun icicle accents that decorate this quick and easy card featuring the set Endless Wishes from the Holiday Catalogue. Enjoy! If you can’t see the video embedded below (if you’re seeing this in a reader) – please come directly to this post on the YamStamps site or subscribe to the YamStamps YouTube Channel.
Oct 30, 2014 | cards, Seasonal Catalogue, Stampin' Up!
 Well, yes, I know it’s been fall for a while, but today is a bright colourful day in our neck of the woods and I’m going to enjoy it while I can….because there’s a nasty rumour floating around that we can expect SNOW tomorrow (that’s right, in time for the Trick or Treaters). I do recall the days of making sure that the Hallowe’en costume could fit over warm clothing…
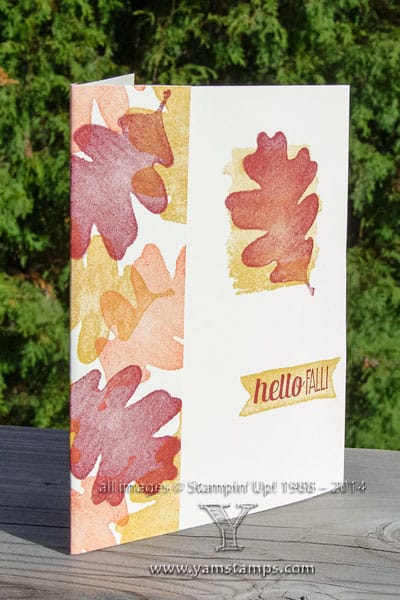
For this autumn card, I used the “For All Things” stamp set from the Holiday Catalogue and did a “stamping only” card. I stamped a strip randomly with the oak leaf, then attached it onto the border of the card, and wrapped it around the fold so there’s a bit on the back as well. Used the same colours for the main image and sentiment and a quick card is done!
This “fall” card is also a reminder that we “Fall Back” this weekend (yay!) – turn back your clocks on Saturday night! I for one am thrilled to be deceiving myself that I am getting an extra hour of rest. Never mind the fact that we give it back in the spring. Whatever. You’ll also want to check back on Saturday to see what I have to share that day….(oh the suspense…)
Oct 26, 2014 | cards, Stampin' Up!
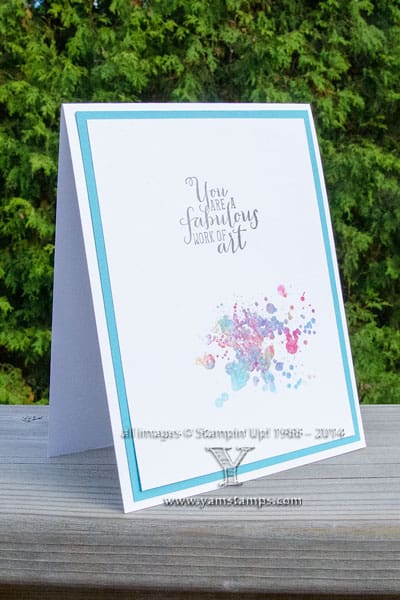 Often during my classes, people will ask me where I get the ideas for the cards we make. Usually, I enjoy coming up with card ideas on my own, but they can also be copies or versions of cards I’ve received or seen! In this case, we did this fun card at club earlier in the month. It uses the Stampin’ Up! sets Work of Art for the sentiment, and Gorgeous Grunge for the splatter. I love how the bright colours in the splatter make it less grungy and more artistic…
and the original is this card that I received from my friend, Lydia Fiedler. She is such a fantastic, creative person and really has the whole white space thing down.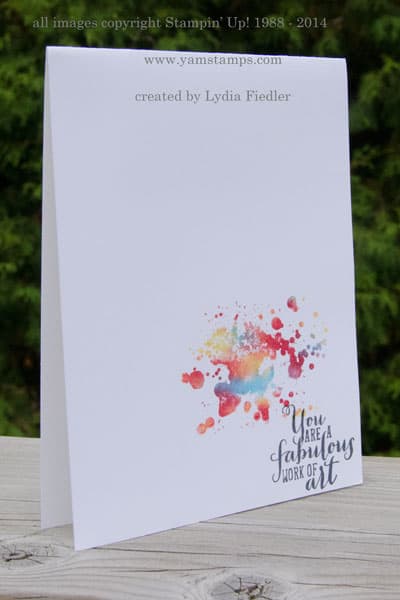 In all honesty, I would have done the card even more like hers….but I felt that I stamped the splatter too low on the Whisper White cardstock for the layout I had planned (with the extra layer of Tempting Turquoise behind the main image portion). OK there you go, you thought there was some science to it, but no. This is me, remember?!!
If you’d like to pick up some card inspiration that you can use as a jumping off point for your own cards, please consider classes with me! You can attend my monthly classes (first Wednesday of each month) (register via email), host one of your own with friends, or take an online class!
Oct 24, 2014 | cards, Seasonal Catalogue, Stampin' Up!
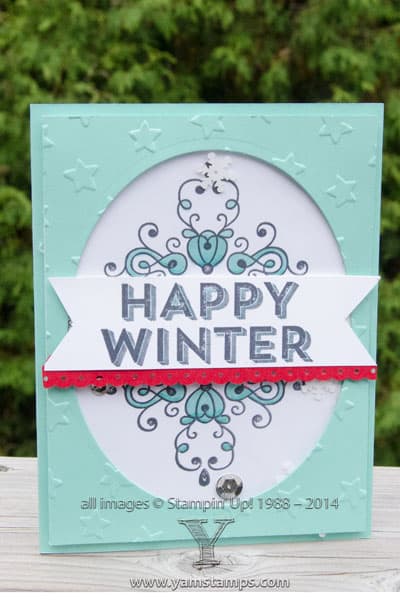 I’m sharing this elegant shaker card that we made during our Stampin’ Up! Canada Fall Conference a couple of weekends ago. Never mind that the stamping may not be perfect…but as we say during Card Class – it’s my prototype, and now I know how to do this card and I can recreate it easily in future. (I’m also realizing that I will have to switch my photo locations in the next while I guess, since the weather continues to get cooler, wetter and will soon be quite white – as the card indicates…) This is the Happy Winter stamp from the Holiday Catalogue, and we were all thrilled to receive it at the event! We also used the Lucky Stars Embossing Folder to add texture to the front piece . The shaker portion of the card is made using a cellophane bag and some of the Frosted Sequins.
While we’re thinking ahead – did you know that I offer gift certificates? You can purchase them in whatever denomination you like – perfect for gift giving options at the holidays or at any time of year! These certificates can be used for product purchases OR class fees – and I offer classes in person or online! If you’d like more information, please be sure to contact me. And last but not least, don’t forget that registration for November’s Card Class will be closing shortly – so if you want to come and make some fun cards, please register ASAP!
Oct 23, 2014 | cards, Seasonal Catalogue, Stampin' Up!
 I thought this was an especially appropriate card to share with you today, given the pretty horrible week we’ve experienced so far in Canada – with two of our armed forces personnel fatally wounded in our own country in two different incidents. For myself, it’s been a sad and sobering reminder that I need to not take things for granted, and that we do need to let those we care about know that we are thinking of them and appreciate them, not just at happy or sad occasions.
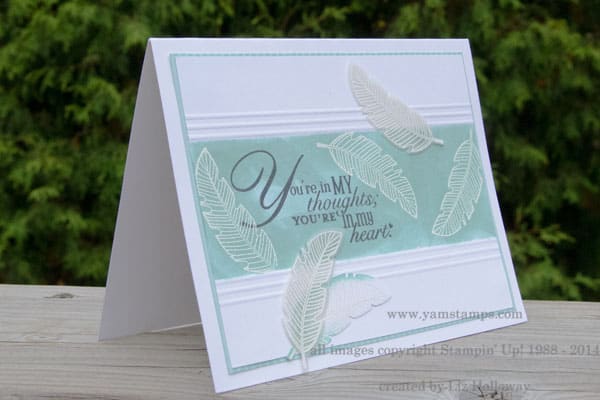
One of the fun things we do as demonstrators is swap cards. Often, this is done in person at Stampin’ Up! events, but recently a group of friends and I have started doing this by mail. This was last month’s card from Liz Holloway. She used the Four Feathers stamp set and framelits (available as a bundle) from the Holiday catalogue. I love the soft colours in this one! The framelits make it easy to cut out your stamped images, even on vellum, as shown here. I look forward to sharing more swap cards with you here in the next while!
A reminder that my next monthly card class is in 2 weeks – Wednesday November 5th. We will be making four different cards using a variety of techniques – please register in advance by contacting me!
Oct 16, 2014 | cards, Seasonal Catalogue, Stampin' Up!
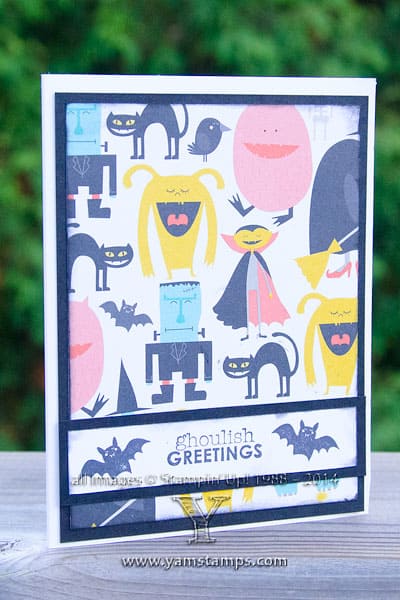 I love how fast and easy this card was! It uses Stampin’ Up!’s Motley Monsters Designer Series Paper (once again), combined with the Ghoulish Greetings stamp set. I did add a couple of bats from the Freaky Friends set that coordinates with the DSP but thought I’d let the images on the paper be the main focus. Why work harder than you need to??!! Adding some Basic Black ink around the edges of the paper and cardstock gives a less pristine look to the card. I don’t usually send out a lot of Hallowe’en cards, but using the DSP makes it easy to come up with a few creations…and as I showed you the other day, there are “non-Hallowe’en” uses for this DSP as well!! (I guess that should have been a Frugal Friday tip??)
Tonight is the scheduled night for the Hallowe’en Wreath Class. If you didn’t register in time for this class, but still want to make a wreath, I have a couple of extra kits, so please contact me if you’d like to purchase one! Stampin’ Up! demonstrators don’t do cash & carry (we don’t carry stock) but we can for certain items – adhesives and kits most notably, so the wreath falls into this category! So if you need a wreath kit NOW (in time to make it for Hallowe’en) – contact me 🙂


