Feb 19, 2015 | cards, Occasions, Seasonal Catalogue, Stampin' Up!
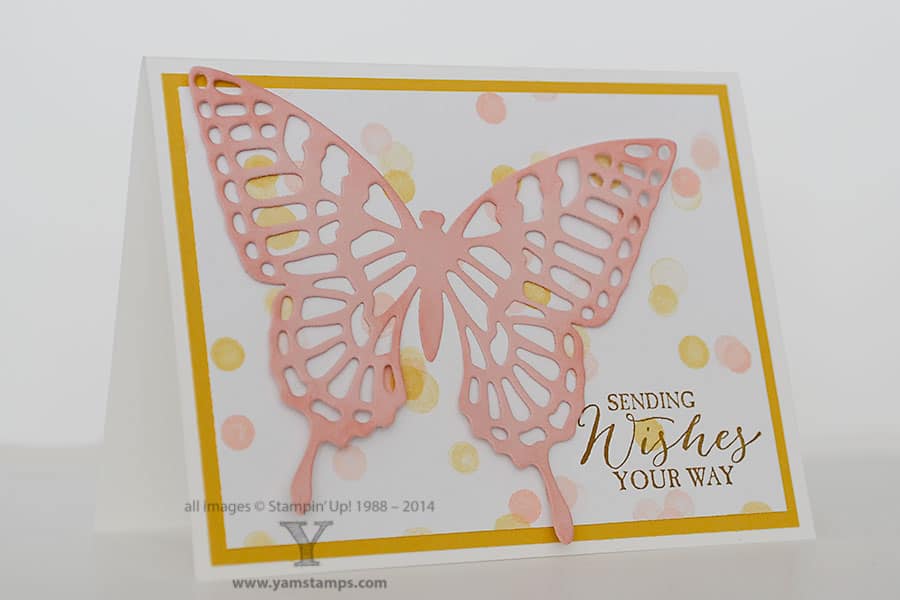 I just love the Butterfly Thinlits Dies in the Stampin’ Up! Canada Occasions Catalogue. They have been so popular that they went on backorder for a while! So easy to create a beautiful accent for your card or scrapbook page.
For this simple card, the Lullaby Designer Series Paper (have I mentioned how much I love this DSP that could be used for babies but is definitely all purpose?!) forms a backdrop and colour point. The butterfly is cut from Blushing Bride cardstock, with some additional Blushing Bride sponged at the edges to give a bit more contrast. The greeting from Butterfly Basics is stamped in Baked Brown Sugar and Hello Honey cardstock adds the matting.
To make it easier to remove your die cuts from the framelit there are a few things we’ve tried. (I will post a quick video comparing the two techniques to the YamStamps YouTube channel in the next day or so.) In the meantime… You can add a layer of wax paper between your cardstock and the framelit and your die cut is easily removed. The technique we tried at club was to cut the cardstock with the framelit, then to run the framelit (with the die cut image still stuck inside) through the Big Shot again, on top of a layer of folded dryer sheets. When you pull the folded dryer sheets away, the die cut image sticks to the dryer sheet, so you just peel it off and then you can re-use the dryer sheets (once you’ve picked off all the little bits left behind). The one thing about this technique, though, is that all the little guide holes that are in the framelit (designed so you can poke your paper piercer through to help remove the die cut) will get embossed into the die cut piece. On this card, I used the wax paper technique so you don’t see any guide holes.
Send a butterfly to a friend through the mail….since if you’re living in Southern Ontario these days, that’s the only way you’ll see one for the next few months!
Feb 16, 2015 | cards, Stampin' Up!
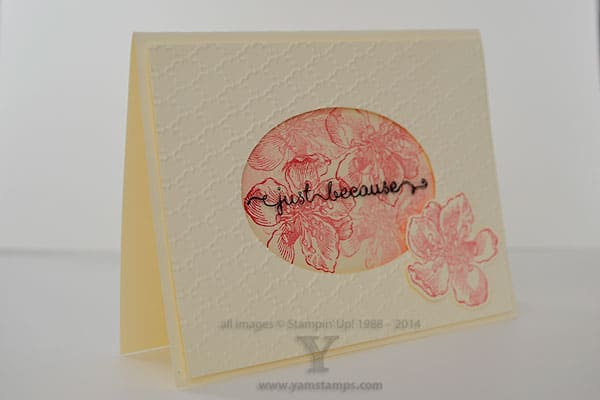 This is a recent card that we created in Stampers Club. Now, those of you that know me, don’t be too shocked, but YES that is a “fussy-cut” flower on the front!! I do tend to avoid fussy cutting as a general rule, especially in classes or clubs – it’s a polarizing thing (some people REALLY dislike cutting things by hand) and I also like to keep my crafting simple. However, there are times when a punch, die cut or whatever just don’t quite do it, and this is an example.
Other than that, this is a pretty straight forward card – really! It uses one image only – one of the flowers from Everything Eleanor. The sentiment is from A Dozen Thoughts and is stamped in Staz On onto a Window Sheet. The flowers are initially stamped in the centre of the cardfront, varying between first generation (ink the stamp, stamp on the paper) and second generation images (re-stamped onto paper without re-inking the stamp) to add variation and interest. The oval window is die cut from another piece of Very Vanilla cardstock, and THEN embossed with the Fancy Fan folder. Important to cut first, then emboss, otherwise your embossed pattern tends to get squashed when the cardstock is run through the Big Shot again. Stamp onto your window sheet, adhere to the back of your embossed cardstock, then put onto the front of the card with Stampin’ Dimensionals. As a bonus – if you don’t like how your sentiment stamped, clean the Window Sheet with some Staz On Cleaner and you can start again!! Hand cut one flower with your Paper Snips and then adhere to the cardfront for a finishing touch.
It’s always great to have a stash of cards on hand, and a “Just Because” card is so multipurpose and so fun to receive! Remember when we were so thrilled to get an email and were innundated with “snail mail”? It’s the opposite these days, isn’t it? Share the joy and send a hand made card! I am working on this for myself this year – send more cards! (Especially to those people who place orders with me, nudge, nudge! LOL). If you would like to build up your card stash, please consider attending a class with me! Monthly Card Class is always open to all levels of crafters – next one is Wednesday, March 4th. Hope to see you soon!!
Feb 8, 2015 | cards, Seasonal Catalogue, Stampin' Up!
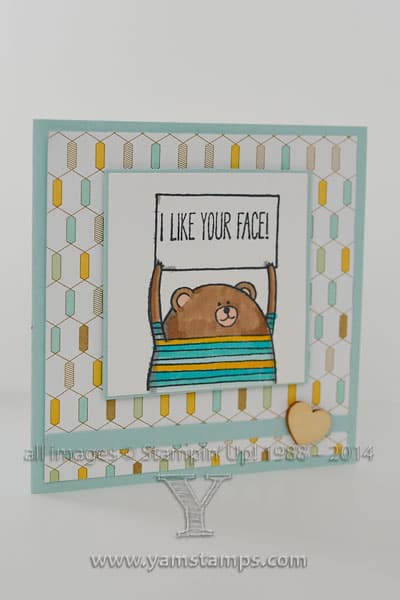 I thought this Stampin’ Up! set was so fun when I saw it! It’s Cheerful Critters from the Occasions catalogue. There’s a number of different critters and sentiments that you can mix and match, so I thought this one was good for Valentine’s Day. I coloured the image quickly with Blendabilities (OK bad shadowing job on the sign, I know, sorry) and then popped it onto some Lullaby Designer Series Paper. I added a strip of the Pool Party cardstock (easy way to add an accent if you can’t find your ribbon…) and then added a little wooden heart from the Essentials Wooden Elements.
It’s fun to spend a bit of time adding colour with Blendabilities. Don’t forget that you should use the Memento Tuxedo Black Ink Pad for good results. If you’d like other tips using your Blendabilities, I will be holding another Blendabilities class Thursday, March 12th at 7pm – featuring the colours Old Olive, Daffodil Delight, and Wisteria Wonder. Cost will be $80 and includes all three sets of Blendabilities markers PLUS a Colour Lifter and the stamp set “A Happy Thing” from the Sale-a-Bration catalogue. If you already have those colours, you may order other colours instead, but please bring those colours with you to class. Registration will open tomorrow and will close Sunday, February 22nd. Check back to the blog and subscribe to my mailing list to get notification of all my events!
Feb 4, 2015 | cards, Stampin' Up!
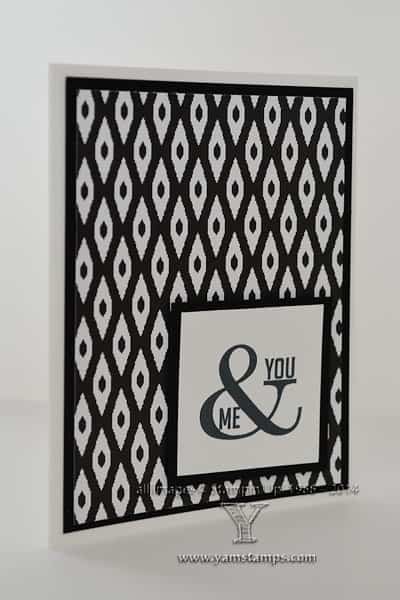 Traditionally, we see a lot of red and pink cards at this time of year, but I thought it would be good to share a card that doesn’t have that colour scheme. A clean and simple layout and design help to focus on the sentiment from the Perfect Pennants set. The Designer Series Paper featured is from the Back to Black set. I always think that Black & White is a classic pairing appropriate for so many occasions. This is a great masculine card for Valentine’s Day. The strong graphics in the paper and the bold sentiment make for a quick card that makes an impression! In case you’re keeping track – if you purchase the wood mount set, the Designer Series Paper, a package of neutrals cardstock and a Basic Black ink pad, you’ll have the supplies to recreate this card (plus make so many more!) AND select a free Sale-a-Bration item to boot!
As always, please contact me if you have any questions or need help placing an online order.
Feb 1, 2015 | cards, Events, Sale-A-Bration, specials, Stampin' Up!
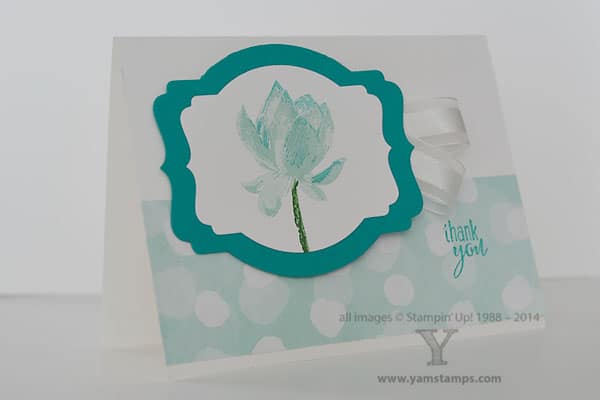 Sale-a-Bration is that great time of the Stampin’ Up! Canada year where your regular orders earn you FREE product. This Wednesday’s Monthly Card Class will be featuring Sale-a-Bration items – like this card here! The Lotus Blossom Stamp Set has proven to be the most popular choice in the first month of Sale-a-Bration amongst my customers, and I have to agree. I was first drawn to Stampin’ Up! because of Two Step Stamping. You stamp a partial image and then complete the image with another stamp. This allows you to have a stem and a flower that are two different colours, and gradation of colour and dimension in an image. In the Lotus Blossom case, it’s actually Three Step Stamping – the blossom has 3 different components combined to make a beautiful image. This card also uses the Best Year Ever Designer Series Paper – another Sale-a-Bration exclusive item. I love that bokeh effect on the paper.
A reminder that registration is required 2 days in advance of any event (to allow me time to prepare all the supplies!) so if you’re interested in attending Wednesday’s class, please register by the end of Monday, February 2nd (once you’ve finished checking out what Wiarton Willie has to say about the weather).
Jan 23, 2015 | cards, Seasonal Catalogue, Stampin' Up!
 I don’t know about you, but the time is flying by. Some other life commitments took priority for the first part of the year, and now I’m ready to re-focus and get things going! I did manage to do a bit of stamping, and we did have our regular Stampers Club get togethers, so that’s kept me creating…I do like that my business can be flexible to allow for a little slow down and then a ramp up if it’s my choice!
Here’s a fun card using the Work of Art set and the Hello Life set from the Occasions catalogue. This sentiment is going to be one of my mottos this year! This quick card can be made and sent in minutes, which for me is rather important. If there’s too many steps involved, the process gets derailed along the way. (As I type this, I am being mocked by the pile of “Happy New Year” cards sitting on my desk, waiting for postage. That’s right, New Year, because I didn’t quite get enough finished for Christmas). I suppose if I had been planning ahead, I would have done them in red, realizing that I would be near the end of the first month before getting them out, then I could pretend it was for the Lunar New Year….even though I’m not Chinese…
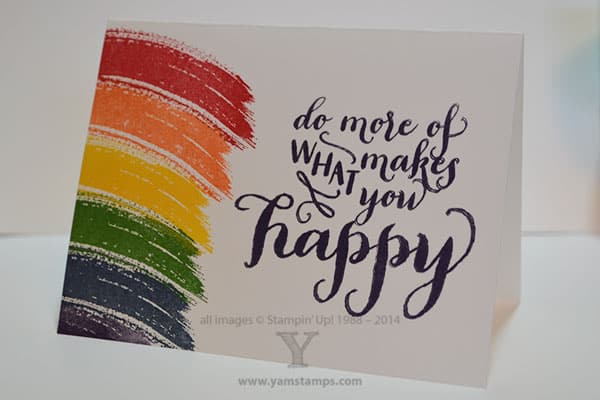
Other supplies used in this card: Cardstock- Whisper White; Ink Pads: Real Red, Tangerine Tango, Daffodil Delight, Garden Green, Night of Navy, Elegant Eggplant
I’ll be spending this weekend trying to further clean out and organize my stamping area (it’s an ongoing battle, I tell you!) and prepping for Valentine’s Day cards, in anticipation of my TV appearance! Please tune in to Morning Live on Tuesday January 27th around 8:20 am (CHCH TV) to check it out. I’ll try to share the clip here as well later.
If you’re looking to do more fun and happy things, consider attending February’s Card Class – Wednesday, February 4th at 7pm! See the YamStamps events page for more information or contact me to register!


