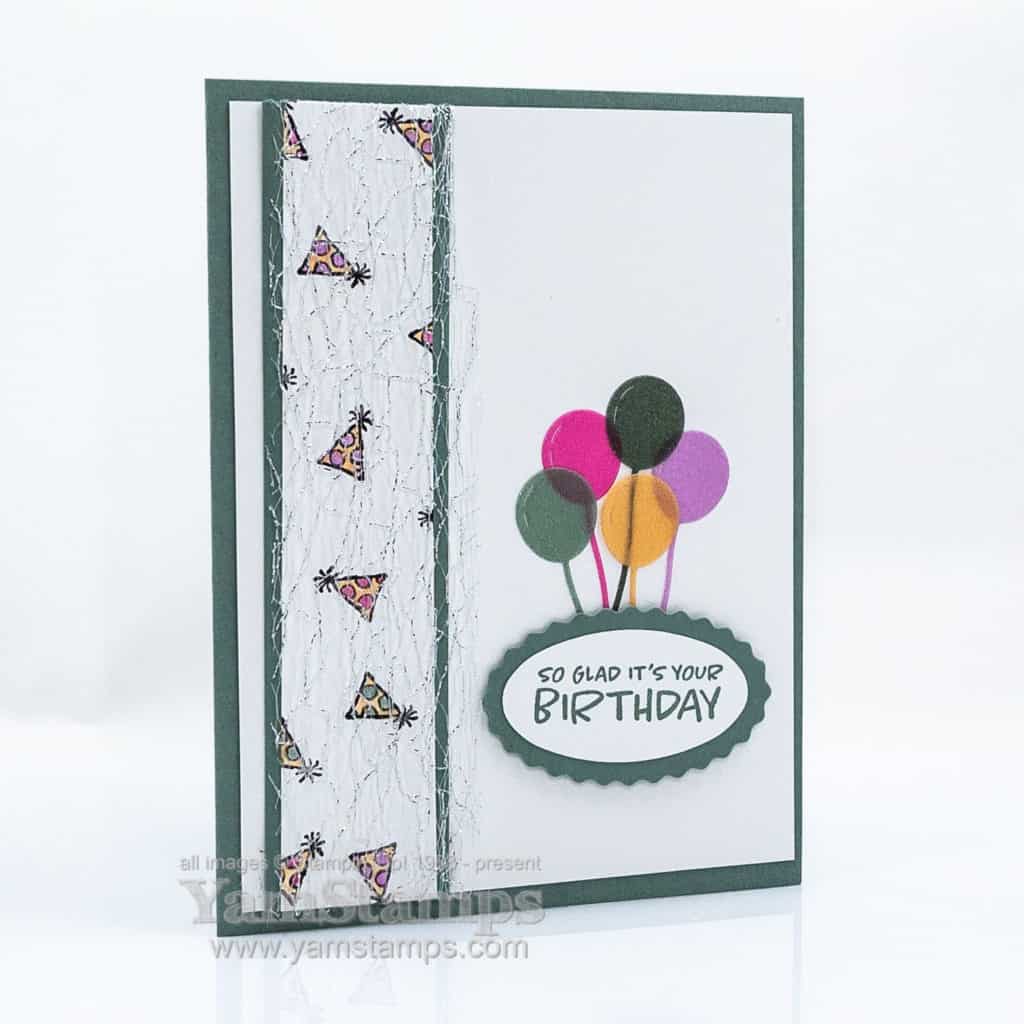
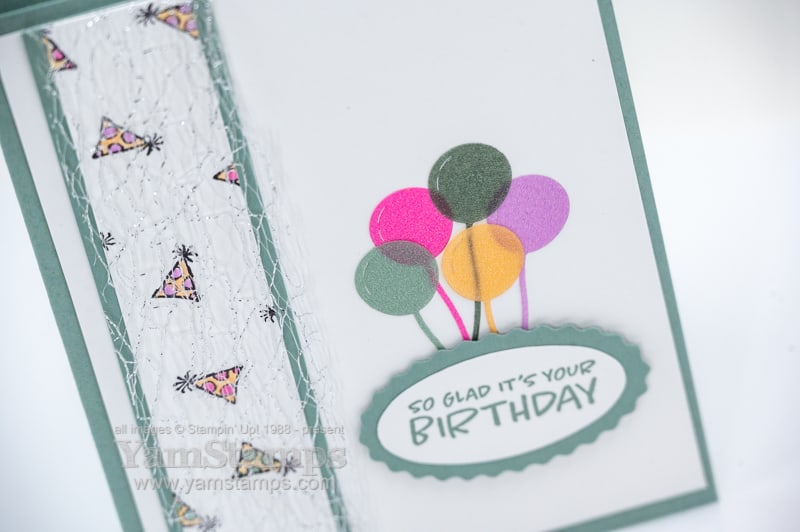
I used Stampin’ Up!’s Counting Sheep stamp set and coordinating Sheep Dies to make this fun balloon birthdaycard – a non-sheep based project!
Balloon Birthday Card
The Counting Sheep stamp set and the Sheep Dies are both Level One Sale-a-Bration items – so you can pick one of them with a $60CAD product order (before shipping/taxes) – so if you wanted both of these items and didn’t want to wait, a $120CAD product order would entitle you to two Level one items – so you could get both (plus enough supplies to make a whole bunch of these cards!).
My favourite feature on this balloon birthday card is the balloons (hence the title of this post!). I die cut them (the Sheep Dies include a balloon die) from the 2021-2023 In Color Shimmer Vellum. I think that the translucent shimmer makes for some realistic type balloons – and I made sure to overlap the balloons to show off the their translucency. I used the Adhesive Sheets on the back of the Vellum (and there is definitely a back and front to this vellum) so that when the balloons are adhered in place, you really can’t see any evidence of the adhesive at all. Love it!
Sale-a-Bration runs until September 30, 2021, but Stampin’ Up! have advised us that certain items will not be guaranteed until the end of the period – the Sheep Dies are one of them – so if you have your eye set on them, or want to create your own Balloon Birthday Card, you’ll want to be sure that they are one of your first Sale-a-Bration picks…and save some of your others for your later orders. Online shopping shortcut is https://yamstamps.com/shop for 24/7 shopping in Canada (Canadian addresses only, due to Stampin’ Up! regulations). If you would like assistance placing your order or want to pay by etransfer, you can always message me. Happy Sale-a-Bration!
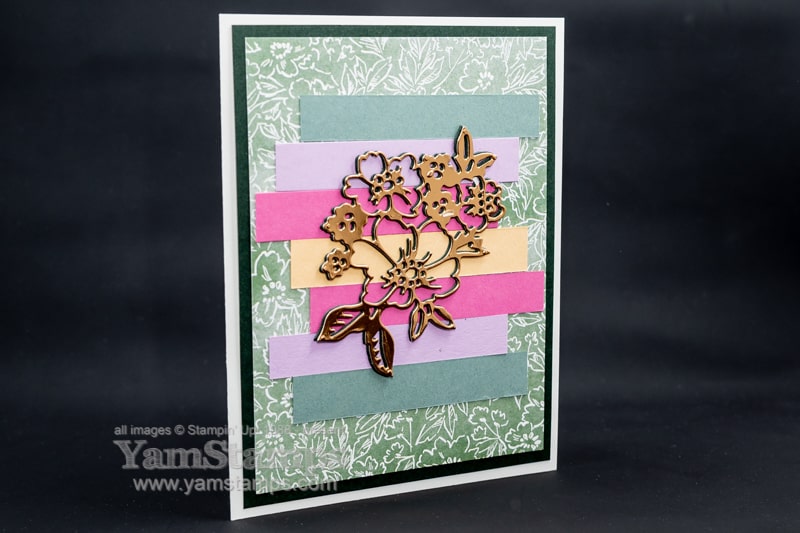
This layered die cut card is a great way to add a bit of dimension to your cards – and of course, because it’s here on the YamStamps blog, you know it’s an easy method! Featuring some products from the 2021-2022 Annual Catalogue.
Layered Die Cut Card
So – I liked the Hand Penned suite products, but in all honesty – I was resisting, and they actually weren’t on my “have to buy” list…until one of my Demonstrator team members, Arlene, shared some beautiful projects she’d made with it during one of our online team get togethers. I pretty much had it on my next order going in LOL!! (so for those of you who say that -I- enabled you in your crafty purchases, know that I am not immune!)
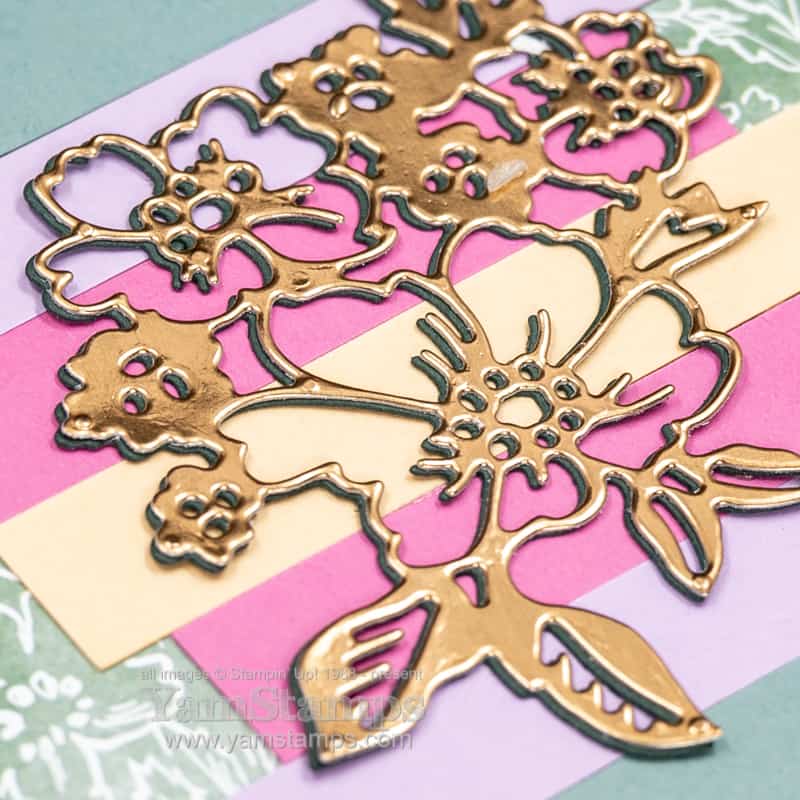
For this card, I added some adhesive sheets to the back of some Copper Foil Sheet strips before die cutting with the outline die from the Penned Flower Dies. I also die cut the same die from the centre of the backing piece of Evening Evergreen cardstock. (One of my favourite thrifty card making tricks!) The hole in the cardstock was covered by the piece of Hand Penned Designer Series Paper, and then I added additional strips of the other new 2021-2023 In Colo(u)r cardstocks.
close up detail layered die cut card
Having the adhesive on the back of the Copper Foil Sheet made it easy for me to adhere it onto the Evening Evergreen die cut – but I slightly offset the die cuts so it showed off the bottom layer and gave a bit more dimensional effect. I suppose I could have put some adhesive sheet on the back of the cardstock layer as well, but I didn’t…so I just used small dots of Multipurpose Liquid Glue on the back of the die cut. One tip I picked up recently was to let the liquid adhesive dry just a bit before setting the layer down so it doesn’t “ooze” out all over the place. Handy tip for a messy crafter like myself!
If you’re in Canada, I hope that you enjoyed your first long weekend of the summer(ish) season! We had our barbeque dinner on our back deck – after clearing so much pollen from our table and chairs – crazy! I saw a comment somewhere about people having to say “Pollen, not the plague!” whenever they sneeze or cough these days. True!!
This is a quick and easy mini fancy fold card disguised as a standard sized card! By adding a mini card on a 4.25″ x 5.5″ piece of cardstock, it fits into Stampin’ Up!’s Medium Sized Envelope for mailing, and doesn’t get lost on a gift.
This card is a single piece of Pool Party Cardstock cut to 4.25″ x 5.5″, and then I die cut the centre of the Designer Series Paper with one of the Stitched Rectangles. The Z folded Pale Papaya Cardstock covers the hole in the centre, and then the die cut piece fits on the front of that mini fancy fold card. The sentiment is another Stitched Rectangle on a Tasteful Label Die Cut. The sentiment and flower images are from the Free As A Bird Stamp Set.
I didn’t add any bulky embellishments to this card because I didn’t want to make it too thick for easy mailing – but you could easily add some ribbon or bling to further fancy it up!
We had fun making this easy mini fancy fold card together in Stampers Club the other evening. Our Zoom gatherings are usually filled with chatter and laughter, often with everyone laughing at me because I’ve messed up something when showing the construction of the card – I will often (unintentionally) demonstrate “What NOT to do when making this card”! While virtual card classes have their learning curve, some of the definite positives are the quick commute time for all and the quick class time – since I die cut and prep everything ahead of time for everyone! If you’re interested in joining us, new members can start their 6 months in club at any time – our next get together will be in June, so if you’d like to join us, please contact me! As we will still be virtual for a while, as long as you are located within Canada and can access the internet, you’ll be able to join us! I will most likely continue to offer an online version of club even once we can safely gather in groups again, because it’s nice to have options.
Thanks for stopping by the YamStamps site! Leave a comment and let me know what kind of projects you might like to see here in future!
Sale-a-Bration is ending on February 28th this year – which is earlier than previous Sale-a-Brations. There will be another Sale-a-Bration occuring in the summer, but this is your last chance to grab the January-February Sale-a-Bration items before they’re gone!
This curvy floral card was inspired by a swap I received from fellow demonstrator Kay Smith. While I do enjoy the design process, one of the things that Stampin’ Up! demonstrators do is share ideas – so then we can add our own twists (or not!). It’s great to see the beautiful work by others and get inspiration.
Curvy Floral Card
The floral paper is the Flower & Field Designer Series Paper that is a Level 1 Sale-a-Bration option. This means that if you place an order for $60 product, you could select it as your freebie. If you place an order for $120, you could get two packages…or one of the Level 2 Sale-a-Bration options (and so on, and so on…). The paper is cut with the curved edge die from the Curvy Dies. It’s layered on some Pool Party Cardstock that is embossed with the Ornate Floral 3D Embossing Folder. A few layered Daisy Punch outs add some more floral accents. Can you tell what the centres of the daisies are? I actually used the centre of the “O” from the Playful Alphabet dies! Added a sentiment from the Dragonfly Garden stamp set onto a Stitched Shape oval. I love oval die cuts for sentiments. The Layering Ovals Dies are a great option as well. They tend to fit a number of sentiments and I always find that curved lines are more forgiving in terms of lining things up. Plus I figured the curved angle went well on this curvy floral card.
So – February 28th is your last chance to grab the Sale-a-Bration items of your choice with your qualifying product purchase – visit yamstamps.com/shop! Also – Feb 28th marks the last day to register for the March Online Card Class – so don’t miss out. Contact me to register for class or for assistance placing an order!
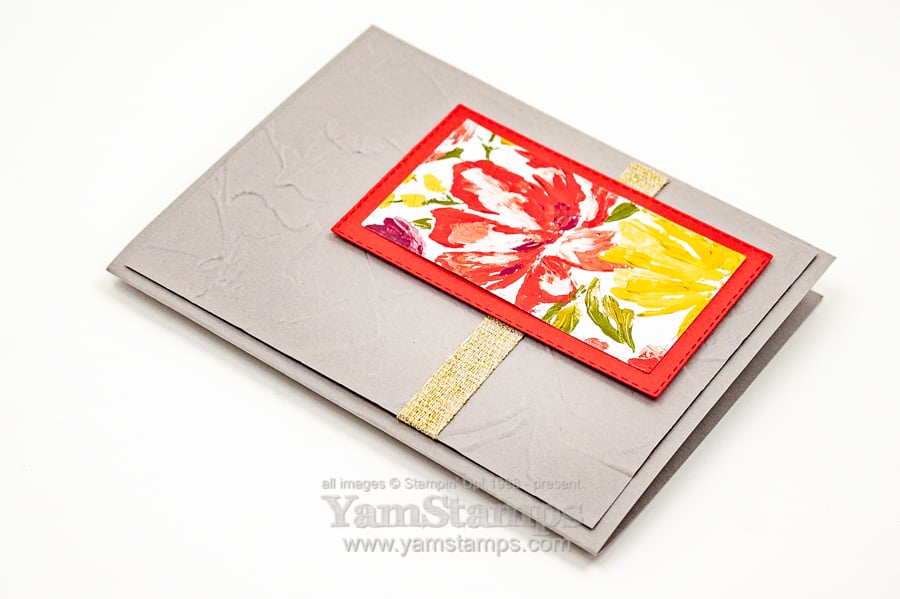
My Stampers Club and Card Classes are being held virtually right now, and one of the Stampin’ Up! rules about class kits that I send out is that I can’t pre-stamp anything. It makes sense, especially when you want to learn about card making and stamping, but it has been stretching my creative brain cells a bit at times! This no stamping required card thankfully came together fairly quickly so that was nice!
No Stamping Required Card
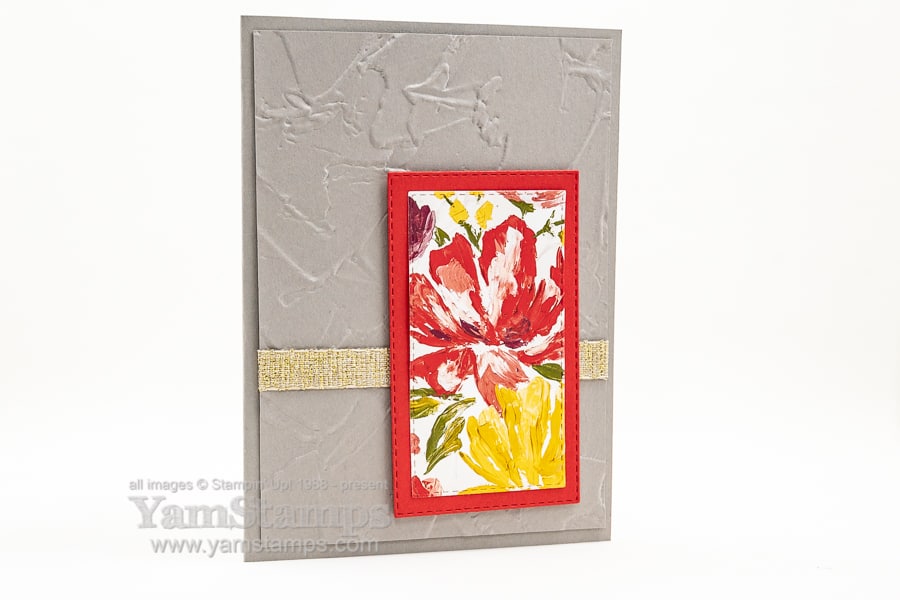
One thing that made this card easy was that I used items from the same suite. They’re all from the Fine Art Floral Suite Collection in the January-June 2021 Mini Catalogue. This is one of my favourite suites! (OK disclaimer, I’m not into the Gilded Leafing because I’m a messy crafter to start, and that stuff would be absolutely everywhere for a very long time). Anyway. I used my current favourite embossing folder, Painted Texture for the backing piece and then added some of the 3/8″ Fine Art Ribbon. It’s a subtle metallic – if there’s such a thing.
No Stamping Required Card
To finish the card, I simply die cut some Stitched Rectangles from Poppy Parade Cardstock and the Fine Art Floral Designer Series Paper. I actually used my new Mini Stampin’ Cut & Emboss machine for this step – it’s such a cute little machine! It would be perfect to take to a crop (whenever we get to do things like that again). I also love that it doesn’t take up much room on my crafting surface – so I have more room to spread out my crafting supplies and mess LOL.
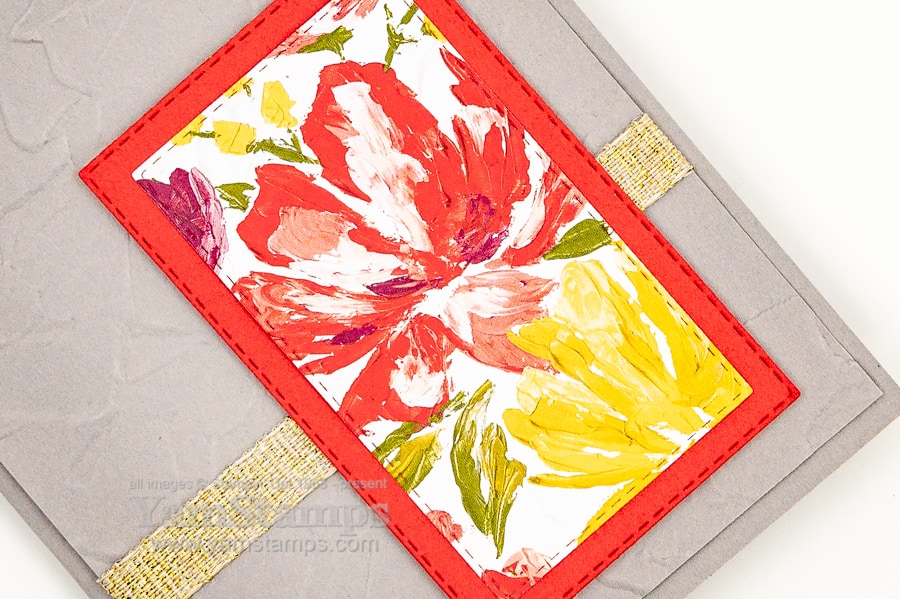
I really like putting main elements towards the bottom right of my cardfronts….I think it adds a bit more interest than always centering the focal image, which I otherwise tend to do.
No Stamping Required Card
Last but not least – if you’re missing card classes, join me in March for my Online Card Class. This is one of the no stamping required cards we’ll make together. I’ll send you the packet of precut class materials ahead of time, then we’ll get together on a Zoom conference call March 10th. If you can’t make it on that date, no worries! You’ll have access to the recording afterward so that you can watch at your leisure.
Class fee is $20 and includes postage of class materials to your home in Canada. You can contact me to register and to get payment links. Deadline for registration is February 28 to allow for postage time. You will need an adhesive of your choice and something that you can score and cut cardstock with, plus Stampin’ Dimensionals are a nice option. You can add stamping from your stash on hand after the class! When I had in person events, a lot of people would actually opt to leave the sentiments out at the time anyway and add them later, once they knew the occasion for which they would be using the card.
I hope you’re enjoying your Family Day (or whatever it’s called in your neck of the woods…). I’m looking to spending time with some of my crafty family tonight – aka the Stampers Club! It’s our online class, and it’s always fun to see each other and catch up a bit, while also getting to share some crafting. I’m off to make sure everything’s charged up and that I have a reasonably cleared worktop!
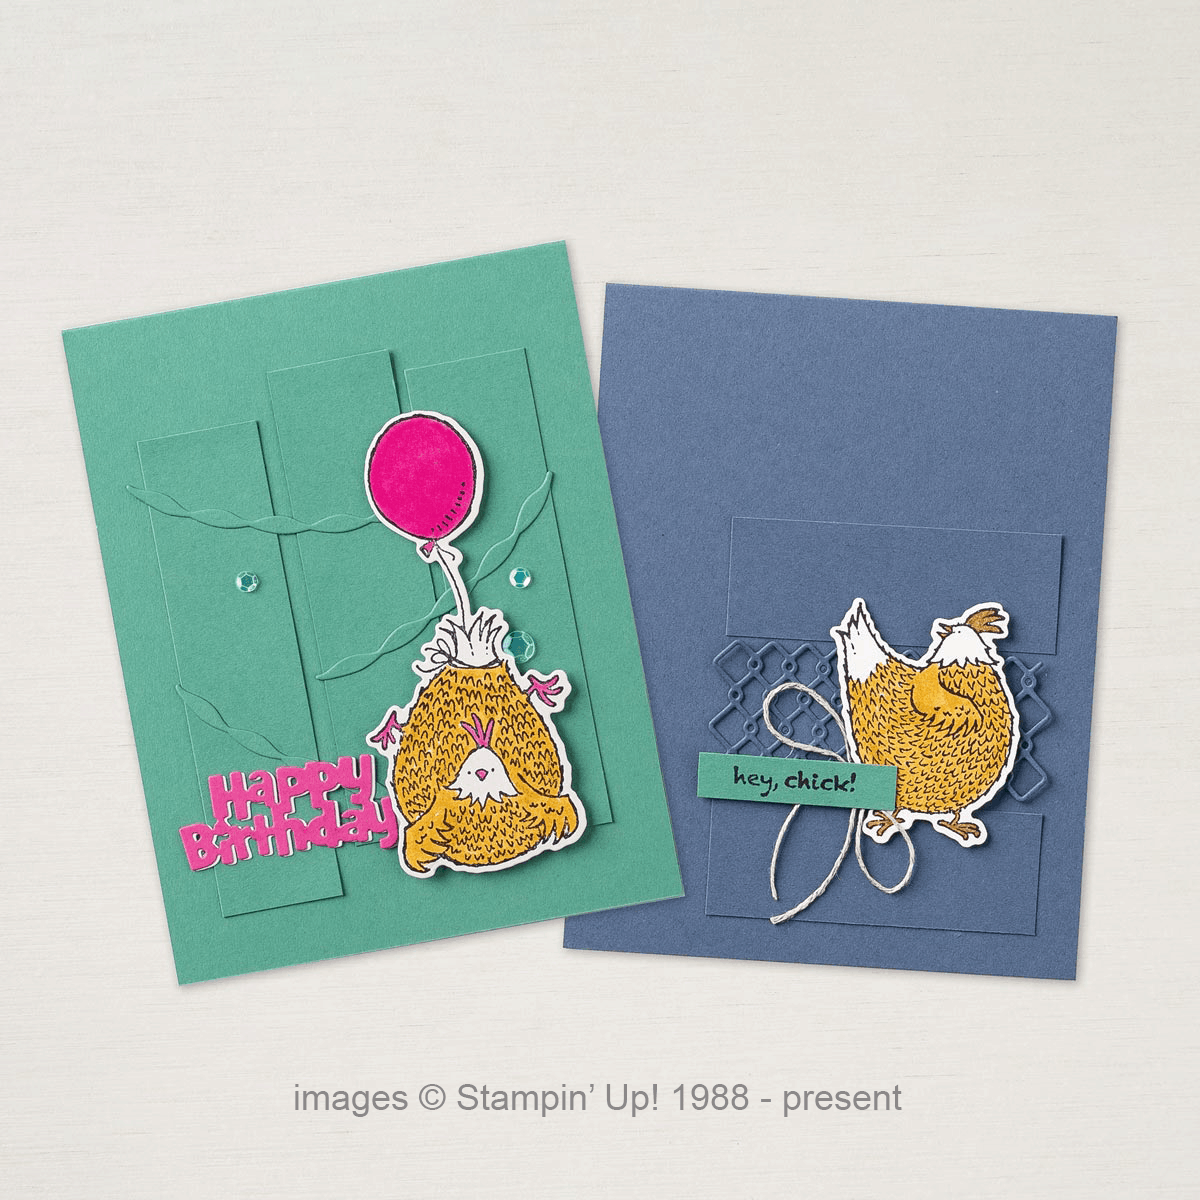
Do you remember the Sale-a-Bration set from the past, “Hey Chick!”? It was one of the most popular selections – and Stampin’ Up! has brought it back for a limited time, along with some additions!
Hey Chick – don’t forget – until the end of February, when you place a $60 product order (or multiples thereof…) you can select a Sale-a-Bration product for free! You can shop in the YamStamps Online Stampin’ Up! Canada store (shortcut yamstamps.com/shop) 24/7 and have your choices delivered directly to your door – or contact me for assistance placing an order (or if you want to pay by etransfer).