A downloadable pdf with step by step tutorials for three different inked embossing folder techniques, plus I’m throwing in fifty tips for using your Embossing Folders! On sale December 26-28 ONLY, it’s a limited time special item – for just $9.99CAD, and the download is available as soon as your purchase is completed.
This is one of the step by step tutorials you’ll get:
I love the look of this! If you don’t recognize the products I used, it’s because they’re from the January-April 2025 Mini Catalogue! The Quick Sheet Tutorials include a supply list, plus step by step instructions. You aren’t limited to the supplies in the list – you can use the techniques with whatever embossing folder you might have in your craft room.
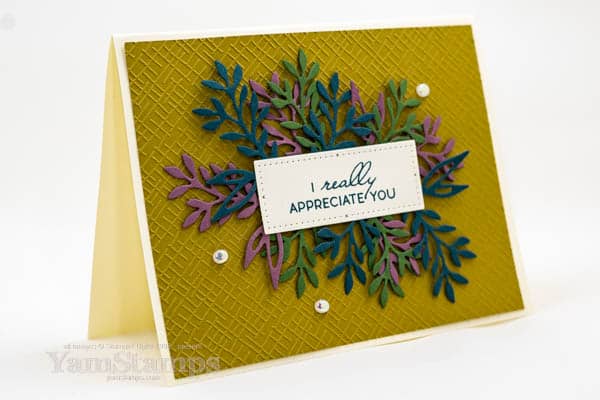
This Layered Leaves Background Card is easier than you might think…
Really! This layered leaves background card uses die cut labels that make it easy to add a lot of delicate details to this card.
I used a number of the newer/returning Stampin’ Up! colours for this layered leaves background card – and I think it might almost look a little autumnal…but I couldn’t wait until then to share it! Using Wild Wheat as the backdrop, with foliage die cut from Pretty Peacock, Moody Mauve and Mossy Meadow. I also used Very Vanilla for the sentiment label and card, as I felt it went better with the tones of the colours I ended up choosing. I tend to automatically reach for Basic White – so every once in a while I have to remind myself that there are other options!! [What about you – are you a Very Vanilla or Basic White kind of crafter??]
The background layer is textured with one of the Basics 3D Embossing Folders. I love these folders that are part of the Online Exclusives. Stampin’ Up! Online Exclusive Products are items that are available for purchase, either through the YamStamps Online Stampin’ Up! Canada store, or by contacting me and having me place the order for you. You just won’t find them in a catalogue. Stampin’ Up! is able to offer different items and will replenish stock as able, and add new offerings every few months – in fact, there’s a new set of products added to the selection as of 6 July!
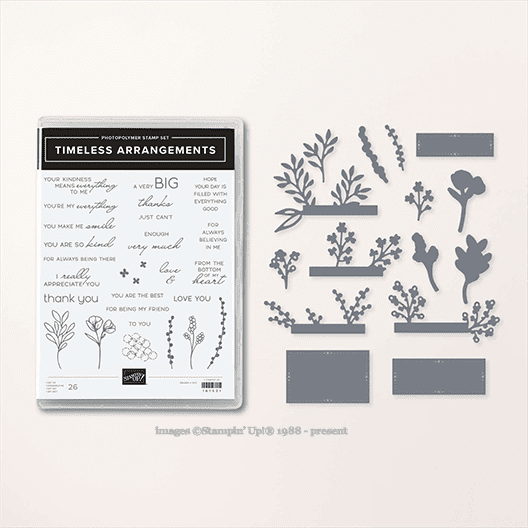
To add these layers, I basically cut one of the leafy frames from the Timeless Arrangements dies twice from each of the cardstocks. I added adhesive to the back of the die cut sentiment, and then arranged the different leaf die cuts – one showing out the top, and one showing out the bottom. I trimmed the rectangular base of the die cut as needed so it didn’t overhang the sentiment. The sentiment is from the Timeless Arrangements stamp set, and I stamped it in Pretty Peacock ink (the rectangular die is also from the Timeless Arrangements dies). You can get the Timeless Arrangements stamp set and dies together in a discounted bundle during the 2023-2024 Annual Catalogue sales period. (They may be available after that if they are not retired, but as individual items only. Stampin’ Up! tends to offer the discounted bundles only for one catalogue sales period).
The small sentiments actually can fit on the little rectangular bar too! To make it simpler for me, I stuck to using just the one die cut with the leafy sprays on it. The finishing touch for this layered leaves background card was a few Flat Adhesive-Backed Pearls because everything is more fun when there’s bling.
You can shop for any of these products 24/7 in Canada at https://yamstamps.com/shop or contact me for assistance placing your order or if you’d like to pay by etransfer.
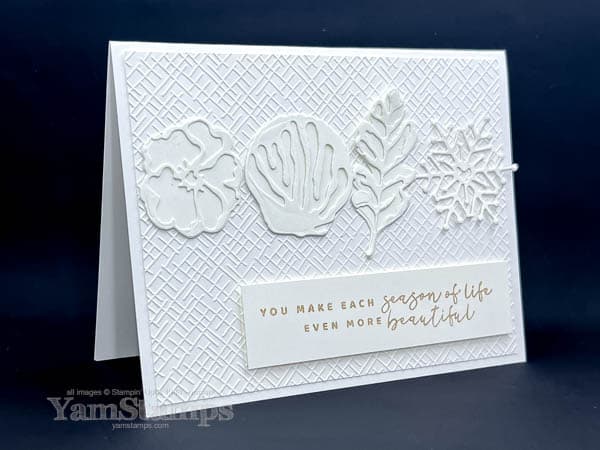
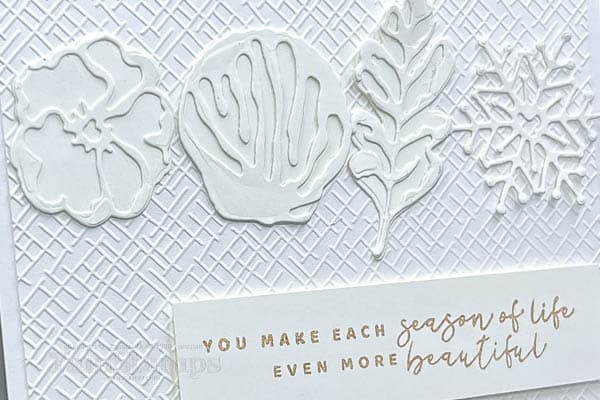
This is a one colour wonder card – I love the monochromatic look!
I love the clean look of single colour cards – I think of them as one colour wonders – like this card! There’s something simple and elegant about the effect, but it’s not so simple that it’s boring.
When I am keeping the colour scheme very simple, I like to make sure that there’s still a lot of eye catching details – so using texture really makes a one colour wonder from being boring. In this case, I used one of the Basics 3D Embossing Folders to create the background – I think this is my favourite out of the three. These Embossing Folders are part of the Online Exclusive Offerings from Stampin’ Up! so you won’t find them in the catalogue – but you will see them in the YamStamps Online Stampin’ Up! Canada Store. You can see the online only offerings by typing “Online Exclusive” in the search box. I just checked the online store, and while you can see the folders, you can’t order them at this moment since they’ve been so popular! Looks like they’re going to be available again in a week or so, though (fingers crossed). Yay! They are available again right now!
The flower, shell, leaf and snowflake are from the Chic Dies, and the sentiment is from the coordinating Seasons of Chic Stamp Set. These are carried over from the last Annual Catalogue (and I’m very happy that they are still around! So versatile!). As a Demonstrator, I like to be sure to share all the new and exciting products that are released in the catalogues or online, but I also like to make sure that some of my existing favourites get the attention they deserve!!
I die cut the layers from Basic White Cardstock, and layered the coordinating images before adhering them to the card front. I decided to use Crumb Cake ink for the sentiment on this One Colour Wonder Card because I felt it added a touch of colour without being overpowering.
The other thing I love about the one colour wonder approach – it makes my crafting easy because I don’t have to think about what colours to put together! If you like to avoid crafting brain strain, you may also want to consider signing up for a YamStamps Sketch System Subscription. Subscribers have told me that they love how easy it makes their cardmaking! Week One brings the sketch and the first sample to your email inbox, and over the following three weeks you get a different take on that sketch. The sketch and samples are tools to spark your own creativity – so that you can enjoy the process and the results without having to work too hard!! It’s just $9.99CAD every four weeks – get more information and start now by clicking here, or message me if you have any questions! Paper Crafting doesn’t have to be difficult to be impressive!
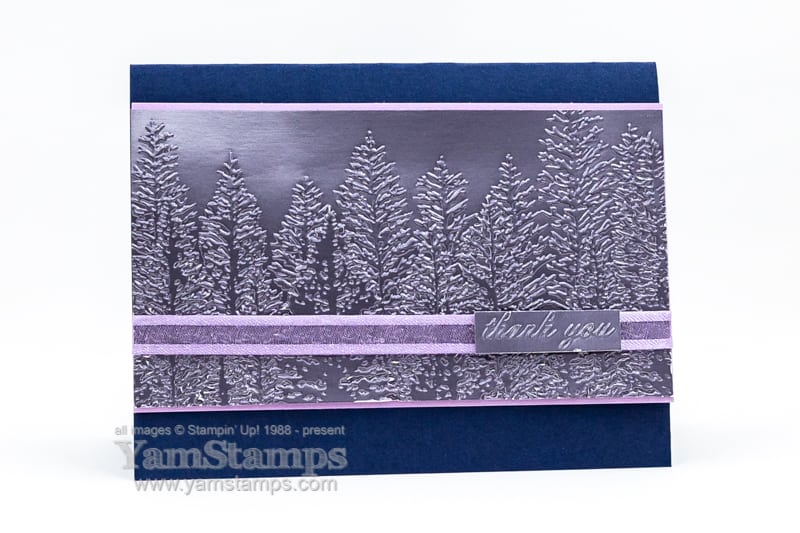
How are your holiday preparations coming along? (*ducking and running*). Mine are behind schedule, as per usual for me…but I thought I’d share this winter thank you card for those of you who are slightly ahead of me.
winter thank you card
Although as I type this now, I’m wondering why it can’t be a thank you card for any season – though I think the colour in general reminds me of a winter sky. I love the Silver Foil Specialty Pack that’s in the current July-December 2021 Mini Catalogue, and I’m thrilled that it’s on the carryover list – which means I will be able to continue to purchase it in the new year! The three different finishes of the Silver Foil give such different effects. The one I used for this card is the Matte Charcoal sheet, which I feel has a slight purple tint to it – so I brought that out a bit more by adding the Fresh Freesia 3/8″ Open Weave Ribbon and backing it with the Fresh Freesia Cardstock. I liked the embossed metal kind of look, so I decided to use that effect for the sentiment as well.
I embossed a scrap of the Matte Charcoal Silver Foil with the Thank You folder from the Thanks & Hello Embossing Folders set. I held the scrap in place with some painters tape, and after it was embossed I trimmed it even closer to the letters with my Paper Snips before adding it to the ribbon. I placed all of this onto Night of Navy Cardstock to complete this winter thank you card.
Well, there’s one thank you card done…
I’m working on cards to send out to everyone whom I’ve had Stampin’ Up! send the January-June and Sale-a-Bration Mini Catalogues….so I still have a few to go… I did automatically include everyone who has made an order with me in the past months, but if you’re not sure if that included you, or would like to receive one, get in touch and I’ll confirm!
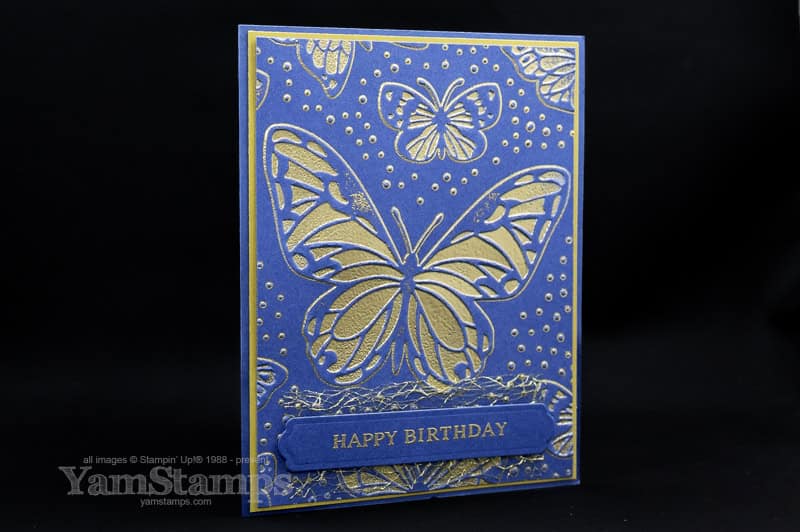
Remember this card I shared a while back? EMBOSSING MAKES AN IMPRESSION…and my Black Friday Special on the Embossing 101 and Beyond class will help you make WOW cards at impressive savings! Get the details and register here.
Out of the vault for four days only and at special pricing – it’s the Embossing 101 and Beyond Online Class! You’ll get lifetime access (or reasonable facsimile…) to the class videos that are housed on my classes website, for just $5 – but registration is only open Friday 26 November to Monday 29 November (Black Friday to Cyber Monday).