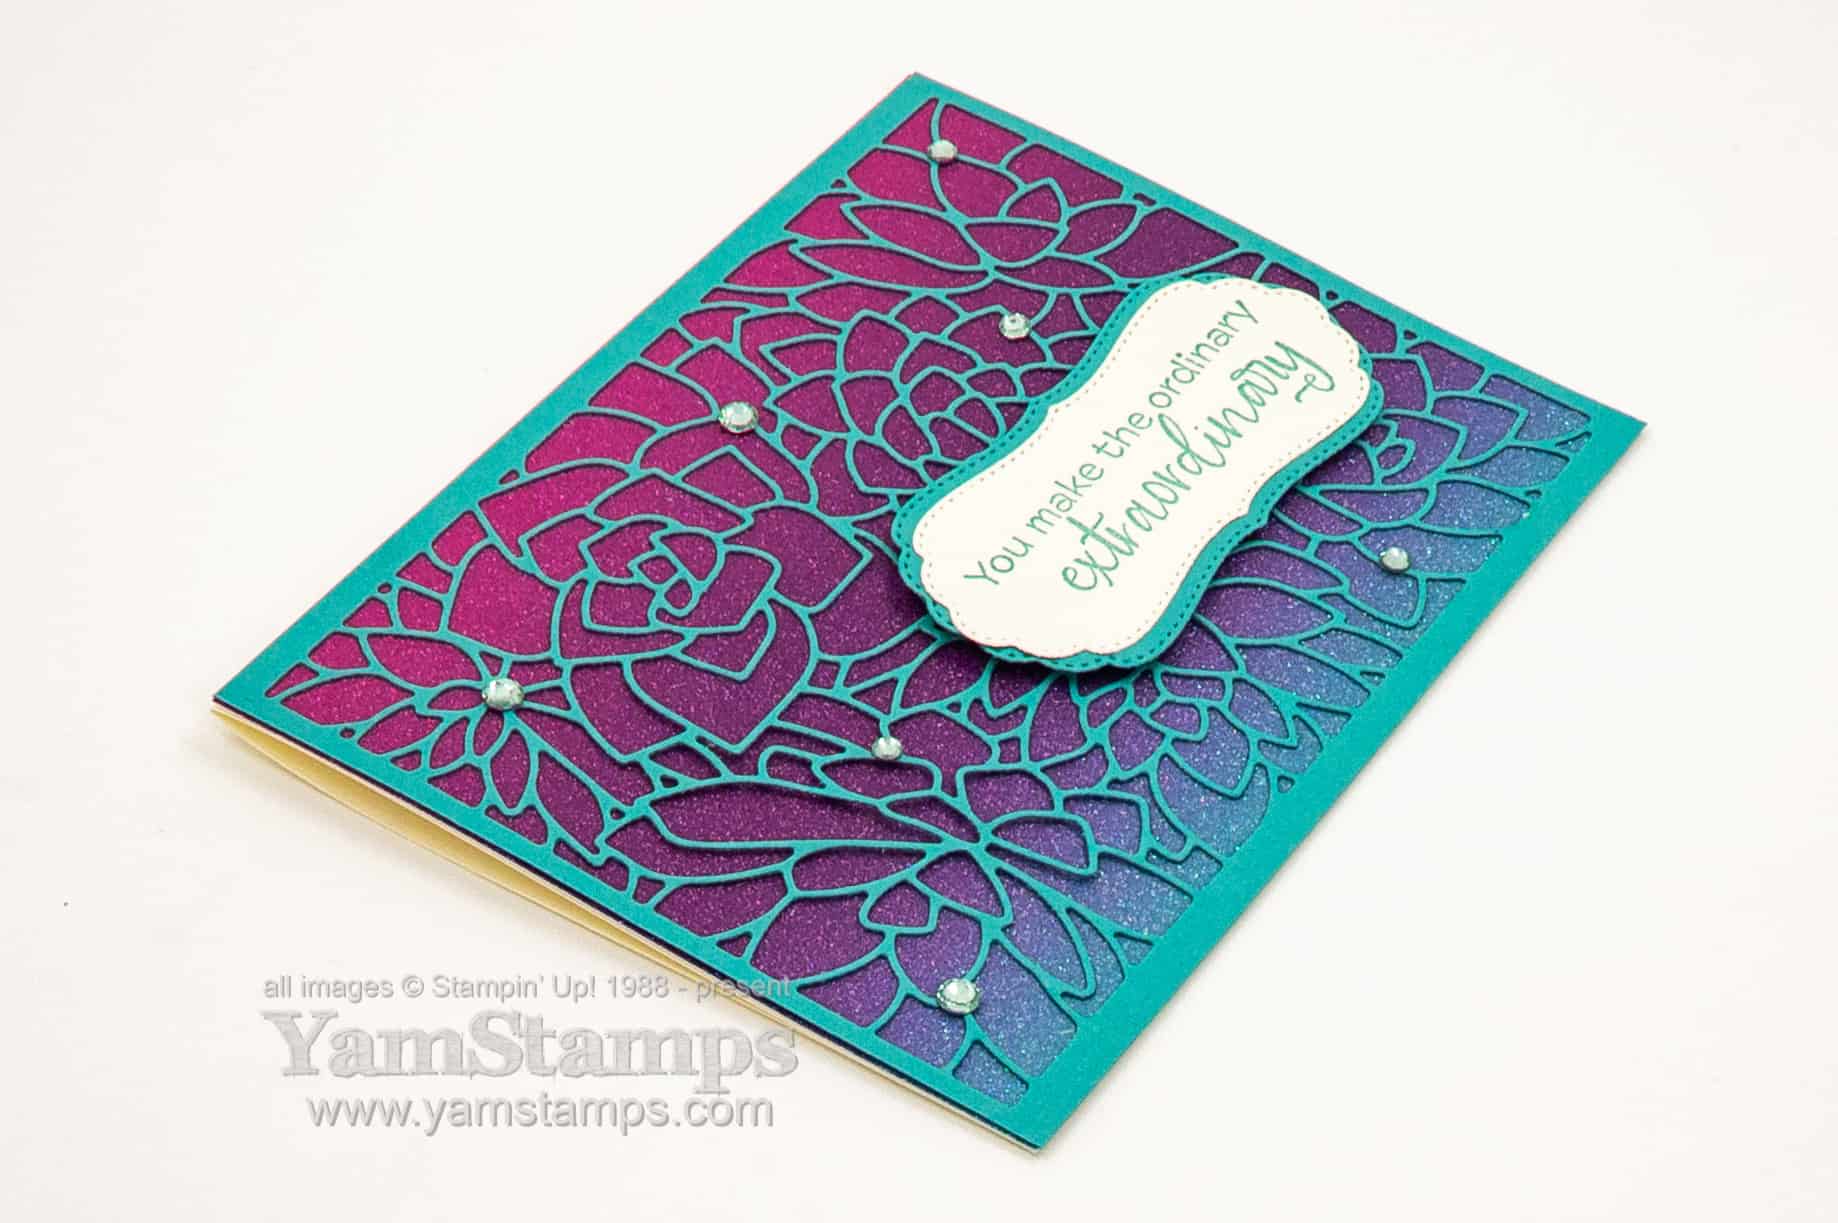
This card is right up my alley – because it’s definitely got the “wow” factor and it’s really easy to make! This sparkly ombre card shows off a few Stampin’ Up! products that are guaranteed to make your projects stand out.
Sparkly Ombre Card
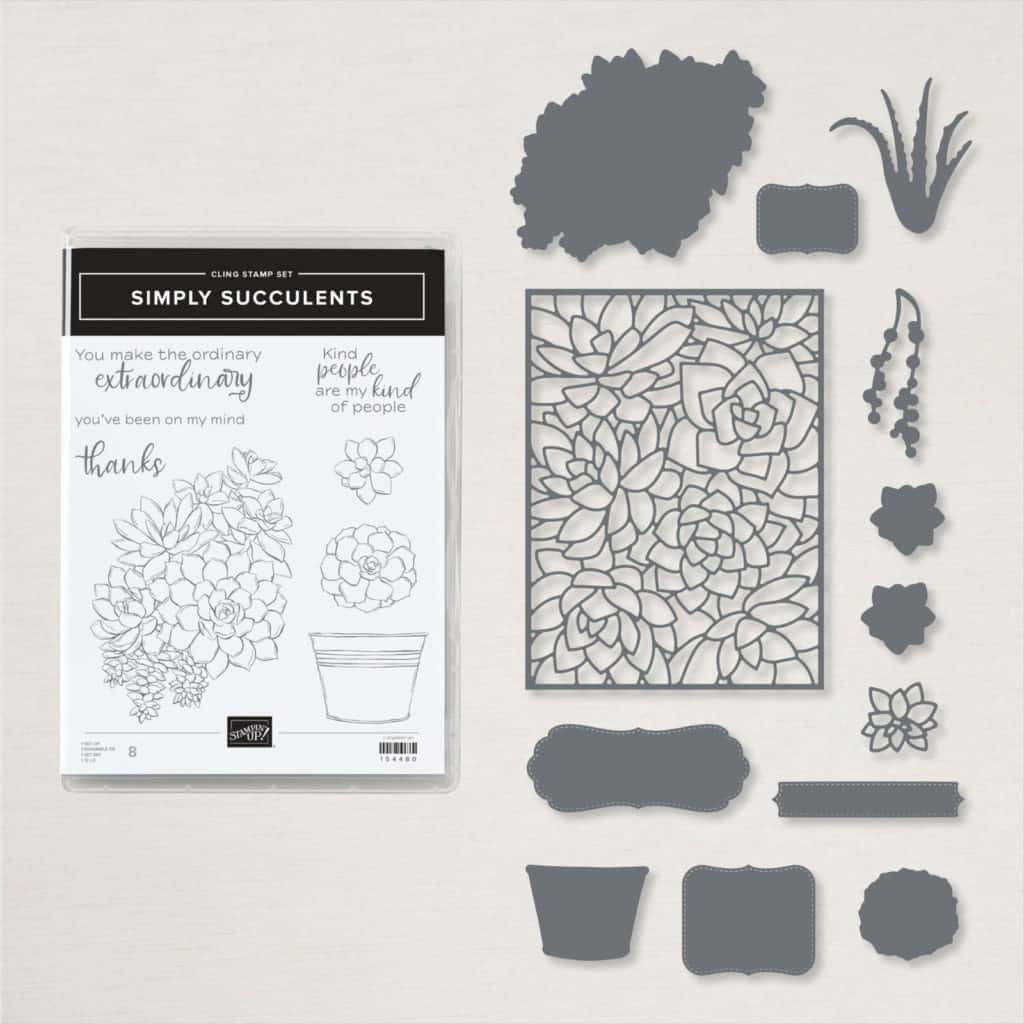
There’s a few stars on this card – the first being the Rainbow Glimmer Paper. It’s got a gradient of colour and stay put glitter so it makes it easy to make impressive paper crafting projects. For this easy but impressive card, I teamed it with some Bermuda Bay cardstock that was die cut with the large die from the Potted Succulents dies (this is the second star if you’re keeping track). I will freely admit that I bought the Simply Succulents Bundle (includes the dies and the coordinating Simply Succulents stamp set) on the basis of this die alone.
Seriously. I loved this die on first sight, and I often have ‘incompleteness’ issues if I buy one item without the coordinating other item….so the bundle. Even though I don’t have a green thumb and I can just barely keep succulents alive. BUT LOOK AT THIS DIE! It cuts the detailed centre portion and leaves the edges intact, so you could use this on the front of a card without an extra layer on top. Love it.
To complete the sparkly ombre card, I added a few Holiday Rhinestone Basic Jewels – I used the Coastal Cabana ones as the light blue shade complimented the colours from the portion of Rainbow Glimmer Paper used. We are going to be doing this card in February’s Stampers Club (though I think we may end up using Basic Rhinestones because I have more of those LOL).
If you’re looking for more paper crafting inspiration, you’ll want to be sure to be signed up for the YamStamps Newsletters! Each week, delivered to your inbox, you’ll get a newsletter with exclusive paper crafting tutorials, information and ideas. The first email of each month is the big projects newsletter, featuring three different tutorials – so if you sign up now, you’ll be sure to get the February edition next week!
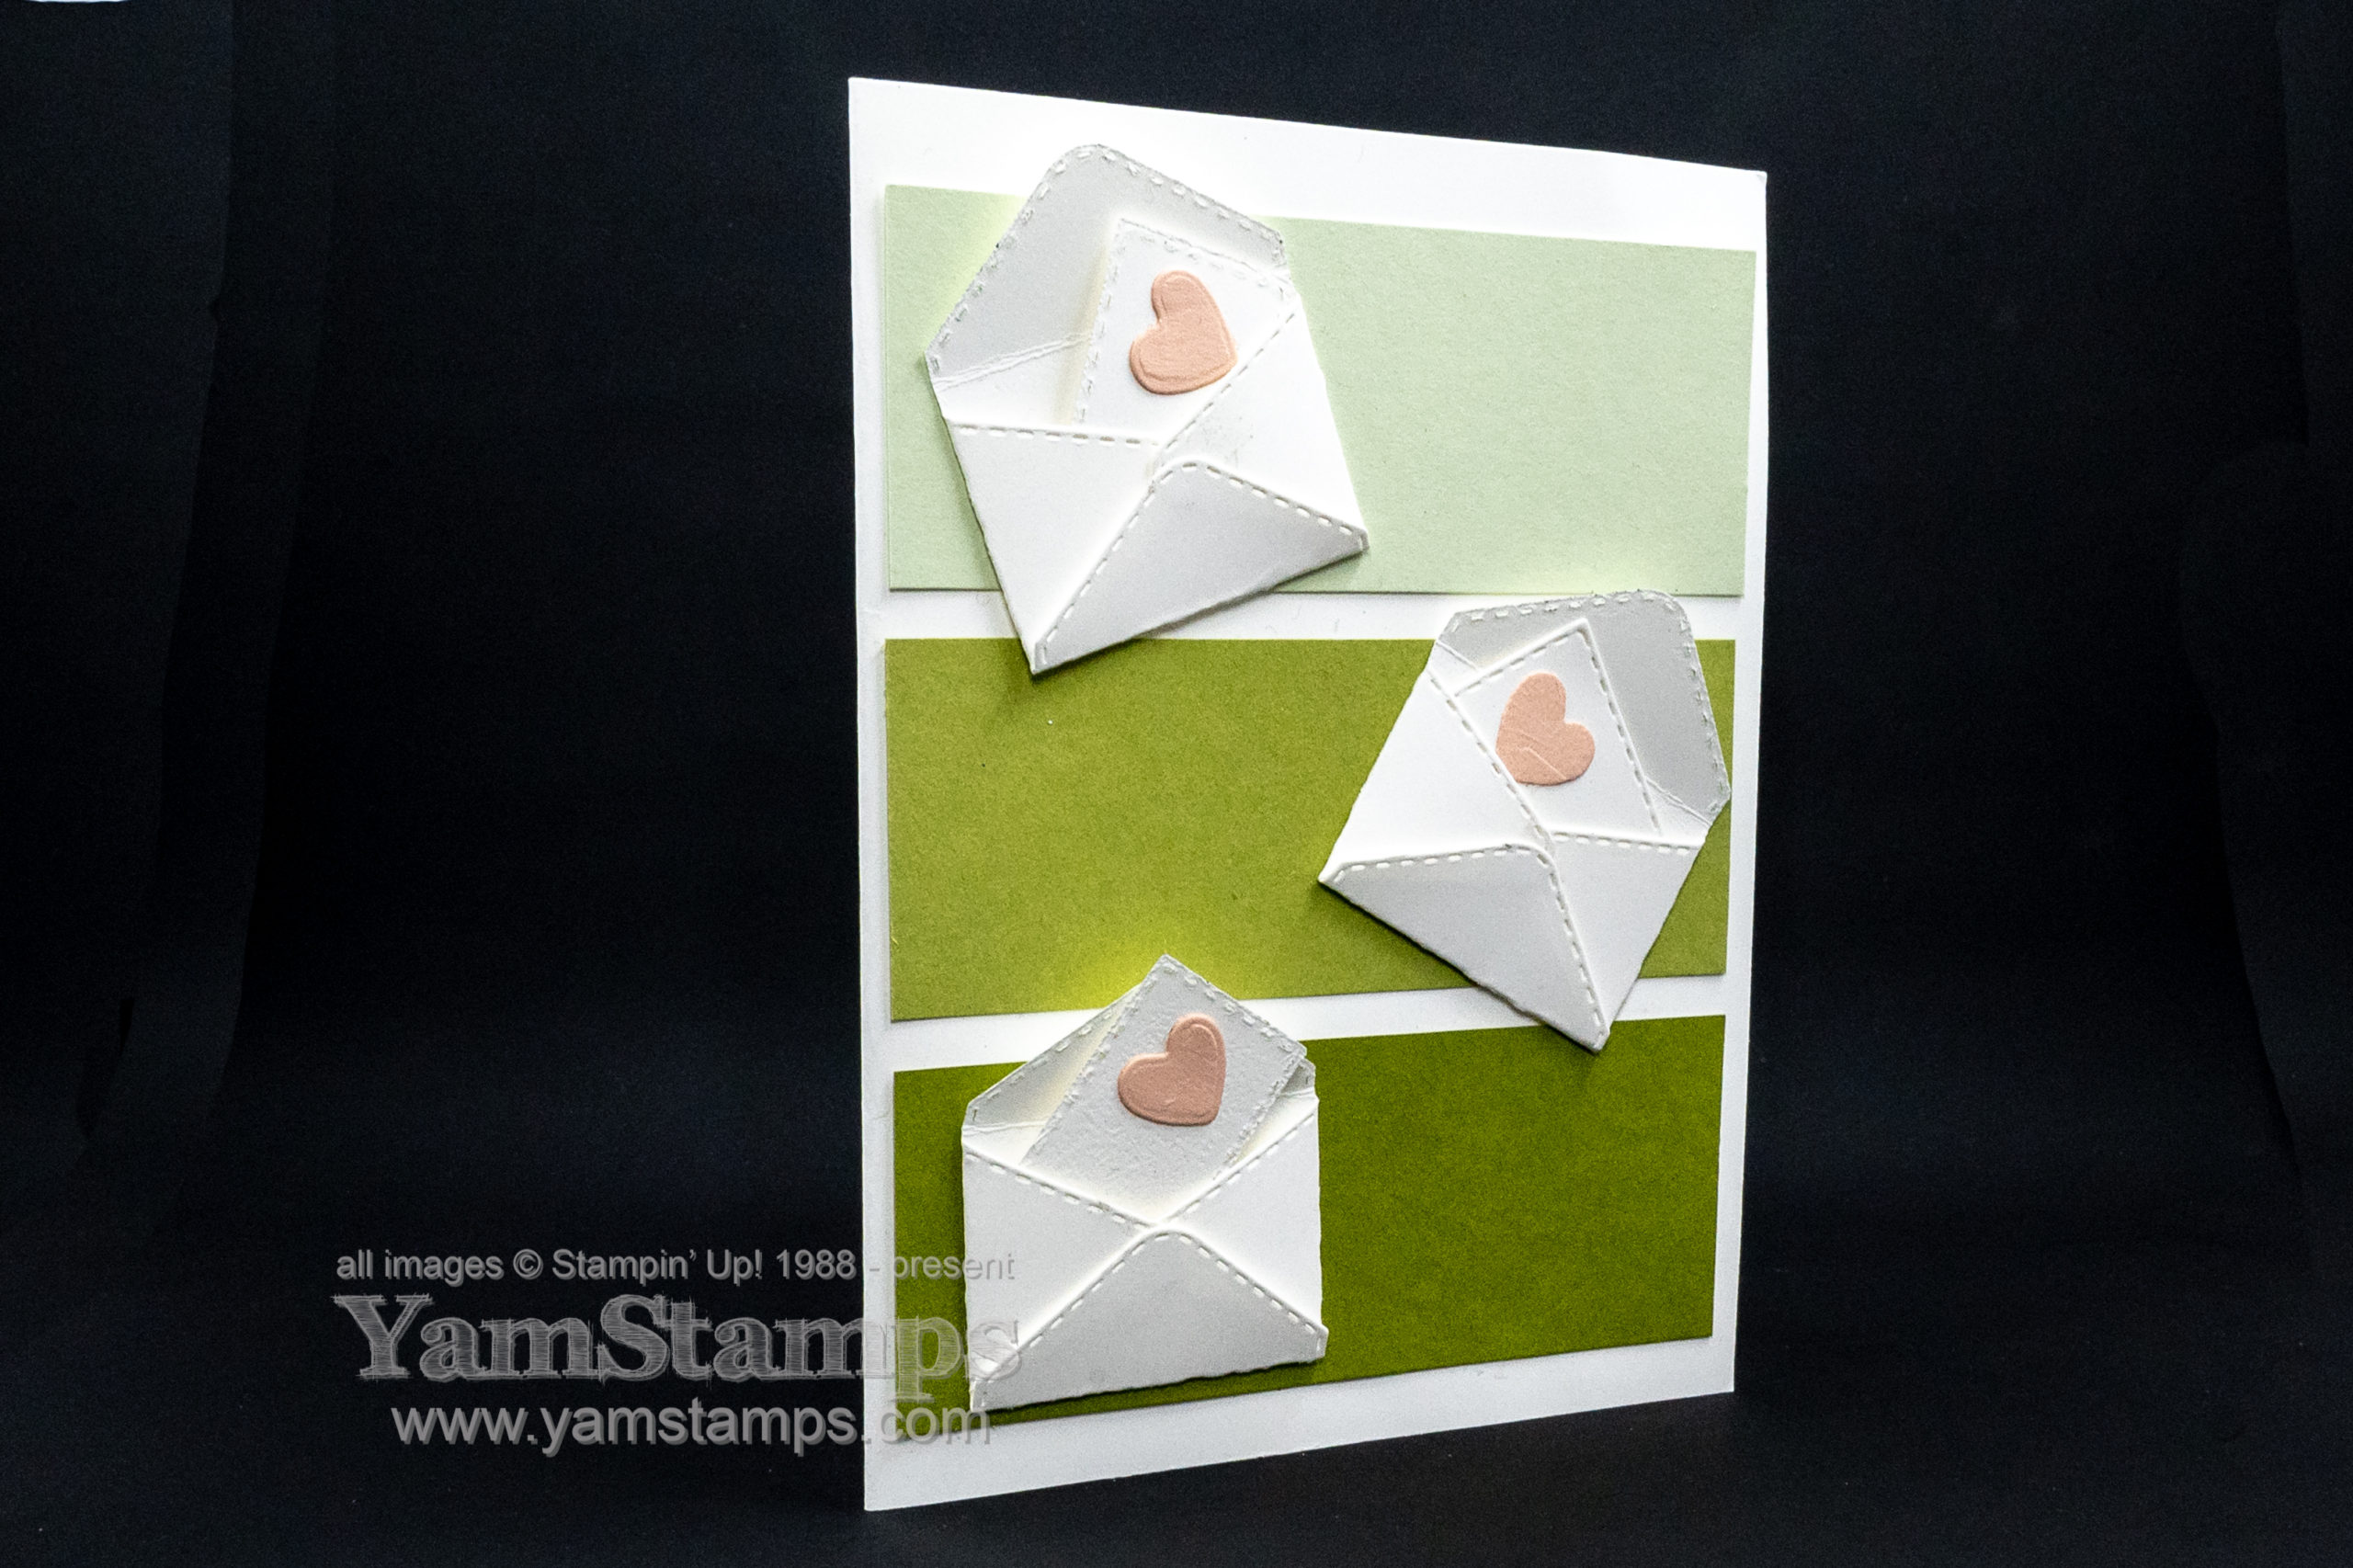
This is a card we’ll be doing in our Stampers Club (which I am contemplating renaming “Card Club”….anyway, I digress…). It’s a “sending love card” which could be used for Valentine’s Day or just to keep in touch with a friend.
Sending Love Card
I created this card with the Snailed It Bundle – which includes the Snailed It stamp set and the Snail Dies. I love the little envelope die! I used it to create three envelopes and then die cut a heart and the “letter” sized stitched rectangle to go inside. The stamp set has a cute cartoon feel to it – so I like that you can use some of the items to create a not over the top cutesy card.
For the club version of this sending love card, I focused on the die cuts, since I can include die cuts in the card kits. Stampin’ Up! regulations prohibit us from including any pre-stamped images in our kits, so for those club members who have the stamp set and bundle, (or non-club members who are seeing this card on the YamStamps site! LOL) my suggestion is to add the “hello” stamp to one of the little letters in the envelope, or to one of the strips of cardstock on the front of the card.
With the current stay at home regulations in Ontario, mailing cards is a great way to keep in touch while staying physically distanced – and you can get out for exercise by walking to the mailbox?! I will let you know that it seems that shipping may take a little longer than the usual due to the sheer volume of parcels in general that are being moved by the various companies – so you may want to keep that in mind. If you would like to use the Snailed It Bundle for your Valentine’s Day cards, you will likely want to place an order sooner rather than later. Plus if you order the bundle before the end of February, you’ll qualify for a Level One free Sale-a-Bration item since the bundle is just over the $60 product level! You can shop online from anywhere in Canada in the YamStamps Online Stampin’ Up! Canada store by clicking on this link or remembering the shortcut yamstamps.com/shop. The other option is to email me and I can place the order for you – you can either arrange to do a porch pickup in Burlington ON or I can have the order shipped directly to you in Canada. Trying to give you lots of options so that you can get fun new product to get crafty!
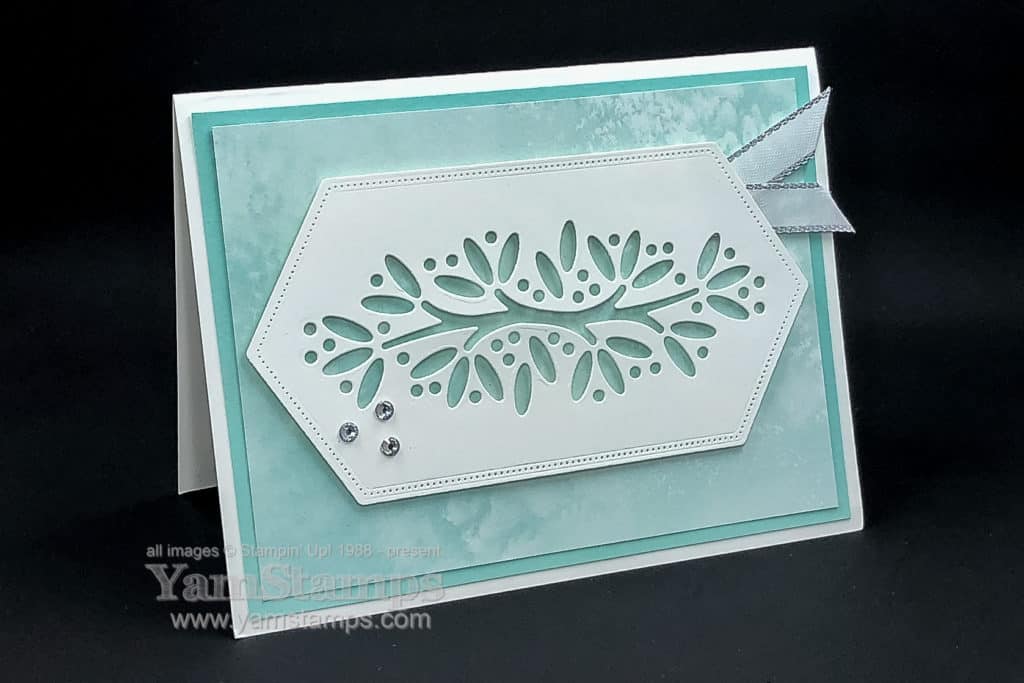
I hope that you had a good Christmas! I am so grateful that I am able to spend time with my son and my mother (yay for being under the same roof!). I was actually on call for Christmas Day and Boxing Day but thankfully it was quiet (health care professionals will understand why I didn’t actually say that word while I was still on call though…no need to jinx it LOL). I’m now enjoying some days off and obviously needed it since I feel like I’m a bit “checked out” at present. HOWEVER. I will endeavour to post here more in the next while. Today’s share is an ornamental die cut card that you can create with the supplies that you have in your craft room.
Ornamental Die Cut Card
I combined a couple of die cuts to create the focal image on this card. I used the Envelopes Dies, which are retiring from the August-December Mini Catalogue and are on sale as part of the Year End Closeout. after die cutting the centre design (don’t you love it?!) I then die cut again with the Stitched Nested Labels die that fit around the graphic. Once I had that focal piece, I then just added it on top of a portion of Designer Series Paper backed with coordinating cardstock. We made this card as part of December Stampers Club, so each member received a packet with precut card supplies – so thankfully the Whisper White and Snowflake Splendour Designer Series Paper selling out did not affect our crafting efforts (since I had the supplies ahead of time – phew). Yes, unfortunately at this time, they’re sold out, so if you’re wanting to recreate this card and don’t have those exact supplies on hand, use a different tone of cardstock and different Designer Series Paper – it’s not too difficult to swap out as you need, really!
If you are looking for a way to keep busy and creative in 2021, please consider joining us in Stampers Club!Our next session takes place on January 18th. If you’re in Canada and can join us online, we’d love to have you! One of the things that club members have mentioned lately about our online sessions – is that they join us live for the companionship and to see how to do things/ask questions – but often will make their cards later on. I record our online session and then post it in our membership site, where current club members can access the video and follow along while they make their cards using their kit supplies, and can pause the video and rewatch portions as needed. Please contact me to join us, or if you have questions/want more information. Our club kits include die cuts and precut materials, and members can add sentiment stamps or additional accents with whatever supplies they have on hand. This ornamental die cut card is an example of the projects that we are making – something with interest but that isn’t totally dependent on stamped images, since each member has a different stash of crafting supplies in their own home.
So in this blurry time between Christmas and New Year (I am pretty sure that I’m not the only who feels that way), I hope that you are able to find some time to recharge your batteries and maybe even get some crafting done. Thank you for stopping by the site and being part of the YamStamps community!
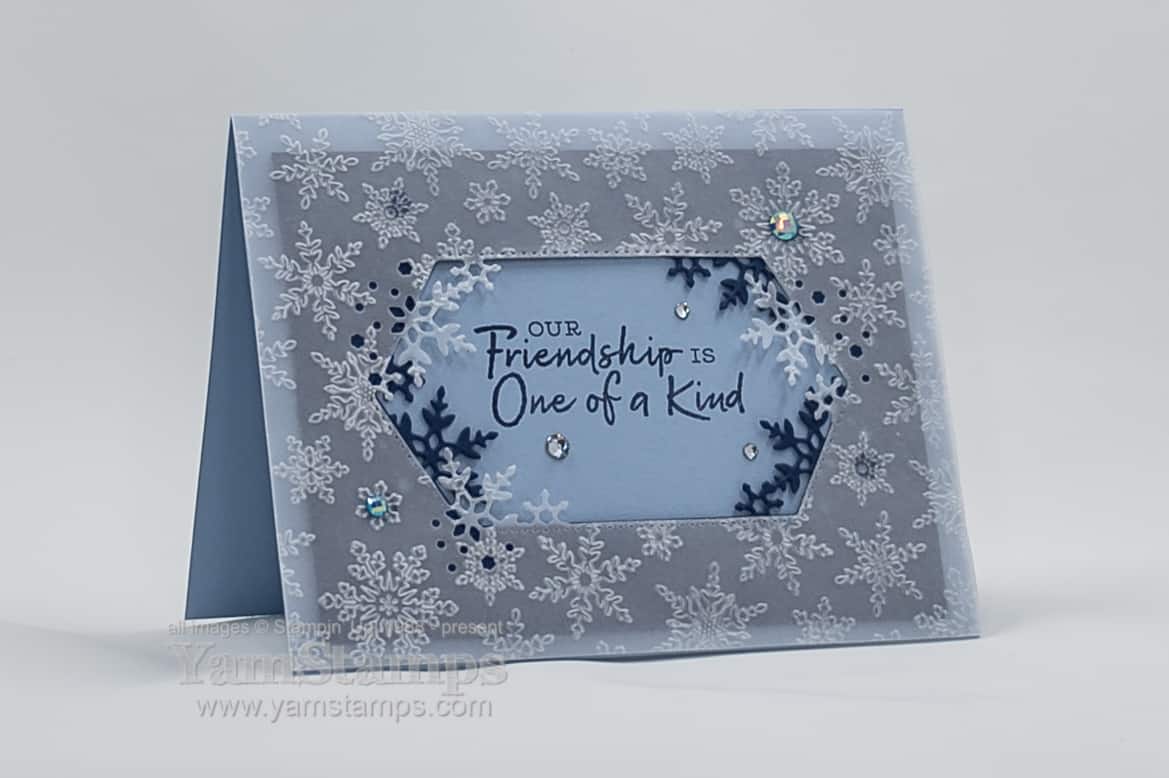
While I know that I’ve been doing the Twelve Weeks of Christmas Projects for YamStamps subscribers, I’m still caught off guard with the fact that Christmas is a month and a half away! Today’s snowflake card for a friend was one that I created for a Stampin’ Up! Demonstrator only swap featuring products from the August-December 2020 Mini Catalogue. Snowflakes are one of my favourite “themes” for seasonal and holiday cards.
I adhered the Vellum to the cardfront with Glue Dots and tried to place them behind snowflakes so they weren’t quite as visible. I hid a couple of them with the gems, and now that I look at this photo, could have added a few more gems?!
I love the fact that this snowflake card for a friendcould be a holiday card but could also be a birthday card, friendship card or just because card during this season. Burlington is entering “Red Zone Status” for the pandemic as of Monday, so I think it’s an important time to keep in touch with people while keeping socially distanced.
If you’re looking for ways to keep busy, consider purchasing one of my Card Classes to Go – the “regular” versions feature a variety of projects, and the Holiday Card Class to Go focuses on holiday cards only. Each class has the precut materials for four different cards, plus a printout with a photo of the completed project and step by step instructions. You can add sentiments from your own stash or shop the YamStamps Online Stampin’ Up! Canada store (shortcut:YamStamps.com/shop) for the ones I use in the samples. Contact me for payment links and more information. Each class cost is $20 and includes postage within Canada.
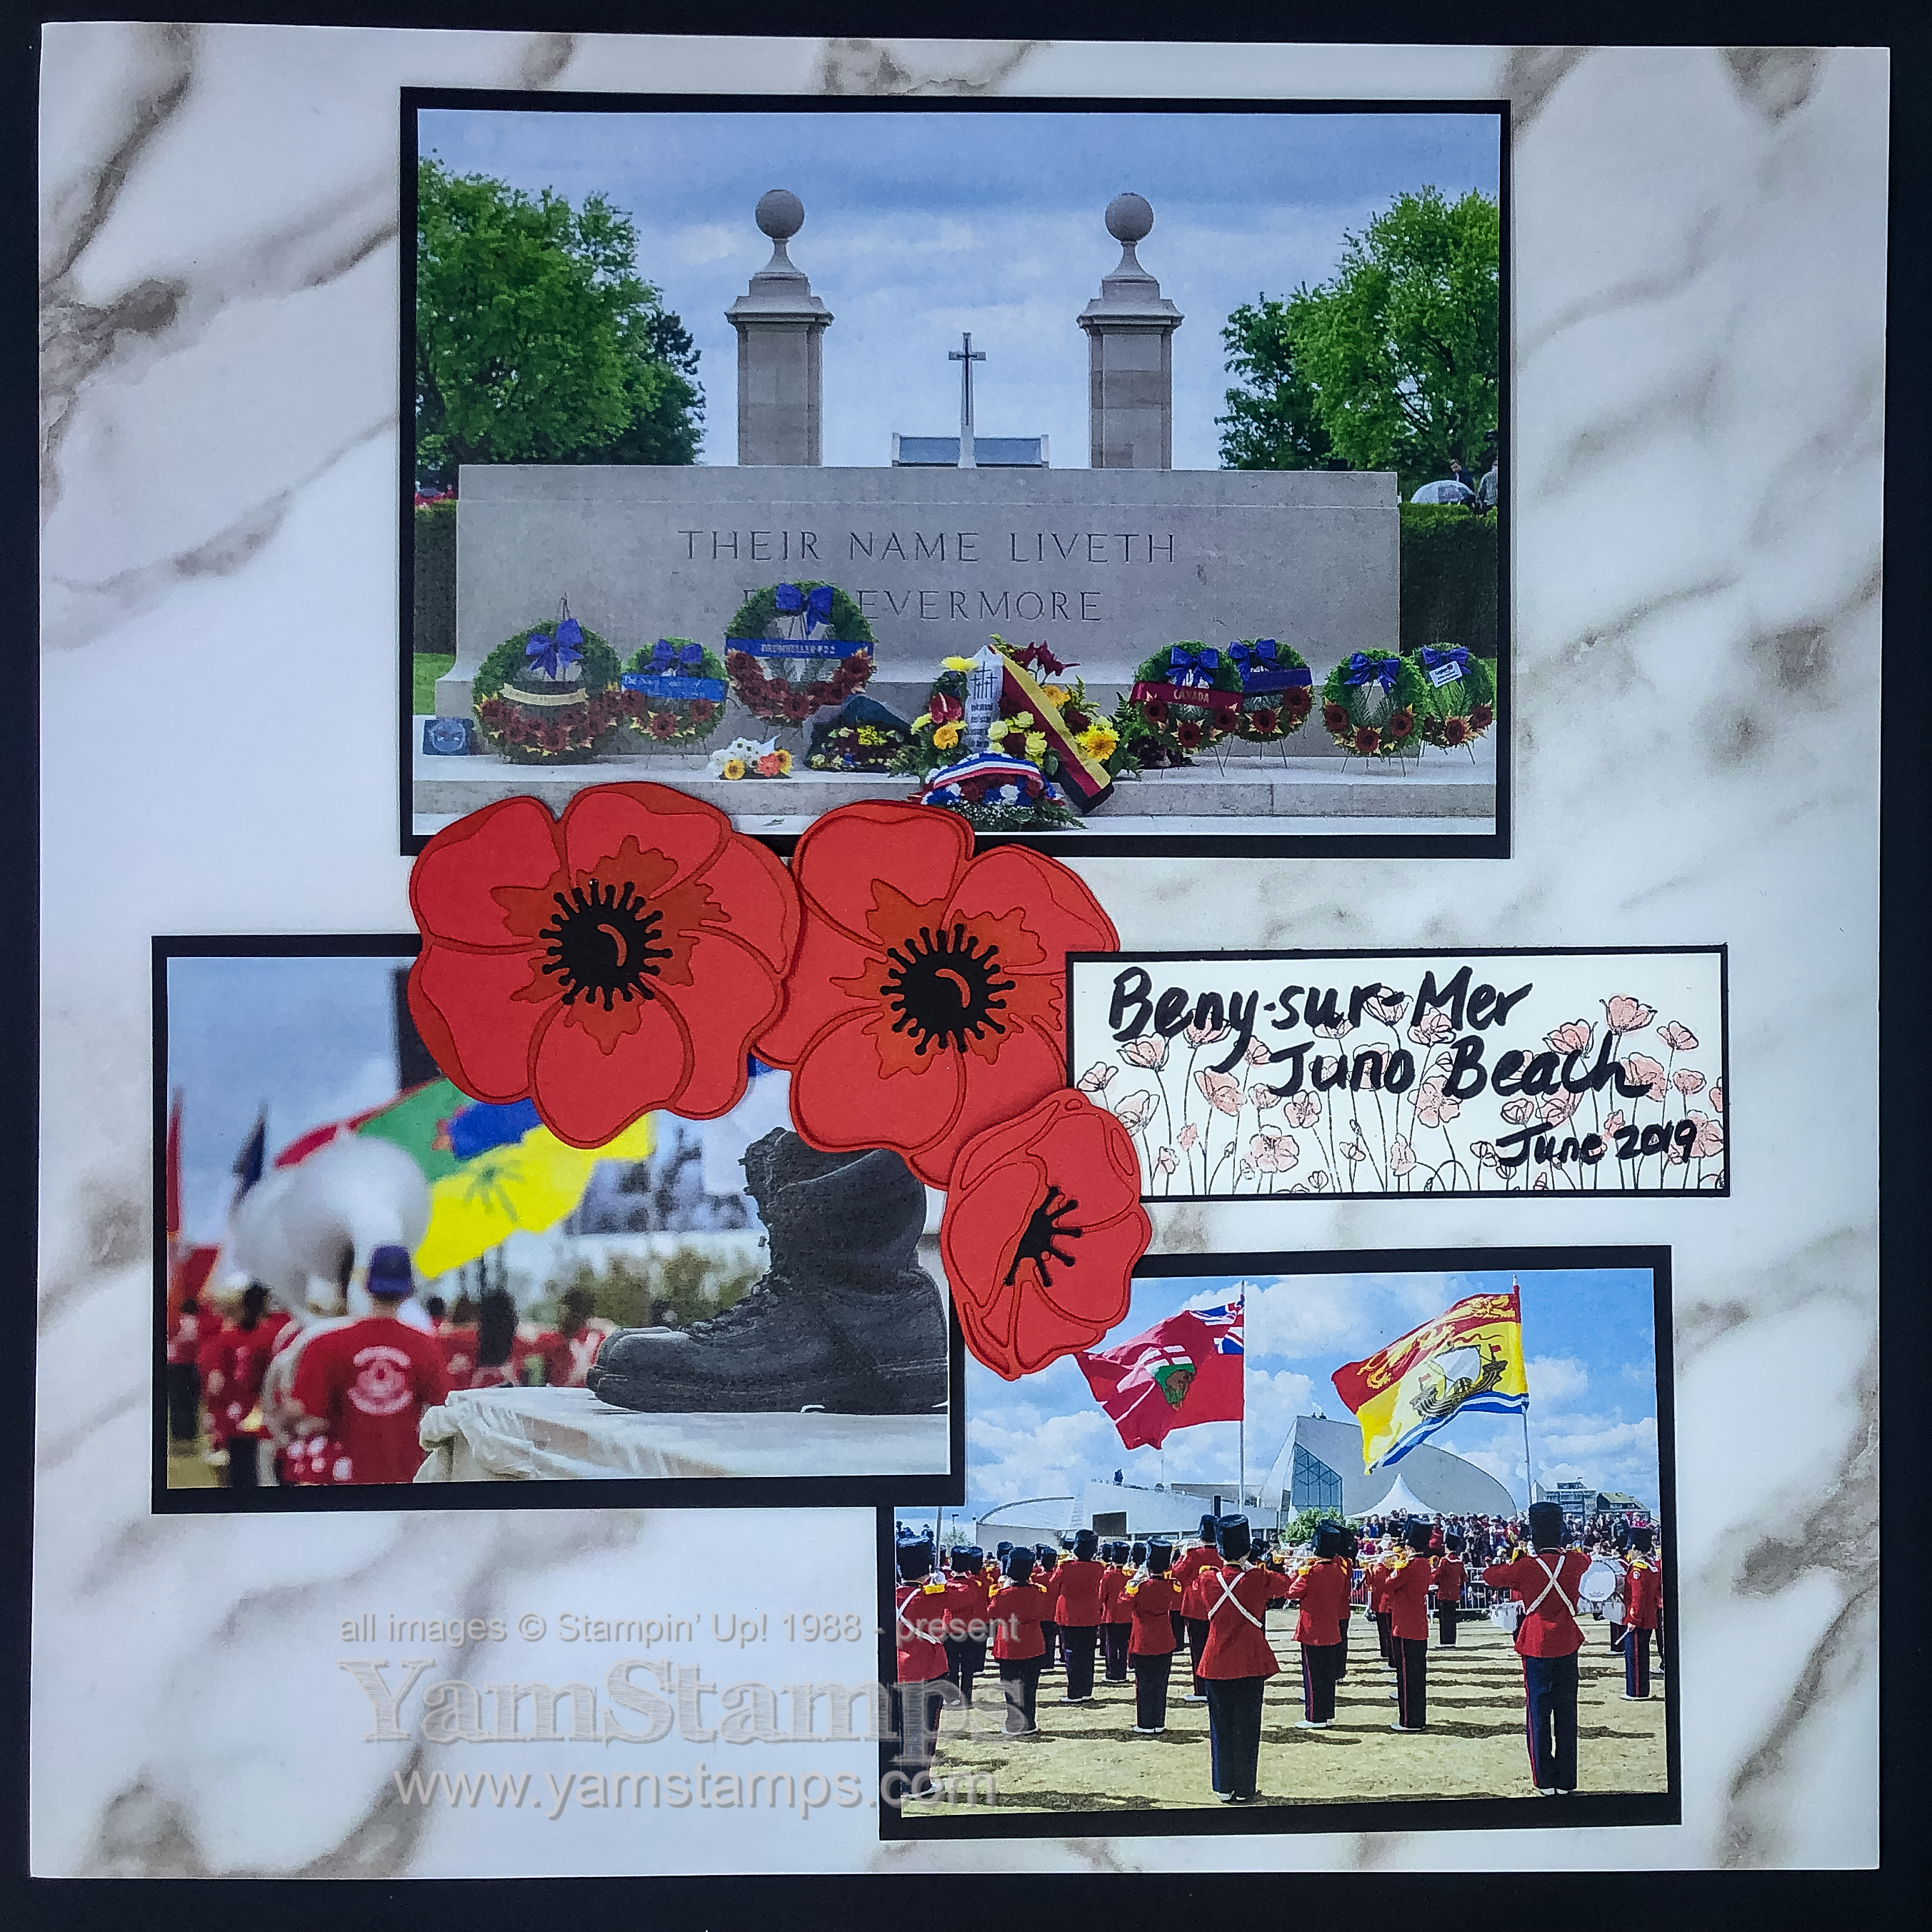
Lest We Forget – sharing a scrapbook page from my trip last year to Normandy. I travelled with the Burlington Teen Tour Band to commemorate the 75th Anniversary of DDay. It was a truly memorable experience, and the highlight for me was watching the incredible band members represent Canadian youth so well.
Lest We Forget
I am typically more of a cardmaker than a scrapbooker, but I do like making a few pages now and then. Since I don’t make a lot of pages, I tend to do more “highlights” pages or pages where I gather similarly themed shots together – and this is one of them. I put a photo from the Beny-sur-Mer Canadian war cemetary together with photos from the band at the Juno Beach Centre. Added a few die cut poppies with the Poppy Moments dies, and put a stamped image from the Painted Poppies stamp set behind the title/text box. I coloured the poppies with the Watercolour Pencils and used the blender pen to smooth the colour.
My hint for tone on tone die cuts is to sponge some of the same ink colour onto the top layer detail die cuts. For this page, I die cut the poppies from Poppy Parade cardstock, and used a portion of a Stampin’ Sponge (or you could use a Sponge Dauber) to dab Poppy Parade ink onto the detailed poppy die cut. It deepens the colour without changing it so makes it stand out a bit more without distracting from the overall look. Stampin’ Up!’s colour coordination makes my crafting efforts so much easier.
I will be taking time from my day to watch the Burlington Remembrance Day ceremonies virtually, and look forward to the time when we can gather together in person again to do the same. Lest We Forget.
Happy November! What did you do with your extra hour? (Assuming you live somewhere where the clocks did change…). Me? My internal clock had me wake up at the same weird hours through the night (it particularly likes 4am for some reason) and then I eventually fell asleep again so that I could wake up and be totally disoriented LOL. It’s all good. So today, I have to keep checking the date, and then double checking the time because I’m not sure if the clock I’m looking at is one of the ones I’ve changed already or not…
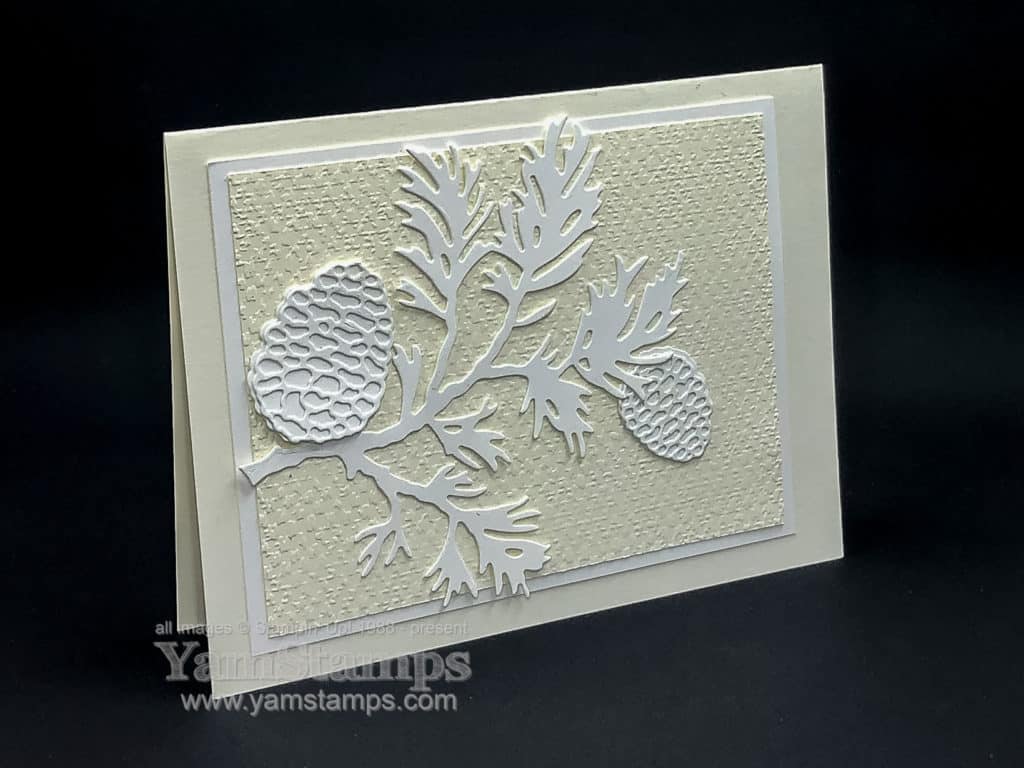
Thought I’d share this monochromatic wintery card with you today. One colour design schemes are a favourite of mine (I created a whole online class based on monochromatic schemes a few years ago!). This could be a holiday card, or a “just because card”. Often when doing cards for Club or Class, I don’t assign specific sentiments – doing designs that could be used for a multitude of occasions is often more useful and then the card maker can just stamp an appropriate sentiment for the card giving occasion.
Monochromatic pine bough card
For this monochromatic card, I used a Very Vanilla base and textured layer (it’s my current go to Embossing Folder – Tasteful Textile). The pine bough and cones are die cut with the Beautiful Boughs dies and are from Whisper White Cardstock. You’ll want either the Multipurpose Liquid Glue or Adhesive Sheets for the detailed pinecone die cut to make it easy to adhere the layers together. If you’re using the sheets, adhering it to the cardstock before you die cut will make it even faster! I also like to have my Take Your Pick tool on hand – with the Brush Tip on one end, and the spatula tip on the other end.
I will be including this design in my Holiday Card Class to Go, which will be available in the next week or so…precut designs ready for you to assemble and add your personal touch. Stay tuned for the official launch!Better yet – be on my mailing list so that you’ll get the notification!
In the meantime, I will continue to figure out what time it is, and ponder whether Daylight Savings Time has started or ended. Seriously. I can never figure that one out. Maybe now you understand why I like clean and simple card designs and monochromatic card themes?! The less complicated for my brain, the better!!