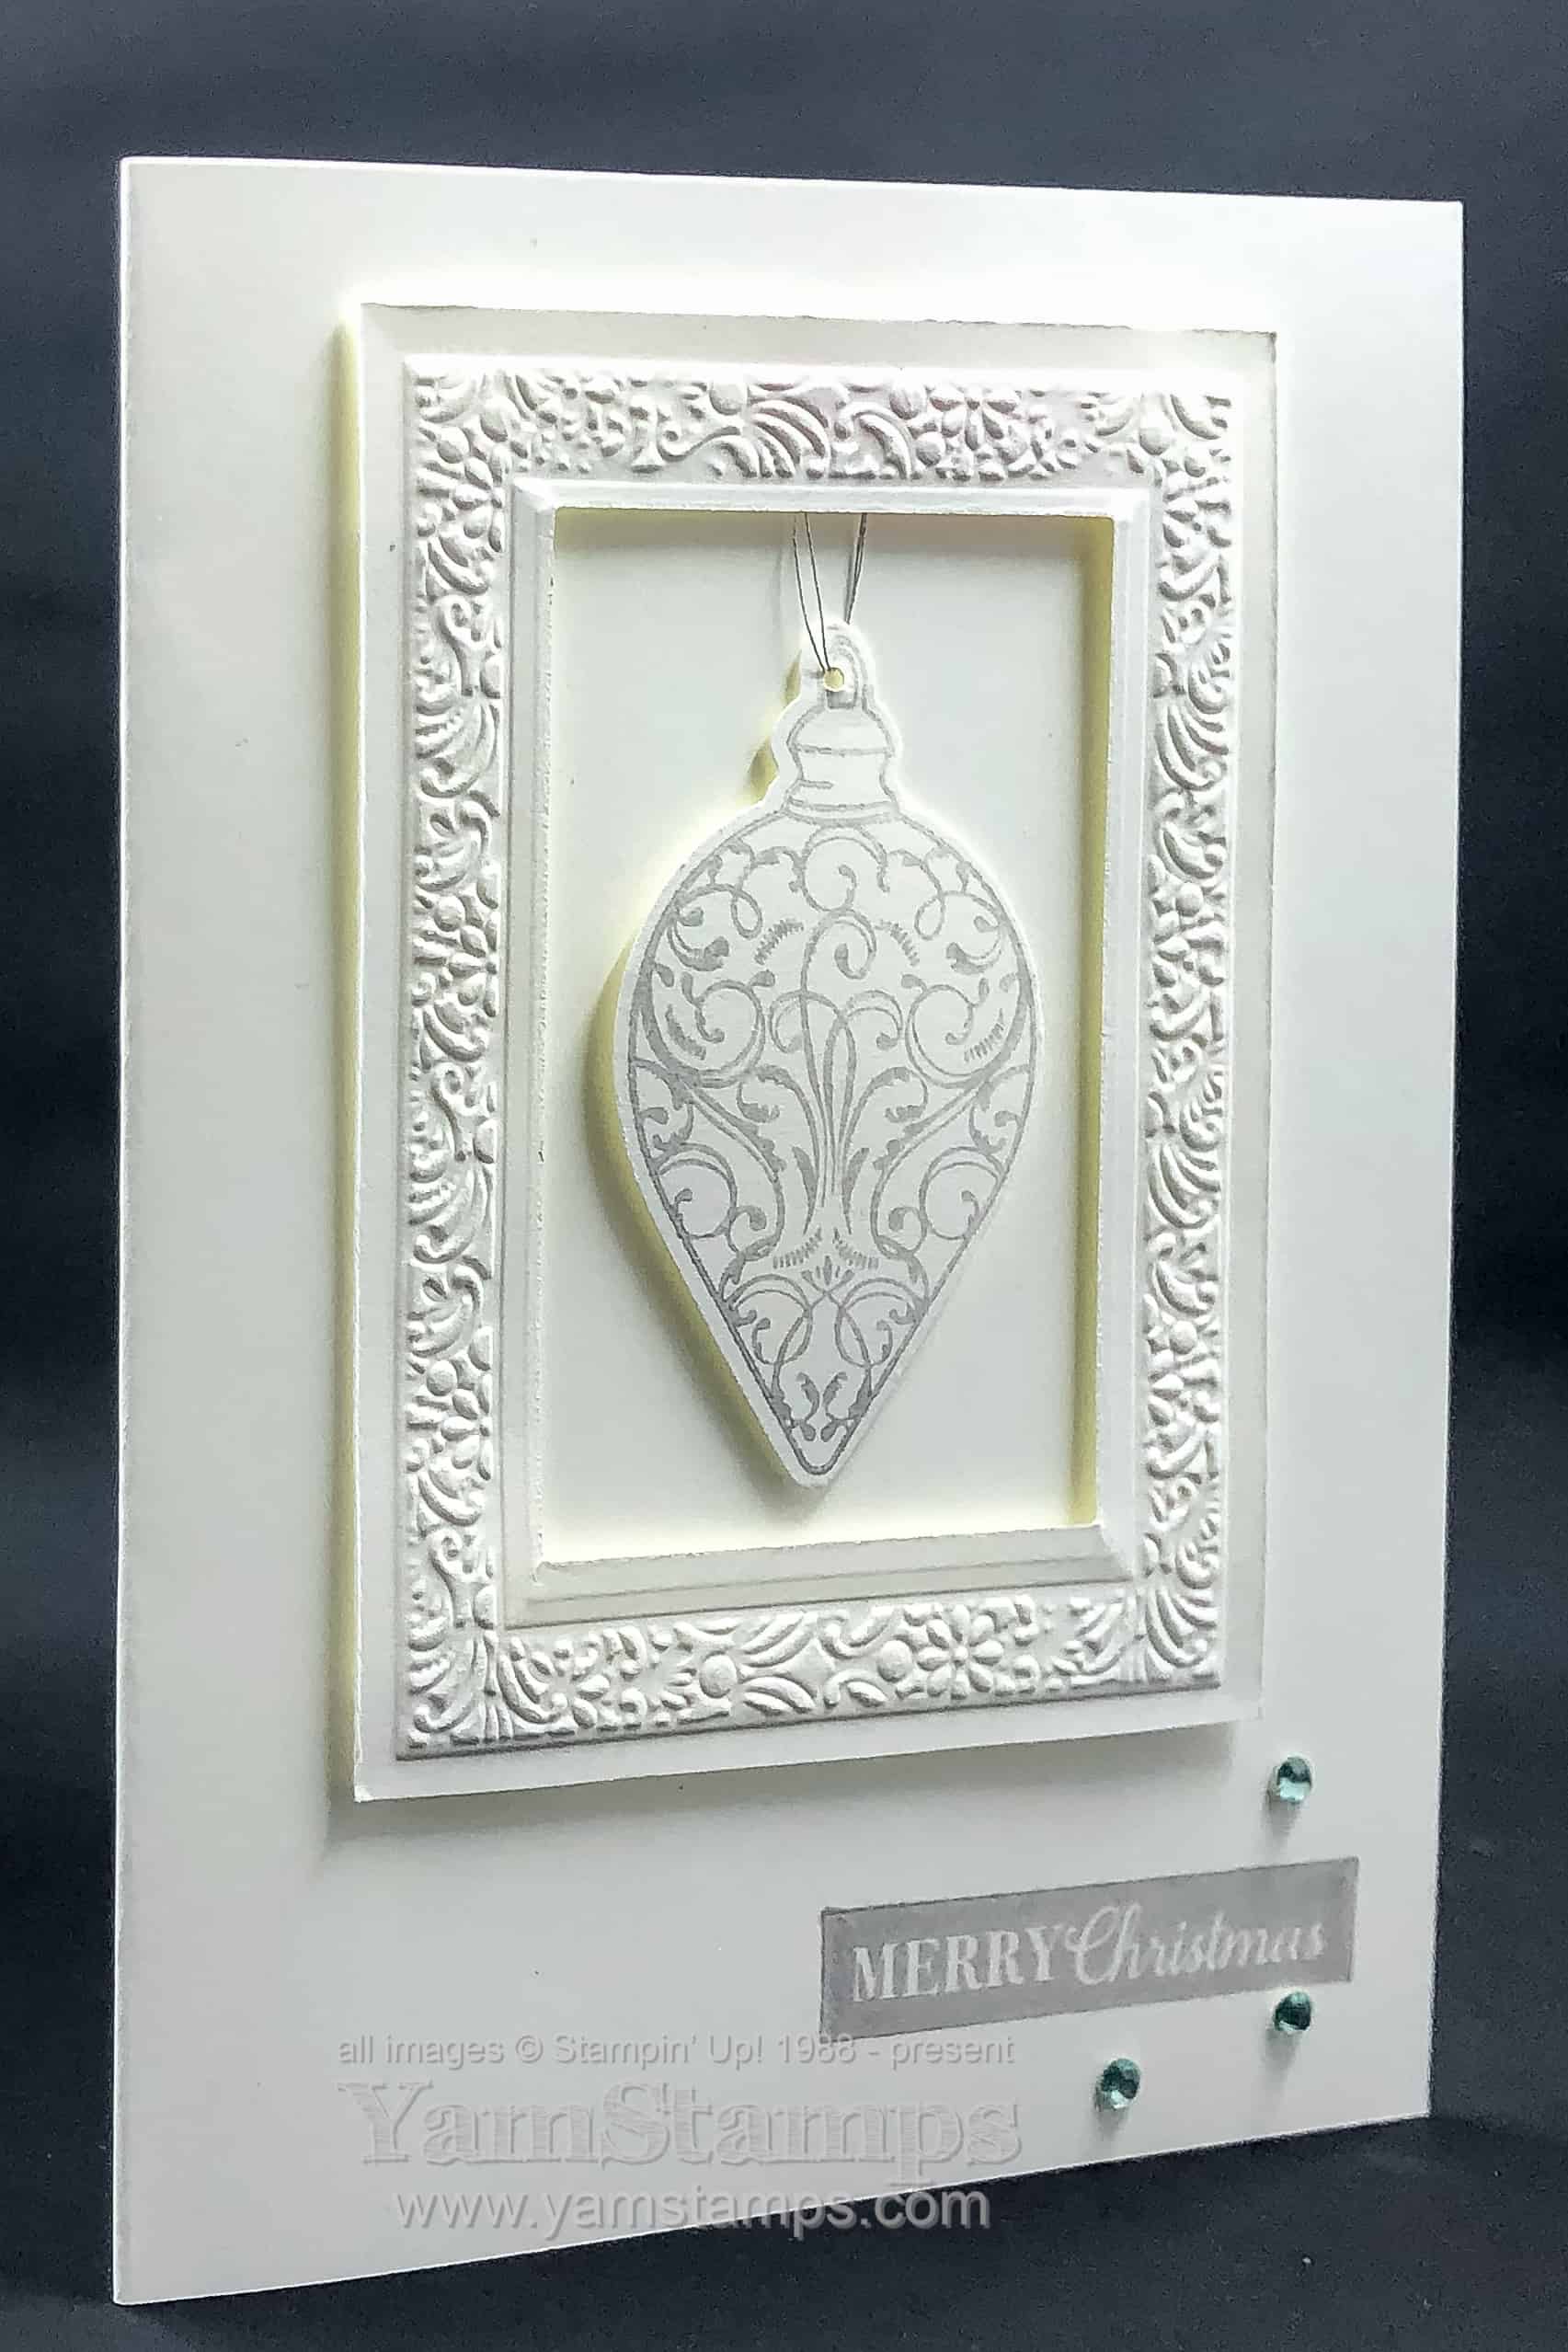
I love the monochromatic look – using just one colour on a project. It’s an easy way to make an impression, and depending on the colour you choose, it can be a dramatic one! Here’s a Monochromatic Christmas Card that we did during the October Christmas Card Class.
For this holiday card, I chose to use a metallic tone – in this case, silver. I used the Delicata Metallic Shimmery Silver Ink. Unfortunately, in the meantime, the Delicata ink pads have sold out! If you want to recreate this card/look – you could choose a grey tone – like Smoky Slate, or heat emboss using Silver Embossing Powder. I shared a card on the YamStamps Facebook Page using Copper Embossing Powder as a way to get a coppery metallic look.
The ornament is stamped and punched out with the Christmas Gleaming Bundle, and I added an extra hole punch to string some of the Silver Metallic Thread. The ornament is hung from the rectangular frame from the Heirloom Frames Dies and 3D Embossing Folders. When you use the frames, I found it more effective to cut first, then emboss – otherwise you tend to flatten the embossing if you do it the other way around. I did “cheat” after and trim a bit at the edges of my cardstock. A bit of subtle bling (is there such a thing?) from the Holiday Rhinestone Basic Jewels. Oh – I guess that technically makes it not a monochromatic card, since I used the light blue ones?! Oops. Well, I’m still calling it a Monochromatic Christmas Card in any case.
My LAST Christmas Card Classes (I can’t believe it) will be this upcoming Wednesday at 1pm or 7pm. Cost is $30 and includes a bottle of Shimmery Crystal Effects. I have had some late openings in the classes, so if you’d like to attend, please contact me ASAP to save a spot. Regular card classes continue on the first Wednesday of each month, and the December class will have one holiday card in the set. You can check out upcoming events on the YamStamps Events Page.
Also upcoming – I will have a Black Friday – Cyber Monday special on an older online class of mine. The Holiday Punch Art Online Class came out a few years ago, but I’ll be offering it at a special price! Check back on Friday for the link – and be on the YamStamps Mailing List to get notification in your inbox!
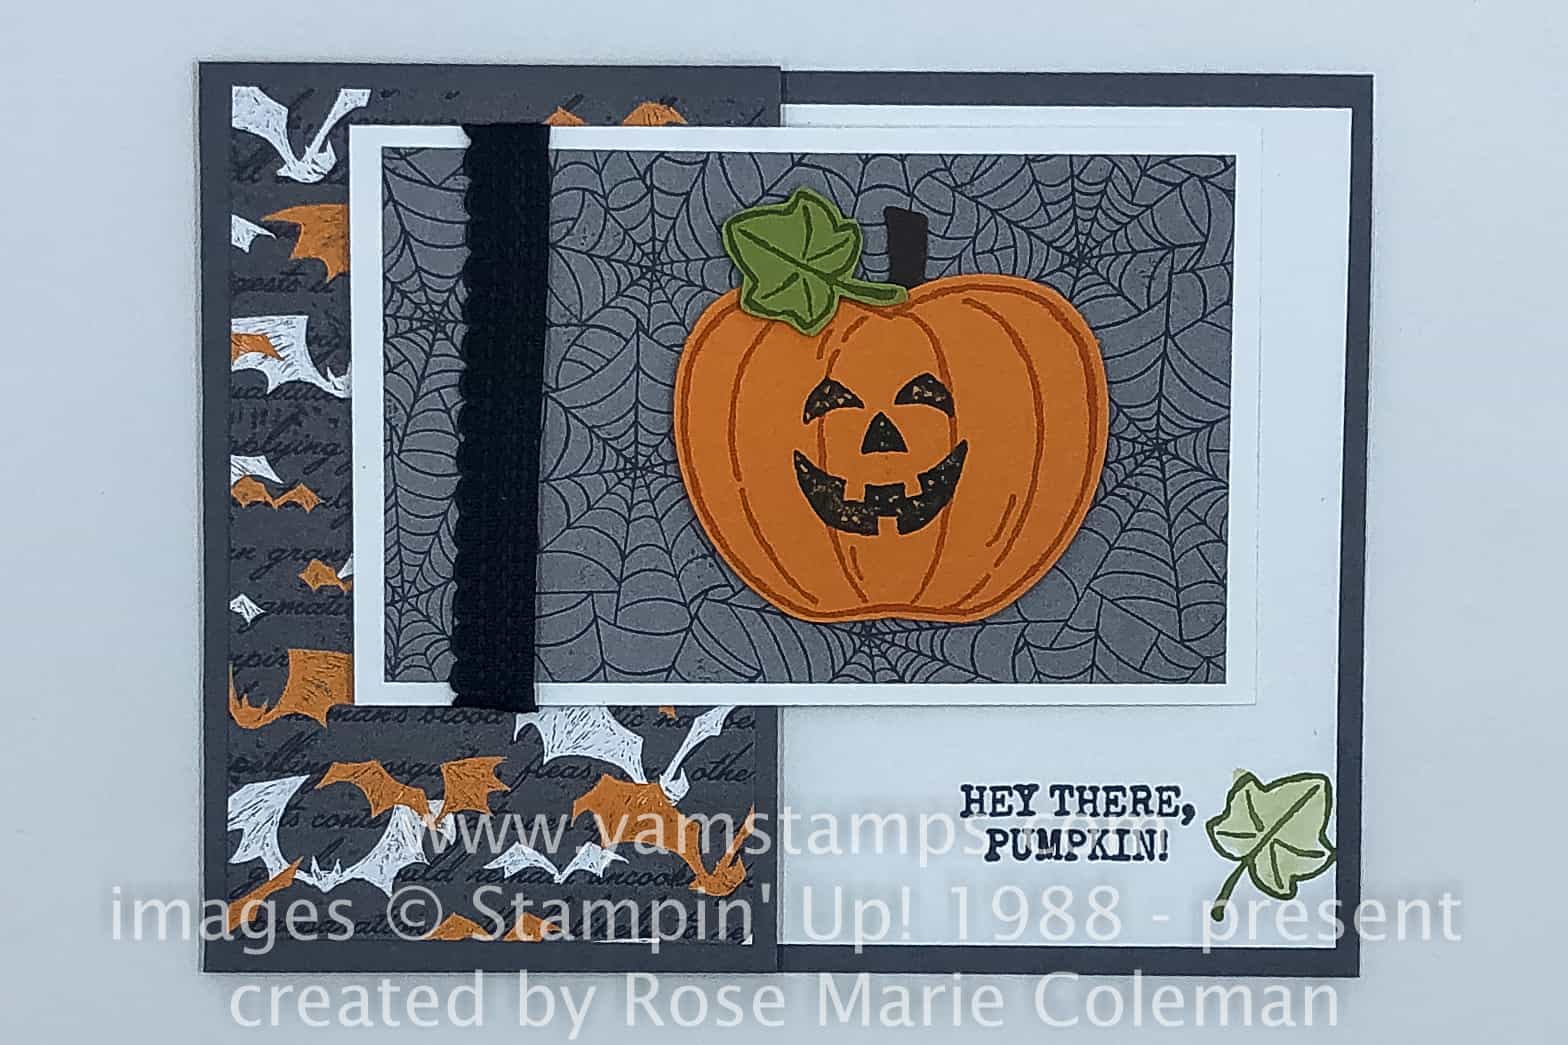
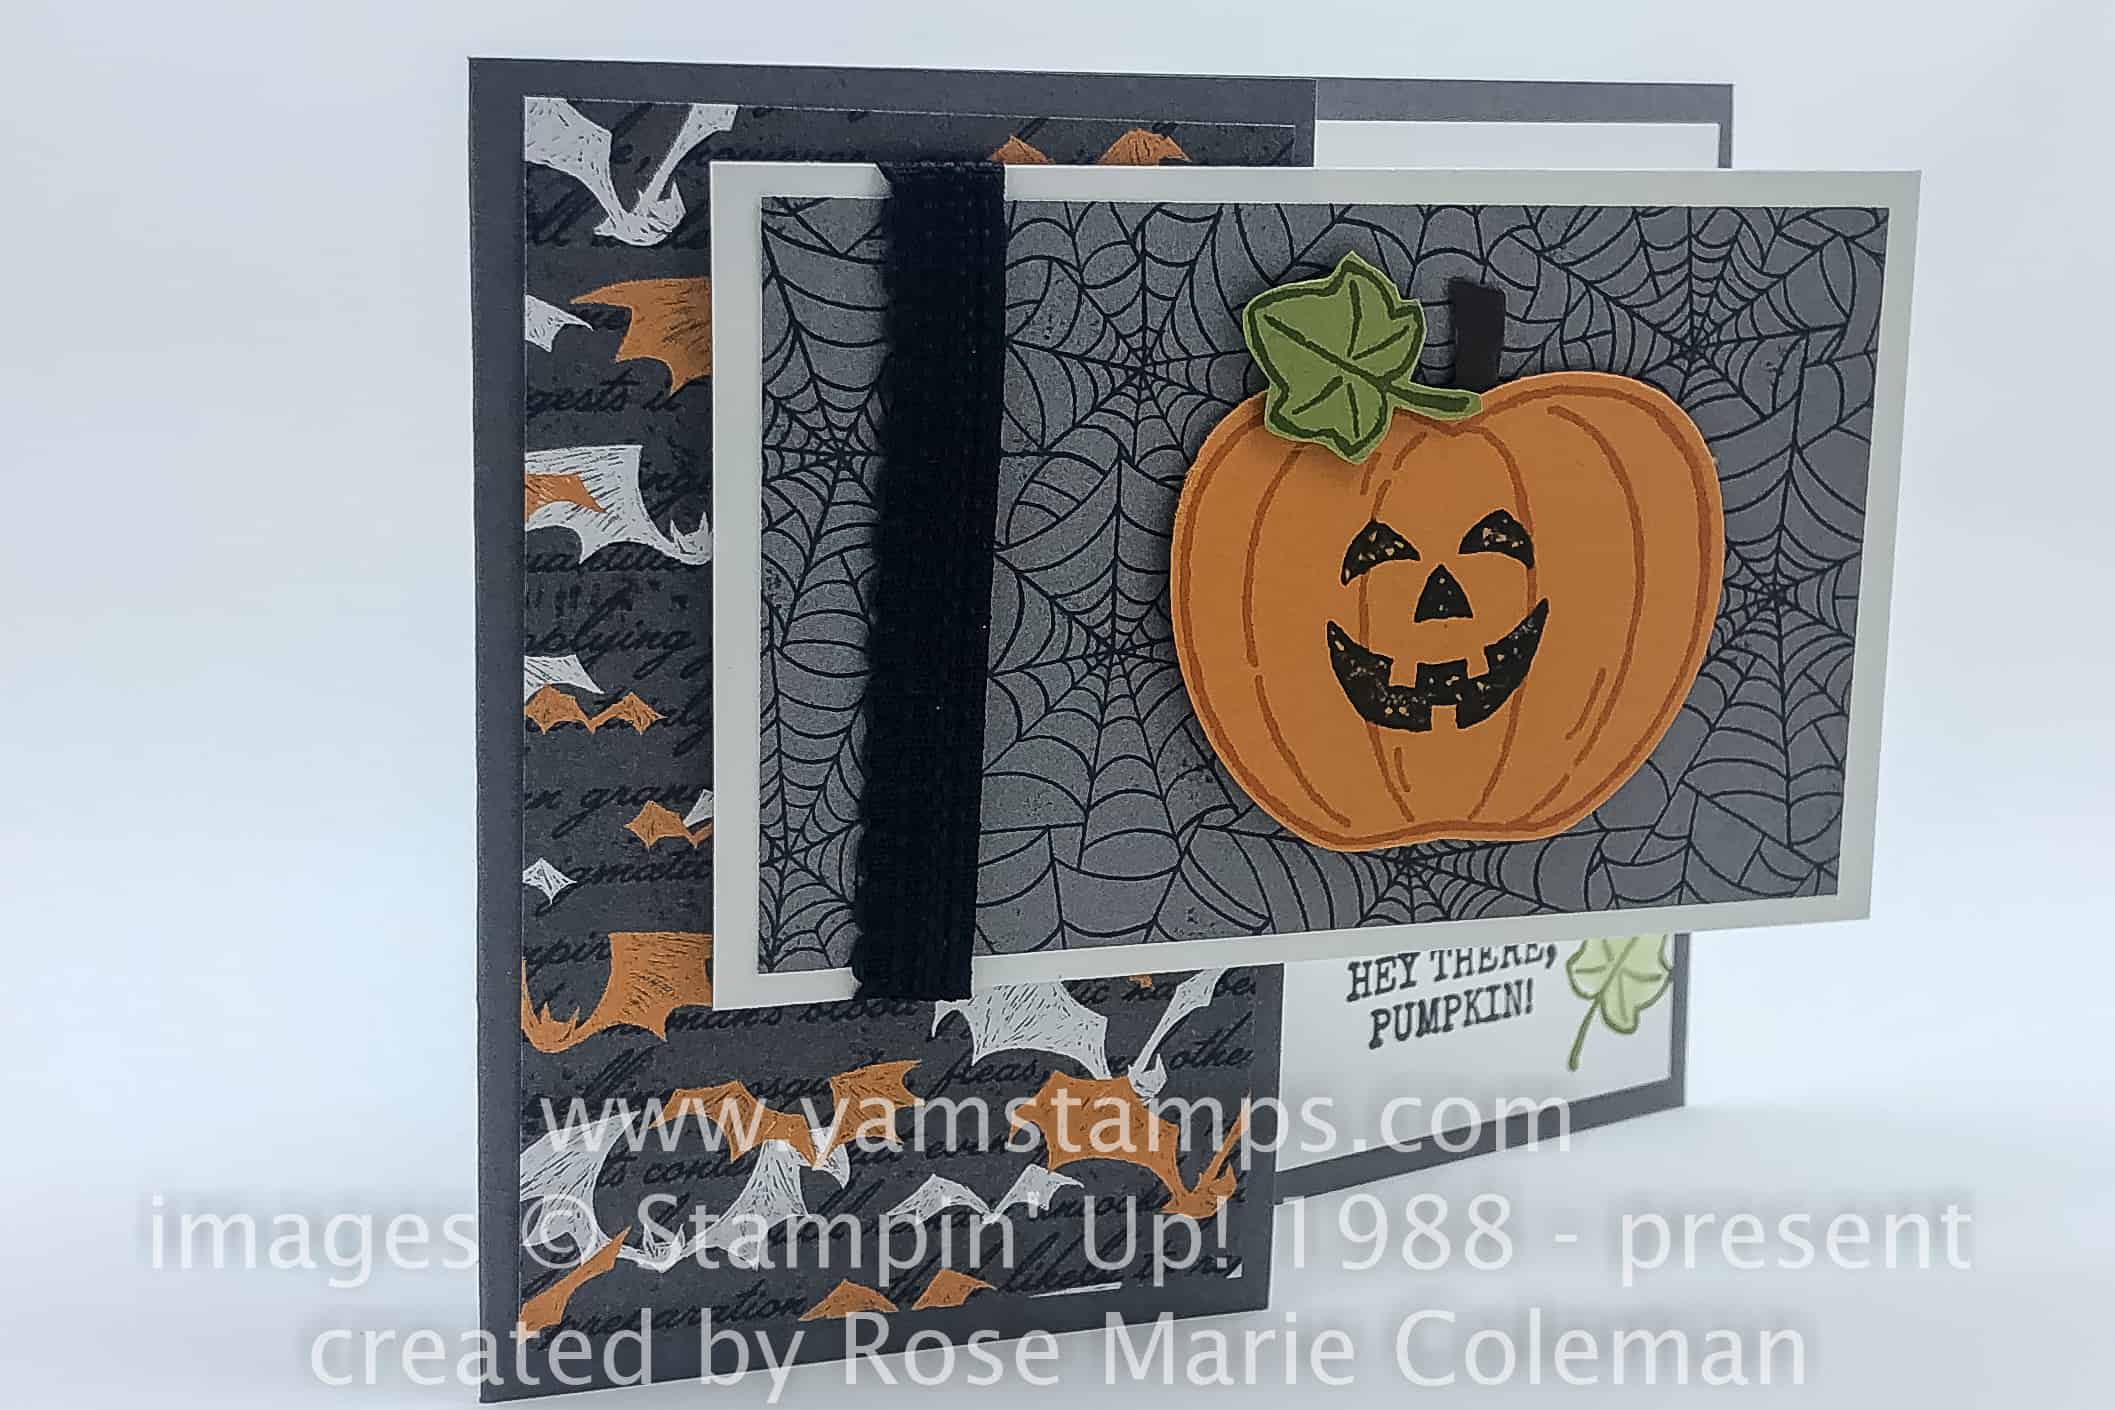
A cute Halloween card to showcase as today’s Sunday Swap Share.
Isn’t it fun? Created by Rose Marie Coleman, this Halloween card showcases the Harvest Hellos Bundle, which includes Harvest Hellos stamp set and the coordinating Apple Builder Punch, which obviously can double as a Pumpkin Builder Punch! Remember that the bundle is discounted so you save a little money on the coordinating products too!
It’s a bit of a fun fold card as well – easily created by cutting the cardstock to 4.25″ x 11″, folding in half and then cutting off a portion of the front of the card. The Monster Bash Designer Series Paper adds even more interest! This cute card would be great to give to your favourite trick or treater!
If you’re looking for seasonal inspiration outside of Halloween, don’t forget that YamStamps Newsletter Subscribers are currently enjoying the Twelve Weeks of Christmas series. This extra newsletter is my way of thanking subscribers – each week brings a different holiday project. We’re showcasing card ideas right now, but will move on to gifts and packaging inspiration in the next few weeks. You can subscribe to the YamStamps Newsletter here, or go here for more information. If you’d like in person inspiration, check out the YamStamps Events page if you’re local to Burlington Ontario. Come to a class, or get a group of friends together and I will bring the class to you! Contact me if you’d like more information or want to see what dates I have available.
It’s beginning to look a lot like Christmas….OK maybe not – but I thought I’d share some DIY Christmas Card Ideas on the blog, especially since we’ve already had our first Christmas Card Class! Starting today and over the next few months leading up to the holidays, I will occasionally throw in a Christmas Card idea here on the YamStamps blog, to give you some inspiration for your own holiday cards (or to encourage you to sign up for one of my Christmas Card Classes!)
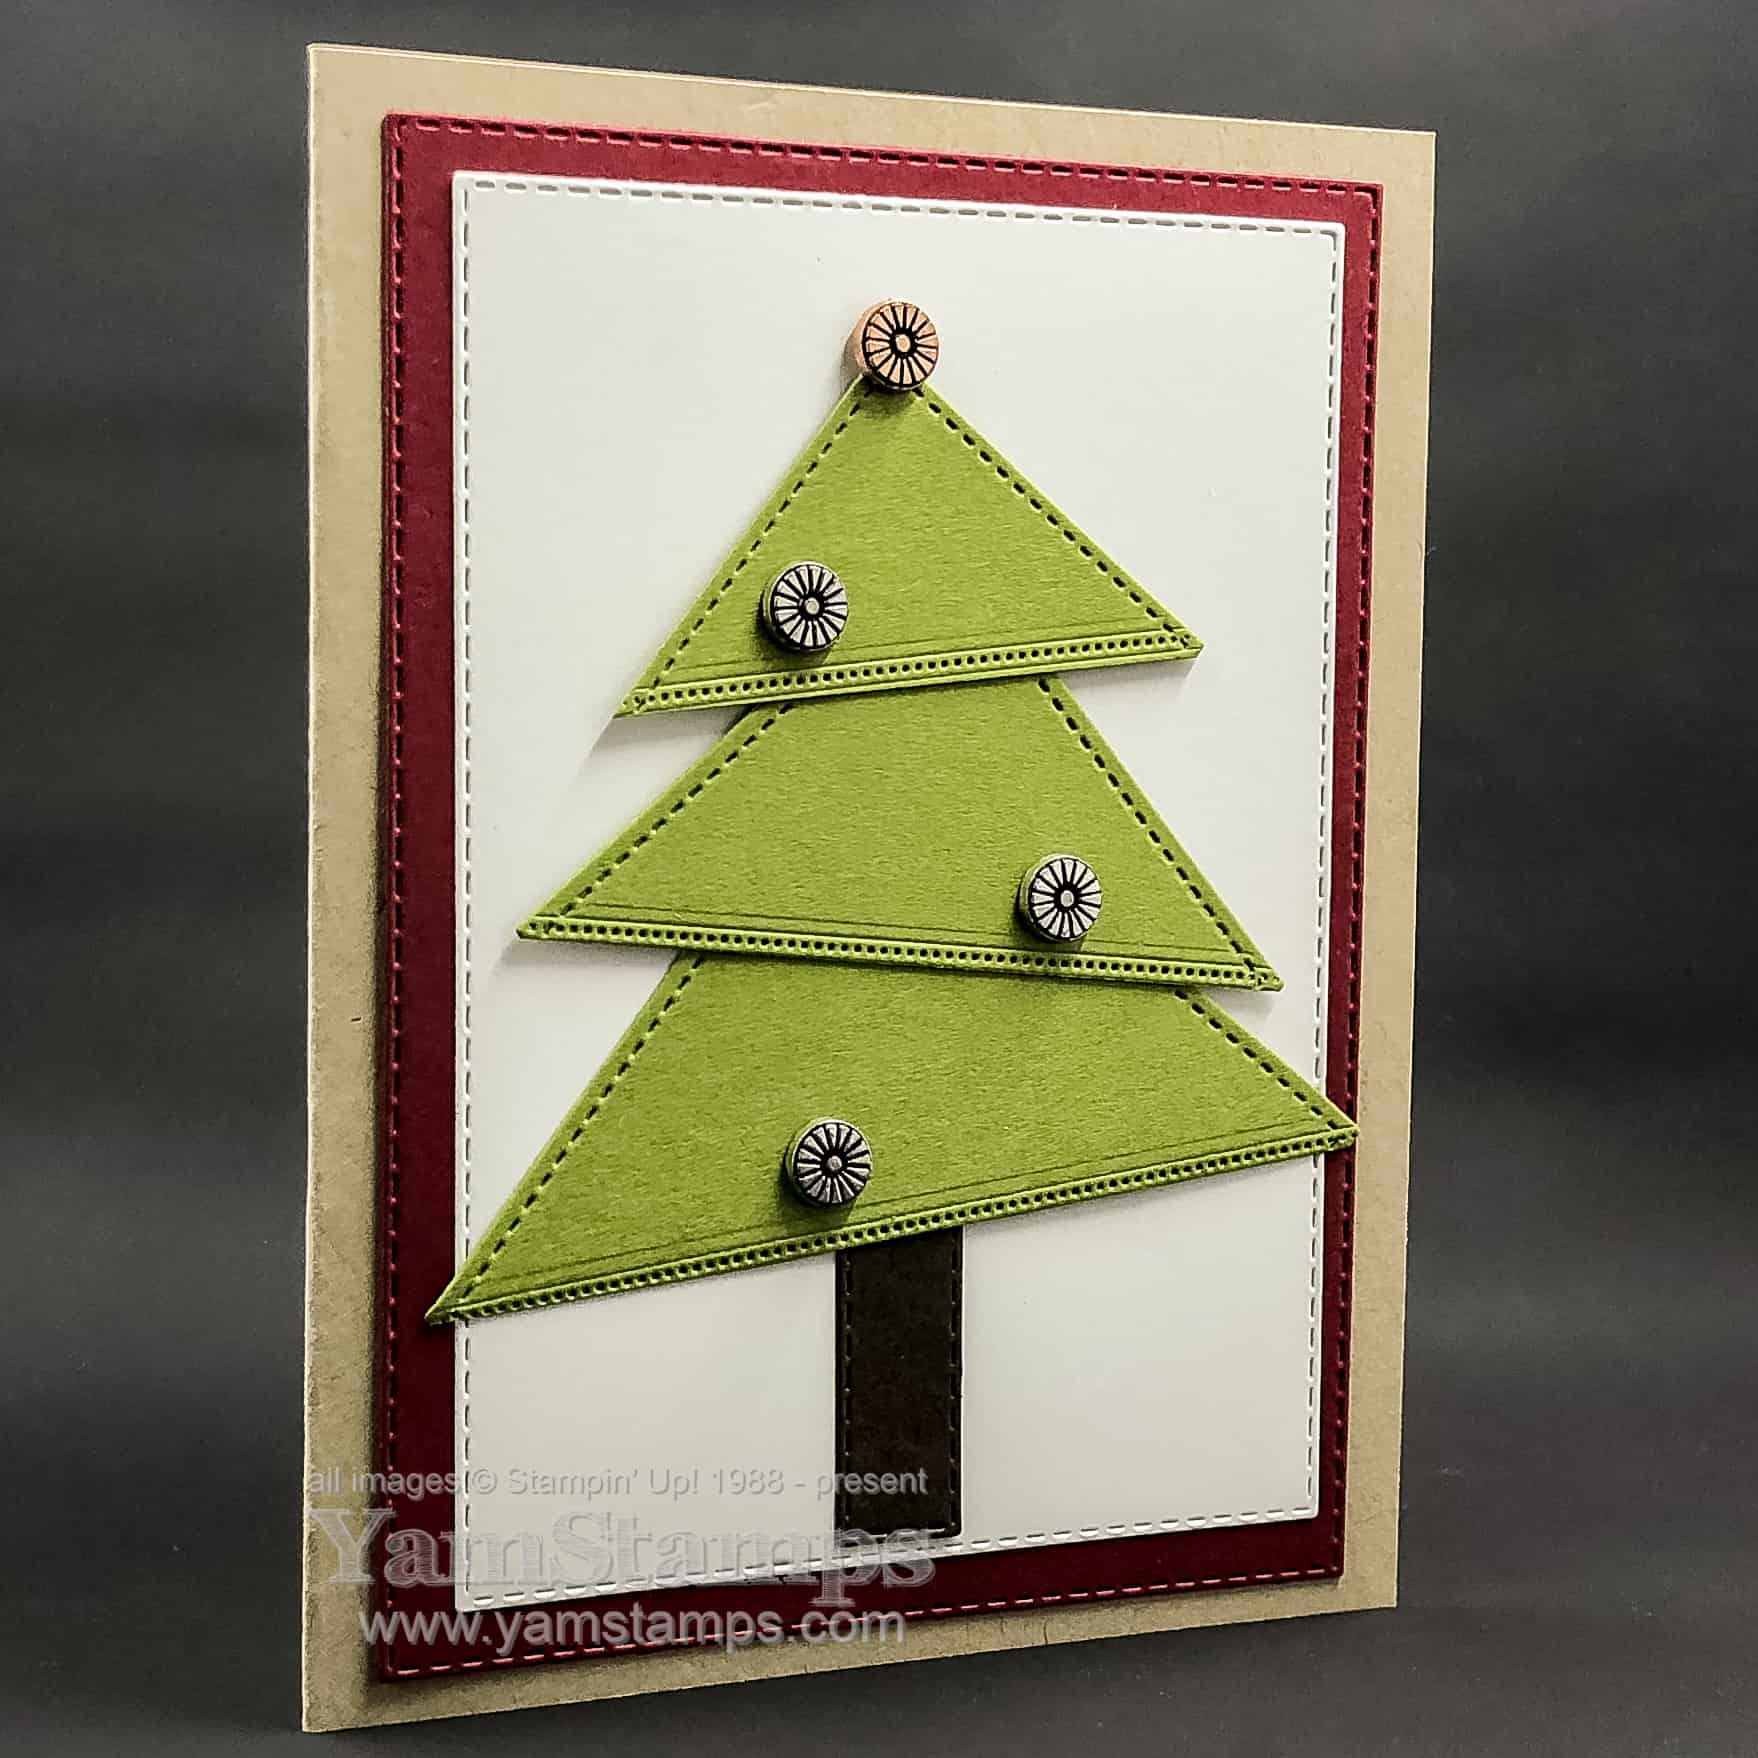
Here’s the DIY Christmas Card Idea number one. This was one of the cards we did in the August Christmas Card Class. Since the Stampin’ Up! Holiday Catalogue doesn’t come into effect until September 4th, I set myself the challenge of only using products that are available NOW in the Annual Catalogue. This one was fun.
All the August Christmas Card Class cards used the Designer Elements as accents, since that was the product included in the class fee. For this fun Christmas tree card, we used three squares from the Stitched Shapes Dies, and then used the stitching line from the Stitched Nested Labels Dies to create a diagonal line across them. We then just cut beside the stitched line to make a triangle. The Stitched Rectangle dies cut out the background and the trunk. I love the homespun, quilted look of this one! It does take a little time to do all the die cutting, but I love the effect in the end and I kind of also love the fact that there’s no “real” Christmas elements used to create it!
This is a card that you could easily mass produce with help from your family! Making the tree “whimsical” by angling the triangles takes away the stress of trying to have everything perfectly straight and lined up.
The next Christmas Card Class will take place September 18th at 1pm or 7pm, and the $30 class fee will include a package of Brightly Gleaming Foil Elements that will add a bit of shine to our projects (and to your other projects since there will be left overs to take home!). Register before September 4th to get the guaranteed $30 class fee – registrations after this date may be subject to an additional rush fee for product delivery. Contact me to register or for more information.
I’ll be sharing lots of DIY Christmas Card Ideas over the next few months here on the YamStamps Blog, plus the YamStamps Facebook Page and Instagram! PLUS YamStamps Newsletter Subscribers will be receiving 12 weeks of Holiday project tutorials that won’t be seen elsewhere! Ho Ho Hope you’ll join me….(sorry, couldn’t resist).
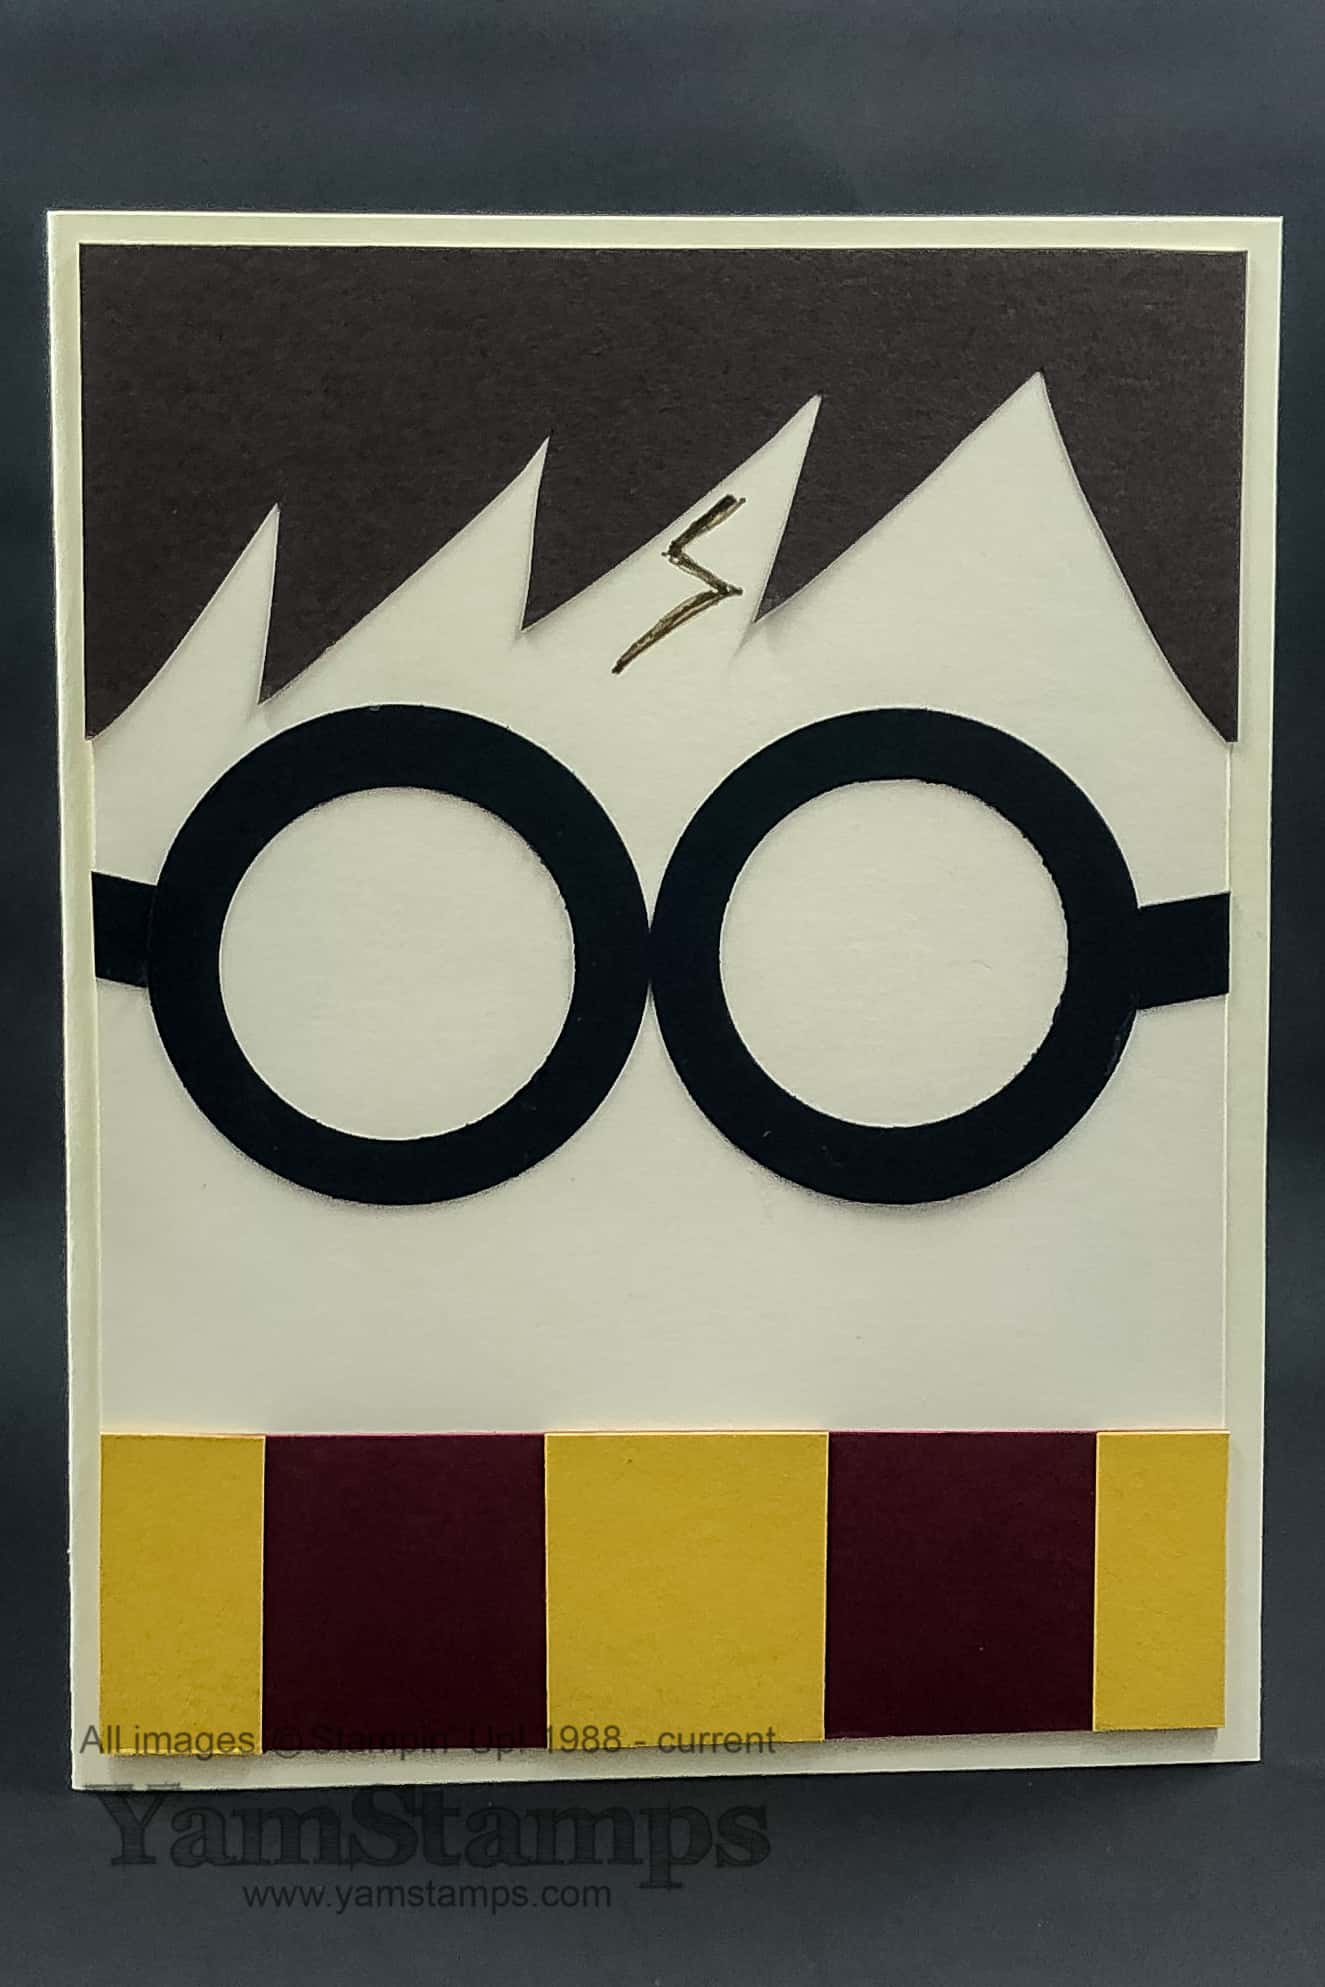
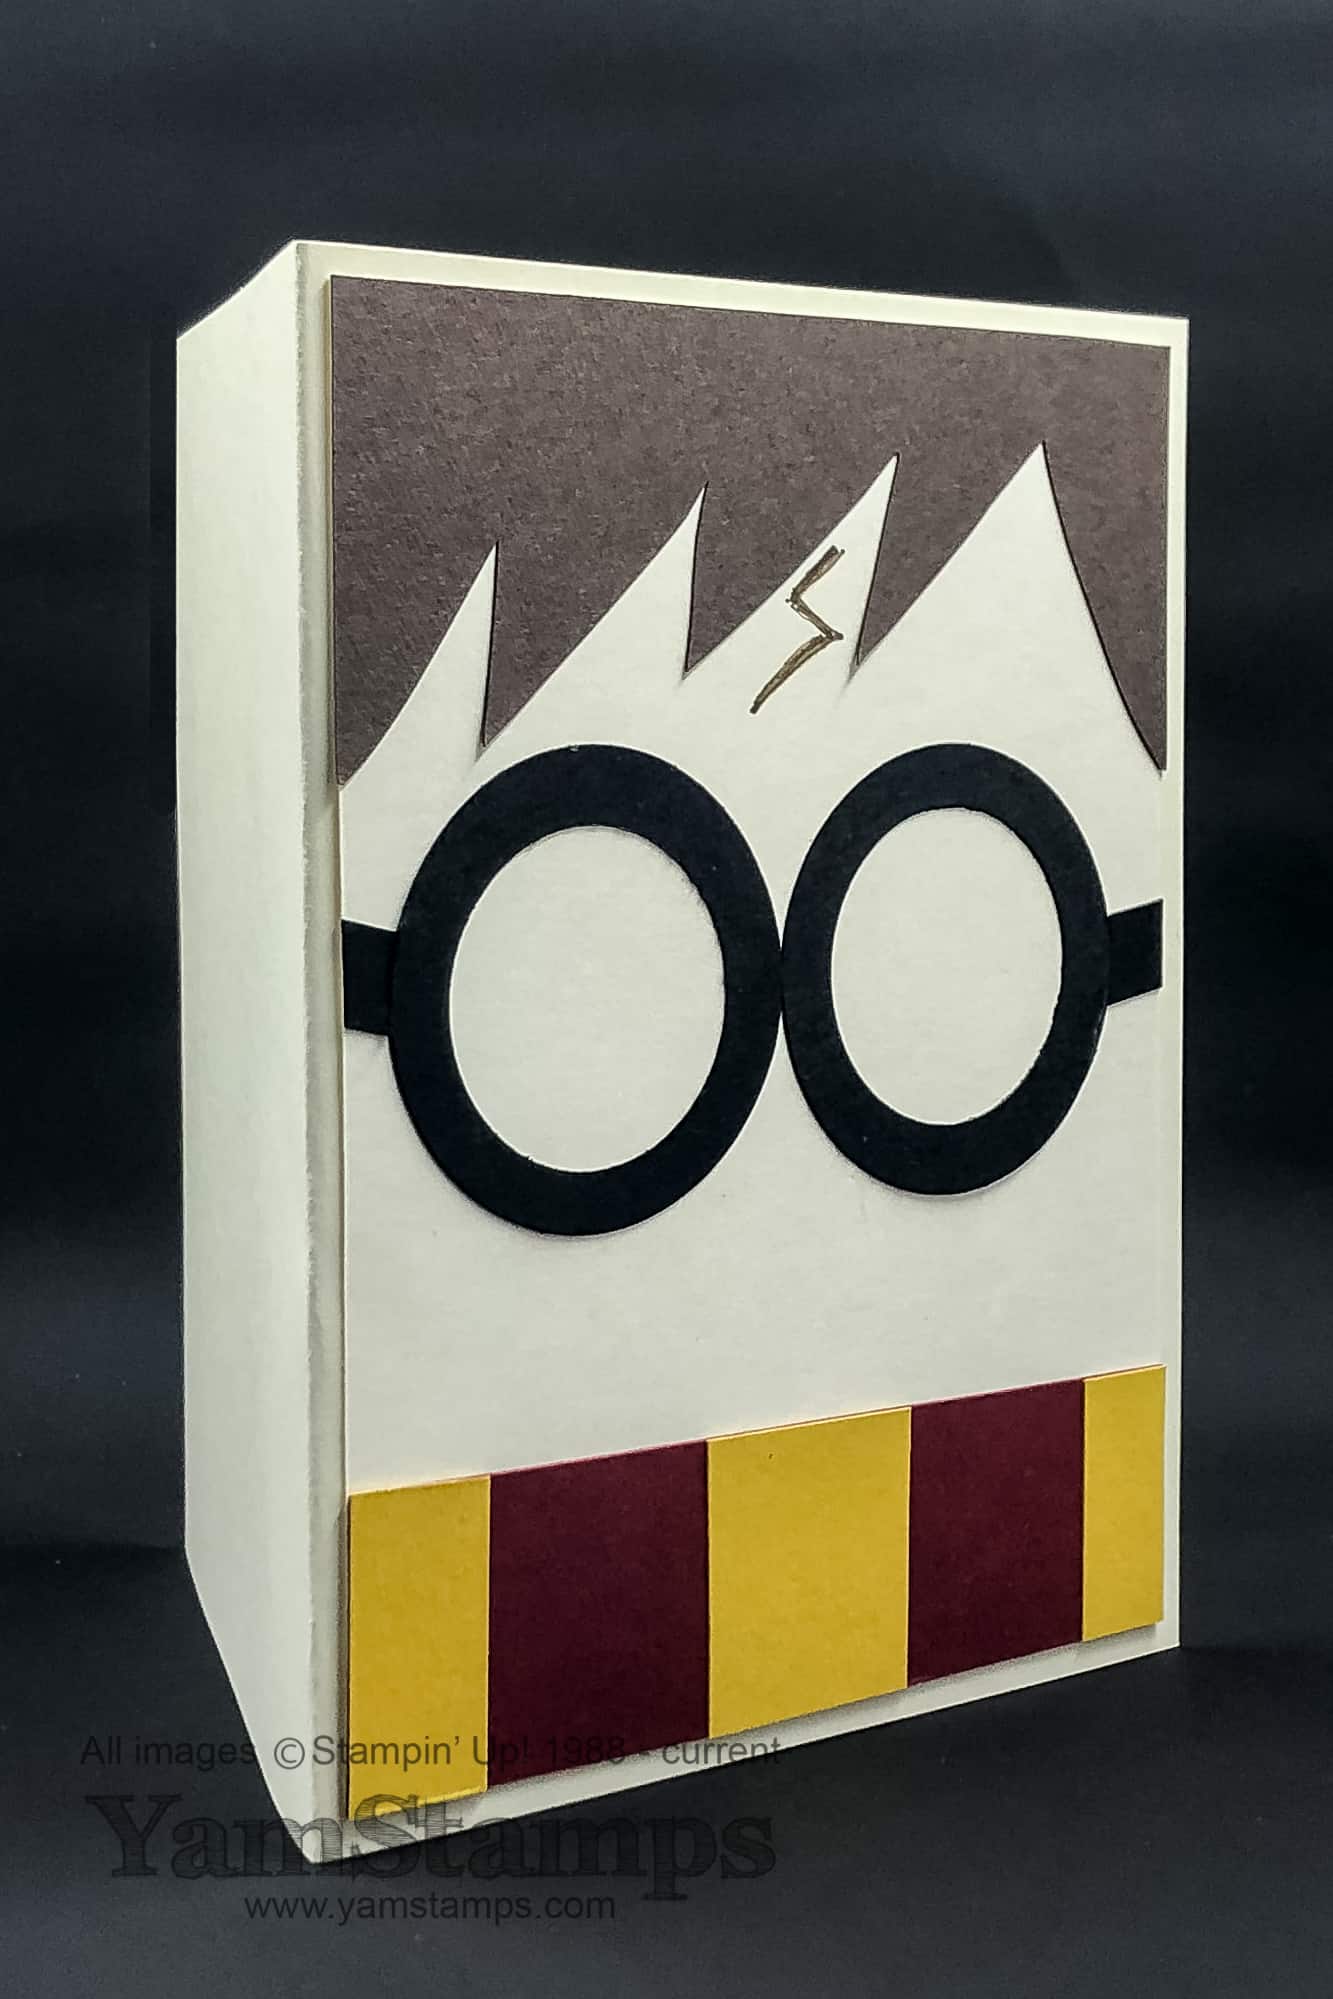
OK I had to save this post because the card recipient wasn’t at band practice last week….and I didn’t want to spoil the surprise! So here it is now – my EASY handmade Harry Potter Greeting Card. So easy, muggles can make it!
I have to admit, I squealed a bit when this card came together like it did! And true confession….not sure if I would do the scar next time…but I know it’s integral to Harry Potter…maybe I’ll just learn to draw it a bit better. (There’s a REASON, well, many, that I am a stamper and not a painter/illustrator etc).
This handmade Harry Potter greeting card is actually VERY easy to recreate, just a swish and a flick and you’re done…
The glasses are created using circle punches – in this case, the 2″ Circle Punch and the 1-1/4″ Circle Punch. Punch the smaller inner circle FIRST, then centre and punch the outer circle. If you wanted, you could also easily do this with coordinating sizes of Layering Circles Framelits and the Big Shot. I just used two scraps of Basic Black cardstock for the arms of the glasses.
For the hair, I had a strip of Early Espresso cardstock that I snipped in jagged points with my Paper Snips. For the scarf, I had a strip of Merry Merlot and I added pieces of Crushed Curry to recreate the Griffyndor colours.
Or…you could give this information to another card maker and then say “Accio, handmade Harry Potter Greeting Card“?!
If you are looking to get into cardmaking, or know someone that is starting out, I’m finalizing details for my Beginners Card Making Class – it’s a 101 class on creating your own greeting cards – from choosing cardstock to cutting and layering, and all the “basic” information you need to build a foundation upon for more intricate cards. I’ll be opening preregistration soon and looking to launch in April. Like my most recent card classes, class registrants will receive an invitation to a private group which will house class information and host the live videos. Stay tuned for more information!
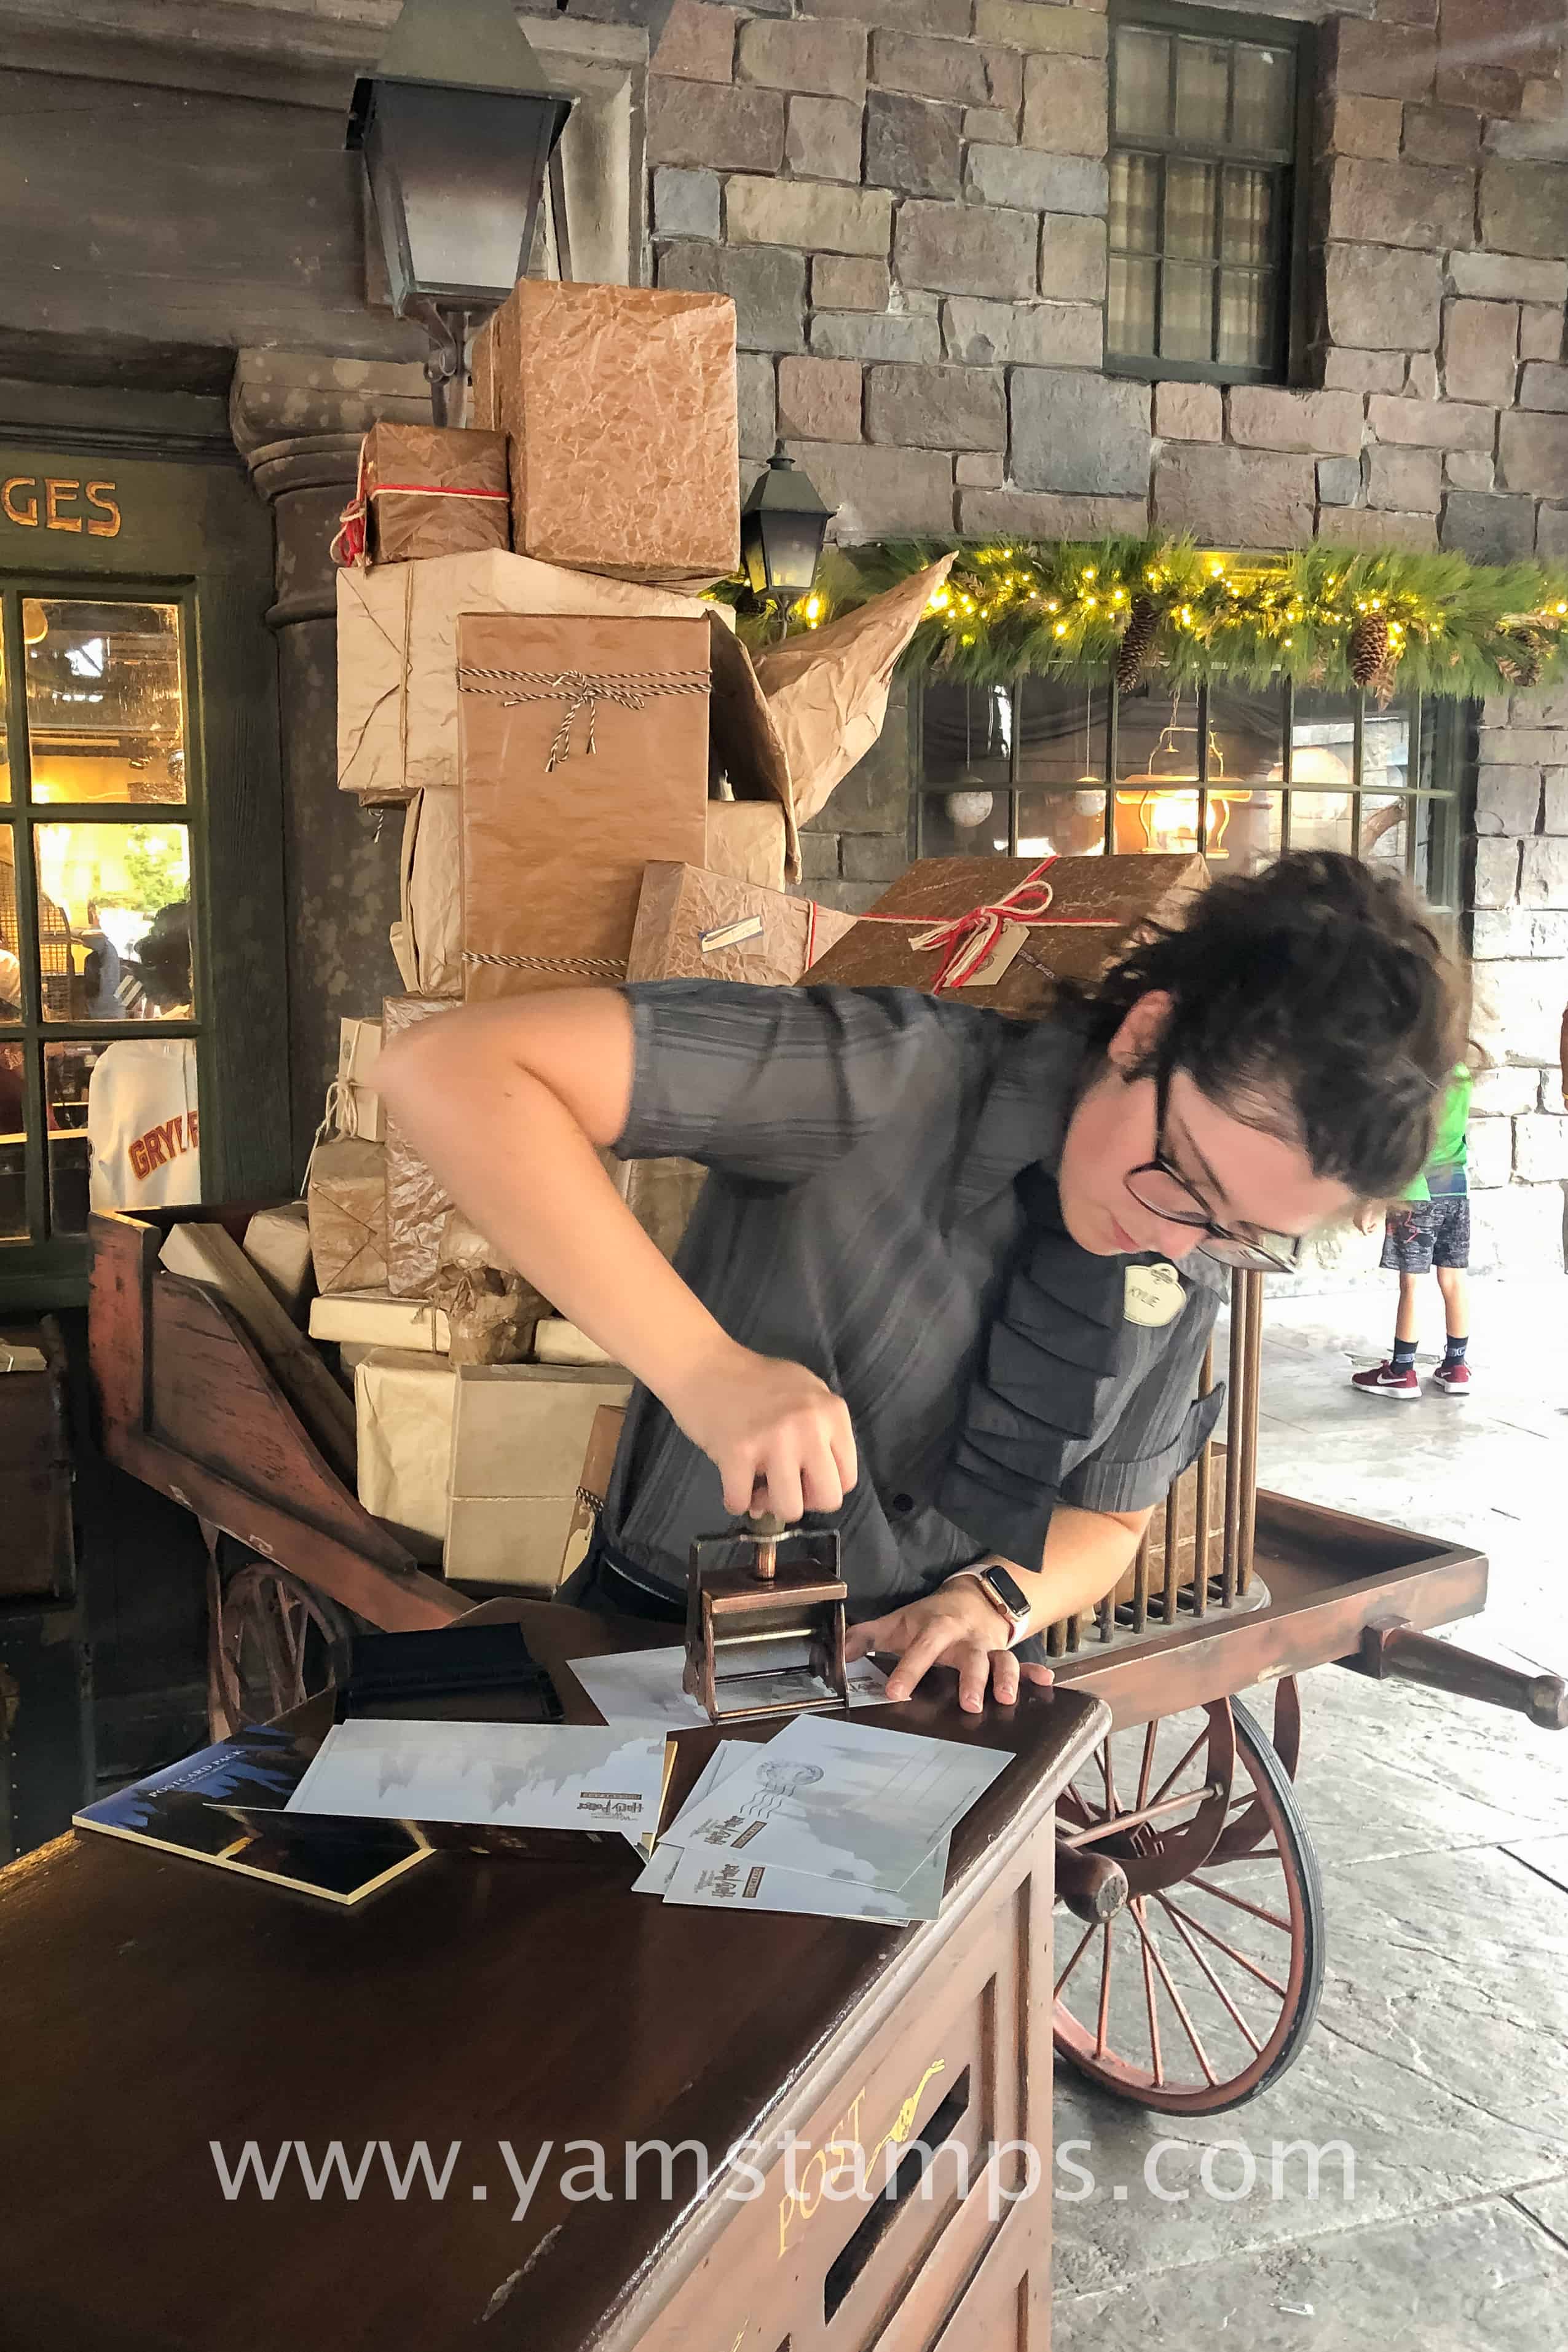
In the meantime, I leave you with this thought….even wizards like to stamp…
Questions? Send me an owl…or just email me. (or leave a comment below!). Don’t forget that my birthday week celebrations are ongoing until Saturday at midnight!
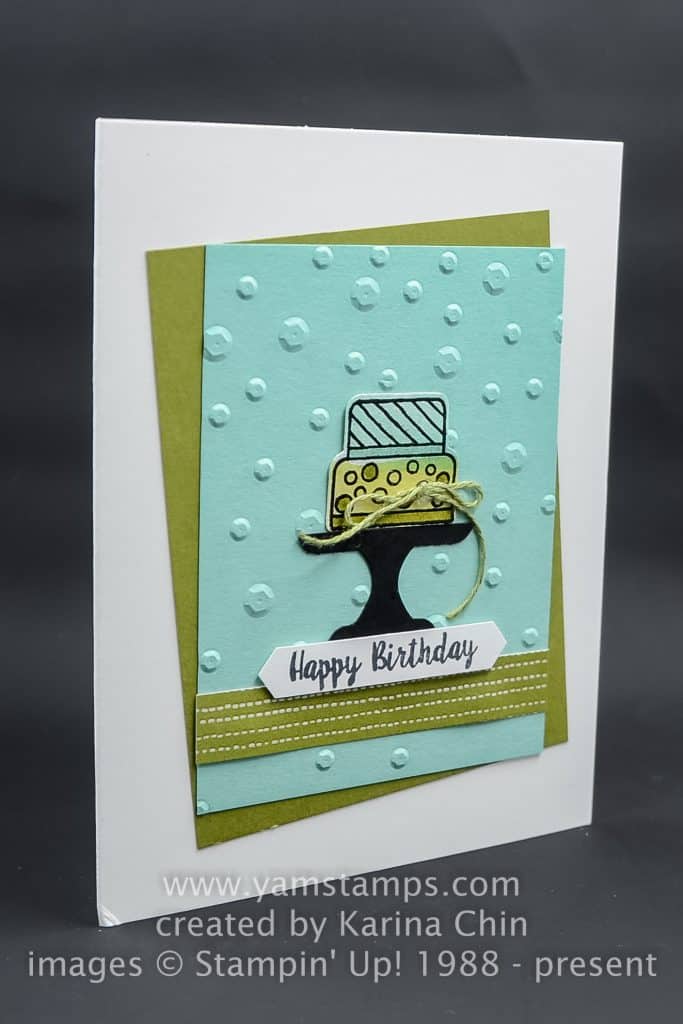
Let Them Eat Cake! OK so I know I’m not using that quote in the correct context, but it talks about cake so that’s good enough for me. Check out this Birthday Cake Card, made with Stampin’ Up!’s Cake Builder Punch which is available for ordering once again!
Today’s Sunday Swap Share is this Birthday Cake Card from Karina Chin – who used the Piece of Cake Bundle on her card. The discounted bundle includes the Piece of Cake Photopolymer (clear/see through) stamp set and the Cake Builder Punch, which is once again in stock and available to order….though I notice it says “Low Inventory” which means it may go on backorder – so if you’d like it and need it now, please don’t hesitate to order it! In the background, the Scattered Sequins Embossing Folder was used to add texture. This folder is available for purchase, or as a Level 1 Sale-a-Bration reward choice with a $60 product order. (please note that there are different item numbers, depending on if you’re purchasing or getting as a Sale-a-Bration item).
There is more good news – Stampin’ Up! has let us know that the Cake Builder Punch (AND the Butterfly Duet Punch – hopefully available to order again in the next couple of weeks) will be available beyond the Occasions Catalogue! I don’t know if the BUNDLES will be carried over, though, so if you’d like to get the stamp set and punch together at a discounted price, you’ll want to be sure to grab the bundle before June 3/while supplies last/once orderable. You can contact me if you have any questions or need assistance placing your order.
One week today I’ll be completing my leg of the Around the Bay Relay Race! This is the second time I’m doing the 2 person relay (15km each) – which I told myself would be so much easier than the bunch of times I did the full race….but at this point in time, I’m not so sure about that! It’s been a tough winter for training for sure – but I’m glad to be able to get out there. Wish me luck… (and I will definitely be saying “Let ME Eat Cake!” afterwards!!!)
A really quick Flashback Friday Olympic Stampin’ Up! style card! This is one that I made in 2010 (??!!) and redid in July 2012 when one of my friends participated in the opening ceremonies for the London Olympics. I love watching the Olympics – always inspiring. It will make mornings more exciting for sure – due to the time change, when I wake up, I can turn on the TV and see live coverage!
I typically use circle punches to make the rings – because it’s quick and easy. Punch the centre of the circle first, and then centre and punch the outer circle. I’ve used 1-1/4″ and 1-3/4″ circle punches to do this. You could also easily use the Layering Circle Framelits and your Big Shot. I would highly recommend the Magnetic Platform as well, since it will hold those metal framelits in the right spot! You’ll want to snip each circle once and then play with them to get the correct order and layering. Recommended colours for this year’s games: Pacific Point, Basic Black, Real Red, Crushed Curry and Emerald Envy.
I can’t believe I’ve been blogging (or trying to blog) for as long as I have – but this Flashback Friday is proof! Perhaps if I get the chance, I will re-do this card while I’m watching some of the Olympic events (not the really fast moving ones though, and not hockey, because if Canada is playing I’ll be busy yelling at the TV screen….yes, I’m one of those types LOL). If I do get the chance, I will share it, and will also make sure that the green ring is in better alignment than it is in this old sample. Now that I’ve drawn your attention to that, it’s all you can see, isn’t it….. but it doesn’t have to be a perfect project to be perfect for the occasion.
I am holding another Monthly Card Class THIS Wednesday (yes, I realize it’s Valentine’s Day, still time to make a heart themed card though, technically?!) – since I postponed this week’s class due to the snow storm we had. It actually wasn’t too bad out by 1pm, but not all the roads were cleared, and there was no street parking allowed due to the ploughing schedule. SO. If the weather cooperates, fingers crossed,let me know if you’d like to take advantage of a late month card class!